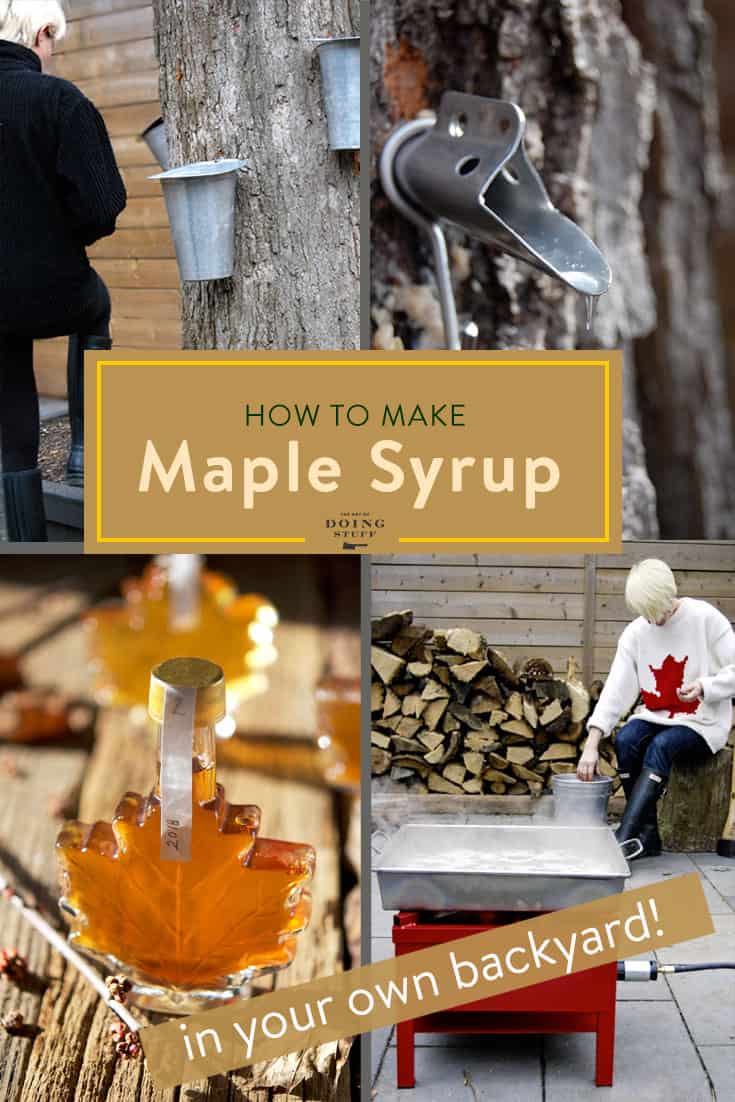
Making maple syrup is an old timey, back to the land kind of fun. You only need a maple tree, a maple tap, a bucket for collecting sap and lots of time for boiling. The complete step by step guide on how to make maple syrup at home. (whether you live in a cabin in the woods, or a house in the suburbs)
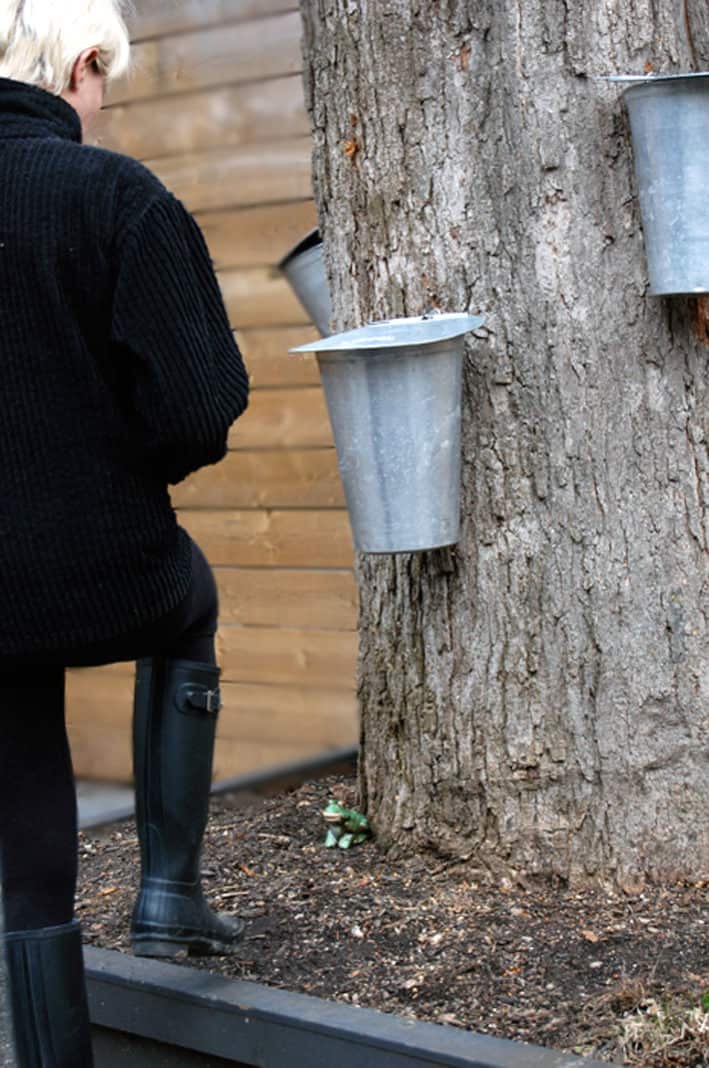
One large backyard maple like this can create gallons and gallons of sap every year.
Go grab your sap bucket, bonnet and lace up boots. I'll wait here in Vermont with the plough horse. You don't have a bonnet or lace up boots?? That's O.K., because I don't live in Vermont or have a plough horse. You don't need any of those things to make maple syrup.
All you need is ONE maple tree. It doesn't even have to be yours. Tap a friend's, family member's or unsuspecting neighbour's tree. I have yet to meet a single neighbour who won't readily allow me to tap their tree in exchange for a bottle of golden maple syrup.
Table of Contents
How is maple syrup made?
Syrup is made by boiling down sap. Sap is made of around 98% water and 2% sugars. The water is boiled away until the sugar content becomes 66%. So a LOT of water needs to boil off before it becomes syrup.
It takes 42 parts of sap to create 1 part syrup.
In order to do this you’re going to need a few things:
Tools needed.
Tapping
- Drill – The drill is for drilling a hole into your tree to insert the tap into.
- Drill Bit – This has to be the same size as your tap.
- Tap (spile) – This is what you tap into the tree for your sap to drip out of.
- Hook – The hook is on the tap and it allows you to hang your bucket off of it.
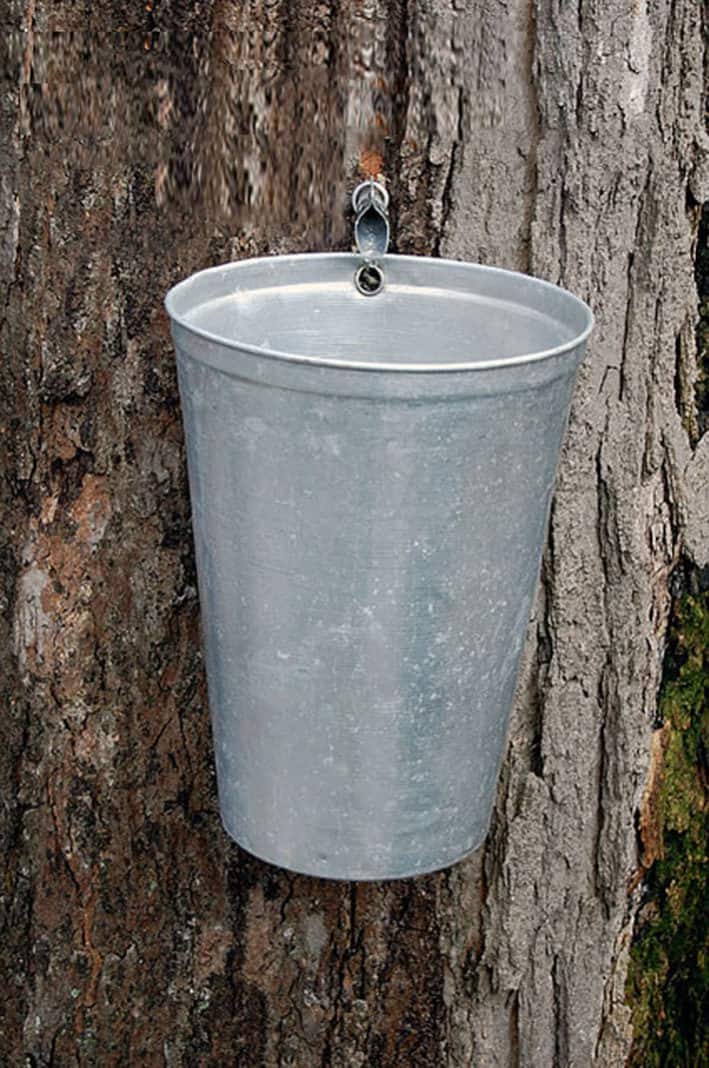
- Bucket – A bucket catches the sap. Duh.
- Bucket lid – You need this to keep debris from falling into your bucket of fresh, clear, beautiful sap.
Boiling & bottling
- Stock pot – A big stock pot with a lid to constantly heat up your sap.
- Shallow roasting pan – It needs to be at least 5″ deep with a large surface area. This is known as your evaporation pan.
- A propane outdoor burner or fire pit / rocket stove.
- A digital or manual refractometer or a hydrometer or hydrotherm. (for testing syrup consistency)
- A digital thermometer
- Syrup filters
- Syrup bottles
Which variety of tree?
So what is the magical maple syrup tree?? It's just a maple. Any maple.
Sugar maples are the most popular tree for making syrup because they have the highest sugar content in their sap but ANY maple will produce perfect maple syrup.
Maple sap has between 1-3% sugar in it (sucrose, fructose and glucose).
Don’t worry about whether your maple tree is the “right” kind of maple tree (Acer saccharum) for making syrup.
They’re all the right kind.
Besides - sugar content varies based on the actual tree, its location and other factors. So you might have a black maple that actually has more sugar in its sap than your neighbour’s sugar maple.
The 4 varieties of Maple Trees that have the highest amount of sugar in their sap are sugar maples, black maples, red maples and silver maples.
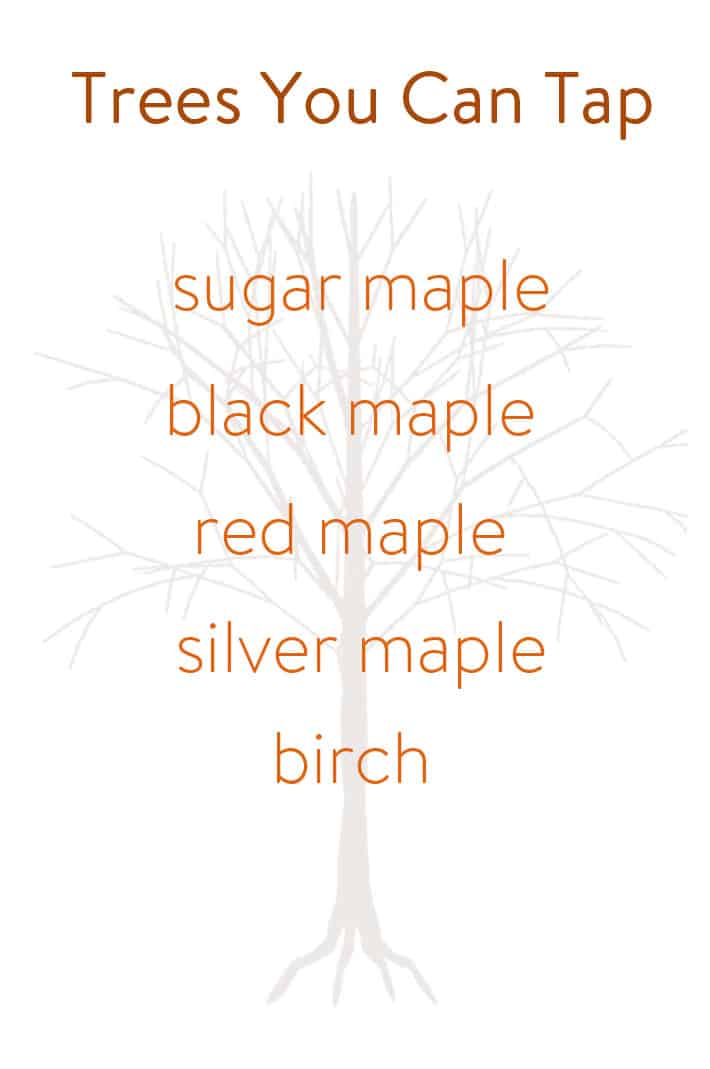
sugar, black, red, silver - birch.
BUT WAIT!! IT’S NOT FAIR! WHAT IF I DON’T HAVE ACCESS TO EVEN A SINGLE MAPLE TREE??!
O.K. Seriously, calm down. You’re being very dramatic.
Don’t have access to a maple tree? You could make birch syrup instead. Yup. It’s made the exact same way as maple syrup only out of sap from a Birch tree.
You can also make walnut tree syrup!
What size of tree?
Do NOT tap a maple tree that is less than 10″ across. (not around … across) Anything with a trunk that’s smaller than 10″ is too young and tapping it could kill it.
If your tree is 10 – 20″ – you can put 1 tap on it
If your tree is 20 – 27″ – you can put 2 taps on it
If your tree is 27+ (and healthy) – you can put 3 taps on it
(some say to never put more than 3 taps on a tree because it’s unhealthy for the tree and it changes the pressure in the tree too much so you don’t get as good a sap flow)
How to tap maple trees.
In the spring …
- Clean your sap buckets well with a light bleach solution before using them to prevent bacteria.
- Do not tap a tree that’s less than 10″ across.
- You can tap once nighttime temperatures are below freezing and daytime temperatures are above freezing.
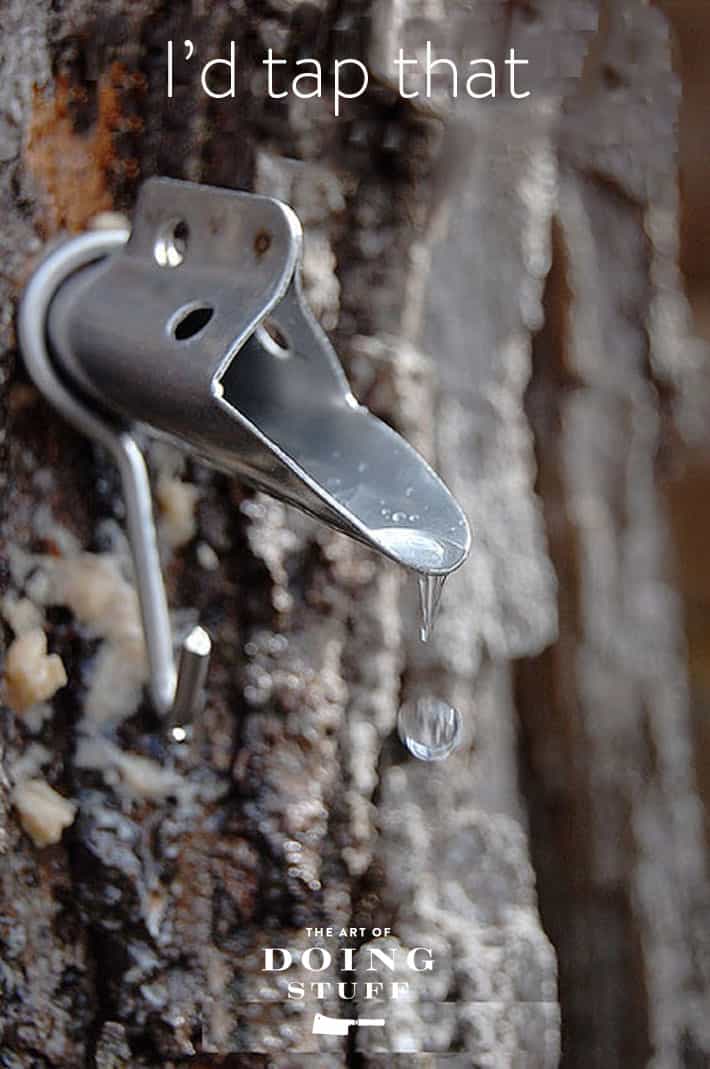
- Drill a hole in your tree with a 7/16ths drill bit at a slightly upward angle.
- Insert the tap (spile) and hammer in gently.
- Hang bucket and collect sap.
- Store collected sap in a cool area for up to one week.

Once temperatures drop at night the sap stops running.
Tapping a maple tree for sap literally means putting a tap in it. How to tap a maple tree? You just bore a hole into the trunk, hammer in the tap and watch the sap flow out of it into your collection bucket.
The first time you do this it will be the most exciting thing you’ve ever experienced. Even if you’ve experienced the joy sounding really good singing once because you had a cold and sounded all sexy and husky.

Mark your drill bit with Sharpie Drill at a slight upward angle


Tips for tapping
- The hole you drill should be no more than 2" deep. Mark your drill at 2″ using a piece of tape or a Sharpie.
- Drill your hole on a slightly upward angle.
- Choose a day that it’s above freezing to drill your hole. If it’s freezing you risk the bark on your tree cracking which will cause sap to drip out.
Clear away the shavings from drilling with a small twig so your tap hole is clean.
On a good day pails will fill to the top. Other days there will be less.

Gently push your tap in. Give it a small tap with a hammer. The tap needs to be tight enough in the tree that the weight of a full bucket doesn’t pull it out but not so tight it cracks the bark around it.
If it’s above freezing, the second you put your tap in it will start dripping. And unless you have the shrivelled heart of a rainbow hater, your eyes will drip too.
It’s a sappy miracle.
Don’t forget to put the lid on to keep twigs, bugs, leaves and curious teenage boys out of it.
Storing sap
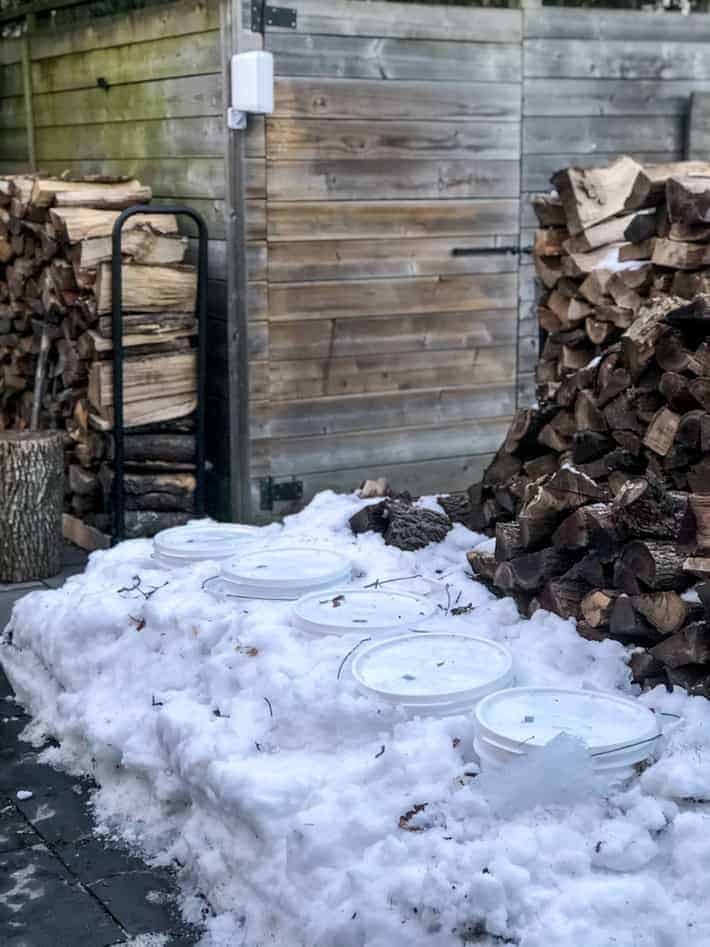
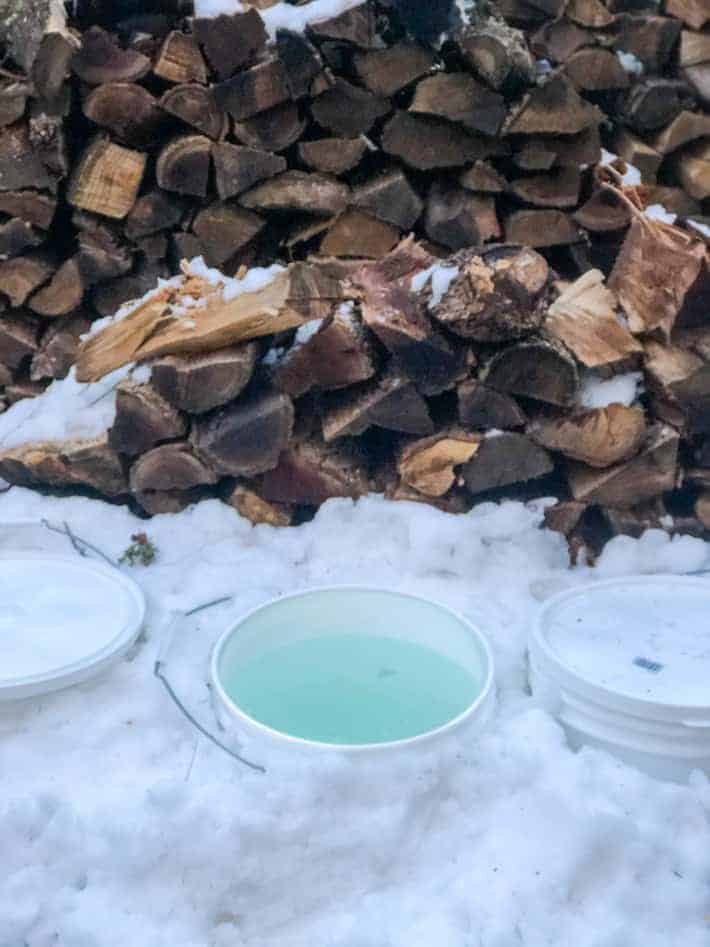
Think of your sap as milk. Not water. Even though it is crystal clear like water. It is perishable and needs to be kept cold. Store your daily collected sap in 5 gallon buckets with lids. You'll have to empty out your sap pails once a day. You can keep the sap outside in the cold for up to 1 week.
If you have snow available, pile snow around the buckets to help them stay cold. Shady spots are the best.
Maple Water
"Maple water" is being sold and marketed as the new coconut water with all kinds of health benefits being claimed by sellers. They say this sap drink rehydrates humans better than regular water and contains vital nutrients. There is some truth - maple water does carry antioxidants and minerals that regular water doesn't. But according to an actual scientific study on maple water it can't rehydrate a person any better than regular water can.

Sap is perishable. Keep it cold. Sap is NOT blue, it's just reflecting the sky here.
When to tap.
You need to tap the maple tree when the “sap is flowing”. I’m sure you’ve heard that phrase before. So when does sap flow?
Sap flows in the early spring when nighttime temperatures are below freezing and daytime temperatures are above freezing.
A 7°C difference in the temperature range between night and day is ideal. For you Americans, that’s a 12°F difference. For example:
For Canadians:
Nighttime temp -2C
Daytime temp 7C
PERFECT FOR TAPPING A TREE!!
For Americans:
Nighttime temp 28 F
Daytime temp 40 F
Don’t worry too much about that. Just remember as long as it’s spring and it’s below freezing at night and above freezing during the day the sap will be running.
Fun fact: Sap doesn’t run because it melts inside the tree when it’s warmer out, it runs because of the change in atmospheric pressure.
Making maple syrup.
Turning sap into syrup is just a matter of boiling away the water until you're left with a high concentration of maple tasting syrup.
Quick Guide
STEP 1. Heat your collected sap up in a stock pot with lid. (It just heats faster if you have a pot w/ a lid) Once hot, add it to the evaporation pan.
STEP 2. Keep your evaporation pan of sap boiling. When it starts to evaporate, add more hot sap from your stock pot.
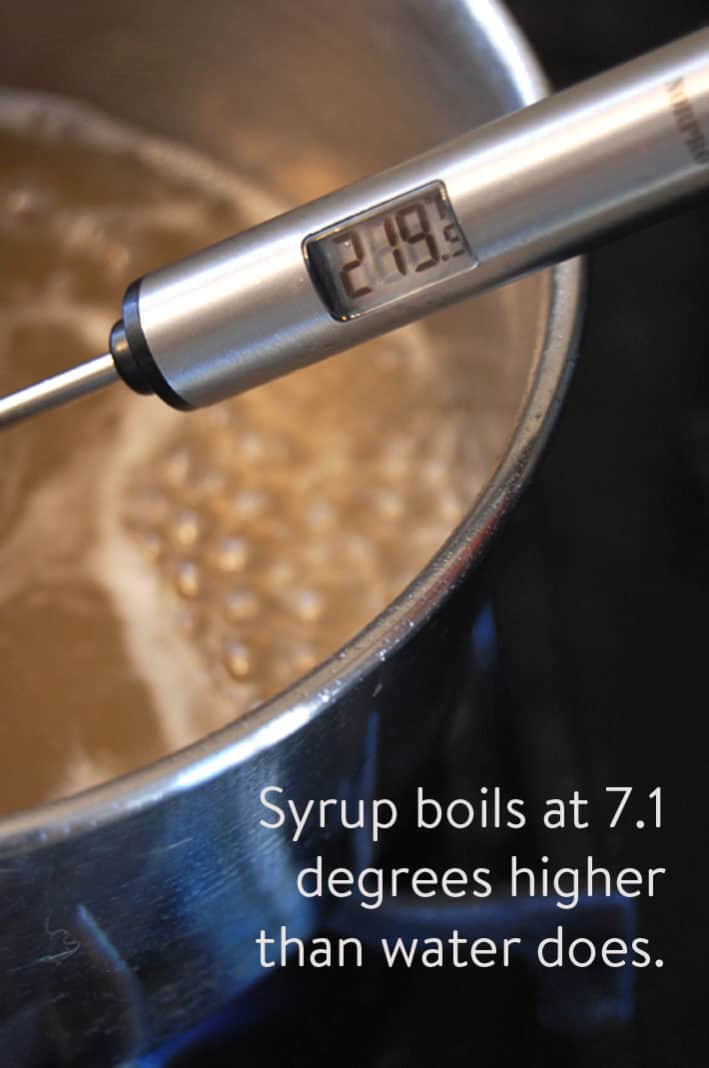
STEP 3. Once you've added all your sap to the evaporation pan and it's looking a darker colour (like syrup) and is approximately 213 degrees, dump it all into a finishing pot.
STEP 4. Water boils at 212 °F where I live. Syrup always boils at 7.1°F (3.94°C) above the boiling point of water. When you reach that temp., you have syrup.
STEP 5. Now you need to test if what you have in the pot is no longer sap, but is actually syrup. You can test whether it's syrup in a few ways.
STEP 6. Filter your syrup.
STEP 7. To bottle your syrup to give away (as if) you need to reheat your syrup.
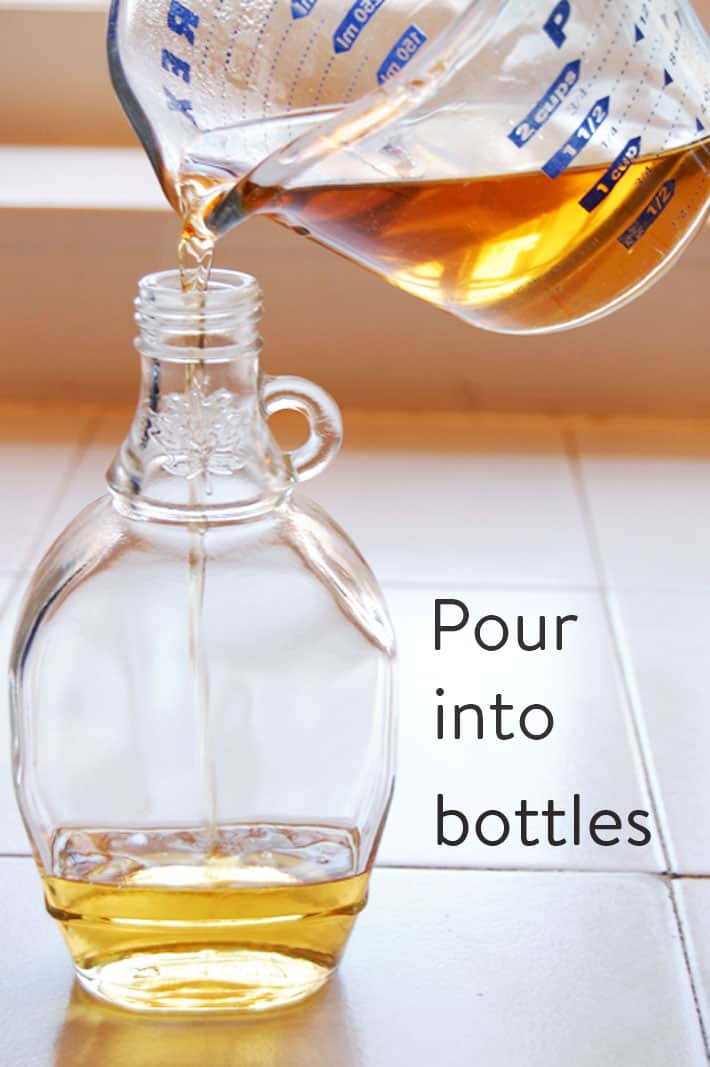
STEP 8. Things are about to get real. You can now, FILL YOUR BOTTLES.
Detailed Guide
STEP 1
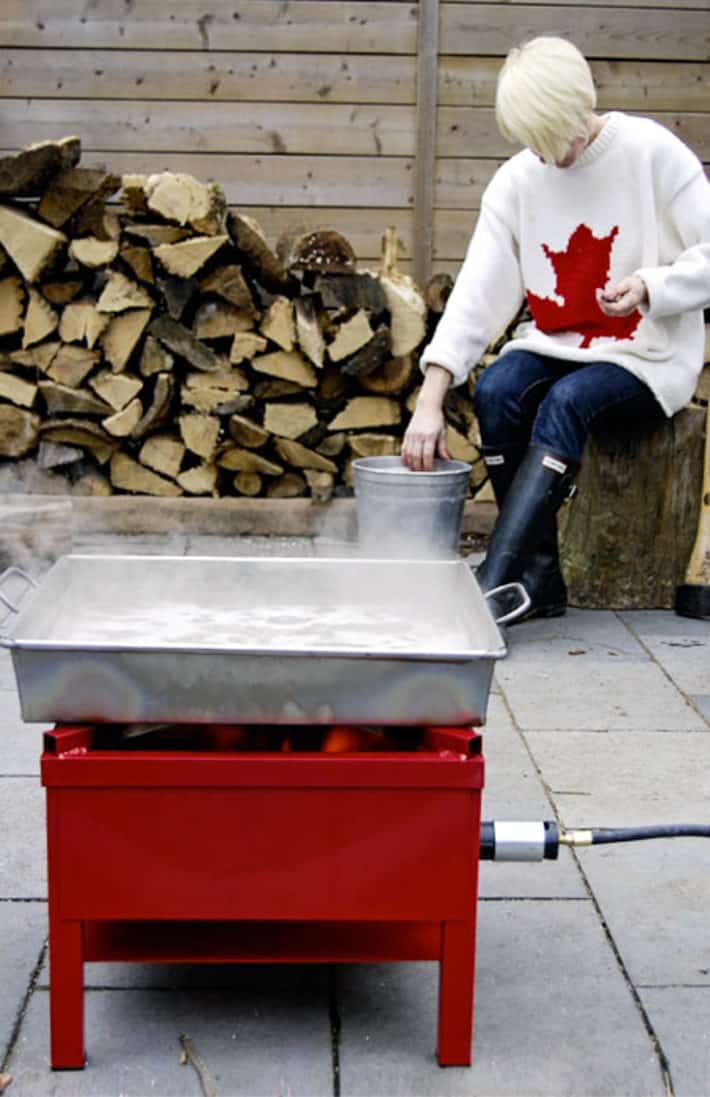
Heating the sap takes many hours so it's best to do it outside if you can. Otherwise you'll have a kitchen with sticky walls. And floors. And cabinets. And cats.
Use a propane fuelled burner or a wood pit if you have one. You can also make a rocket stove like I show you here.
On boiling day ideally you have 2 areas going - one that's heating a stock pot of sap, and another that's boiling down the hot sap in an evaporation pan.
I'm just a gal making a few bottles of maple syrup in my backyard.
So I just skip the stock pot heating up phase, and add my cold sap straight into an evaporation pan.
An evaporation pan is any pan that is at least 5" deep and has a large surface area. A large surface area means water can boil away faster.

My first method of boiling was with a propane burner.
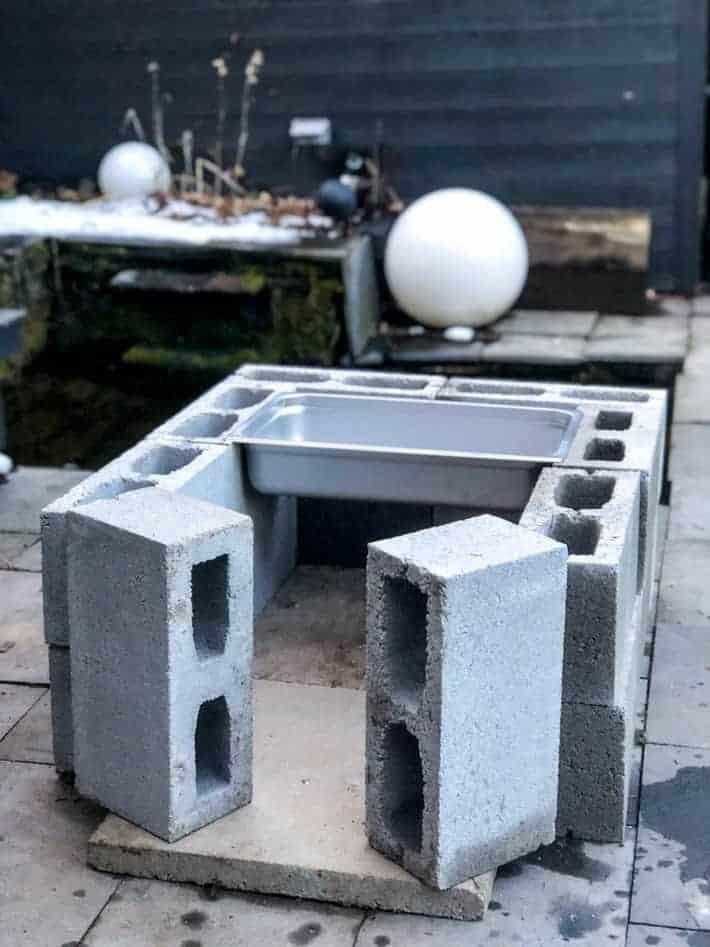
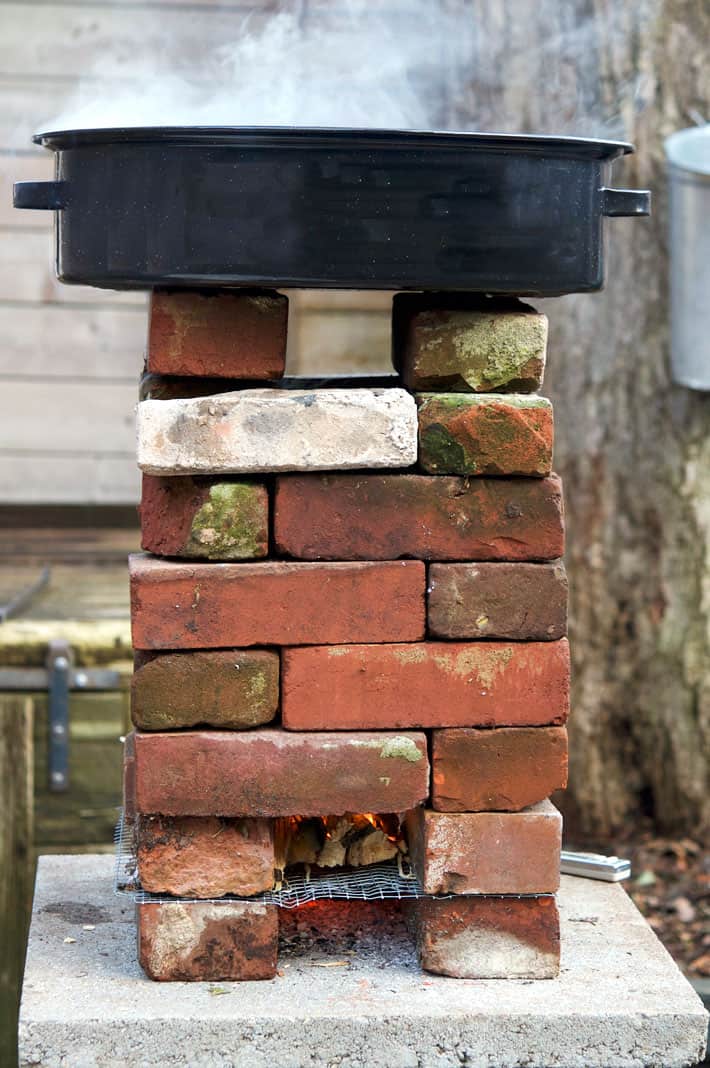
Last season I built a maple syrup boiler out of cinderblock. It worked GREAT. If you have the room for this I recommend it 100%.
The base is 2 patio stones which are surrounded by 12 cinderblocks, with an additional 2 to act as doors.
1-2 evaporation pans can be placed on top.
The fire is built on the patio stones, underneath the evaporation pans.
My most recent way to boil syrup is with a cinder block fire pit.
STEP 2
Once the sap is hot, transfer enough to your evaporation pan to fill it. Let it boil. You'll notice it become golden coloured as the water starts to evaporate.
As the sap boils down in the evaporation pan, continue to fill it with new, hot sap. Repeat this process until your reserve of fresh sap is gone and you only have the evaporation pan of sap left.

See? This is a rocket stove. A tower of bricks creates a remarkably hot fire.
STEP 3
When the final sap in your pan reaches 213 degrees while boiling it's time to pour it into a finishing pot and bring the operation inside. The last part of boiling down the syrup is more precise and using stove burners makes it easier.
The finishing pot is just any regular pot, but you need to use it. It helps ensure you don't burn your syrup, because the smaller pot (as opposed to the large surface area evaporation pan) means less chance of burning and ruining syrup. Just trust me on this.
Transfer the pot to your stove and boil it until it's syrup.
How to know when your sap is syrup
When it's boiling temperature is 219°F.
Syrup always boils at 7.1°F (3.94°C) above the boiling point of water. When you reach that temp., you have syrup.
Water boils at 212 °F.
So sap reaches 219°F while it's boiling, it's officially syrup.
To calculate your syrup boiling point, boil a pot of water and check the temperature. Add 7.1°F to that number and you will have the temperature you want your syrup to hit.
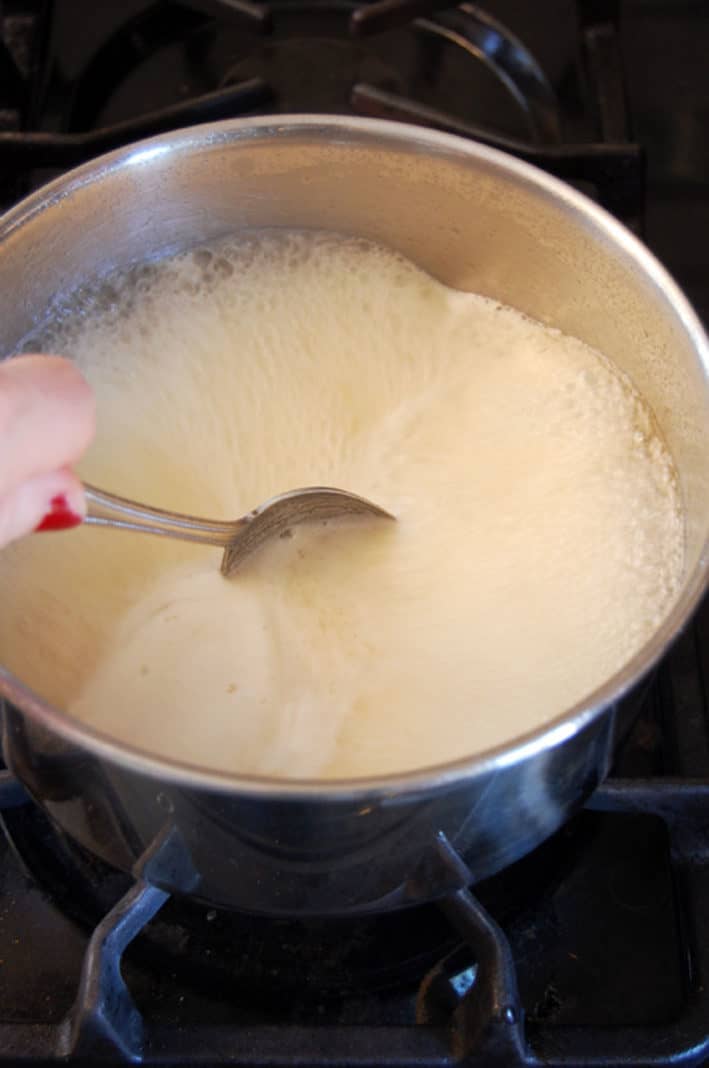
When syrup looks like this when it's boiling it's almost done.
STEP 4
Once you *think* you have syrup, and its boiling point is at 219°F (depending where you live) it's time to test it to confirm it.
Maple Syrup needs to be between 66.5% and 67.5% sugar. Anything below or above that isn't syrup.
You can test whether your sap has turned to syrup in a few ways:
The Drip Test
The first way is by looking at how it drips off of a spoon.
When it's syrup, the final drop off of the spoon, will just hang there for quite some time. When it finally drops off the spoon, you will see a *tiny* thread of a tail from the drop. Like a sperm. A maple syrup sperm drop.
This method is fine and it works but really to test maple syrup you should use scientific tools.
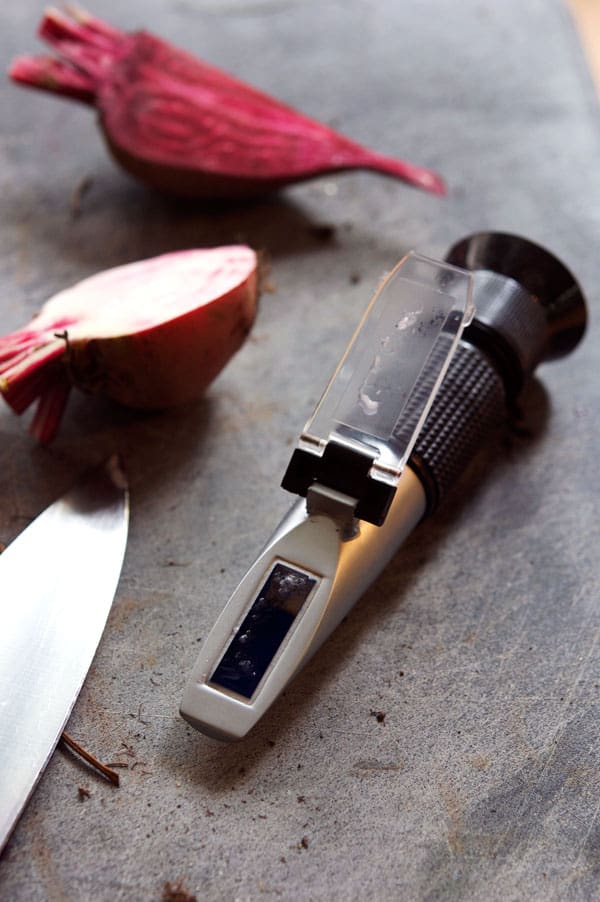
Using a hydrotherm or a refractometer.
Hydrotherm for testing maple syrup 
Refractometer for reading Brix level in any liquid.
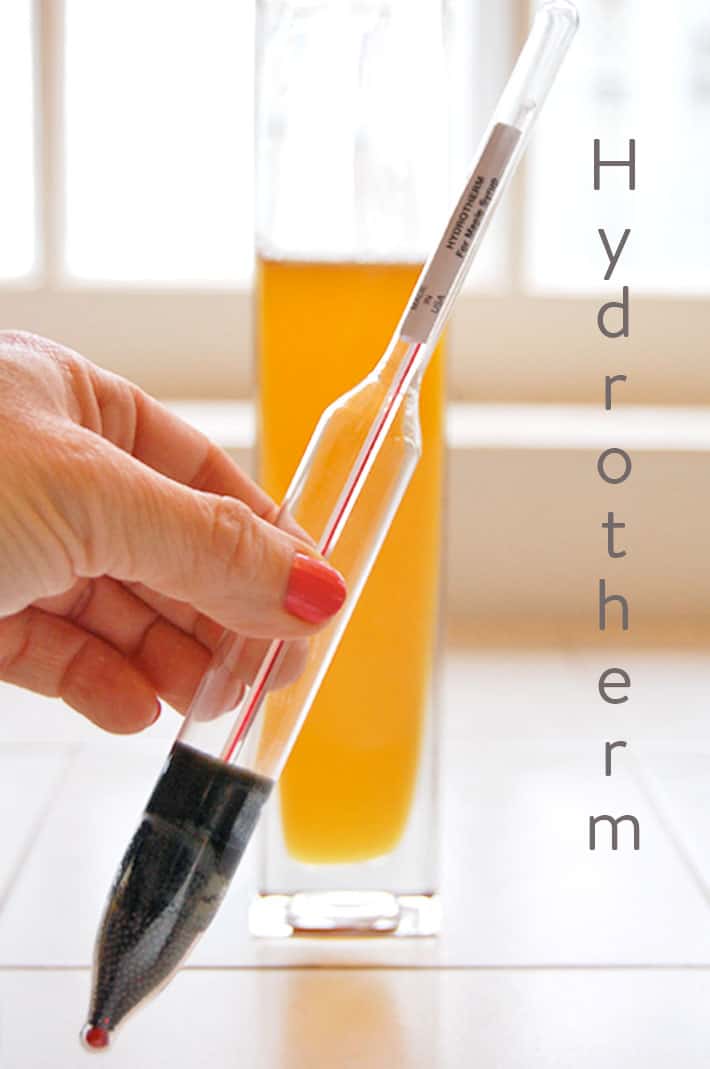
A hydrotherm tests the viscosity of the syrup by floating in it. You have to have a vessel as deep as the hydrotherm, fill it with your syrup and put the tool in. You then read your viscosity level based on the level the hydrotherm floats at. They can be bought at maple syrup supply stores.
A refractometer is much easier to find and use. You have a choice between an inexpensive manual read refractometer like above, or a digital brix refractometer like below.
The manual is about $18. The digital around $140.

Digital refractometer for reading Brix levels in maple syrup
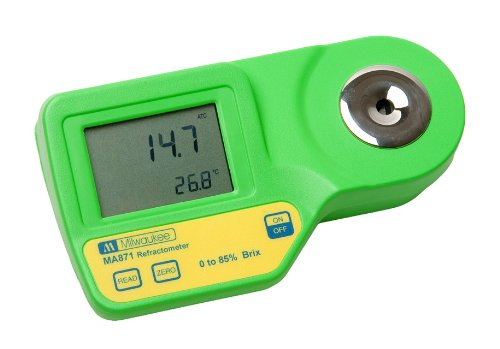
Both the manual and digital read the Brix level of liquids. In this case syrup. It will tell you exactly what the level of sugar in your syrup is down to a decimal point.
You just squeeze a drop of liquid onto the plate of the manual tool or into the recessed cup of the digital one. The refractometer does the rest.
If it reads between 66.5% and 67.5% you have syrup.
STEP 5
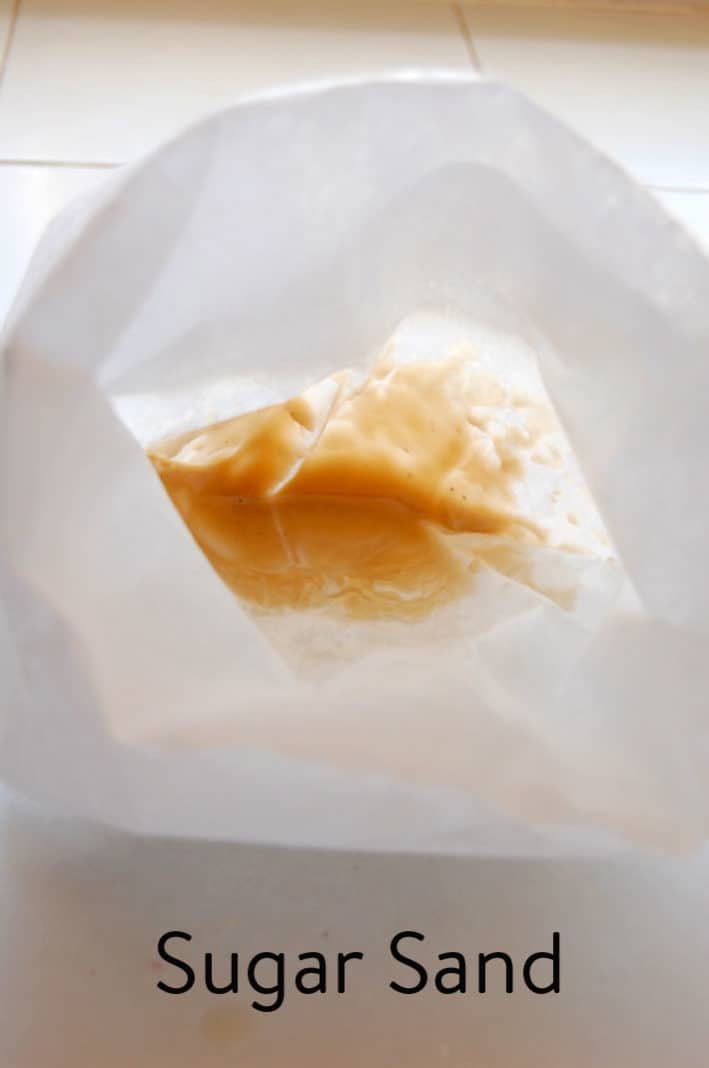
Filter your syrup. Large operations filter through a felt sock with paper liners inside of it. Filtering helps get rid of any contaminants as well as "sugar sand". I ONLY USE PAPER LINERS. The felt sock absorbs a lot of syrup. More than I care to share with a bag of felt.
Sugar Sand: This is also known as Nitre. Sugar sand becomes visible when your sap becomes condensed as syrup. It's a sandy looking sediment that's made up of minerals from the earth in the tree's sap. It isn't bad for you but it's gritty and will make your syrup cloudy.
If you don't filter out sugar sand it will settle on the bottom of the maple syrup bottle. Just don't shake up the bottle and it'll stay at the bottom of the bottle and out of your tasty syrup.
You can order these specialty bottles online.
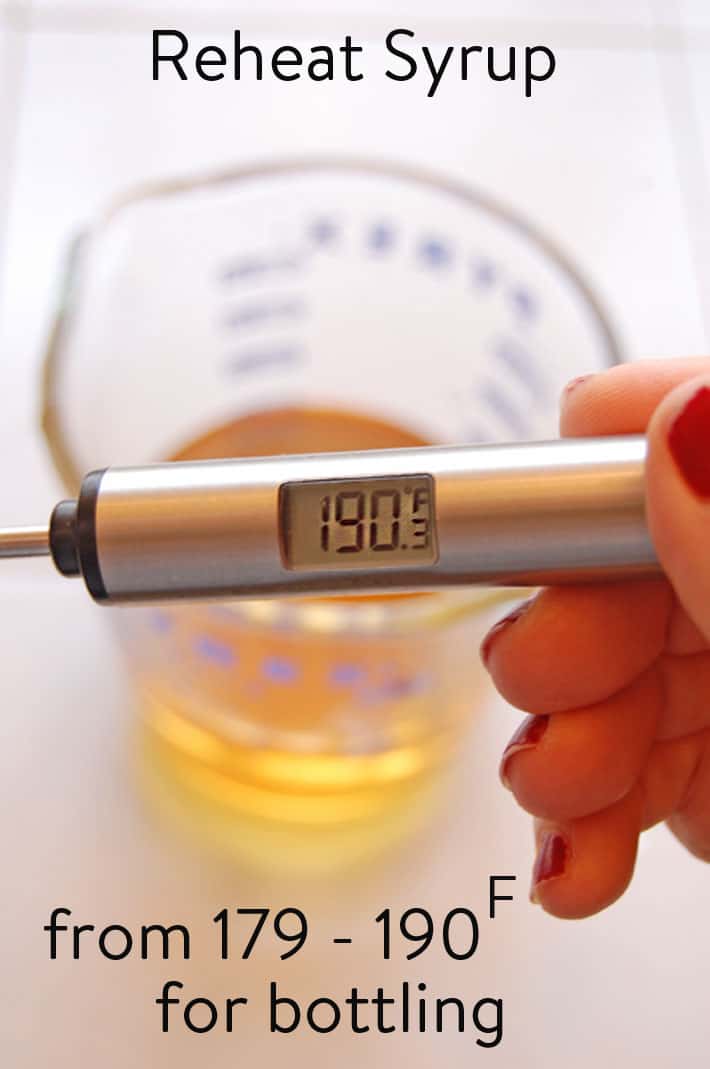
STEP 6
After filtering you need to reheat the syrup before bottling to get rid of any "ick" that developed while you screwed around testing its Brix levels.
Reheat your syrup to between 82℃ - 88℃ (170℉ 190℉) before bottling.
You can skip the reheating step if you store your bottles of maple syrup in the freezer instead of in a cupboard.
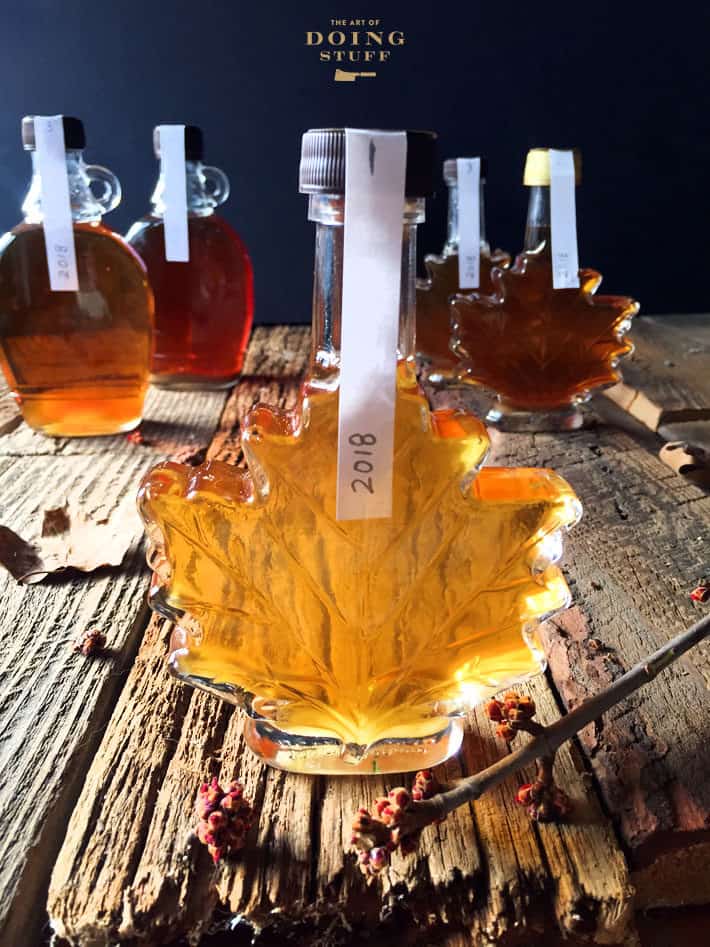
Maple Syrup Grades
There used to be a confusing system of maple syrup grades and up until a few years ago the US and Canada had different names for them which made it even more confusing.
NOW all maple syrup is graded using these words which describe their colour.
Golden - delicate taste
Amber - rich taste
Dark - robust taste
Very Dark - strong taste
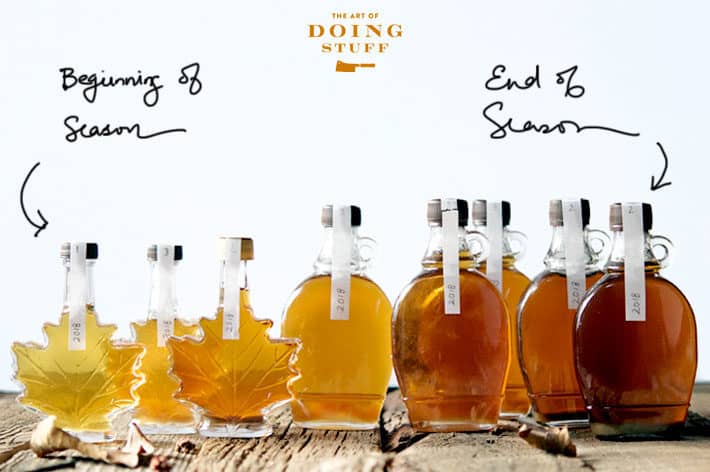
The grades or colour of maple syrup has nothing to do with how much the syrup is boiled. The colour of maple syrup depends on the daytime temperature the sap was collected.
Maple syrup grades are explained a bit more along with the more sciencey stuff in my Maple Syrup Grading post.
I think you have all the information you need now. These are alllllll the things I struggled with or had questions about when I first had the inclination to tap my own tree for homemade maple syrup a decade ago.
Here's some extra info that should clear up any other questions running through your head right now.
Maple Syrup by the Numbers
(numbers vary depending on the weather)
- It takes 10 gallons of sap to make 4 cups of Maple Syrup.
- It takes 1 week to collect 10 gallons of sap from a single large maple tree.
- That means you can produce 4 cups per week, for around 3 weeks, resulting in 12 bottles of syrup a year from one tree. (if that tree is producing very well)
- On a cold day it takes 9 hours to evaporate 10 gallons of sap outside.
- Then it takes another 1-2 hours inside on the stove to turn it into syrup.
- A minimum of 3 fingers are chopped off anyone who tries to steal a bottle of my syrup.
FAQ
There's some debate about this and not a lot of scientific papers I can reference. A lot of maple syrup producing sites say that the mold found on the surface of maple syrup is harmless. They recommend scooping off the mold and then heating the syrup to 179℉ to kill remaining bacteria.
In this post from the Cornell University mushroom blog, the author recommends throwing away any moldy maple syrup even though the xerophile fungus (Wallemia sebi) isn't always toxic.
If it's been properly bottled, maple syrup will last indefinitely on the shelf. Once opened it can be refrigerated for months. Freezing maple syrup in bottles is also a good way to store it.
Sap is clear liquid. But near the end of the tapping season it may start to look slightly cloudy. As long as it tastes fine and isn't deeply cloudy it's still good to use.
The perfect conditions for tapping a tree are when it's below freezing at night and above freezing during the day. Once the tree starts to go into bud you can't tap your trees anymore, the syrup this late sap makes will be bitter.
It depends on the season, but generally you have 3-4 weeks before conditions aren't right for sap to run anymore. Plus after 3-4 weeks the hole you drilled into the tree will start to scab up and close over.
The rate at which the sap drips will depend on the weather conditions that day. Sunny and warm always = faster running sap.
Good question. Sap is basically the tree's blood delivering minerals and nutrients around the tree. In the spring sap jumps into action pumping energy around the tree as buds are forming.
Maple Syrup Recipes
If you have even one INKLING of interest in making your own maple syrup DO IT. Do it right now before you forget about it and the season has passed. There are only 3 weeks every year that you can do this.
For the love of pancakes and french toast, do it this year.


This is really cool! We went to Mountsberg sugar bush this Sunday. But with March Break being this week, it was far too packed! So we didn't get to try any fresh syrup.
But we will be tapping the trees in our yard, next year, when we buy our first house.
I agree with you with the not sharing. Too much work to share! What is the yield ratio from sap to syrup?
Appx. 40 to 1. Yup. ~ karen
Yay! You did it! Lovely pics by the way. :) looks like a nice Light Amber.
Yay! I did it! :) Sap doesn't seem to be running very well despite the warm weather and cooler nights though. I hope I get to make more. ~ k!
good job karen! i will be seeing terry this weekend at his sugarbush so i will tell him how wonderful it all turned out. he is passionate about his maple syrup!
I'll probably never make maple syrup but I loved reading these posts! If the topic of maple syrup ever comes up, I'll be like the nerdy kid in class, hand raised "Oo, Oo, I know how to make it!"
We moved from Atlanta to Massachusetts in the 70's and decided to tap the maple trees in the yard. Started the fire, etc.in the BBQ pit, bundled up in 3 layers of coats, scarves and hats. It didn't work. Brought everything in on 3rd day to the kitchen stove. Big mistake. Good way to take off the old wallpaper in kitchen, hall and dining room, however. Boiled down to 2 small bottles of syrup the kids wouldn't touch. Neighbors never forgot it and we "southerners" are still joked about. I find its cheaper to just go buy it. You Canadians have a thing about Maple anyway! My hat, scarves, are off to you and I bow to your enthusiasm and talent.
Your syrup is beautiful- looks like it's Canada #1 Light grade!
Sally I'm pretty certain you cannot make oak syrup - we accidently tapped an oak once (trees all kinda look alike when they don't have leaves) and oaks don't appear to have a sap run - or maybe it's deeper inside the tree but we didn't see a drop.
Karen! I'm so impressed and the bottle looks very cute hanging on the door knob.
Karen, this was such a treat to see. My dad - who is THE MOST FRUGAL PERSON ALIVE - used to make maple syrup, and I don't think he went through the exacting standards you did... which is to say, he was all good with the thinner syrup (it meant it would go further on our morning crepes, LOL). He asked us if we might want his equipment, and after seeing this post, I'm definitely going to take advantage of his offer. Also, you have piqued my curiosity about the Laura Ingalls and the maple sugar. How freakin' great would it be to say , "Yeah, we supply our own sugar..."
this is super cool! great job. very informative, yet totally readable for someone like me with a relatively short attention span. If not for my inability to keep focused on the task at hand, I'd want to give this a shot myself. will you be doing this again? selling a few bottles, perhaps?
Bernadette - Yes. They're a million dollars each. Plus your first born and family pet. ~ karen
ha! I'll get saving. or breeding, as it were.
"Pack yer bags, son! And grab the cat! We're headin' north! And we're stopping at the bank on the way, so grab yer carpet bag. I'm gittin' me some of that lucious maple syrup!"
I don't have maple trees here but I do have lots of oaks. Wonder how oak syrup would taste? After this tutorial I'm pumped to make syrup out of something! You, my dear, aren't afraid of anything! I'm super duper impressed with your syrup skills. And, I don't throw that kind of compliment around willy nilly.
You lucky son of a gun you!!! Now I want to run to my neighbours house and tap their tree and steal all their sap...But I will just head to the local Conservation area in north Burlington and buy a bottle or two instead :) What a great tutorial! Thanks so much for expending all that time, energy and money (for supplies!) on making sure we can (if we want to) make maple syrup! You are so cool... :)
Wow! What a great idea! I have 3 huge old maples in my yard. All they have ever given me is leaves, leaves and branches after a wind storm. Oh did I mention the limb that fell on my Lincoln and totaled it? So making maple syrup for my pancakes would be a fabulous idea. I think I shall run right out and buy all the stuff I need today. .....wait a minute! How much did it all cost?... Maybe I'll just go to the store and get a bottle of syrup, wash off the label and call it mine! :-)..... So enjoyed your experience though!
We lived (poorly) in a lovely valley in a very wealthy area and my parents tapped the trees. I will never forget my mother standing in her oldest clothes with a kerchief over her head, stirring her witches cauldron of maple syrup over an open fire, and the local bird-watchers society all trooped by. I don't think my mother ever got over the humiliation of them all gawking at her without a word, because she never made maple syrup again.
Since you're living in a newly temperate zone and dont' have any snow this year, you forgot the best part of the testing - throwing a half-cup into the clean snow and eating maple snow cones!
Susan - I *did* want to do that! But ... no snow. No snow all winter! :( ~ karen
Love the last tip!
I make my own Rose Face Cream, and people are always asking me to show them how (even though I sell it!). I use that strategy!
I absolutely loooove maple syrup and knock back a tablespoon a day...mom always told me it was good for you, you know like honey. Amazing diy Karen!!!!
I o I o i... Its off to the shops I go. Looks so complicated Karen! Could you please show us how to make beer next. I'm sure that's easier...
Bex - Not complicated at all. I was just thorough in the tutorial. I wanted to cover everything so you didn't have to go through the same mistakes I did on my test runs. ~ k!
I am in awe of you. I love, love that you figured out how to do this - it's the neatest thing I've ever seen.
You are absolutely amazing.
Where did you find that cute maple leaf bottle?
Gale - I ordered a few of them from the same place I ordered my Hydrotherm. The bigger, plain bottles were much cheaper from my farm store, but I *had* to have a few of the classic Maple Leaf bottles. ~ karen!
You are freaking awesome!