My niece snorted at me the other day when I showed her this latest DIY of mine. Not because she didn't like the end result, but because I told her I copied it from one I saw and loved in Country Living Magazine.
"Did you ever think you'd see the day when you'd be looking at Country Living Magazine?"
She has a point. But I don't think I've changed. I think Country Living Magazine has. Gone are the days of chintz and dancing roosters on the kitchen counter. There's a certain country charm to every single one of the pages.
Without, you know ... conjuring up images of Hee Haw.
I'd have to say it's my all time favourite magazine right now. House Beautiful and Architectural Digest has some stunning design but ... a lot of times I can't imagine living in those rooms. Country Living however ... I could move right in, throw a blanket on the couch and watch a movie. They do country chic. Elegant country decorating that always looks modern and up to date. Not corny or cheesy.

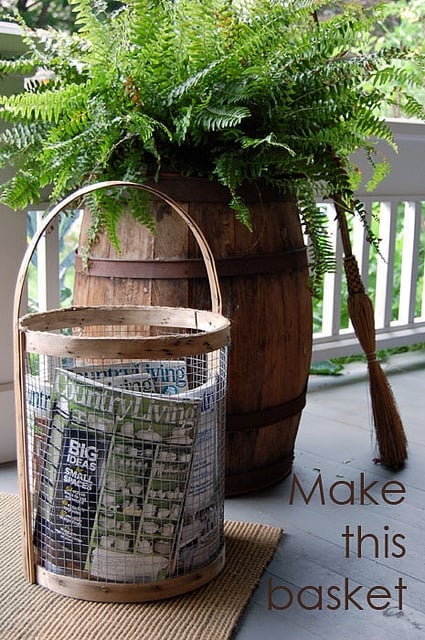
So when I saw this basket in the June issue I knew I had to make it. Firstly because I loved it and secondly because it looked ridiculously easy to make.
I started out making a version that involved steam bending wood. Then I decided if I was going to share this DIY with all of you ... chances are only one of you would ever consider making anything you needed to steam bend wood with a homemade steam bending contraption. So I nixed that idea.
(if you're that one person, let me know ... we'll talk)
Instead I found a way to make a reasonable facsimile out of everyday objects you can find quite easily. I found all of these materials in my potting shed. But most of you will have to buy/scrounge/find a few of the materials.
You'll need:
1 peach basket (local produce or grocery stores will have and gladly give you one. Farmers markets try to hold onto theirs but I'm sure you could persuade someone to sell you one for a couple of dollars.)
1, 12" round cork mat I bought mine at the hardware store for $5, but they're also available in craft stores. Dollarama in Canada has 9" ones for $2)
A long length of jute twine, string or bailing twine. (again ... available in hardware, craft or Dollar stores)
Hot glue gun
2, ½" wood screws
Hardware Cloth or Chicken Wire (available at hardware stores and sometimes garden centres)
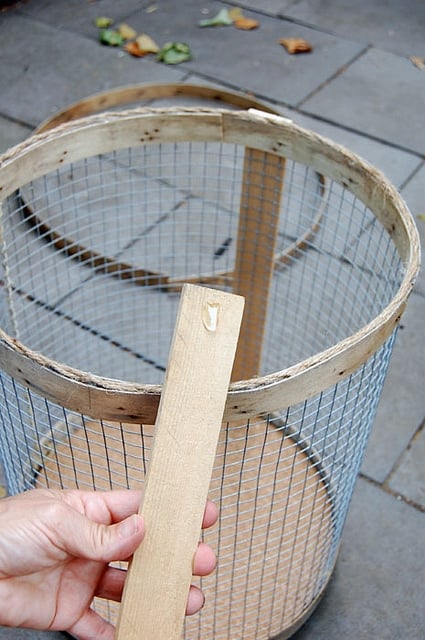
2 wood paint sticks, or other thin, 1" - 1½" scraps of wood cut to fit height of basket. (15" in my case)
Wire snips
Scissors
I N S T R U C T I O N S
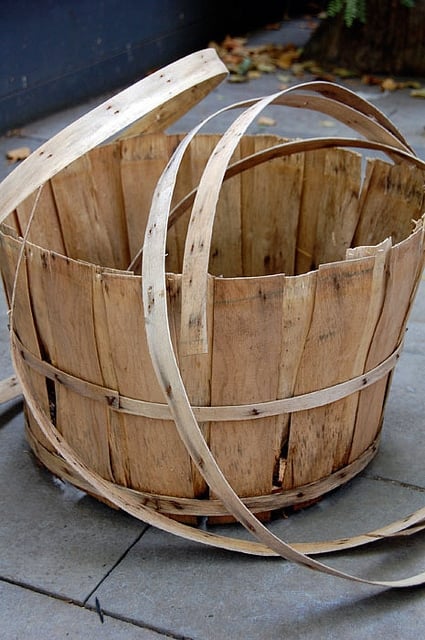
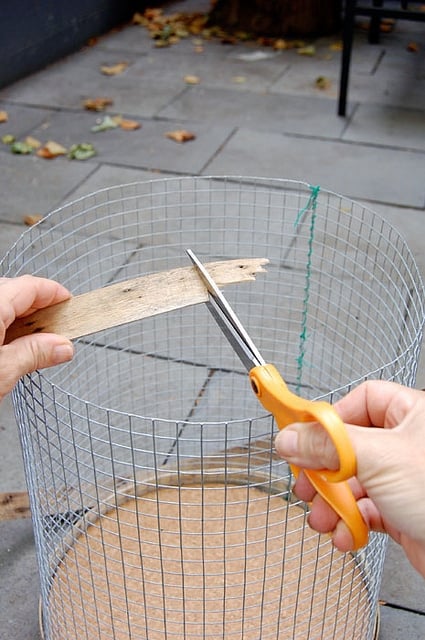
1. Carefully pull your peach basket apart. All you'll be using are the round, thin pieces of wood that go around the top and bottom of the basket. Using your wire snips or a screwdriver pull the staples holding it together out. Be careful to not break the long length of thin wood.
2. Cut a piece of hardware cloth to fit whatever sized piece of cork you have. For a 12" piece of cork your hardware cloth will have to be 38" to wrap around it, by however high you want your basket. I made mine pretty big at 15" high.
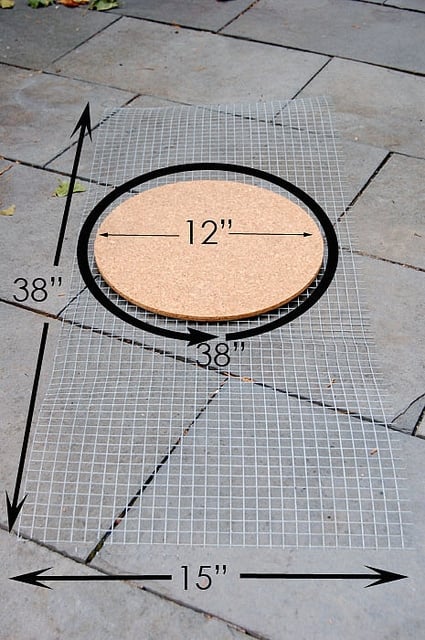
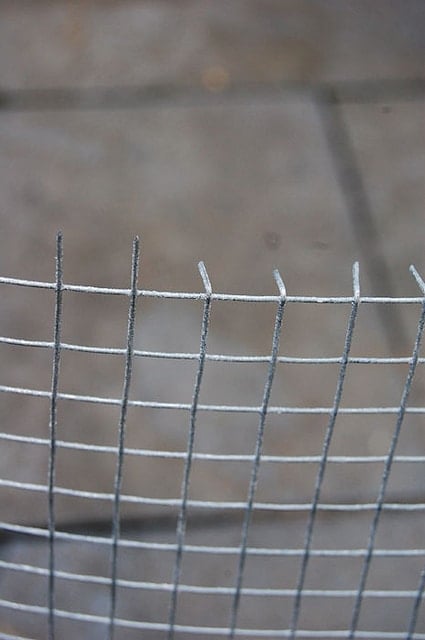
3. When cutting your hardware cloth make sure you leave one of the long ends with the pointy bits still in tact. You'll be bending these over to act as support for the cork at the bottom of your basket. Just bend them at a 90 ° angle with your thumb.
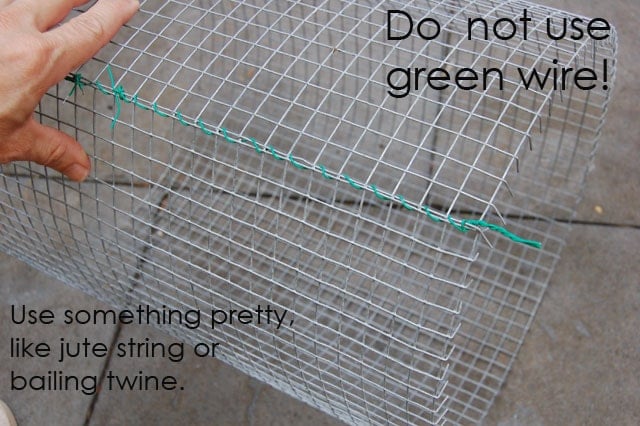
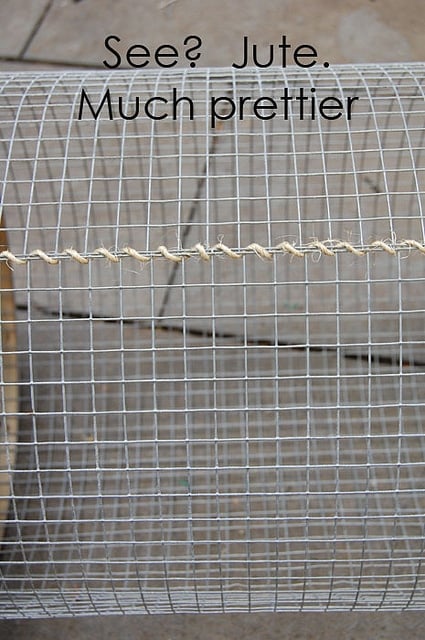
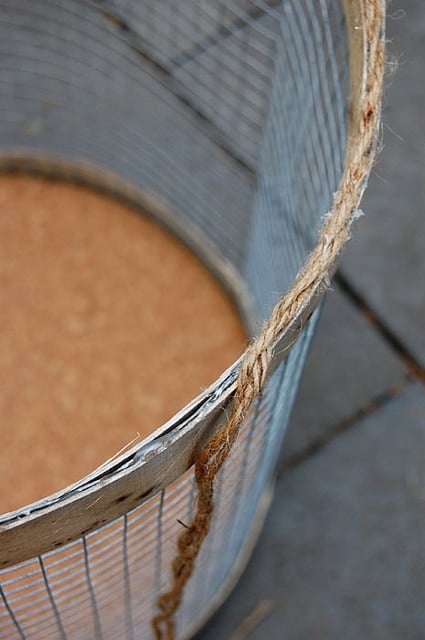
4. Once you've bent the ends down, roll your hardware cloth into a tube and tie the edges together with a piece of string or jute. (I started off using green coated wire thinking you wouldn't be able to see it but changed my design midway through the basket to something where you would see the wire. So I took it off and replaced it with jute string)
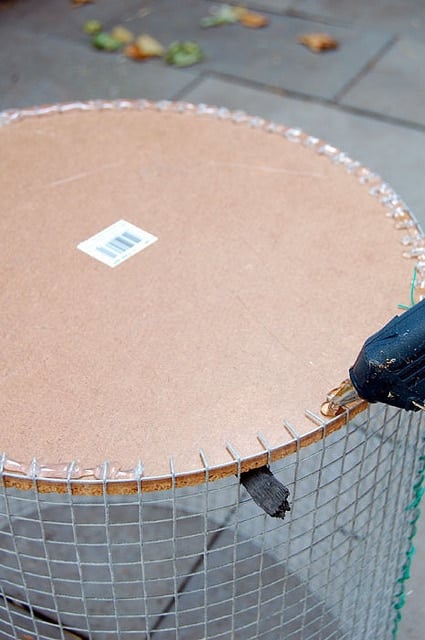
5. Stand your cylinder on the ground and place your cork bottom inside.
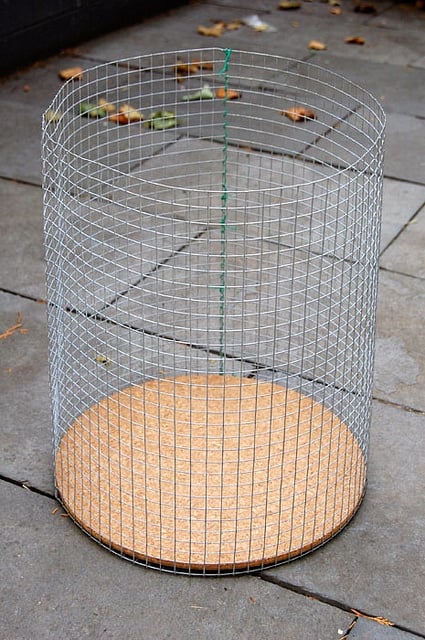
6. Make sure your tines are pressed up tight against the bottom.
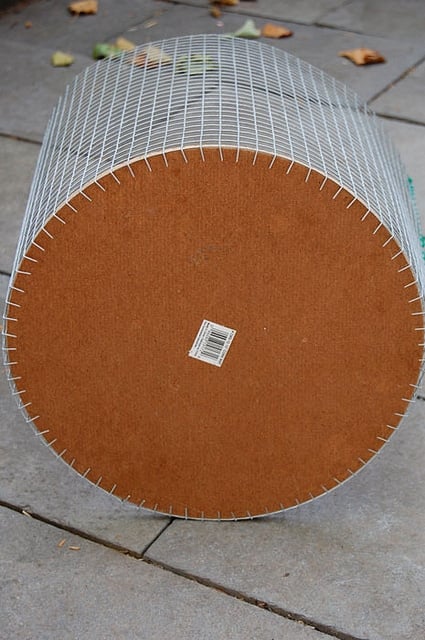
7. Hot glue the tines to the cork. If you need to, shove something in between the hardware cloth and the cork bottom to keep it pushed up tight against the tines while you're gluing it. I've just used a bit of mulch.
8. Cut the ends of your peach basket strips so they're straight.
9. Hot glue the strips along the bottom and top of your cylinder. Use clamps if you need to to hold the strips in place.
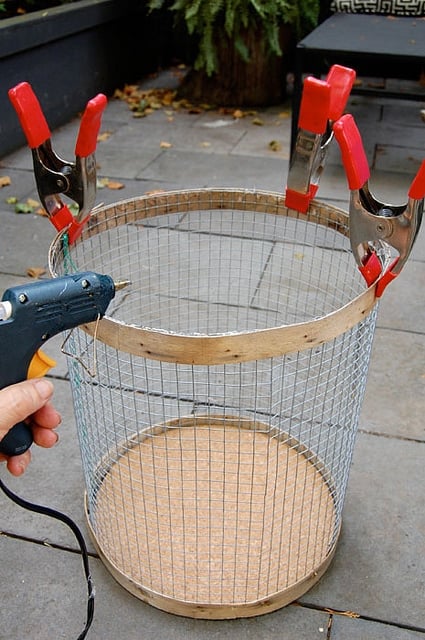
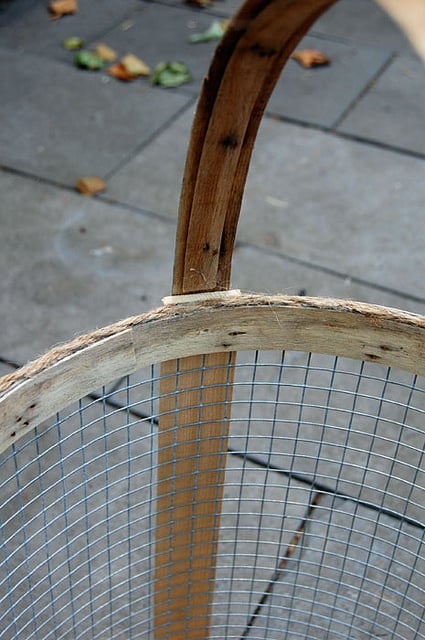
10. Place a final wood strip around the inside of the top of the basket and hot glue it.
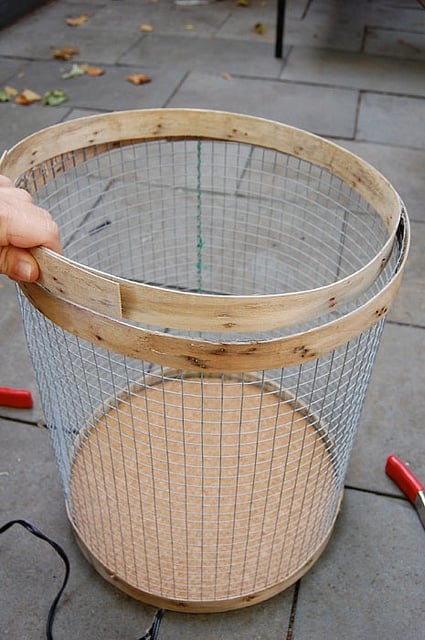
11. To finish the top edge of the basket (cause all that hot glue and wood is messy looking) just run a length of twine or string along the edge and hot glue it. If your twine isn't thick enough to cover the whole edge, just double it up and twist it.
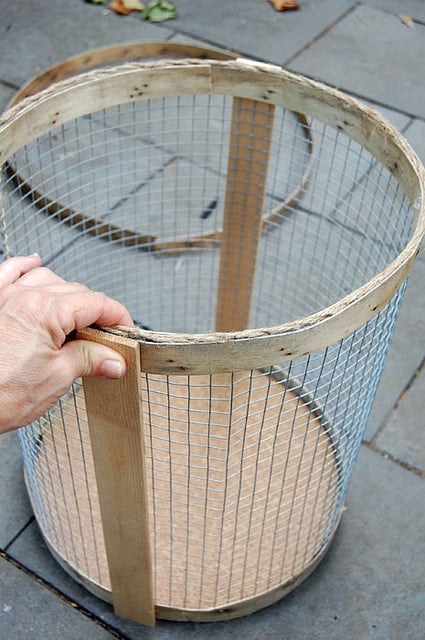
12. Cut your thin pieces of wood or paint sticks to fit the height of your basket. In my case, 15". Dab hot glue on each end ...
... and stick them to the side of your basket. Like so.
13. Hot glue your final piece of peach basket wood to the sides of your basket, leaving enough for the handle. Just eyeball whatever looks good for the length of your handle.
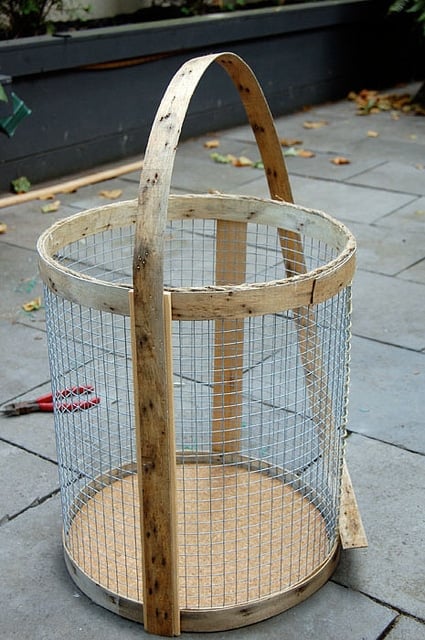
14. Since the peach basket wood is so thin, reinforce the handle by gluing another one or two pieces of peach basket wood to the underside of the handle.
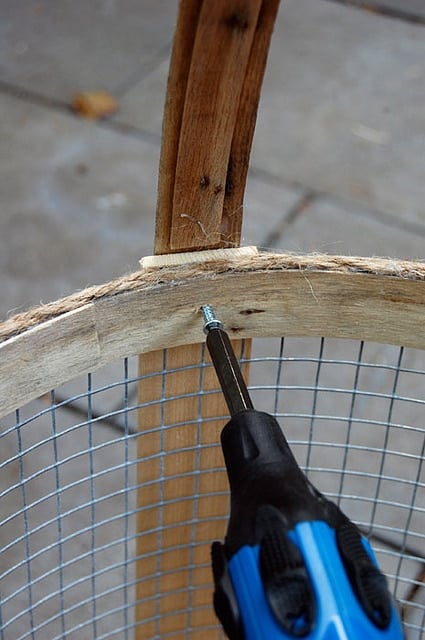
15. Screw a ½ screw on the inside of the basket to hold the handle in place, so you aren't relying on the powers of hot glue alone.
And admire.
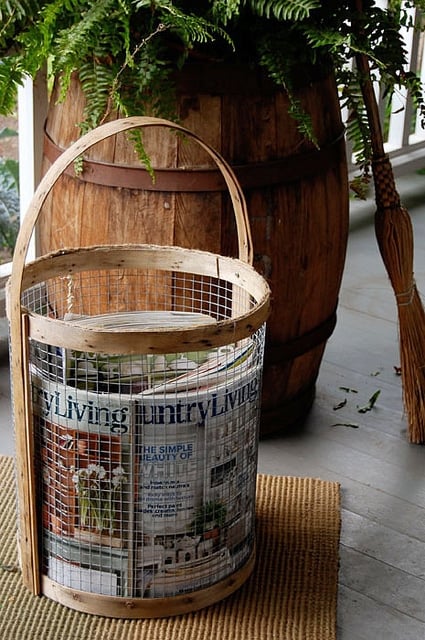
I'm already planning on making another one of these. Mainly because this one turned out a LOT bigger than I thought it would. This one I'm going to use inside in the winter beside the fireplace for kindling and rolled up paper.
In the summer it's on the porch with magazines in it.
The smaller one, I plan on making this weekend will be for gathering vegetables from the garden.
The difference between my basket and the one in Country Living, is the one in the magazine has "feet". But I decided I liked the look of the basket with just the two strips of wood along the sides where the handles run (as opposed to the 4 the basket from the magazine has). To make feet for the basket to stand on I'd need to add 2 more strips of wood to the outside of the basket. I didn't wanna. So I didn't.
What I actually like better about my basket is it already looks old and worn. That comes from using an old, worn peach basket. Keep that in mind when you're picking your peach basket out. If it's old and worn that's how your basket will look. If it's new and clean, that's how your basket will look.
Country Living. Snort. Not only am I looking at it, I've subscribed to it. In more ways than one.


I was thinking you could the embroidery hoops could be easier to use & easy to get they are already shaped
Heather - You could, but I wanted to use things I already had around the house, plus I wanted it to look authentically old. You wouldn't get that look with an embroidery hoop. I'm not sure ... do they make embroidery hoops that are 12" around? They might. That's some big embroidery, LOL! It would work for a newer looking basket though. ~ karen
I just found your website--I am instantly addicted!
Such WONDERFUL, creative ideas...written with such humorous, incredible style.
How refreshing!
Cheers to a wonderful week!
~Lisa
Thanks Lisa! I'm glad you found me. Welcome to the site. Sometimes I swear. ~ karen
I'm a big dummy and thought you were making the big barrell BEHIND the basket so I was confused for about 90% of the post.
Then it clicked so I re-read it and it made awesome sense and I'm just a dumbass who ignores things in the foreground.
Seriously, first the bird feeders, now this? Stop. I have too many freaking craft projects in my basement and suddenly I am like omg Karen did it again. You are a terrible influence. In a good way.
So cool. - want to try it soon
Awesome, nice work. I feel like we all get caught up in "instructions" but in reality, although it may not be exactly what you are mimicking, you can kinda guess on a lot of things and even if it looks different, it becomes an original!
Agreed! ~ karen
Brill.Iant.
I totally love this. I'm going yo try a version of it really soon.
Thanks Karen! ~ Karen!
You made me giggle because I too never thought something like Country Living Magazine would be my favorite either! for added strength on the bottom, you could glue another cork trivet on, sandwiching the tines between the two?
Karen, I am inspired by your barrel with the fern on it and the broom - I have all of those and never thought to put them together on my front porch!
I saw a picture in a log cabin mag yesterday with a small woodstove on the porch with a mum in it and thought - I have one of those in the storage closet in the basement and never thought to put it out on the porch either! Is there not an original idea in my head, or what!?
I just happened to notice apple baskets in my daughter's garage a couple of weeks ago and asked here where they came from because usually you have to kill someone to get one. Her daughters grand parents on the other side retired from being a college professors to owning an orchard and they give her a basket of apples every year so......I know where I can get one. I don't remember what we were talking about but a while back I told you that I know a woman who makes wire cages for a living so I can get the wire from her. Gosh, I might have to actually buy the cork. As for the HeeHaw in Country Living, I'm having a chuckle at a girl who has chickens in her back yard having an aversion to HeeHaw. HaHaHa He Haw! My favorite magazine now that they are all uptown is Romantic Living. It changed a lot, getting away from that awful Barbie Pink. Now why would Barbie Pink bother me when I'm buried under a mountain of Barbie-itis. School starts tomorrow and I get my house back. Yeeehaw!
Gayla T - Yes ... but my chickens have all their teeth. ~ karen
Is there corn in that there basket? By golly it looks like it!
W0W Karen..I think this is one of your best..Love it..I love Country Living too..
Speaking of steam-forming wood, have you ever considered making a Shaker basket/box? For example:
http://www.wooden-box-maker.com/making-Shaker-boxes.html
http://bentwoodboxes.com/
http://www.shakerworkshops.com/catalog/view/shaker-oval-boxes/Shaker-Oval-Knitting-Carrier/13C46
They're the baskets to which I compare all other baskets. Yours *is* very cool, by the way :)
And the wire drum/wooden collar can also make a great form for a floor or hanging drum lamp.
Good job! Might have to make one of these as I just pulled a large roll out of the front pasture! Thanks for the inspiration.
as my SILs tell me, "when doing country, you want to make sure it's country with a 'C' not country with a 'K."
I think that basket is definitely a C.
And you get an A.
So now that you're weaving your own baskets, does this mean you are *officially* nuts???
I *love* that. Make sure it's country with a C. Off to weave some more baskets. Maybe brew up some moonshine. ~ k
Oh wow, lovely, you're going to get me in trouble...hubby can't stand baskets. But I really love this.. Just going to pin it for now.
Karen, would wood edging that you use for counters work (if a peach basket isn't available)?
Shelley - Any wood you can bend into a 12" circle will work. Just needs to be pliable! ~ karen
Stunning
Thanks Karen! I needed a veggie basket for my garden! I am SO gonna make this!
You're welcome! ~ karen