If you’ve ever bought a house you know the two main things that will sell you on it are the kitchen and the bathroom. Those are the areas we are told time and time again a homeowner will always get their investment back on. That and an actual living gnome in the garden who acts out The Sound of Music every weekend. That's an investment you'll never lose on.
So when, 12 years ago, my real estate agent brought me to see an historic 160 year old cottage in Southwest Ontario I couldn’t wait to see the kitchen and the bathroom. I was hoping for a restaurant style kitchen and a bathroom with a dual head, rainforest shower.
 Much to my surprise, when we arrived at the house my real estate agent didn’t take me in the front door. Instead she said we’d go in the back door. To do this we had to pass through a gated arbour at the side of the house covered in climbing roses. It led to the nicest backyard I had ever seen in my life. Aside from the super-cute courtyard backyard Barbara Ryan had on As The World Turns in 1984. (obviously)
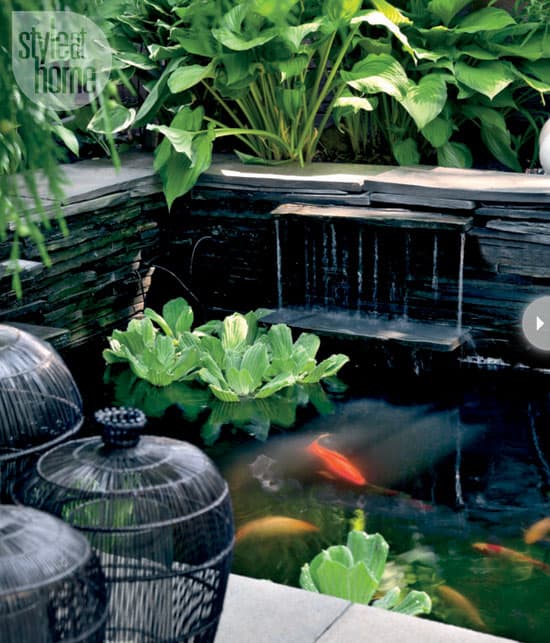
 The entire backyard was paved with beautiful dark grey slate. Not a blade of grass in sight. There was a natural looking pond in the back corner by a very cute potting shed. The entire space was framed by huge handmade cedar planters that bordered the whole backyard. Birds were singing, fish were swimming, fuzzy caterpillers with big smiling face were looking up at me and winking. It was perfect. Within 30 seconds of looking at the backyard, I had mentally bought the house.
In case you're wondering, the kitchen and bathroom hadn’t been updated since 1940 and there was a mouse skeleton in the ultility room. I didn’t care. I had a fetching backyard in which to throw garden parties. (I knew I would never, ever throw a garden party but I liked the notion that if I wanted to, I could)

Fast forward to March of 2007. The stunning slate had deteriorated to the point of mush, the planters surrounding the backyard were rotted and falling down and my pond had a leak which the fish weren’t too fond of. Even the birds had taken a hike. Literally every single thing that initially sold me on this house had turned into a great big load of crap at the same time. It’s like it was on a timer or something.
So … being a fairly handy and incredibly cheap kind of gal, I figured I could do something about it myself. Heck, I used to host a show that had the word "Handyman" in the title … I was MORE than qualified. I figured I could fix this sucker up in no time. 3 weeks maximum. Maybe 4 if I took it at a leisurely pace.
It took longer. And there was nothing leisurely about it.
Along with being cheap, part of the reason I decided to do this little project myself was because of an incident from a few years back. I needed a section of my fence replaced so I called around for someone to fix it. Shouldn’t be problem, right? Easy enough job. Pretty basic. Here’s what I ran into. At least 8 companies that didn’t have time to do it, 2 companies who just didn’t show up and one guy who politely did show up, and was courteous enough to bring his own booze.
The fellows I did end up hiring (because they actually showed up and appeared to be sober) ended up building my section of fence 6 inches shorter than the rest of the fence and nailed it together with nails so long they protruded by 2 inches on the other side. I was the girl with the porcupine fence. Suffice it to say, that’s around the time I decided by become handy(er).

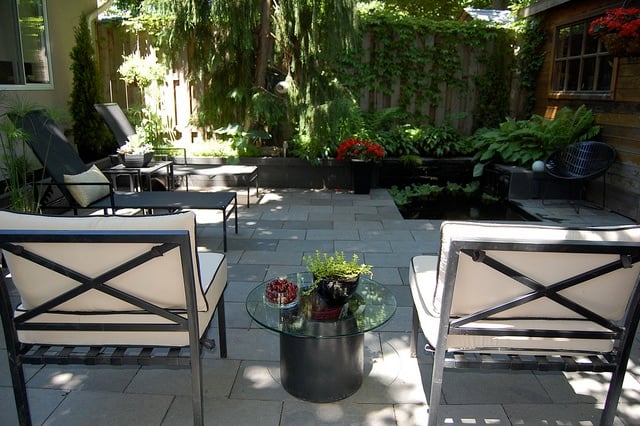
So in the very early spring of 2007 I started planning. I decided I wanted my new backyard to go from looking cozy and naturalistic to something a little more contemporary. Sleeker. I needed a new stone “floor”, new planter beds and a new pond. I wanted to use a manmade stone product instead of the slate, in the hopes it wouldn’t flake, crack and basically rot away to nothing. Slate has a tendancy to do poorly in my area of Canada because of all the freezing and thawing. It’s made of many shaley layers that just fall apart over time.
Problem is, no one makes a manmade stone that had the look and size I wanted. So, I ended up choosing a dark grey square cut flagstone. It was small enough for me to handle (athough each piece was still over 20 pounds) and came in the rectangular shape I wanted. Going with flagstone ended up tripling the cost of my backyard. That's what's known as "unforeseen costs". Turns out my flagstone was coming from India, so that quadrupled my timeline. That's what's known as "sucking". They were running on a decidedly more casual pace in India so it took reallllyyyy long to get the stone.
By the way, if you’re doing a largish job by yourself, you have every right to ask your supplier for a contractor’s discount. I got 20% off my flagstone which was a huge savings.
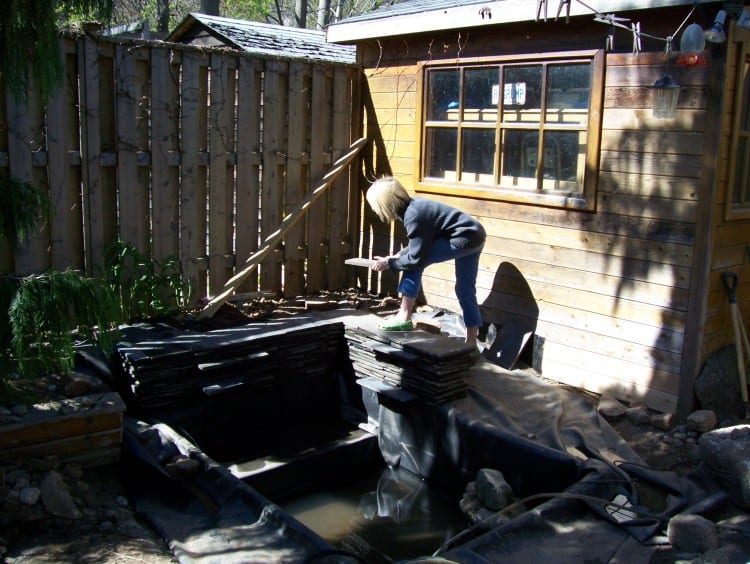
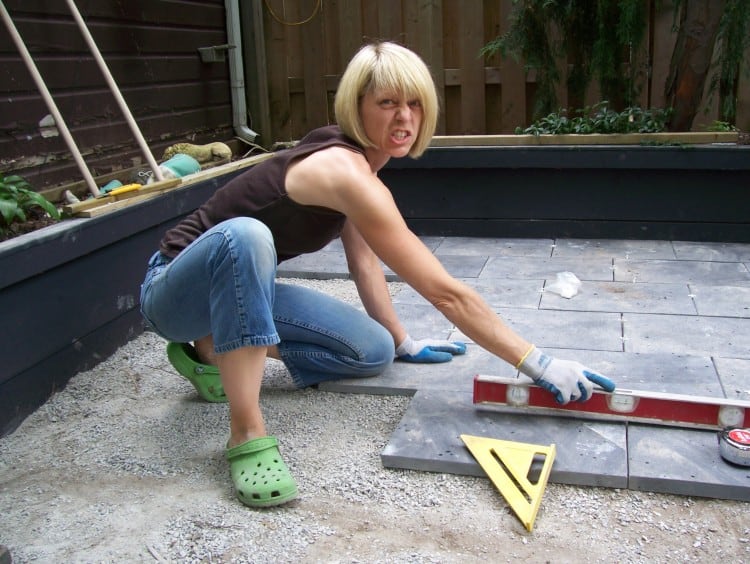
While I waited for the flagstone to show up, there was the matter of ripping every single thing out of the backyard and taking it to the dump. I pulled out every piece of slate, planter bed and all of the huge landscaping rocks surrounding my pond. By myself. Like an idiot. (my 6’4” fella had JUST had shoulder surgery and couldn’t help me with anything) I’m not sure how, but I believe he planned this. Actually, that's a bit of a lie. He did help me, broken shoulder and all move the huge boulders. I was afraid if I told you he helped me move the boulders you'd assume he helped me with other stuff too. He didn't. I did it all myself. Like a dumb-dumb.

It was approximately the time this photo was taken that I started to think this was a bad idea. The one positive was that I had made a new friend in the form of a chipmunk who crawled all over me, but I was sore, tired and not at all sure about how to do any of this. And my pal Chippy wasn’t any help. Mostly he ate like a pig and watched me.

I had ripped my entire backyard apart with not much of a plan. Enter the Internet. Even though the Internet lies, if you properly research and cross reference you can actually learn how to do stuff from it. I didn't have a clue how to do any of this. But I knew I wanted a new backyard and I knew I wasn't gonna pay someone else to do it. So I researched, jumped in and gave it a shot. I taught myself to juggle. I could teach me myself how to build planter beds and lay a patio.
I housed my fish in a kiddie pool while I rebuilt my pond. I figured it would take 4 days. It took about 2 weeks. I had to redig the pond, build a wooden box to act as a rectangular form, line it and level it all. To be perfectly honest with you, the hardest thing about doing this backyard wasn’t the physical labour, it was the mental. (insert Karen's dumb joke here) Trying to figure out angles, and slopes and grades to make sure the flagstone was laid in such a way the rainwater would drain away from the house and the pond would be level and … holy crap. It made that soft spongey thing in my skull hurt.
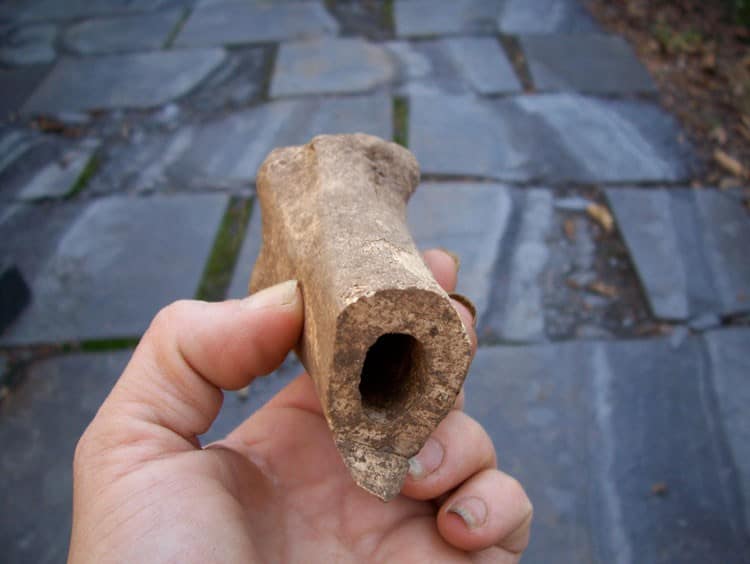
One of the big bones I dug up.
Oh! And while digging my pond I found some kind of a femur. Did I mention the femur? Uch. I put it back where I found it and banished it from my mind until this very moment.
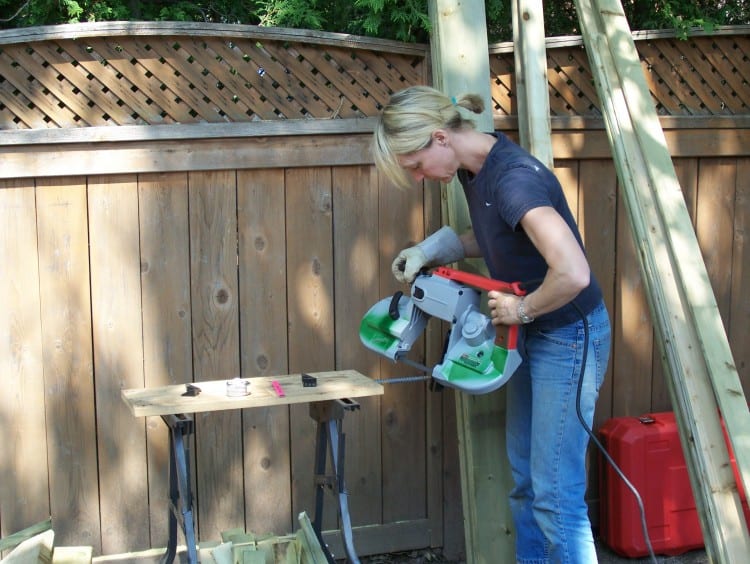
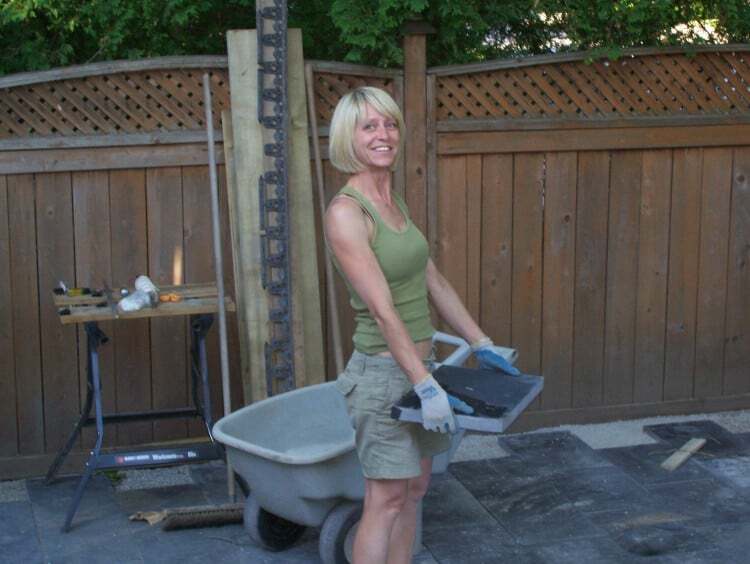
After completing the pond the flagstone still hadn’t arrived so I started building new planter beds. Much sleeker than the original ones, stained in a dark grey the same colour as my flagstone. By the way, if you ever plan on doing anything at all with wood, invest in a good sliding compound miter saw. It’s a girl’s best friend. I borrowed my sister's at the time. I now own my own. I call her Sally.
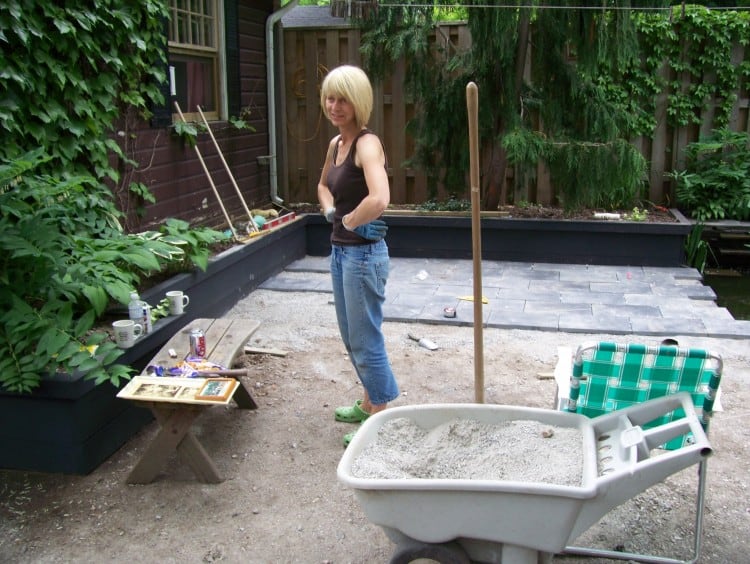
The planter beds were finished and still no flagstone so I began lugging in the screenings to level the backyard. I would say I lugged and dumped approximately 3 yards of screenings. For those of you who don’t know how much that is … it’s enough to make you very, very cranky. Finally after weeks of waiting, my flagstone showed up and I cut and laid all 800 pieces of it. My backyard was done.
Looking back at what I’ve written here it seems like doing the backyard was pretty simple and straightforward. It wasn’t. If anyone had told me how much work this would have been I would never, ever, ever, ever have done it. I would have rolled out a bunch of Astroturf and called it a day. Would I recommend anyone else do this? It depends on how cheap you are and how much time you have on your hands. And how prone to nervous breakdowns.
My backyard cost me about $6,000 for materials. It would have been at least $15,000 plus materials for someone else to do it. I would charge one bazillion dollars to do it for someone else. A day. One bazillion dollars a day.
I originally calculated it would take 21 days to complete my project. It took 127 days of working a minimum of 12 hours a day. I can tell you it’s a lot easier to host a handyman show than to be a full time handyman. I can also tell you I will never move from this house. Unless the backyard falls apart again.
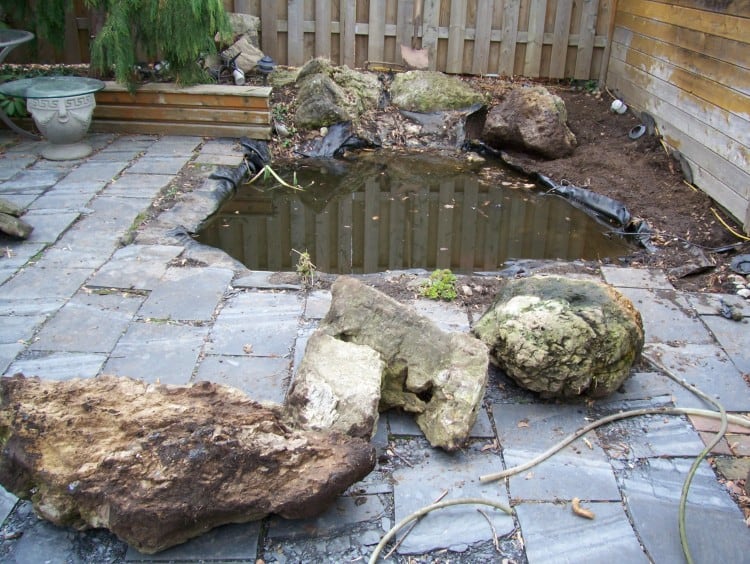
The pond before
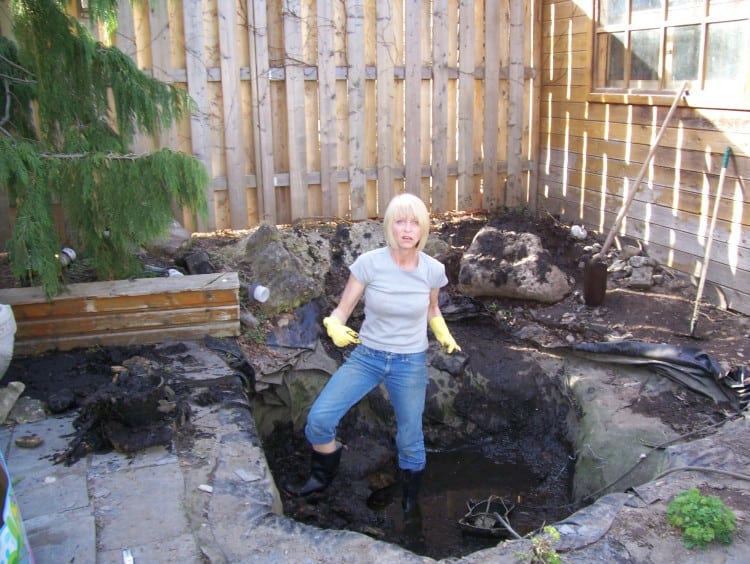
Cleaning the muck.
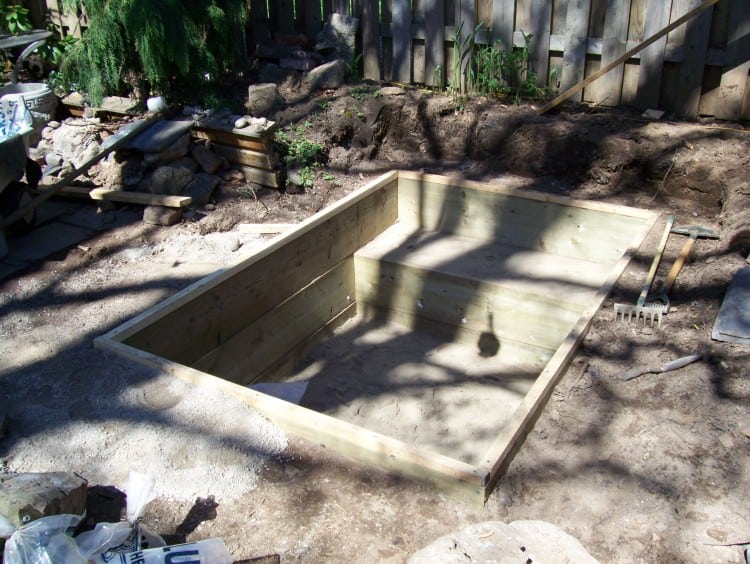
I built the pond form out of wood and made it 2 depths to create interest for the fish and places to put plants.
I built the waterfall around the pond with some of the slate from the backyard I could salvage. Reduse, reuse, reanger.
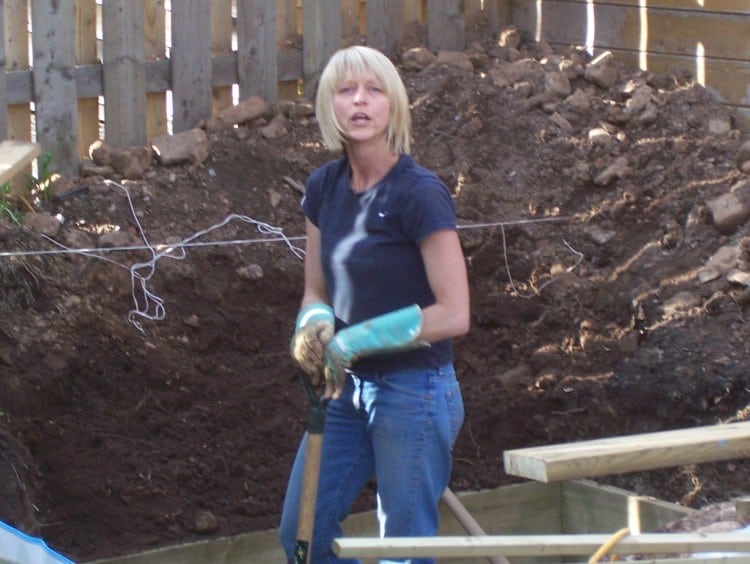
See that big pile of dirt and rocks behind me? That's what I dug out to create a bigger pond. By hand. With my hands. I'm sure you can see the word forming on my lips.
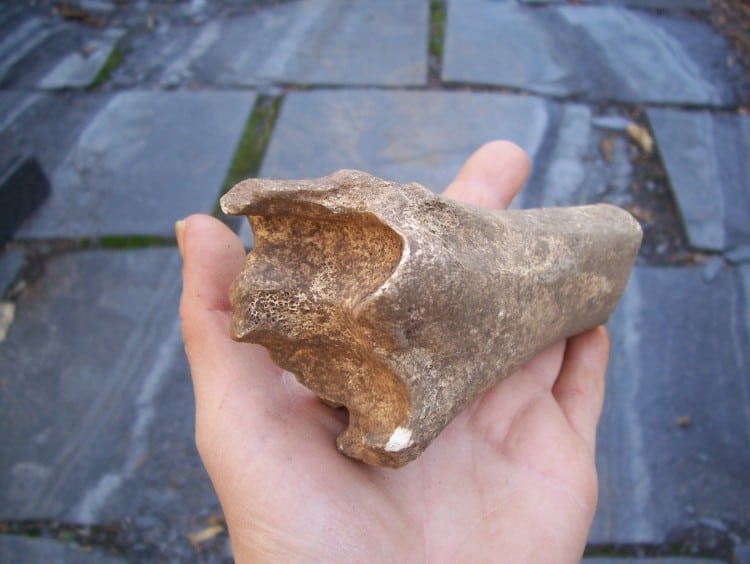
Another one of the huge bones I found. I threw them back where I found them and reburied them.

After the pond was done it was onto the planter beds around the perimeter of the backyard. And then it's straight to the store for more ugly shoes.

By month number 2 of the backyard overhaul this was me standing as straight up as I could.
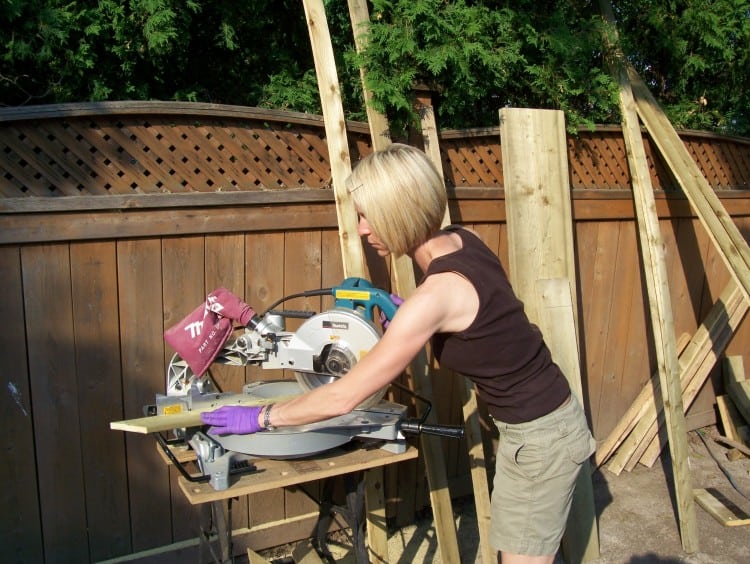
Best little sliding compound miter saw around. Wish I owned it. It's Pink Tool Belt's.
Hacking off some rebar for building the planter beds.
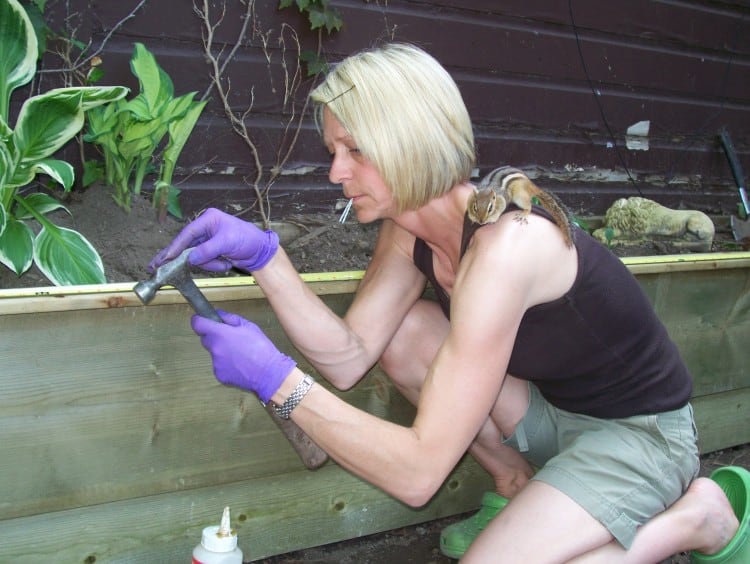
For real. That is how much time I spent outside that summer. I was literally crawling with wildlife.
Now the beds are built and stained, the pond is completed, all that's left is another 17 million days of levelling the backyard and laying the flagstone.
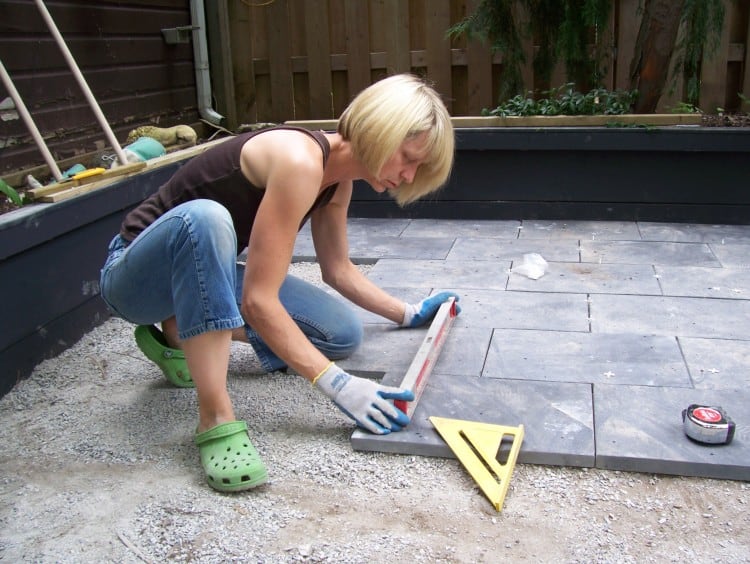
Because these are natural flagstones, not manmade cement pavers, each stone is a different thickness which means each one has to be hand laid and levelled.
Again. I'm not sure if you can make out the word that's forming on my lips.
I'm close enough to the end of the project that I can actually start to smile again. Also I'm slightly delirious.
THE AFTER GALLERY
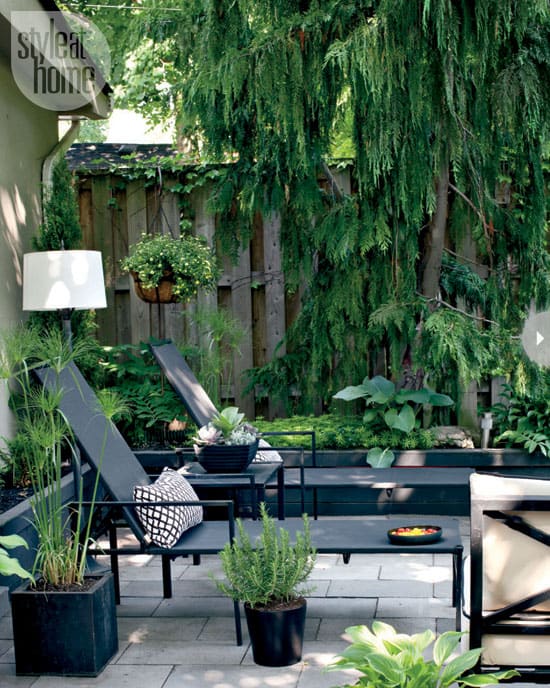
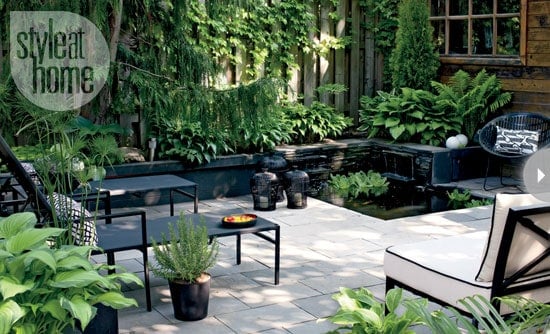
Update: The backyard has changed even more in the past few years with the addition of a midcentury modern chicken coop and a ridiculously fantastic (and relatively easy to make) pizza oven.


Hey Karen, Wow, a really beautiful modern garden! I'd like to use it as "inspiration". I was going to make a retaining wall by stacking 4x4's, but I really like what you've done. It's much more modern and elegant. How did you make your retaining walls/planters? You mention using rebar as a support. It looks like you've used a 2x4 and a 2x10 stacked on edge and then put a cap on? How did you fasten it all together? And what prevents the soil from pushing it all over? Any info you can provide will be appreciated!
Thanks for finding a good use for rope light.
Hi Ted. Thanks for the compliments on my garden! It took a good lonnnnnnnng time to figure out how to do those planter beds! The people working in the lumber yards didn't really think it could be done. That of course angered me, so I figured out away. I built the boxes like you thought, by stacking a 2 X 12 on top of a 2 X 4. (in other areas I did lower planters with different sized lumber). I drilled pilot holes and then screwed everything together with green wood screws. I then made "loops" basically out of galvanized strapping, which I loosely screwed to the back of the planter bed forms. The I had a loop near the top of the board, plus another one near the bottom. I pushed the planter beds into place and then hammered rebar through the series of loops I made on the back of the planters, into the ground as far as they would hammer. At least 2 1/2 feet into the ground. I then tightened the strapping around the rebar. This has kept them perfectly secure for the past 2 years and they don't look like they're going anywhere anytime soon. When everything was in place, I simply walked around and cut all the rebar off near the top of the planter beds with a zip cut or something. I'll search through some of my pictures to see if I can give you a better idea of how I did it. If I find a good example I'll send it to your email address. The cap was the last thing I did which is just a 1 X 4 on top, with a 1 X 3 (I may have ripped it I can't remember!) hanging down to cover the rope light. Glad to have provided some inspiration. Phew. That was a long comment! Good luck!
Wow, you are one crazy Canuck! Glad to see the Timmies cup in one of the shots, I swear they put something in their coffee to cause addiction to it,lol.
What an amazing project, love, love, love it.
We have purchased a old home in Owen Sound, and I would love to build something like this behind the house, love the shape of the pond, I want something more clean then the boulder look you had going on before. Lots of fabulous ideas, thank you.
out of curiosity, was it the ripping apart the old coutyard or building the new one that was the bigger pain in the hiney? Because I am planning on building a schmic new garden after I move house (no paving though) but there is basically nothing there now so theres no ripping stuff down to go through.
hi- i was wondering what you covered the wooden pond with so the water would stay in? was it a plastic liner? I wish you could put up more detailed step by step instructions!!!! everything is so nice!
thanks
Hi Sherry! The reason I didn't put up more detailed instructions is because it would end up being more of a book than a post! :) But I'm happy to answer any questions. Once I made my pond form I dropped it into the hold I had dug. I then lined it with a felt pond liner. (you get this in a pond supply or garden store) Since there was no bottom on my box only sides, the felt helps protect the actual pond liner from rocks and twigs and tree roots from putting a hole in the liner. After the felt was down, I lined everything with my pond liner and smoothed it all out! You can't use regular plastic, you have to use a thick, pond liner from a pond supply store. It's rubber-like and is very tough so it won't develop holes easily. It's also safe for the fishies.
thanks for the info! I have tried to work with that pond liner before and I thought it was hard to work with. I found it hard to get smooth(alot of bumps and waves!) and flat. How did you get around that? I would buy your book by the way!!
Nope. There's no way around it, pond liner is difficult to work with. The only thing to make it easier is to make sure you lay it out on the sun to soften up before you work with it. No matter what you do there's going to be bumps and folds. I spent a long time working on mine to get it as flat as possible, but it still isn't perfect. Just pray your pond becomes a little cloudy and you won't be able to see right down to the bottom!
Just read your backyard makeover story and I am inspired...and humbled! What a huge job! I just moved into a house with a square patch of grass in the back and a postage stamp deck that my guy is going to rebuild. The square patch of grass stares at me everyday daring me to get creative on it. I don't have a creative bone in my body! Not sure where to start! Any suggestions?
Hi Allison! It's pretty hard for me to suggest something without a picture, but f you're not all that creative feeling at the moment, the easiest thing to do would be to dig out a bed all around exterior of the square patch of grass then put in plants of varying heights. If it's shady use shade plants, sunny .. plants for the sun. Makes sense, right? :) You could also get fancy and add a small tree in one corner and a small bench under it or in the opposing corner. That's just off the top of my head. Again, w/put pictures it's difficult ... but it's at least an idea for you. Thanks! - karen
Thanks! But I should have also mentioned that around the perimeter of the yard (on three sides) we have cedar trees, with wonderful patches of weeds beneath them. The yard faces west and gets full sun. Apart from that, it is just grass. Sorry I forgot to say that in my earlier post...but I get on here once my 9 year old is in bed and I am tired! So I forget stuff. Would you like a pic of the yard? Can I put one in here? Ok....chat later! Love the frozen yogurt btw. The story.... I mean. Haven't had to do that to myself. Okay..gotta head off to bed.
HI Allison. If you have a picture you can send it to me at karen@theartofdoingstuff.com. That would indeed be very helpful. This landscape design by text is near impossible! Looking forward to it. - karen
Hi,
Garden looks fantasic, how did you wire/attach your lights to the bedding plants.
Hi Dean. Thanks! I think you're talking about the rope light around my planter beds. I just stuck them underneath and then drilled a screw underneath to keep them from falling down. I didn't want to attach them too permanently or make it too difficult to get them out because they'll eventually need to be changed when the rope light wears out. If you're laying on the ground you can see the screws holding the rope light up a little bit, but you can't see it if you're standing.
This is AMAZING. Wow. I love it. And the waterfall? Wow. You are so darn impressive!!! Beautiful. You have given me great ideas for my backyard (which is currently all concrete!!).
The waterfall IS amazing as well. I am just very impressed.
ps. I will so come and lounge on your loungers any day.
I love, love, love your new backyard! Good job! We installed new flower beds this spring and it took me a week to recover. Major props to you on completing such a large scale project all by yourself. Where did you purchase the outdoor furniture? I am currently looking for new chairs for our backyard, and I love the clean lines on your pieces.
Out of curiosity, are you happy that you sank most of your budget on the flagstone? I've always balked at the prices, but love the finished product.
Congratulations on finishing your project. It's gorgeous.
Paul! I'm not gonna lie to you. I wish it had been cheaper. :) I would have been perfectly happy with a manmade, rectangular, grey stone. But ... since it didn't exist ... I got the natural stone. It is beautiful and although I would have preferred spending less ... it does look much better than a fake stone would and I haven't regretted spending the money for a minute! So there's your answer.
Fabulous job. I laid a lot of 1/2 to 3/4 inch bluestone (18X12s to 18X24s) in my backyard, by hand, just me and my trusty trowel, many years ago and then revised the layout several times over the years. Too bad the original owner didn't use bluestone because they don't fall apart. We have very stable clay soil here, so I was able to lay them right on the dirt, after a lot of individual leveling. So I absolutely appreciate what you did. Very inspiring!
Lisa. Well if anyone knows the pain, you do! 18 X 24 is a pretty stinkin' big hunka rock! Send in pics if you have em!
OMG you are amazing! Not inspiring, honestly because there is no way I would ever take all of that on, but amazing! I do think I have the energy to go home and whip out a few coat hanger boards now. ps SUPER cute chipmunk! You have a new fan!
Colleen - that's funny! Not inspiring .. that made me laugh. Thanks for visiting and please come back anytime!
WOW! WOW! Unbelievable. I'm not worhty. I'd come over and cook for you and make my hubby help you lug. You're amazing! Now, get a massage. And an alcoholic beverage.
Monika! Thanks! I love cooking, but it's always better when someone else does it. I request something ... um ... good. Just anything really good! Thanks. I'm waiting. - karen
I bow down to you ... you super woman you!!!
WOW you did great!
Popped over from design sponge
Enjoy the fruits of your hard labour.
Thanks Gayle! I'm glad you came over to visit from Design Sponge. Not super woman by the way! Well .... a little bit maybe, but not completely. :)
Beautiful work! I hope you can spend many years enjoying the fruit of your labor.
My two cents: DON'T PAINT THE POTTING SHED. IT IS SO BEAUTIFUL AS IS, especially with your renovations.
Your backyard is AMAZING! I am in disbelief. I would be impressed with the design alone - but that you did it all by yourself (with a chipmunk on your shoulder!!)? Whoa! Thanks for sharing!
Just found you via Design Sponge...way to go...as awful as it was...I bet it feels amazing to sit and admire all that hard work! Beautiful...the waterfalls are stunning...just right.
Thanks! I had to go and look at your site 'cause of the name of it. I LOVE the tables you redid. Pretty, pretty. Great colour. Love the site. Good job.
I laughed so loud when I saw the Chippy picture it scared my cat! You are my new hero. I once renovated a 300 year old farm house - learned how to use a jackhammer, a sandblaster, power tools. I feel your pain but your finished result is incredible. I love your blog = looking forward to Chippy stories!
300 year old house???!!! Where do you live? Aren't many 300 year old houses around in North America!
My friend MaryFrances showed me your blog. I am "speechless". I consider myself to be a do-it-yourself gal, but you put me to shame! Wonderful oasis you made. I love it. Kudos to you - be very proud of yourself!!! You are a strong woman - that's because it takes one to know one....lol.
Linda Langevoort
Thanks Linda! I'm strong except when it comes to refusing potato chips. I am then unstrong. A lot.
Congratulations!!! Your garden is gorgeous.
Thank you so much Tatiana! I went to look at your site, but alas ... I couldn't understand a thing! :) I did understand the spoons as plant markers though! That is brilliant, isn't it? Love it. Thanks for visiting my site!
Amazing...you're amazing. I am guessing you're telling yourself that all that heavy work is worth it because your garden is beautiful!!!
I am thinking...I can give my garden a shot now - and hope my husband doesn't "accidentally" hurt himself.
THanks for the inspiration!
Celia
Give it a shot! Nice purses on your site by the way! I especially like the leafy one! You probably have no idea which one I'm talking about.