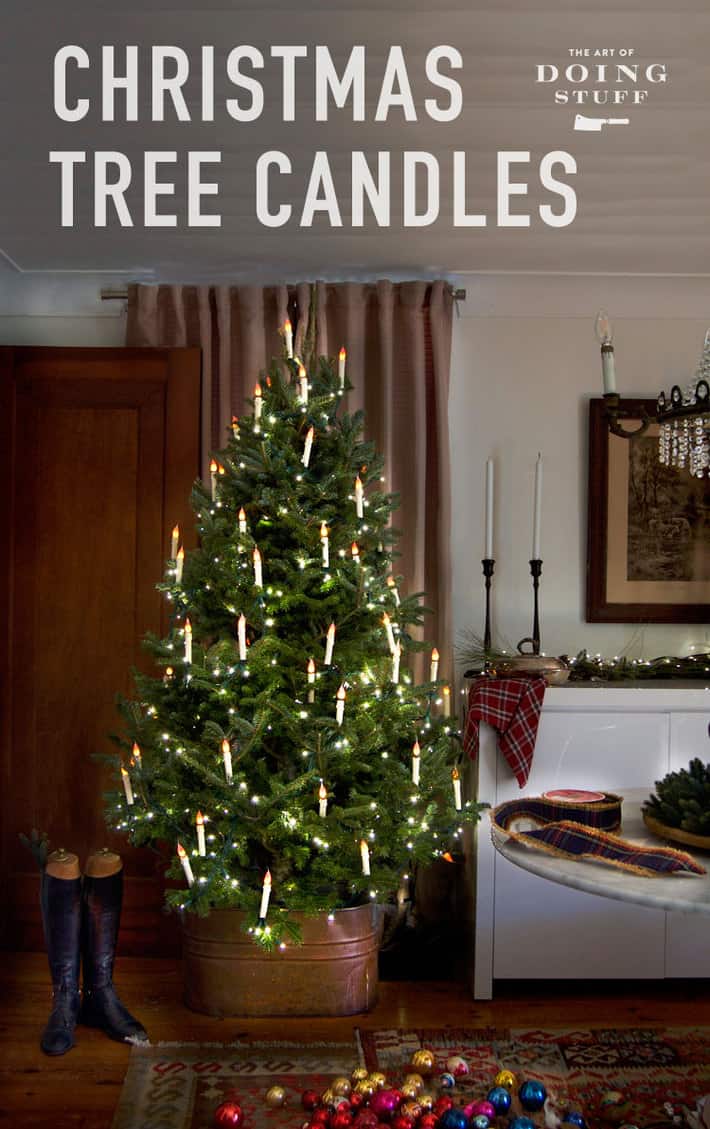
These DIY Christmas Tree candles look astonishingly beautiful, are FUN to make and are 100% safe to use. That's like a Christmas craft trifecta! Here's how to make these flameless tree lights.

Every year I come up with one great Christmas DIY. Not 10 or 12 ... one. Of course I post a lot more than that, but we all know only one of them is actually any good.
One year the DIY that bubbled forth in my brain was the elegant bookcase presents, an idea that I randomly made up completely in my head, on my own, while looking at them at my friend's house. The year before that it was the insanely popular Christmas dessert, The Snow Globe a la Mode as featured on Country Living.
This Christmas DIY is possibly my favourite to date because it hits all four Christmas craft criteria; easy, fun, affordable and impressive.
The DIY Christmas Tree Candles.

I know. They're beautiful and classic and old fashioned feeling. And they're easy. And fun. And affordable. The whole affordable thing is what prompted me to figure out this DIY. I've always loved the look of candles on Christmas trees because in my heart of hearts I'm an English Victorian lady (with a hunting dog named Muddles) and an entire staff to douse my tree whence it goes up in flames. Candles on a tree just look so nice.
Of course you can't have real candles on a tree because good candles are expensive ... and on fire.
Here's how to make Victorian looking Christmas candles for your tree.
(Printable version of the tutorial at the end of this post)
DIY Christmas tree candles
Materials
CLICK HERE FOR A PRINTABLE VERSION OF THE MATERIALS
Will make 48 candles.
- ½" rigid plastic pipe, 5' length x 3
- Hot glue gun and glue
- String of C6 clear LED lights (I used a total of 400 lights on a 7' tree)
- White, cream, orange, dark orange latex paint (just the cheap craft paint from the dollar store)
- Paintbrush
- Clear silicone
- Metal can
- Floral wire
- 48 Alligator clips
TOTAL COST: Approximately $15 for pipe, $5 for silicone, $5 for the paints, $5 for alligator clips. The rest you probably have. So the high end total is $30 for 48 candles.
Steps
CLICK HERE FOR A PRINTABLE VERSION OF THE STEPS
- Cut the plastic pipe into 3 ¼" lengths. (this length may differ a bit based on your particular string of lights as you'll see a bit later on) You can use a circular saw or a hacksaw to cut your plastic pipe.

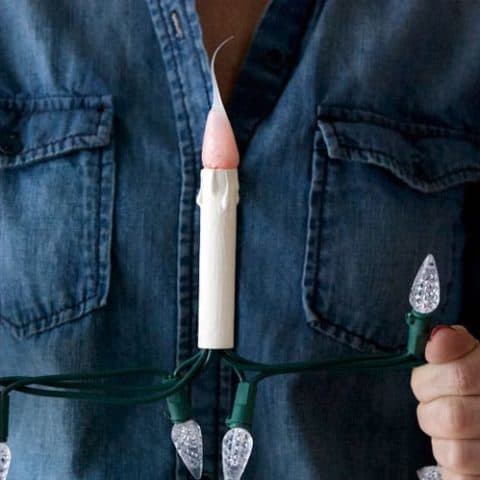
2. Squeeze hot glue onto one end of the pipes to mimic dripping candle wax. This is your sheath.

3. Paint the sheath with a mixture of white and cream paint which will resemble wax.
TIP: Spray with a low sheen clear coat to make it resemble wax even more.

4. Remove 48 bulbs from your string of lights. (number of bulbs you do is optional but I used 48 candles for my tree) Paint each bulb with light orange paint and let dry. Once dry, paint the tips with dark orange.
TIP: For some reason you cannot buy a string of orange C6 LED lights at this time. Green? Yes. Blue? Yes. But not orange. That's why you have to paint the clear bulbs. If in the future orange is available you can buy those and avoid having to paint the bulbs. Possibly keep your eyes open around Halloween.

5. Cut a pop can in half and fill it with clear silicone.

6. Wrap a piece of floral wire around the base of each painted bulb and dip them in the silicone.

7. Hang the bulbs to dry overnight.
TIP: Make sure your bulbs are hanging straight down so the tips will be straight and not bent when they're dry.

8. Glue an alligator clip vertically at the base of the sheaths. I used Loctite's Super Glue but a couple of years later some of the alligator clips started to fall off when the glue became brittle, so I'd now recommend the world's best glue E6000.
Tip: You can buy a 12 pack of alligator clips at Michaels. You can get twice as many (24) for the same price on Amazon.

9. Gather your string of C6 lights.

10. Grasp the lighting wire in your fingers until it's bent like this.
TIP: The measurement from the tip of the socket to the base where my fingers are pinching is how long your plastic pipe pieces should be cut. This may vary with different brands of LED lights.

11. Insert your sheath over top. It will fit tight enough that the sheath won't fall off. Make sure there aren't any loose bits or sharp edges inside the sheath from cutting it because that can cut the wire as you push it through and you do NOT want to do that.

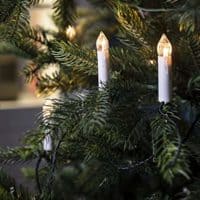
12. Insert your silicone bulb and there you have it. They're done.

12. To light your tree, clip your sheaths all around your tree where they look good. Space them out evenly but don't worry about getting them to stand straight at this point. Finally string your lights around your tree, inserting the cord and candle bulbs in the pre-placed sheaths as you go. Again. Don't worry about them being straight yet. They'll be all slanted and askew and you'll think this is a total fail. You will call your sister to tell her THIS is why you don't do anything off of stupid Pinterest. Relax. Have patience.

Once the tree is lit and all the bulbs and sheaths are placed, starting from the top down, straighten all the candles. They'll move and shift as you go, so just keep straightening them. Don't expect perfect if you're working with a real Christmas tree. Perfection is easier on a fake tree but it also isn't as authentic looking.
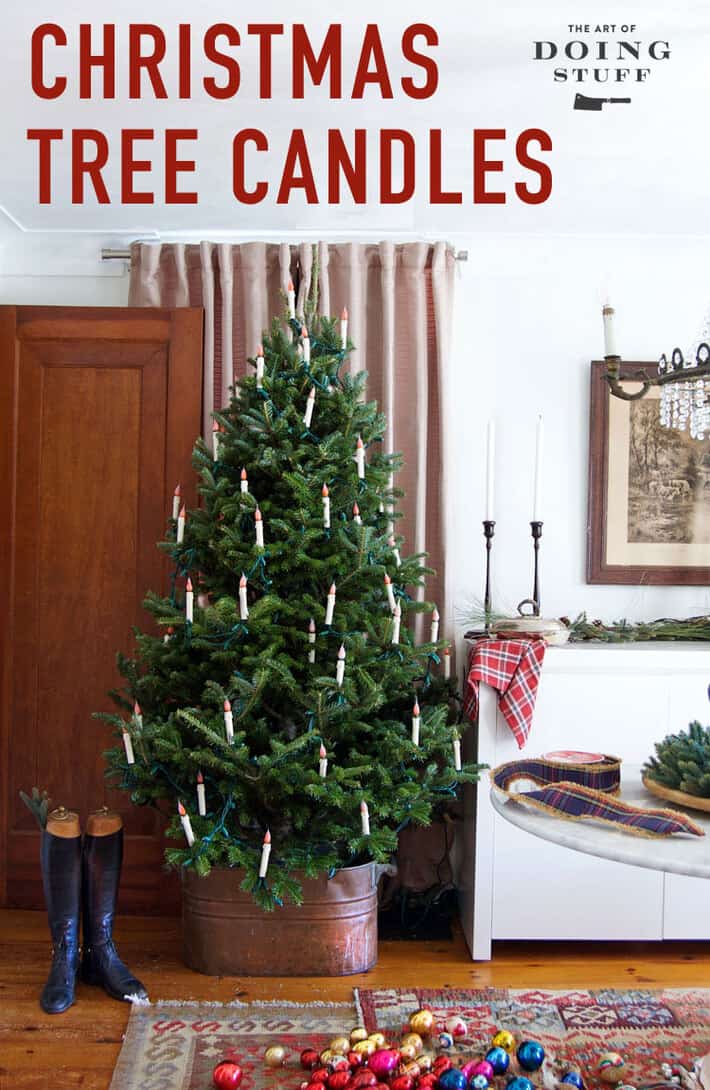
DIY Christmas Tree Candles.
Make a set of DIY Christmas tree candles from a regular string of lights, some plastic pile and a tube of silicone.
Materials
- ½" rigid plastic pipe, 5' length x 3
- Hot glue gun and glue
- String of C6 clear LED lights (I used a total of 400 lights on a 7' tree)
- White, cream, orange, dark orange latex paint (just the cheap craft paint from the dollar store)
- Paintbrush
- Clear silicone
- Metal can
- Floral wire
- 48 Alligator clips
Instructions
- Cut the plastic pipe to 3 ¼" lengths. (this length may differ a bit based on your particular string of lights as you’ll see a bit later on) You can use a circular saw or a hacksaw to cut your plastic pipe. (See step 10 to figure out how long your pieces of pipe should be.)
- Squeeze hot glue onto one end of the pipes to mimic dripping candle wax. This is your sheath.
- Paint the sheath with a mixture of white and cream paint which will resemble wax.
- Remove 48 bulbs from your string of lights. (number of bulbs you do is optional but I used 48 candles for my tree) Paint each bulb with light orange paint and let dry. Once dry, paint the tips with dark orange.
- Cut a pop can in half and fill it with clear silicone.
- Wrap a piece of floral wire around the base of each painted bulb and dip them in the silicone.
- Hang the bulbs to dry overnight.
- Glue an alligator clip vertically at the base of the sheaths. I used Loctite’s Super Glue.
- Gather your string of C6 lights.
- Grasp the lighting wire in your fingers until it’s bent like this. The measurement from the tip of the socket to the base where my fingers are pinching is how long your plastic pipe pieces should be cut. This may vary with different brands of LED lights.

- Insert your silicone bulb and there you have it. They’re done.
- Put your lights on the tree, clipping the candles where they fit and look good.
- Insert the bulbs.
- All the candles will be wonky, so straighten them from the top of the tree down.
Notes
After painting the candle sheaths you can spray them with a low sheen clear coat to make it resemble wax even more.
For some reason you cannot buy a string of orange C6 LED lights at this time. Green? Yes. Blue? Yes. But not orange. That’s why you have to get clear bulbs and paint them. If in the future orange is available you can buy those and avoid having to paint the bulbs. Possibly keep your eyes open around Halloween.
Make sure your bulbs are hanging straight down so the tips will be straight and not bent when they’re dry
I got my alligator clips on Amazon.
Recommended Products
I'm an Amazon affiliate some I get a few cents when you buy something I've linked to.

More or a shopper than a DIYer? You can get these similar ones on Amazon.
→Follow me on Instagram where I often make a fool of myself←


You leave me speechless, Karen .... this is pure genius!! How the heck do you ever come up with these ideas but then, more importantly, bring them to fruition? (My big word for Wednesday. 😉)
You must have been a top student in school because you are so darn, over-the-top smart with a capital S! Well done!
Positively gorgeous - perfect - old timey and homey. LOVE it. You dun good, gal.
Uh.... was I supposed to be doing something on the Christmas pledge list? Ooops.
Wonderful! Gotta do this! Thanks, Karen. Happy Christmas!
You're an effin' genius! Now I'm sorry my tree is already up and decorated. You officially have the prettiest tree in all the land.
You're just full of great ideas & this is one of your best yet. I love it. I won't do it but I really love the look of it. Thanks for all your hard work & sharing.
You are totally BRILLIANT!!!!!!!
Awesome idea and great DIY this is in my top 3 Christmas projects !!!!!!! Thanks Karen and Merry Christmas to you🌲⛄
Wonderful idea. We used to have those old bubbling candle sticks of clear with a red bottom....they were my favorite.
Good post. Thanks!
Reading, I was not sure this was going to work out until I came to the bulb-dipping step. Before that the bulb-candle effect looked, sorry, a bit tacky. Not anymore. Nice trick! Well done, Christmas angel.
I went to the link, http://amzn.to/2jyUjbY and ordered the frasier pine oil and diffuser reeds. I have a ton of glass containers. Thanks so much for the information.
I am so freaking excited about this diy! I had all but given up having candles on my christmas tree. I can't tell you how many Scandinavian blogs I've seen that show real trees with real candles and how it's "totally doable", but somehow I couldn't pull the trigger on that project. Now I will not be outdone by my Swedish brethren!
I got these the other day. They even have a remote. I'm not as crafty as you and my ADD only allows projects that take an hour or less.....
http://amzn.to/2j1QVan
Those are great! Still not cheap when you need 50 or so of them, but for 10 they're fantastic. ~ karen!
WOW! Your best Christmas DIY ever!
Aw, you're just saying that 'cause you know it's what I want to hear. But thanks! ~ karen
amazing !! glory be to God in the Highest.. (Angels singing). I grew up in a dirt pour home. We had an aluminum tree my mom made out of cardboard and aluminum foil, we had a light with a red, blue, green and yellow wheel that spun around when turned on, that gave us a light show never experienced by the rich folk. When we could afford a Christmas tree, she bought those bubble candle lights and put them on it. It was amazing to us how that worked. The other day while I was shopping I spotted those bubble candles and bought a set for myself. Course there were only 7 to a set but my mom bought them at 25 per set and they didn't cost an arm and a leg to get way back in the day. I love candles in the tree, they make me all warm and fuzzy inside. Love your tree and when you are done decorating it, please post more photos..
I will Linda, every Christmas I do a photo tour of my house. That'll be coming up. :) ~ karen!
This is pretty awesome! They look very pretty.
LOVE! But what I really want to know is how you anchored your tree in the copper tub so it won't tip over.
My fingers are crossed Patty. It's in a tree stand that's like a bucket but a bit wobbly. If I'd had more time I would have filled the copper tub with sand to stabilize everything. As it is, the tree is just in there in a stand with no legs. But I have used fishing line to attach the tree to the wall behind it just in case. ~ karen!
Yeah, me too, that's what I want to know! I love it and I have one of those copper bins and never knew what to do with it. ...and the candles look great too.
Great DIY! I think this would also work on your mantle/ table center piece, I don't put up a tree, because I have cats that would not leave it alone, and I'm usually gone to my daughters for Christmas, but it would be a cool alternative to real ones that might get knocked over! Genius! You rock girl!
Karen, I've followed you for years (and never before commented) but I think this is quite possibily your most ingenious idea yet! Love the silicone to create the flame tip, just amazing.
Thanks Annette! Now I know it's a good idea, if it's brought out lurkers. :) ~ karen!
Did someone have 10-12 great ideas that pushed their way from the deep recesses and bubbled up? Is this how the Jacuzzi was invented?
LOLOL! ~ karen