Today is the most exciting day of your life. You're going to learn How to Build a Pizza Oven!

When last we met, in part 1 of this series, I had built the base and the sand form for my cob oven and lost my funny bone. It's currently buried beneath a layer of pizza fat.
Now it's time to make the actual cob for the pizza oven. The cob is the material of the first layer of the oven. The cob is the layer that will heat up (the thermal mass). The insulating layer, which comes after the cob is what holds the heat in.
As I keep saying, these tutorials are meant to be a reference to how I built my oven. If you want to build your own I highly, high, HIGHLY recommend you buy the book Build Your Own Earth Oven and watch architect Sigi Koko's 4 part video series on How to Build a Cob Oven.
The book will give you accurate measurements for your oven so it will vent properly, and accurate amounts of how much building materials you need for various sized ovens as well as a ridiculous amount of pointers. Sigi's videos will have the book all make sense and give you a great visual reference.
My posts, will give you a good idea of the work involved and the confidence that you can indeed do it yourself.
Also there's a lot of stomping involved so it'll give you great legs. Don't get excited. Those will disappear when the stomping stops and the pizza eating begins.
The materials to make cob.
Clay
Sand
Straw (straw is only used in the insulating layer of cob)
One of the reasons I decided to go with a cob oven for my pizza oven was because the materials are either free or cheap. My town happens to be filled with clay, so I knew all I had to do was dig up my mother's yard to find enough clay to make an oven. Sand, well that's cheap enough and straw goes for around $4 a bale at my local feed store.
If you watch the videos and read the book I recommend they describe perfectly how to see if the clay you've dug up is pure clay, or clay with a certain amount of sand content. Mine, as it turns out, was fairly pure.
The reason you need to know this is because the amount of sand you add to your clay will depend on how much sand the clay already has in it. You're creating ancient cement basically.
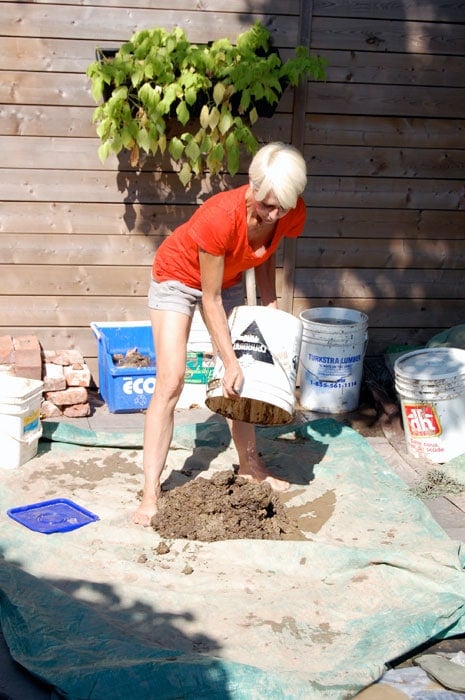
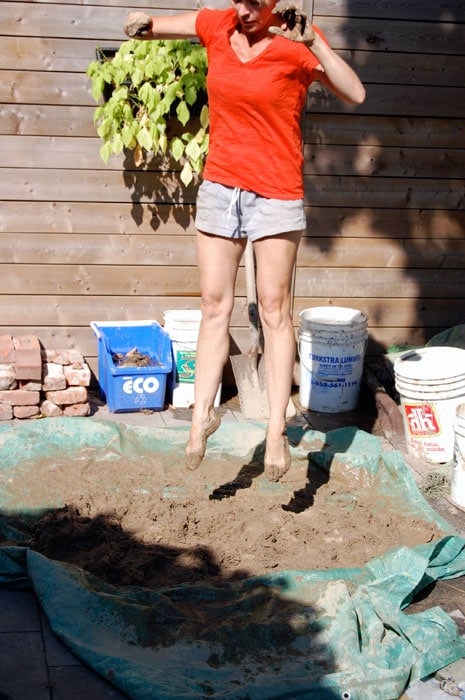
The clay and sand (in the required proportions), I believe mine was one part clay to 3 parts sand, are mixed together. Not an easy feat. Or feet. You stomp and jump and turn and toss and jump some more to fully integrate the sand into the clay.
Your mixture needs to be sticky; so enough clay that it will all stick together, but enough sand that once it dries it won't crack apart.
Mixing and testing cob
Is making a cob oven a pain? Yeah. A little bit. Is it fun? You bet. Worth it? DEFINITELY. Here's a quick look at how to mix your cob and test it for the proper consistency
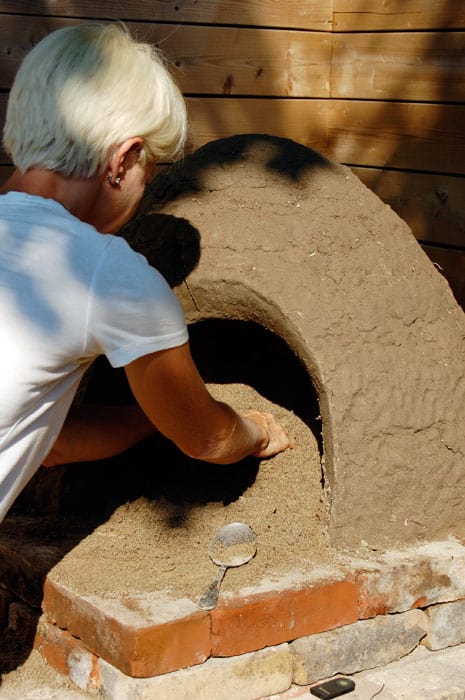
You can see in this next picture that I've placed a layer of newspaper over the sand dome. This is so when I go to dig the sand out to crate the interior of the oven, I'll know when to stop digging. Once I hit newspaper I know I've made it to the cob layer.
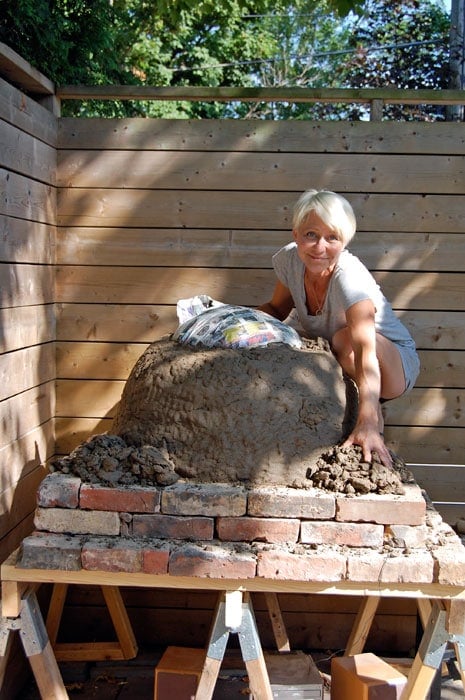
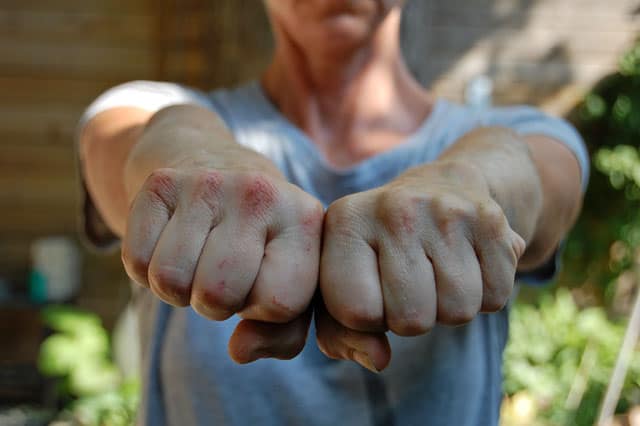
Creating the outside of the oven (the cob layer) involves grabbing a handful of the mixture, plopping it down and smashing it with your fist to make it nice and tight. This layer needs to be around 4" thick. Just keep plopping and smashing. Plop and smash, plop and smash.
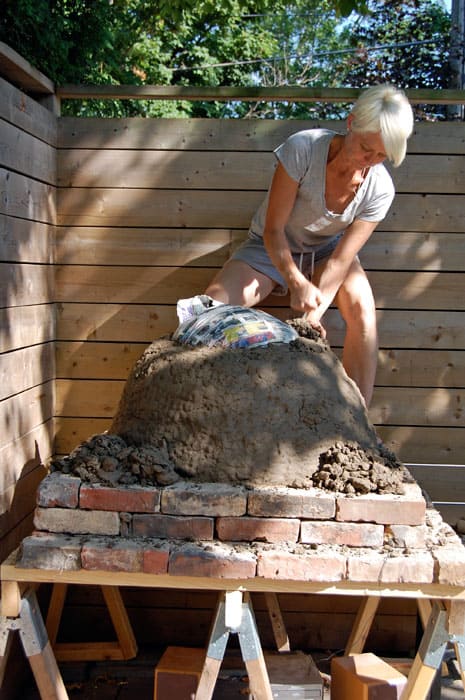
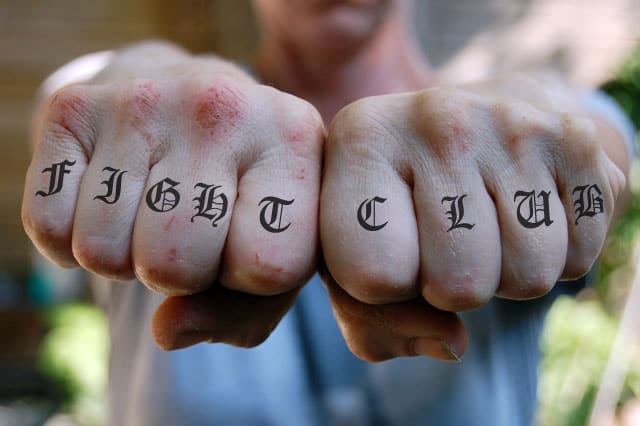
You'll know you're doing a good job when you look like you joined Fight Club.
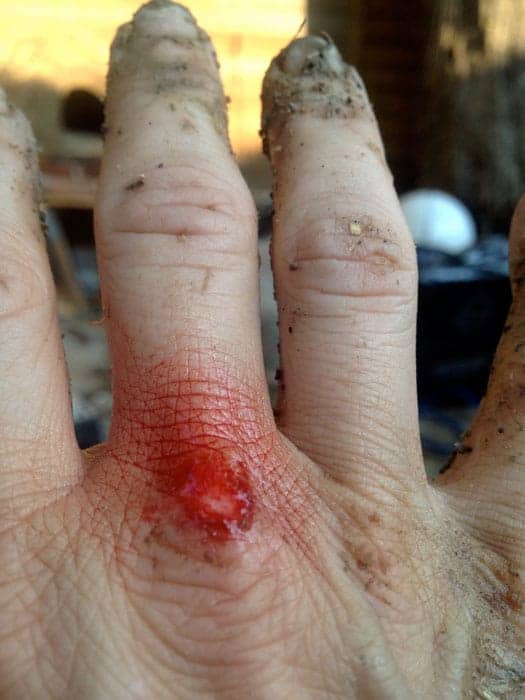
Don't worry about it. Suck it up. Show those knuckles off. You're knocking out a pizza oven, Sugar Ray.
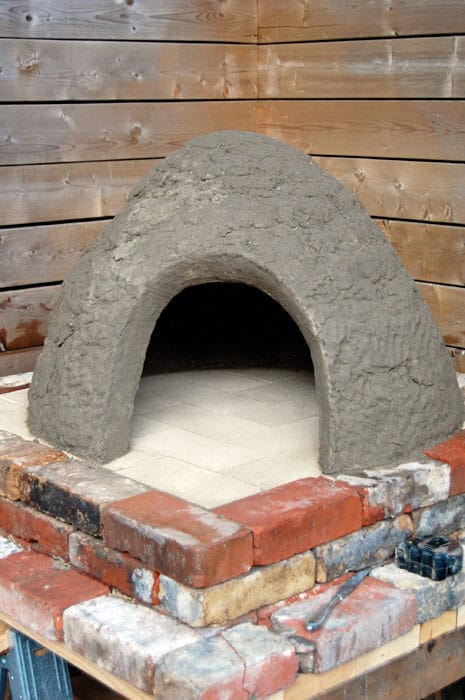
Once the cob layer is done, you need to let it dry for a couple of days. Just enough so it won't collapse when you start your next step.
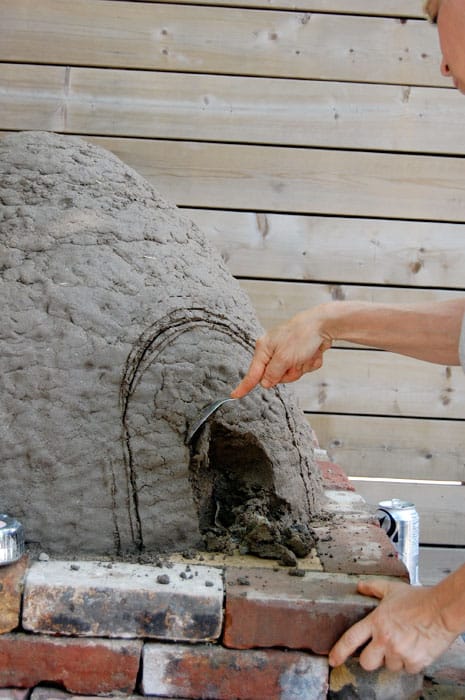
Which is cutting out the door of your pizza oven.
The door needs to be specific measurements (again explained in the book) in relation to the size of the oven in order for the pizza oven to vent properly. If your proportions are right the smoke from the fire inside the oven will roll up to the top of the pizza oven, then roll right out the top of the door.
The smaller your oven, the smaller your door needs to be, the smaller the pizza you'll be able to fit into it. Bigger oven means bigger door which means bigger pizzas.
My oven's door will barely fit a 12" pizza peel. I can fit 2 pizzas in it at a time.
Once your door is dug out you'll discover your original sand form ...
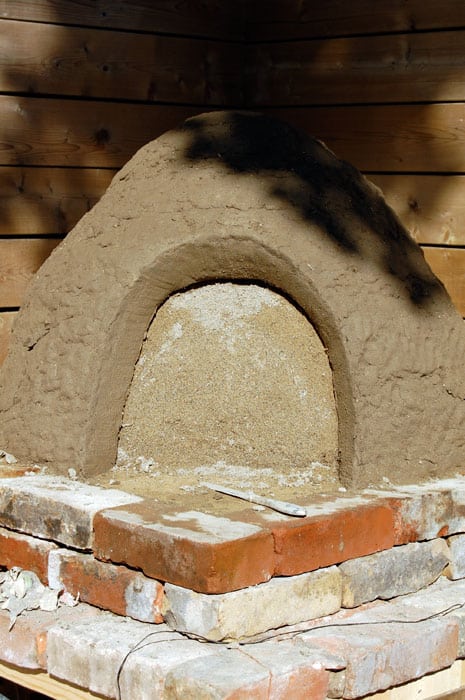
Which you can now dig out. Once you dig that out, you'll have something that actually looks like a genuine wood burning oven and you'll be very, VERY excited. So excited in fact that you'll spend a lot of time running, squealing and shaking.
It's a pizza oven. It's a bread oven. It's the focal point of your backyard, neighbourhood, TOWN, p r o v i n c e, COUNTRY, P L A N E T!
And you built it. With your own bare hands.
Let's move onto the final step of How to Build a Cob Oven, Step 3!


Wonderful! And a great way to house your funny bone till you need it again! It is a smashing good focal point in your patio fairyland!
Oh, Honey! Those thigh muscles!
Oh those are gone now. They've been replaced by what appears to be partly melted mozzarella cheese. ~ karen!
OK - I'm hooked! Question for you - do you think it's easier to find a source for local clay to dig or order pottery clay online and mix yourself? I'm all about quick, easy and cheap projects, but - if I dig holes in somebody's yard I guess I have to then refill those holes with something other than trash with fake dollar store grass on top!
It depends on where you live. If clay is abundant, just go dig it up. I got mine when someone was redoing their backyard and had dug up a bunch of clay. Then when I needed more I just dug under a tree in my mother's backyard where you'd never notice it was gone. When you dig up your own clay though you have to do a test to see how much clay is in it compared to sand. That lets you know how much sand you have to add to your mixture. If you buy clay you'd be buying powdered clay that needs to be hydrated. ~ karen!
how do you test the clay from a yard? We live in San Diego where most yards are made of clay, and rocks. I wouldn't know how to test it though to be sure of it's clay ratio.
Hi Shauna! I wish I could remember, lol. Basically you put a sample of the "dirt" into a mason jar and shake it and shake it if I remember correctly. It will then separate itself over the course of 24 hours and you can actually see the clay layer and the sand layer and therefore know how much of each there is. I have a feeling one of the videos that I suggest you watch talks about it. ~ karen!
I'm curious about the ratio of effort to pizza. How many pizzas must one make and eat to counter the time and effort necessary in making the cob pizza oven? Do you have to stop making and eating pizza once balance is achieved or is there another project that counters pizza consumption? Finally, is fired pizza that much better than the frozen stuff?
Miriam - In answer to your questions a) You must begin a new project immediately in order to maintain balance. And b) How could you ask such a thing! ~ karen!
This is fantastic Karen!
This is so cool and I'm so impressed with your work. Reading your daily how to's has me hooked like waiting for the next book in a series.
I'm curious. How do you get the firebricks so clean? Do you brush the sand out, vacuum it or just cooks lots of dough that makes the sand stick to it?
And if I read the very first comment I'd know the answer...
Thanks Ocean State Home! AActually, the paper doesn't cover the fire bricks! You just have to wash and scrub down the bricks after you pull the sand out. ~ karen!
I can only imagine how cathartic this must have been and the thoughts going through your mind as you were punching...
This is the most impressive lemonade from unsolicited lemons ever!
Wow. You tackle jobs that most would never consider. And you got a sand pedicure too. How did it compare to the fish pedicure?
LOL! ~ karen
She certainly does look good, doesn't she? Damn, if this video gets out to large groups of men, imagine the crowds at her house! Pizza and a smart, good-lookon' woman, yee haw!
I confess that mixing and kneading the cob with your feet seems to me like the most fun anyone could have standing up. It is, though, criminal how good you look doing it.
Great tutorial.
Hi, Karen! Here's a video of me making a pizza in less than two minutes in my pizza oven:
LOVE your oven! I think you should get a digital laser thermometer to test the temperature of your oven--not because you need to, but because it's super cool and geeky. They're a little bit "spendy" (as Kiko Denzer would say), but it's so cool to be able to know how hot the interior of the dome is. Great job on this and on everything else in your life!
P.S. Did you notice Tippie the hen waltzing by just as I'm about to put the pizza in the oven? She's such a diva.
Watched it! Very nice. Tippie is very pretty! And you keep WAY more flame in yours than I do, even for pizza. I'll try that for my next firing. I always leave coals but not nearly that many. Pizza looked great! Love broccoli on a pizza. Do you use pizza flour for your dough? I was given some by the very nice people at Cumbrae's market where I live because they're Italian and they heard I was making wood fired pizzas without using pizza flour, lol. I'll try the dough out of it when I do my next firing too. Which after watching your video might just be tomorrow. :) ~ karen!
I don't use Italian pizza flour. It doesn't have enough gluten for my style of pizza. As you can see in the video, I stretch my (very soft) dough over my knuckles, and it would fall apart if I used doppio zero. If you spread your dough on the counter top, it would work. I like to take my cat's temperature, too.
I work it over my hands and spin it. I don't roll my pizza dough. Oh well. I"m gonna give it a shot anyhow to see how it works. Apparently you get great bubbling on the crust from it. ~ karen!
I"ll watch the video now Kristin! Thx! ~ karen (oh ... and I thought you knew me better than that. Do you really think I've had a wood fired oven without owning a thermal thermometer! As if, lol! I routinely take the temperature of my cats noses.)
You inspired me to make pizza from scratch tonight.... We are hooked.........
Excellent! Did you do it on your BBQ? Did you use the dough and sauce recipe from my site? Don't worry I won't be offended if you didn't, lol. ~ karen!
No - was store bought pizza and a copy-cat recipe for Boston pizza's perogy pizza - hubs favorite - he said it tasted better than from Boston Pizza ☺
My love affair with pizza has began...... just printed your recipes and will be making the dough tonight and pizza tomorrow night........ thank you
One word .... gloves!
oh-dear-god-and-all-the-little-kitties-you-are-crazy.
My gas station sells pizza, for 2$ a slice on Tuesdays.
Now my mother will make me make this for her. Thanks for nuthin.
Awesome! I've always wanted a backyard oven. I imagine the s'mores are every bit as delicious as the pizza.
Karen - YOU ROCK!
What will be next? I can see you becoming a Bee Keeper!
Pizza oven book on wish list. Just have to finish building my pallet coop and pallet green house. Cob oven may be a next year project BUT that gives me time to toughen up my knuckles.
Niki I find a good cheese grater is the fastest way to go in terms of knuckle training. ~ karen
And thank goodness I already own one. I'd hate to figure out how to build a cheese grater out of pallets!.... no, that's not a challenge. ;)
You are seriously killin me over here.....
Sorry 'bout that. At least is it softly? Am I killing you softly? ~ karen
Lol..... no apologies necessary!!! I am simply in awe of the way you just tackle stuff.
Next to the coop cam this is my fave blog, tutorial or whatever you are supposed to call it! Until you make another one! Is that the same knife you used in that glue add for the Brits? I liked that one also.
Question: How do you manage to get every last bit of sand out so that your oven won't be forever be dropping sand onto your pizzas?
Hi Shauna - There's the layer of paper in between the sand and the cob. So you dig out the sand, peel off the paper, and you're left with the cob. Whatever paper you can't peel off just gets burned away during the first burn. ~ karen!
Another Shauna! spelled the same way even.
My husband and I are so going to do this when we get to re-landscaping our backyard.