You probably don't think you need a personal fire pit. And you're right. Although come to think of it, fire is an essential element. I'm rethinking this - it's possible you really DO need a personal fire pit. You just don't need a massive expensive one. A little tabletop cheap fire pit? You could probably use one of those.
My name is Karen and I haven't lit anything on fire in 5 months. I'm sure I deserve some sort of a chip or something for that.
You see ... I'm a bit of a pyromaniac. Technically I'm not a *real* pyromaniac I guess. I mean, I only light things on fire that should be lit on fire. Like kindling and hardwood and pretty much anything with Hello Kitty on it. And of course all of Rush's 1980's albums where they dabbled in "New Wave".
I light fires in the fireplace every night here in the old Casa de Karen from October until April. 6 or 7 face cords go flying up that chimney every year. But as deep and strong as my love of the log runs, I couldn't bring myself to buy an outdoor firepit when they first came out.
They were hilariously expensive at the time and really in my climate not all that useful. In the last decade or so the weather in Canada has changed.
We used to get Spring. Spring is now a fleeting moment that takes place between the hours of 4 and 5 p.m. in late May. When we wake up the next morning our guts have liquified and the garbage cans have maggots crawling out of them.
Once the season for fire rolls around it happens almost as instantly. And by then I want to be inside laying on the sofa with a hot chocolate and a plate full of cinnamon toast on my chest. Not outside being bitten by the limp stingers of aged mosquitos.
But still. There are 3 or 4 weeks when it makes sense to have a little personal fire pit outside.
So what was a pyromaniac girl like me to do when it's cool out, but not cool enough to trap myself in the house all night with my cat, tv remote and fire tongs?
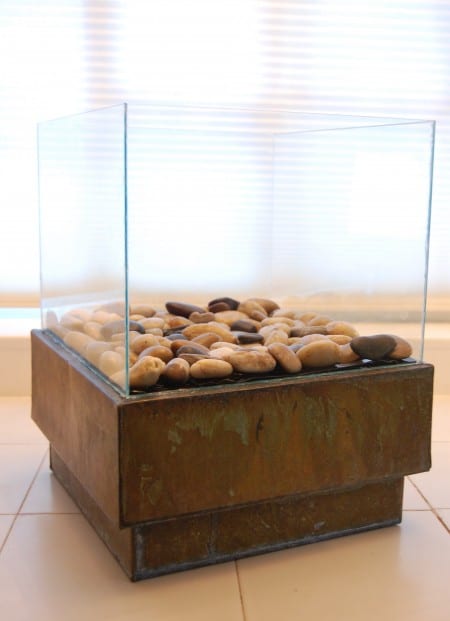
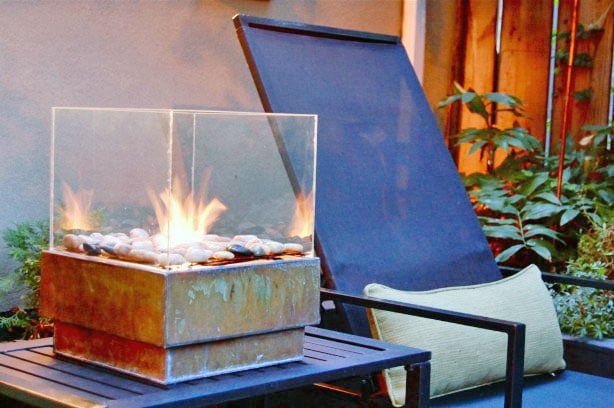
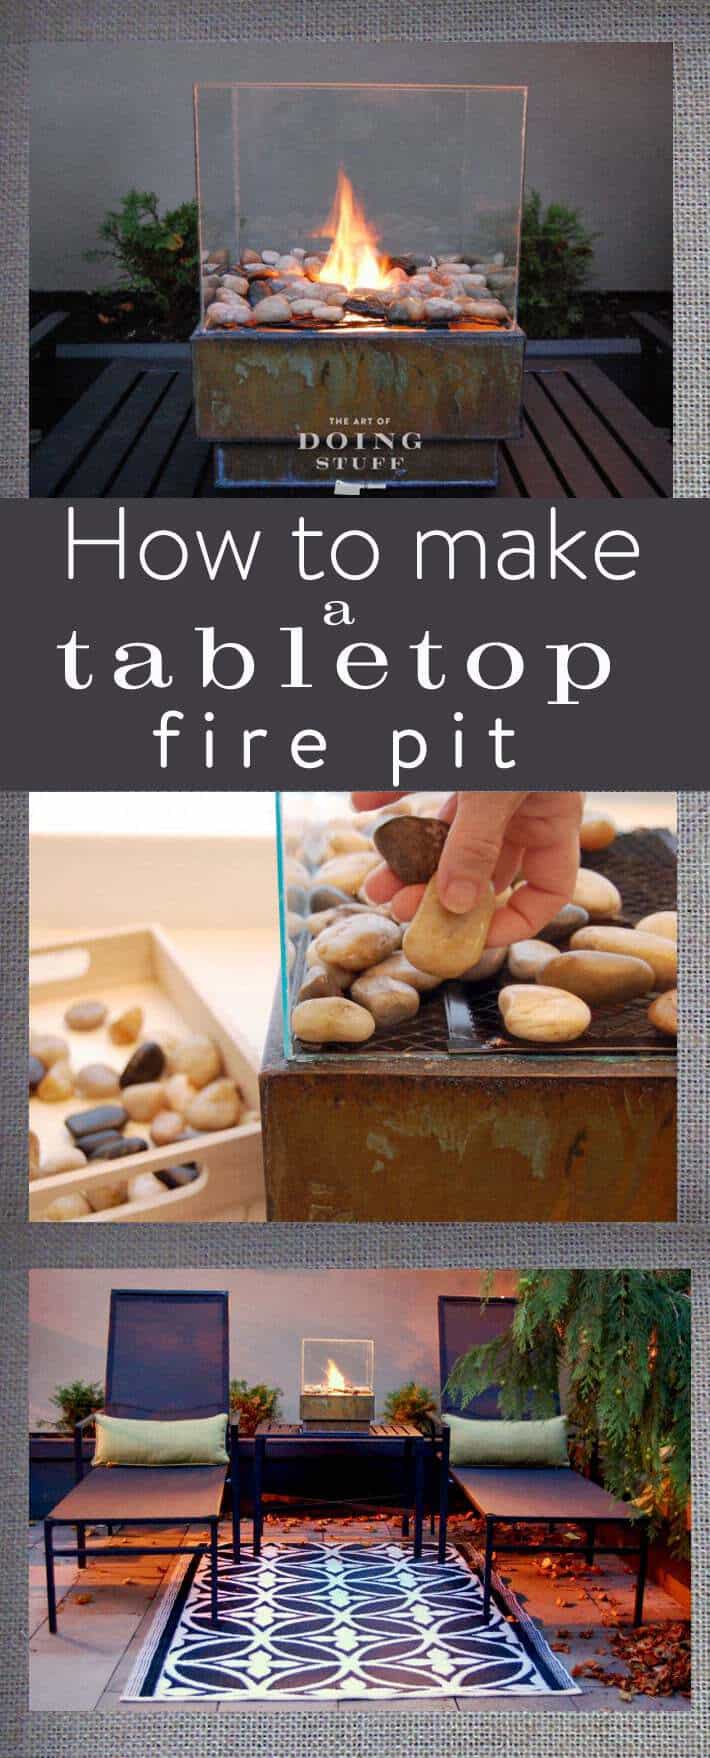
The Answer ... The Personal Fire Pit. (as designed by my sister ... I saw hers and then immediately came home and made my own exactly like the one she made.) It's easy and inexpensive to make. I used to say it's a lot nicer than any fire pit you've seen for sale in stores, but now that 10 years has passed since I originally made this fire pit a lot of stores are carrying ones that look - how do I say this - completely identical.
Here we gooooooo ...
How to Make a Personal Fire Pit
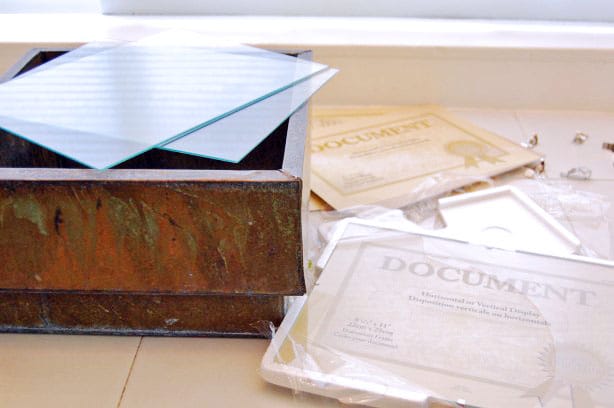
Materials you Need
- Marine Silicone
- Small rocks
- 4 pieces of glass (I bought 4 cheap picture frames from Dollarama and used the glass from those)
- Metal Mesh
- Gel Fuel (recommended) or 70%+ isopropyl alcohol
- Square planter (with a bit of a lip on it)
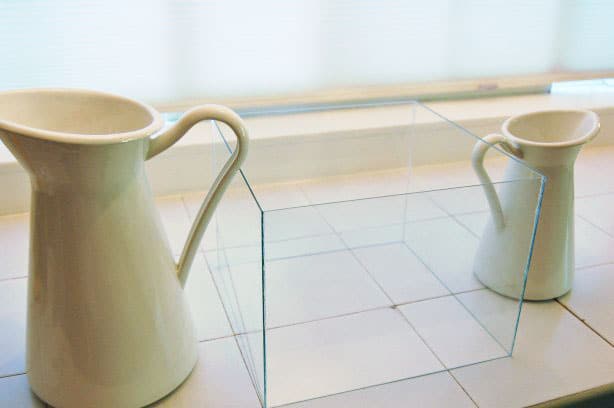
Step #1 - Making a Glass Box
You need to make a glass box. To do that just run a bead of silicone around the edges of your glass, and place them together.
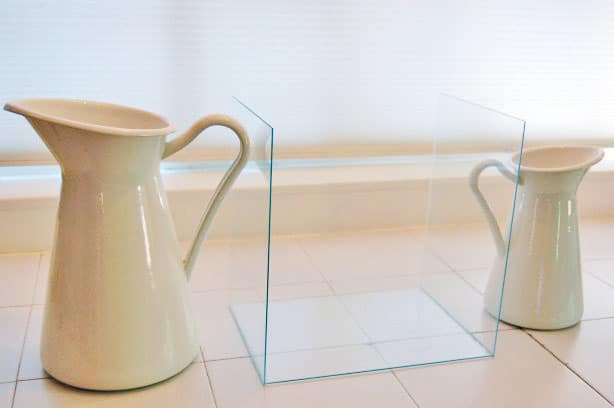
Do two sides first and hold them in place somehow until they dry.
Position them so your final side will be easy to silicone.
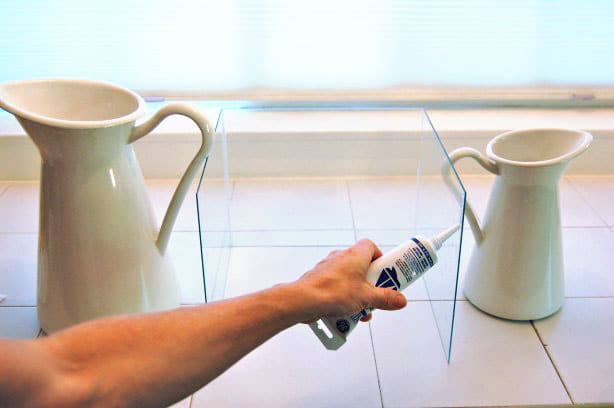
Run another bead of silicone and place your last piece of glass.
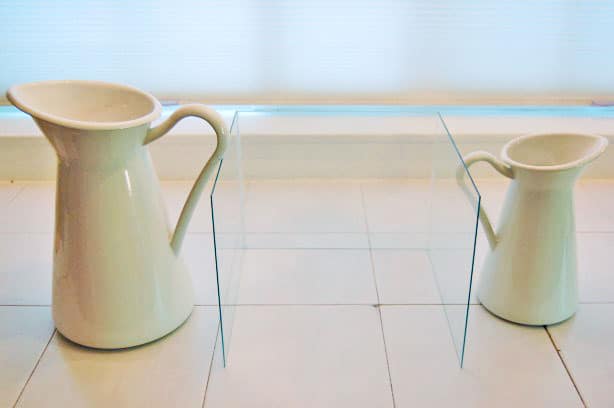
When you're placing your glass, try to be a bit careful about it. You don't want to smear the silicone around on the glass because it's a HUGE pain to get off. Just take your time.
Run a final bead of silicone all around the bottom edge of your newly created (because you're kind of great) glass box.

Flip the box over then place the siliconed edge on top of the metal planter, making sure there's enough edge in the middle left over for some metal mesh to rest on it.
Update: Everyone seems to be in fits over the fact that the glass will EXPLODE from the heat. It doesn't. I'm not going to say it never will but 1) only tempered glass EXPLODES. This isn't tempered glass. 2) Glass breaks through stress either from dropping it or by extreme, fast temperature changes. Neither of which you should have with this project. 3) Thin glass is less likely to break from stress than thick glass. ** I know that seems counterintuitive.
Step 2: Making the pit.
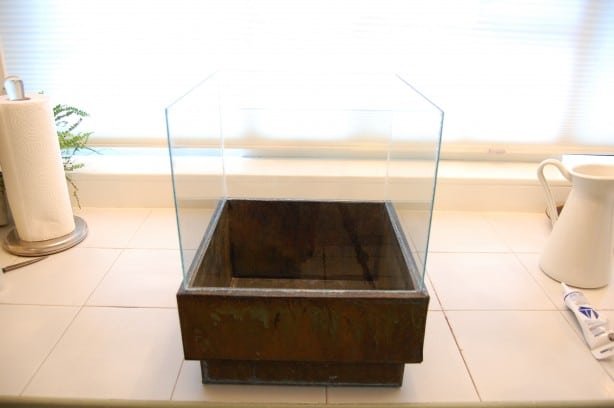
Your box is made so now you move onto cutting your mesh that will fit inside. The only purpose of the mesh is to support some rocks, which in turn hide the fuel can beneath.
Once your piece of mesh is cut your structure is complete and you just have to "build" the fire.
Put an opened can of gel fuel into the centre of your fire pit. If you're using Isopropyl Alcohol pour some into a leakproof metal container like an old, clean paint can.
Rest the mesh on the inside edge of the planter.
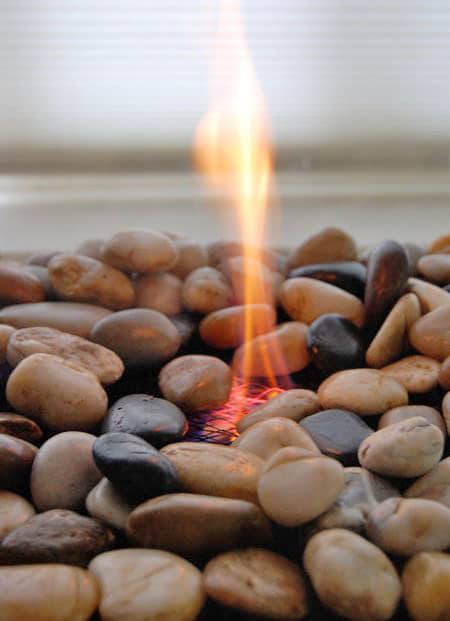
Finally, start putting down your rocks to cover the hideous mesh. If you're using rocks that you aren't sure about don't put them directly over the flame. Rocks with moisture in them can explode as can shaley rocks.

Cover mesh loosely with rocks (you need some space in between the rocks to allow for oxygen so the fire will stay lit).

Update: since writing this post originally, fire pit rocks have become available. They're 100% safe so you don't need to worry about keeping the rocks away from the flame.
You're almost done
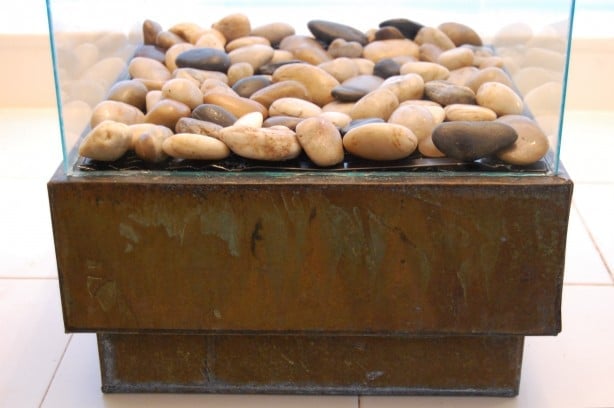

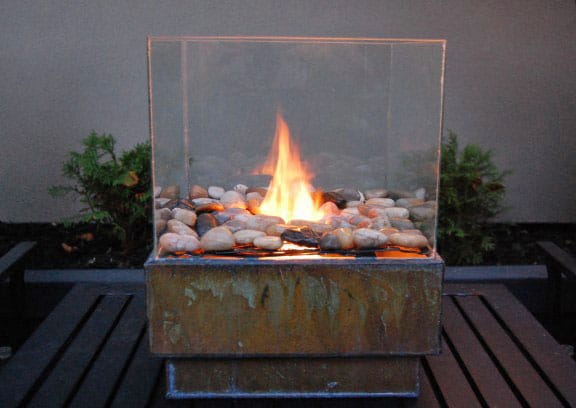
Firsty ... admire what you've done for about $25.
Step 3 - Light your fire
Clear the rocks away from above the gel fuel can and carefully light the gel fuel. I use an advanced technique. I light the end of a piece of spaghetti. Whole wheat of course.
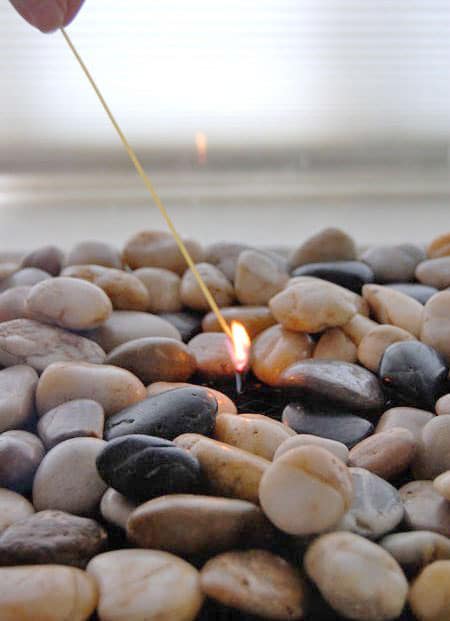
I would rule on Survivor, provided I'm allowed to bring a piece of spaghetti. Push the rocks away from the flame a bit (even a bit further than I show here) because some rocks can shatter when they get too hot. Or buy the fire pit rocks that are now available.

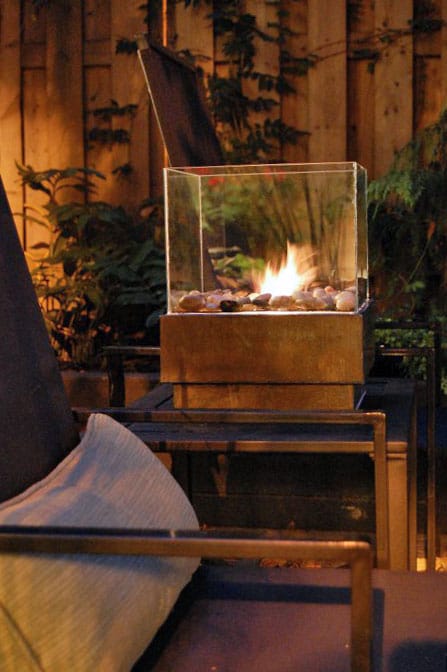
There you have your fire pit! $25. Plus as an added bonus, depending on what type of fuel you use, you can also use this fire pit *indoors*!!!
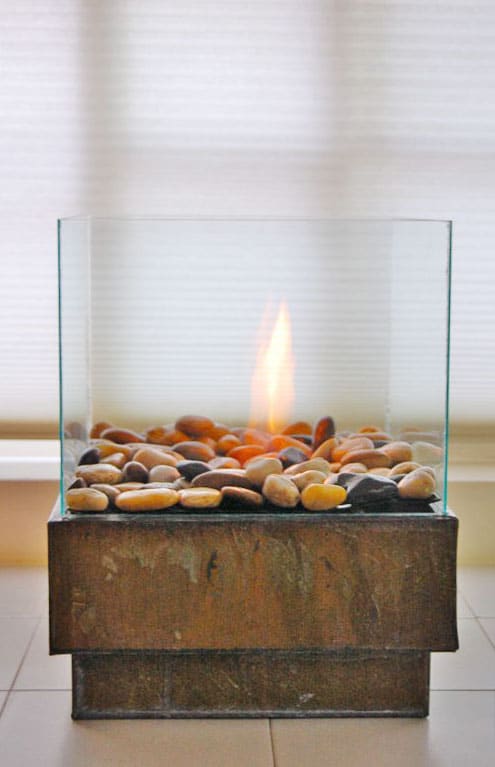
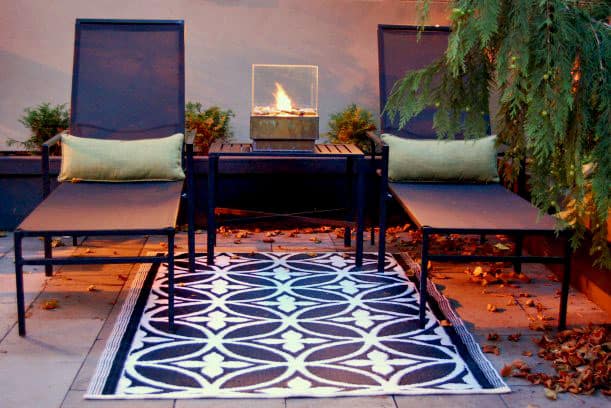
What makes this fire pit so amazing is the glass. The flames reflect against it creating dancing flames all over the place! Before I get to the final pictures with the fire pit in it's rightful home in my back yard I wanted to let you in on a few tips.
1. Make sure you buy gel fuel that's meant for gel fireplaces. Gel cooking fuel will not work because it usually only creates heat, not an actual visible flame.
2. Like I said, if you use a proper gel fuel (Real Flame for example) you can actually use this fire pit indoors. Be careful to place it on heat resistant fabric so it doesn't scorch your furniture. The metal conducts the flame heat a lot!
3. Make sure your rocks are heavy for their size. Rocks that are light are full of air and may explode!
4. You can use any metal planter for this. This was on sale, so this is the one I got for this little fire pit experiment. Black metal square planters that are probably on sale at garden centres right now would look fantastic with white rocks.
5. The gel cans last for about 3 hours, if you'd like to stop the flame earlier, just place something non flammable over the glass box to snuff out the flame. Cans can be relit at a later date or time.
.
WARNING
Use common sense. Don't wander off, leaving this burning and never EVER try to refill it when it's still burning. Snuff out the fire and make sure that it isn't hot or burning before refuelling. Otherwise you can create a firebomb. You can see that here.
That's it! That's all it takes to make your own personal fire pit. $25, about an hour, and a piece of spaghetti.
Update: A lot of people are having trouble finding a metal planter similar to mine. Remember you can also use terra cotta or ceramic.


for safety, sand the edges of the glass so you don't cut your hands handling it or someone doesn't cut themselves admiring it....doesn't take much, but sure saves on bandaids
This blew me away! I love small indoor electric fireplaces, since I can't have a real one. but now I want to put one of these on my coffee table to enjoy the flame while I knit and drink wine!
Thanks so much for posting this!
No problem Ann. ~ karen!
Karen....you freaking ROCK!
Schneider - I really do. ~ karen! (and welcome to my site!!)
My son used to be a fo-real pyro... Since he's done sooo well coming out of that, I'm going to make him one and send it to him for Christmas! :D Thanks, Karen.
Beautiful, I think I'll make one myself.
Greetz from Belgium.
Why hello Tom from Belgium. ~ karen!
This such a great project!
Looks every bit high-end deco.
ONE small WARNING though: Galvanizing uses zinc that, when heated ==WILL Create some toxic fumes coming off the galvanization--various sources conflict on how hot, how long, or how toxic, but general consensus is, one might feel very flu-like for some days after exposure.
IF using galvanized metal, ONLY use it OUTside, for good ventilation.
OR, find plain steel, plain aluminum, plain stainless steel, or plain copper metal containers, or use ceramic or brick, for indoor use.
THanks Chimonger. The container doesn't actually get hot. It doesn't even get warm in fact so there shouldn't be any issues. ~ karen!
I would be afar aid if the glass breaking from the heat and or flame
Hi Connie - Glass only breaks from extreme temperature change. Like, if it was freezing cold, and then you put a torch on it. So you don't need to worry about the glass breaking. Also, the thinner the glass, the better. Thinner glass is less likely to break due to temperature change than thick glass. ~ karen!
Very impractical when it comes time to refuel (like every 3 hours). You would have to remove all of the rocks and then the mesh and then replace the gel can and then replace the mesh and then reset the rocks. Why not use something like a propane powered flame (I'm thinking bunsen burner or something like a gas grill heating element) and route the gasline hose through a hole in the backside of the planter to the gas bottle. You could then ADJUST the heat and flame to your liking for the moment, and it would last longer, be cheaper to fuel (than a gel can) and would survive a rain storm (unlike an open gel can which will fill with rain). Karen - you can do better than this.
Just like a man to make things ridiculously difficult. A bunsen burner also doesn't burn like an actual fire. It burns like a lighter. Rick - I don't know you from a hole in the ground but apparently you cannot do better than this. I tend not to sit outside in rainstorms with my fire pit going by the way. ~ karen!
What a lovely idea!!! Thanks for sharing! I was wondering if we could use lava rocks instead of the rocks posted? Thanks again for sharing you genius idea!!!
Hi Shellina - Yes, lava rock would be a great option. ~ karen!
Where can u buy the gel fuel at ive been to lowes target walmart. Noone has it can u lead me in the right direction thanks
I've bought mine at Rona, Home Depot and at a local gardening centre that also sells fire pits. ~ karen!
Loving it gonna start to collect bits to put together for next winter, thanks Karen your doing fantastic job. Inspirational in a word..
Im a professional glazier of 12+ years...1 silicon will NOT hold this together and 2 you cannot cut tempered glass 3 tempered glass doesn't stand up to heat any better than regular annealed glass. While an amuzing idea get your facts before you get someone hurt
Hi Phil. You may be a professional glazier, but I'm kind of a professional DIYer. The silicone has so far held up for 3 years. So I'd call that a success. I did nor recommend the use of tempered glass. I recommended regular glass. I also never said it would hold up any better under heat. I recommend using cheap, thin glass as it is LESS likely to break under extreme temperature changes. So, my facts are straight. ~ karen
Can these items be found at Lowes, or Home Depot also? and maybe Walmart?
Lowes and Home Depot carry the gel fuel and hardware cloth. Walmart would possibly carry the rocks and glass. The planter you'll have to scrounge around and search for. :) ~ karen!
Karen, love your design but one question....is it hard to swap out he gel fuel when it runs out? Seems like you have to take the whoe thing apart. Any tips on how to make that process easy?
Hi. This is a great idea, and I am excited to get started. I was just wondering: where did you get the Marine Silicone for that price, and how much did you use?
-Thanks for the tutorial =D
Hi Dawna - I just got the marine silicone at my local hardware store. I can't quite remember, but I probably used half the container. ~ karen!
Great idea and nice tuto.
For the most skilled, I'd use a metal cutting tool to open a door, the size of the gel fuel can, at the back of the metal planter.
I't be more convenient for replacing cans without moving all the stuff inside the pit.
Also lighting and snuffing out the flames would be even easier.
Have you tried drilling a few holes at the back of the metal planter to allow oxygen to flow in directly at the level of the gel fuel can ? Haven't tested but may result in better combustion.
Hi Pierre - THe only problem with that is, then your planter can't be viewed from all angles. Because there would be a big hole in the back. There's no need to drill holes for better combustion either, LOL. I think you may be making things a teensy bit more complicated than they actually are. The gel can gets plenty of oxygen and has nice big flames. Not to worry. :) ~ karen!
Brilliant idea. Would love to adapt for the inside of my home is this possible?
Thanks Michelle. You can absolutely bring this inside without adapting it at all. The only thing is the gel fuels stink a little which can be unpleasant. Some people don't mind it, but there's definitely a slight smell to them. And don't forget that you don't have to kill yourself trying to find a metal planter. You can use any square, low planter. Terra Cotta, clay, (are they the same thing, LOL?) ... anything that won't burst into flames if it gets warm. ~ karen!
Great idea, I was wondering if you have tried doing several of this in line with the same concept. A longer base with a few gel fuel in a line, like this
_____________________________________
| |
| O O O O O O O O O O O O |
|_____________________________________|
Wow! This is beautiful and so easy looking! Thank you :)
You're welcome Cori. And thanks! ~ karen!
I just wanted to say that I found your fire pit idea while searching for an inexpensive way to build my own and just had to share my finished product!! Thank you so much for the info and idea :) I bought most of the supplies at our local Habitat for Humanity ReStore location so they put my pics on their website, total cost was $29.16 (just under the $30 budget I gave myself); http://tricitieshabitat.org/projects_35.html?frm_data1=50&frm_data1_type=large