You probably don't think you need a personal fire pit. And you're right. Although come to think of it, fire is an essential element. I'm rethinking this - it's possible you really DO need a personal fire pit. You just don't need a massive expensive one. A little tabletop cheap fire pit? You could probably use one of those.
My name is Karen and I haven't lit anything on fire in 5 months. I'm sure I deserve some sort of a chip or something for that.
You see ... I'm a bit of a pyromaniac. Technically I'm not a *real* pyromaniac I guess. I mean, I only light things on fire that should be lit on fire. Like kindling and hardwood and pretty much anything with Hello Kitty on it. And of course all of Rush's 1980's albums where they dabbled in "New Wave".
I light fires in the fireplace every night here in the old Casa de Karen from October until April. 6 or 7 face cords go flying up that chimney every year. But as deep and strong as my love of the log runs, I couldn't bring myself to buy an outdoor firepit when they first came out.
They were hilariously expensive at the time and really in my climate not all that useful. In the last decade or so the weather in Canada has changed.
We used to get Spring. Spring is now a fleeting moment that takes place between the hours of 4 and 5 p.m. in late May. When we wake up the next morning our guts have liquified and the garbage cans have maggots crawling out of them.
Once the season for fire rolls around it happens almost as instantly. And by then I want to be inside laying on the sofa with a hot chocolate and a plate full of cinnamon toast on my chest. Not outside being bitten by the limp stingers of aged mosquitos.
But still. There are 3 or 4 weeks when it makes sense to have a little personal fire pit outside.
So what was a pyromaniac girl like me to do when it's cool out, but not cool enough to trap myself in the house all night with my cat, tv remote and fire tongs?
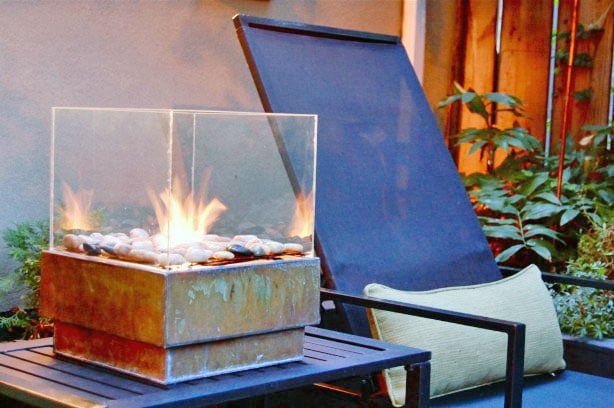
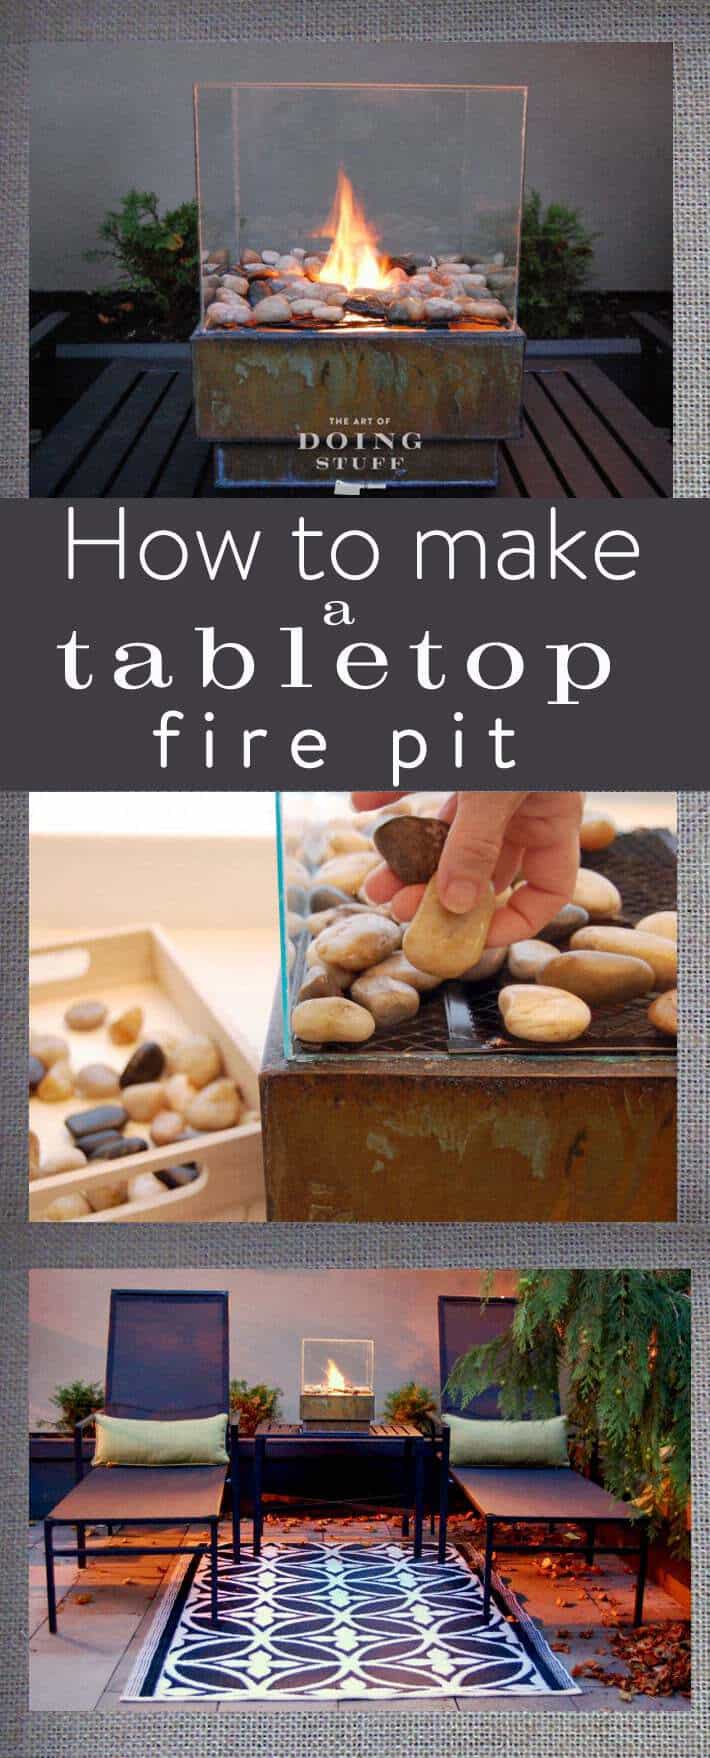
The Answer ... The Personal Fire Pit. (as designed by my sister ... I saw hers and then immediately came home and made my own exactly like the one she made.) It's easy and inexpensive to make. I used to say it's a lot nicer than any fire pit you've seen for sale in stores, but now that 10 years has passed since I originally made this fire pit a lot of stores are carrying ones that look - how do I say this - completely identical.
Here we gooooooo ...
How to Make a Personal Fire Pit
Materials you Need
- Marine Silicone
- Small rocks
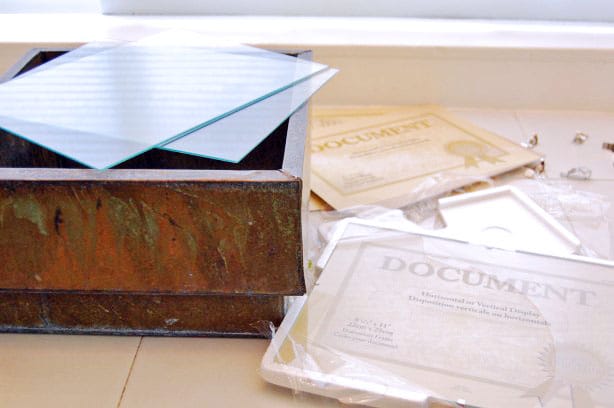
- 4 pieces of glass (I bought 4 cheap picture frames from Dollarama and used the glass from those)
- Metal Mesh
- Gel Fuel (recommended) or 70%+ isopropyl alcohol
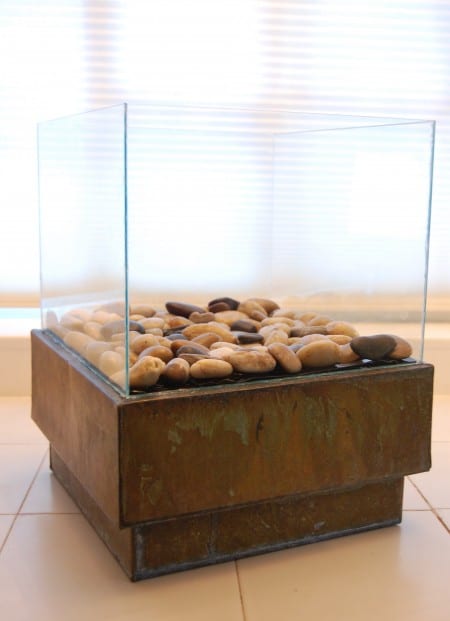
- Square planter (with a bit of a lip on it)
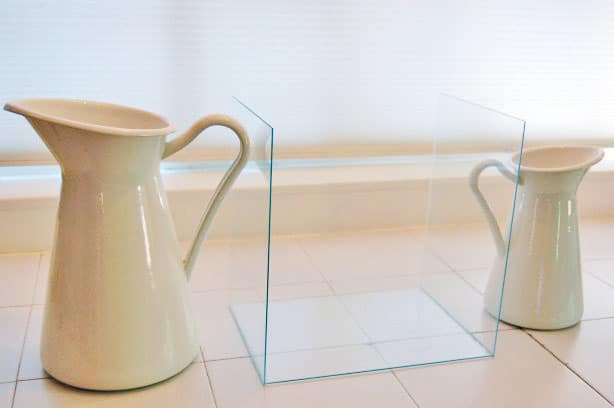
Step #1 - Making a Glass Box
You need to make a glass box. To do that just run a bead of silicone around the edges of your glass, and place them together.
Do two sides first and hold them in place somehow until they dry.
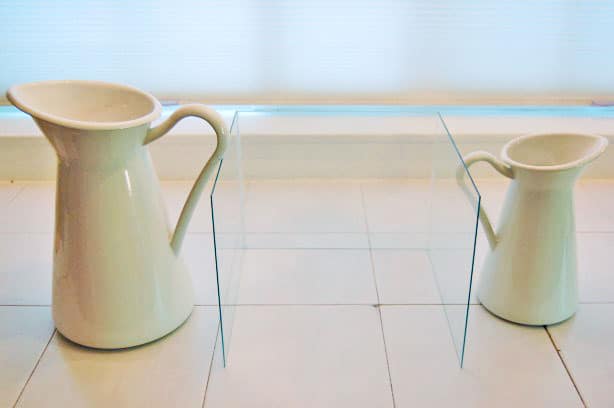
Position them so your final side will be easy to silicone.
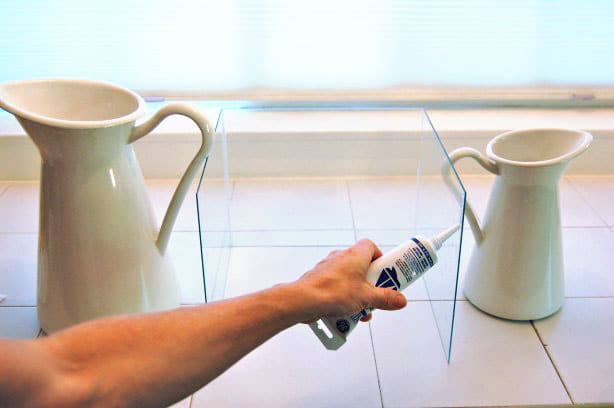
Run another bead of silicone and place your last piece of glass.
When you're placing your glass, try to be a bit careful about it. You don't want to smear the silicone around on the glass because it's a HUGE pain to get off. Just take your time.
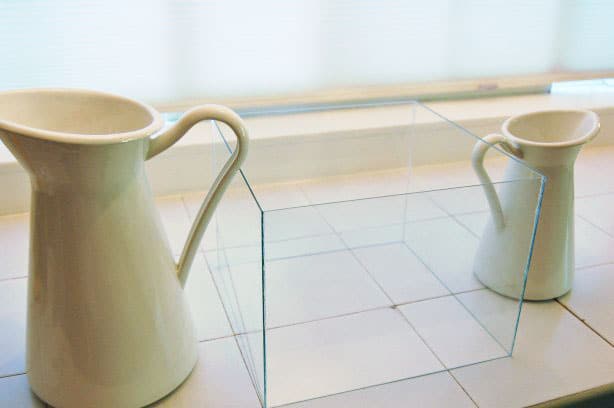
Run a final bead of silicone all around the bottom edge of your newly created (because you're kind of great) glass box.

Flip the box over then place the siliconed edge on top of the metal planter, making sure there's enough edge in the middle left over for some metal mesh to rest on it.
Update: Everyone seems to be in fits over the fact that the glass will EXPLODE from the heat. It doesn't. I'm not going to say it never will but 1) only tempered glass EXPLODES. This isn't tempered glass. 2) Glass breaks through stress either from dropping it or by extreme, fast temperature changes. Neither of which you should have with this project. 3) Thin glass is less likely to break from stress than thick glass. ** I know that seems counterintuitive.
Step 2: Making the pit.
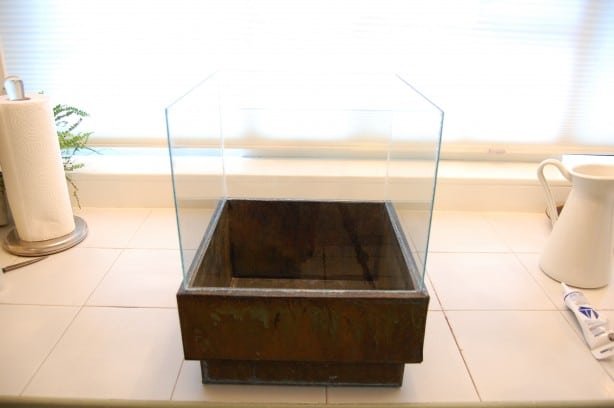
Your box is made so now you move onto cutting your mesh that will fit inside. The only purpose of the mesh is to support some rocks, which in turn hide the fuel can beneath.
Once your piece of mesh is cut your structure is complete and you just have to "build" the fire.
Put an opened can of gel fuel into the centre of your fire pit. If you're using Isopropyl Alcohol pour some into a leakproof metal container like an old, clean paint can.
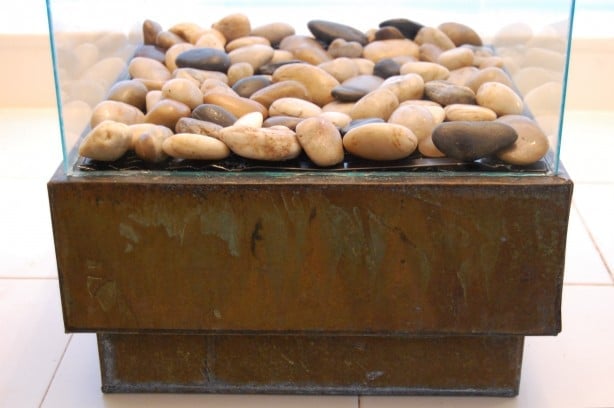
Rest the mesh on the inside edge of the planter.
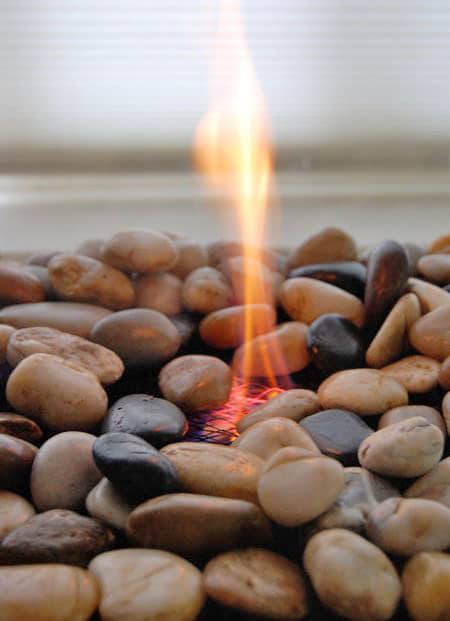
Finally, start putting down your rocks to cover the hideous mesh. If you're using rocks that you aren't sure about don't put them directly over the flame. Rocks with moisture in them can explode as can shaley rocks.

Cover mesh loosely with rocks (you need some space in between the rocks to allow for oxygen so the fire will stay lit).

Update: since writing this post originally, fire pit rocks have become available. They're 100% safe so you don't need to worry about keeping the rocks away from the flame.
You're almost done

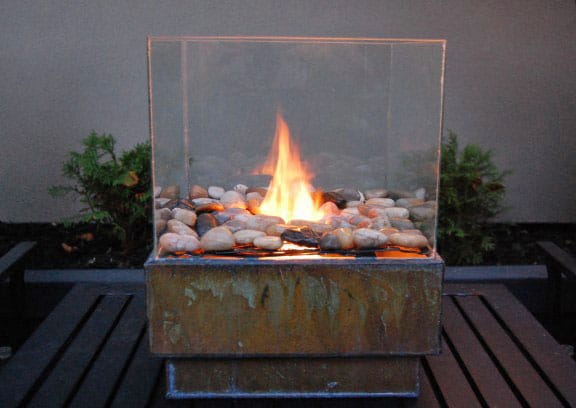
Firsty ... admire what you've done for about $25.
Step 3 - Light your fire
Clear the rocks away from above the gel fuel can and carefully light the gel fuel. I use an advanced technique. I light the end of a piece of spaghetti. Whole wheat of course.
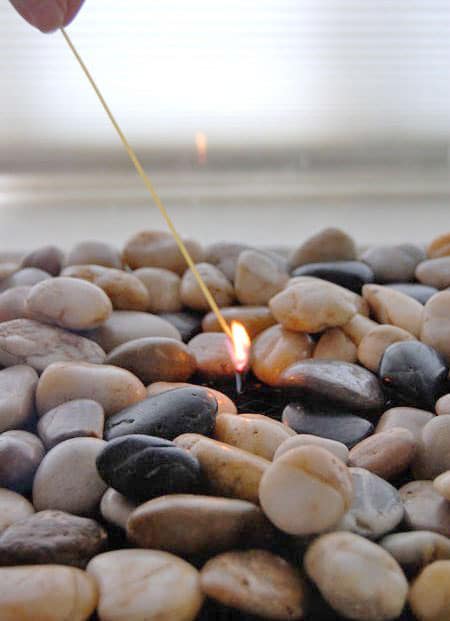
I would rule on Survivor, provided I'm allowed to bring a piece of spaghetti. Push the rocks away from the flame a bit (even a bit further than I show here) because some rocks can shatter when they get too hot. Or buy the fire pit rocks that are now available.

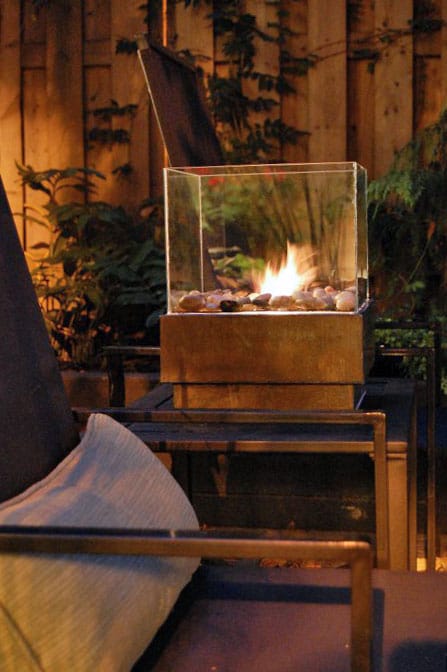
There you have your fire pit! $25. Plus as an added bonus, depending on what type of fuel you use, you can also use this fire pit *indoors*!!!
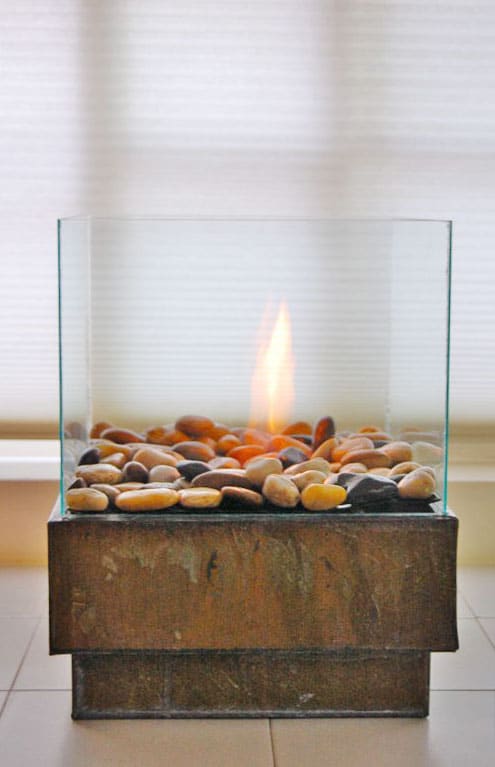
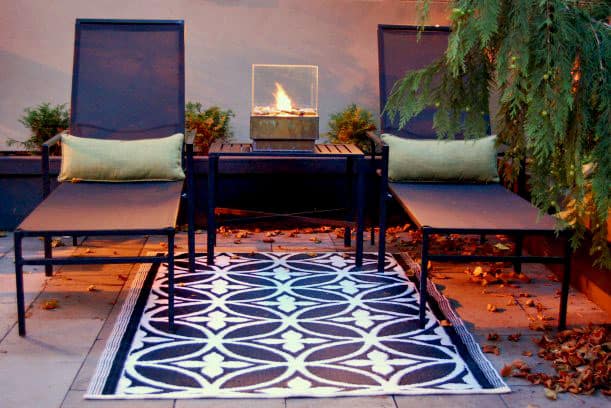
What makes this fire pit so amazing is the glass. The flames reflect against it creating dancing flames all over the place! Before I get to the final pictures with the fire pit in it's rightful home in my back yard I wanted to let you in on a few tips.
1. Make sure you buy gel fuel that's meant for gel fireplaces. Gel cooking fuel will not work because it usually only creates heat, not an actual visible flame.
2. Like I said, if you use a proper gel fuel (Real Flame for example) you can actually use this fire pit indoors. Be careful to place it on heat resistant fabric so it doesn't scorch your furniture. The metal conducts the flame heat a lot!
3. Make sure your rocks are heavy for their size. Rocks that are light are full of air and may explode!
4. You can use any metal planter for this. This was on sale, so this is the one I got for this little fire pit experiment. Black metal square planters that are probably on sale at garden centres right now would look fantastic with white rocks.
5. The gel cans last for about 3 hours, if you'd like to stop the flame earlier, just place something non flammable over the glass box to snuff out the flame. Cans can be relit at a later date or time.
.
WARNING
Use common sense. Don't wander off, leaving this burning and never EVER try to refill it when it's still burning. Snuff out the fire and make sure that it isn't hot or burning before refuelling. Otherwise you can create a firebomb. You can see that here.
That's it! That's all it takes to make your own personal fire pit. $25, about an hour, and a piece of spaghetti.
Update: A lot of people are having trouble finding a metal planter similar to mine. Remember you can also use terra cotta or ceramic.


I am an avid blog reader as well as a blogger. You are hands-down, my favorite! Great DIY projects that I would actually want in my home, funny and witty instructions/dialogue and everything laid out so nicely. I have wasted a lot of time this Friday afternoon at work - because Fridays aren't for working, they're just for looking pretty - at least that's what I like to tell my bosses;) So far, they believe me.
Thanks Shauna! That's quite a compliment. I just went and took a look at your blog. Very cute! I love the printable stuff. Well, I should let you get back to not doing work ... ~ karen
Amazing now added your site to my favs!!! Thank you for helping me fill up some of my free time! Ha well I'll now find some for your awesome shared talent!
Thanks Eve! ~ karen
looks great/easy/cheap - BUT
what the post doesn't tell you is that:
1) the glass you're going to get in most inexpensive picture frames is going to be super-thin and impossible to glue w/o breaking
2) You can't buy Real Flame in lots of less than 12, making a purchase of the $4 canisters $48 - oh, and you can't find them in any store
3) nobody seems to carry square planters (or any planters for that matter) off-season.
rb - Sorry to hear you've had trouble with this but as the person who wrote this post I feel I need to defend it.
I've made several of these and so have other people I've known. Thus far I don't know anyone who has broken the glass while siliconing it. I'm not even sure how that's possible w/out dropping it.
As I stated in the post and the comment section I bought the Real Flame in single cans at my local hardware store (Rona). Obviously I can't guarantee they are sold this way around the entire world, but it definitely is possible to buy Real Flame in single cans.
I just left my local garden centre from getting a Christmas tree and they still had rows of metal planters for sale (at 75% off). They also had square terra cotta ones.
So, as I said, I'm truly am sorry if you're having trouble with this, but I felt I had to set the record straight. I do not under any circumstances post anything that is misleading or untrue.
- karen
Just the other day I was talking about how much I'd like to have the Iittala indoor fireplace that goes for a whopping $1300 -- so happy I found this even better and cheaper version. And it totally fits my bargain-hunting and DIY personality. I blogged about it here -- thanks for the great idea!
http://www.palavering.com/brilliant-diy-personal-fireplace/
Hey Karen, this is by far the best DIY project I've ever seen. Thanks for coming up with it.
I found a metal planter that measures 9.75L x 7W x 4.75H inches. In your opinion, is that too small? Would the flames be too close to the glass? For comparison, what are the dimensions of your planter? Would love to avoid making the glass too hot.
Thank you!!
This is PERFECT! I just got a brand new loft with a beautiful deck and it's the middle of winter (snow)! Aaahhhhhh! Soo perfect. I love you!!!!
:D
Thank you so much for the inspiration. We made ours this weekend:
http://picasaweb.google.com/lh/photo/PJLM3WovqoUnU27PFBGa1FX5ByJcCuE0r0KJHVGCF2I?feat=directlink
The hardest thing is indeed to find a suitable container at the end of november. We got lucky at the third store, but we had to overlap the glass panes a little bit.
I'm so impressed!!! Not only that you a good job, but that you did it at all! I'm impressed that a lot of the people who read this website, actually take the initiative to go out and do the "stuff" I show. Thanks for linking the picture. I love it when people send photos of their completed projects. You made my day! ~ karen!
So amazing! Thanks so much for sharing, it's gorgeous!!
♥
Another Karen as smart and resourceful as me!!! I even have blonde hair too, but you got the pretty genes, probably bedazzled too!
Looking forward to your emails and I am also trying to think of some glass tube that I dont have to glue over my mostly round planters. Hmmmm????!!! Keep using that noodle, so it doesnt dry out. : )
If you want a cheap round fire pit, may I suggest another cheap alternative: the inside metal basket of your washing machine! This is my hubby's trick. You can find them at places that sell used appliances. We got our for free (the washing machine it belonged to was broken). We placed it in position in the center of our backyard patio, stacked bricks around it, and it was done. Instant wood-burning fire pit!
so...i came across your project on design sponge and fell in love. I live in an apartment with a small balcony and cant wait to try this one out. My question is.... do you think the temperature difference when it starts to get around 40 degrees outside is gonna have an effect on the glass and the heat when I turn it on? I recently experienced exploding glass when I tried to make some brownies and put the hot pan on my cold sink. I would love to avoid it as much as I can.
Oh dear. Exploding glass is such a bad way to end a batch of brownies. Oddly enough it's really only things that are made for heat like Pyrex that explode like that with temperature change. Regular glass will usually just crack and break as opposed to explode. You should be fine with lighting your pit if it's in 40 degree weather. The glass will gradually warm up from the flame. As long as your fire pit is as large as mine, which keeps the glass quite a ways away from the actual flame you won't have another brownie incident. My glass gets warm but it isn't so hot that you can't touch it. Give it a go! I should say that if you bring the fire pit inside (which is totally doable) the Real Flame does stink a tiny bit. They say it doesn't ... but it does. The BEST part about Real Flame gel cans is they actually crackle like a fire! So try and get that brand if you can. Good luck! ~ karen
Update on the firepit: (I was the one who said I wanted to make on for the boyfriend's b-day.) Went looking for a base, discovered NO ONE sells flower pots in October, particularly rectangle pots with a rim. Also, apparently the fire gel is semi-seasonal as well. Five stores later, amazoned the fire gel. Sixty dollars worth of it. Ok, now I'm committed to this project. Six more stores looking for square flower pots. Complete no go. Fire bowl, maybe? Back to same stores, looking for metal or clay bowl. From Tuesday Morning: large metal planter/cauldren/bowl thing. From the hardware store: can of spray paint so that bowl didn't look like it wandered out of the 80's. From the dollar store: multiple oven racks to use as screening. Total fail again. Square racks don't fit into round bowls so well, even with wiresnips. But need something to hold the can in place. Several hours later: D'oh moment: filled metal bowl with dirt, hollowed out a space to hold the can. Placed a layer of river rocks around the can, they're fairly large, so a few of the cover the edges of the can, and it doesn't look quite so round. Fired it up, (yes, without him!) and works beautifully. Looks similar to this one: http://www.buy.com/prod/real-flame-530-b-hampton-fire-bowl-black/q/sellerid/16881584/loc/66357/215519604.html
but at a nineth of the price. Thank you so much for the idea and the lovely tutorial ... still hoping to make the square one with glass next summer. --S
Hah! Well that sounds like quite an adventure. If you're doing this again you can also go to the hardware store and ask for "hardware cloth". It's like a heavy duty version of chicken wire, that you'll need tin snips or wire cutters to cut to size. Really cheap. You won't need more than $1-$2's worth. If you manage to take a picture of your creation send it along. Sounds like it was a struggle but turned out well! Congrats ... hope your boyfriends loves it (and appreciates all the pain in the butt running around!) ~ karen
I LOVE this project!!! This will make a romantic Christmas Gift for My Guy. Thank you for posting!! (I found the link to this on Design Sponge.)
~Kelly
I love it, love it, love it! I found the glass at a dollar store and one square metal planter at Lowes. It was the last one in stock. I cannot wait to make it. I only hope to find more planters.
Thanks, Karen, for your brilliant ideas!
Want to thank you-- my BF has been bemoaning the lack of fireplace in our little starter apt, and regulations don't allow a firepit ... gonna make this for him for his b'day *smiles*
I will have to say... I have built and re-built my ourside fire pit. (That I love) But this mite just be what the screen house (its large) Needs! As we are coming into the colder months and I am sure this puts off a little heat as well. Great job! I will also share a link to you on my blog.
A=MAZING!!!!!! I just stumbled upon your blog, and am in total AWE! This project gives me a great idea on how to use the firepit/cooler patio table that I've had for years and NEVER had a fire in (let alone, cold drinks). I didn't really want to burn wood in it, as it's on the walk-out patio under my deck and was in fear of burning it down. Now all I have to do is head to the dollar store and get a grate and glass panes and make my own. I have the rocks from there already, saving them for just the right project, and HERE IT IS!!! I already have a cover to put out the flame and mesh dome from the pit (maybe I don't even need to build the glass frame then, but it sure does make the fire DANCE) (slight pyro tendencies here too), so once I assemble the rest and find the gel fuel, GAME ON! I'd love to send a picture of the finished product when I'm done... thanks a million for the inspiration! You ROCK!!!!! (major girl-crush going on here too) Jules
Can you send me a picture of what you did if you finished it. Thank you Tami
How hot does the air above the fireplace get? I'm thinking of building something like this to make use of one of Chicago's many no-longer-functional fake fireplaces in my living room, but I'm not sure if it would be too hot. It would be about a foot away from the painted, bricked-over flue of the old fireplace, so probably not a huge deal.
On a recent road trip, somewhere between Texas and California, I saw a sign that said "Mom and Pop's Pyro Shop"! That's what you and I can do when we retire! Open our own pyro shops!
I'm in.
Great Idea! I absolutely love it.
It looks like it may be a bit tricky to get the old can of fuel out and put another one in. Do you think it would be possible (with a little extra time and money) to make the bottom hinged somehow?
Hi Jayfa. It really isn't much of a pain to change the can out. You just have to remove the rocks and then remove the screen. Put a new can in, and refill it with the screen and rocks. If you were to put a hinged trap door on this planter bottom, you'd have to lift the planter over your head to open it, at which point the gel can would fall on your head. Presumably. LOL. Plus the rocks would be smashing against the glass as you held it over your head. Posing yet another problem. :) If I were you I'd just keep it simple, and remove the rocks and screen. I think it'll be easier in the long run! Good luck.