This kitchen renovation of mine has been a real save and splurge event.
I'd like to rephrase that. Classifying my kitchen renovation as an "event" seems wrong. A bit of a narcissistic exaggeration, heh. It would be more appropriate to say the renovation has been an ass pain undertaking. The completion of it will be an event! Complete with contortionists and ponies if I have my way.
And I will. Because it's my event.
I've had to hire only 4 people to do things around my house in the past 5 years or so. The nice man Tim who unclogged my pipes, Dave who did my electrical work, Grant who is installing my kitchen and Kyle ... who drywalled my ceiling. None of those phrases are euphemisms.
All of these were jobs I couldn't do myself. I tired to fix my plumbing but wasn't successful, I tend to shy away from elaborate electrical work or anything that might kill me if done incorrectly, and I don't have a clue about how to hang cabinets in a house that has walls that look like you're seeing them through a funhouse mirror.
Drywalling on the other hand I can do. What I can't do is drywall a ceiling. I'm too little, drywall is too big and it brings out the swear words in me. Words like snarklefart.
So in the spirit of "Save and Splurge" I hired Kyle to drywall the ceiling, while I did all the other drywalling that needed to be done in the kitchen. If it wasn't on the ceiling, I was doing it.
I know. Drywalling scares people. Putting nail holes in it scares people, knocking a hole in it scares people and putting anchors into it scares people. (If you're afraid of using the wrong anchor, this is a my step-by-step guide to using the right anchor on drywall)
Any money saved on drywalling I could put towards clowns and lion tamers for the big event.
Drywalling scares a lot of people for the same reasons most home repairs do. Raccoons.
One wrong move and a raccoon could come flying out of the wall at you.
Also you're afraid you're going to wreck something. But think of it this way ... if you DO wreck something you can just call someone in to fix it. On the other hand, if you're successful, you've saved money, learned a skill and saved snarklefart for another occasion.
Today I'm going to show you how to patch a large section of drywall. I am not an expert. I may not even be very good at it. But I can get the job done and that's all that counts.
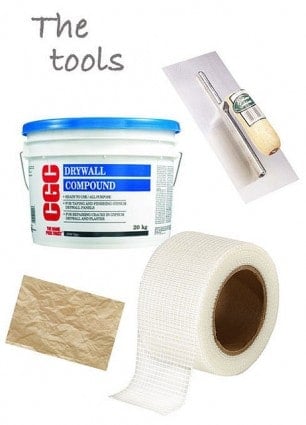
The tools you'll need to patch a large section of drywall are ...
1. Drywall in the same thickness as the wall you're dealing with (in this case ⅝ths of an inch)
2. Drywall compound (pre-mixed in a bucket, or dry that you mix yourself with water)
3. A 10" trowel (I didn't have one so I used what I had on hand)
4. Drywall seam tape (sticky mesh like shown here, or paper tape)
5. 150 grit Sandpaper.
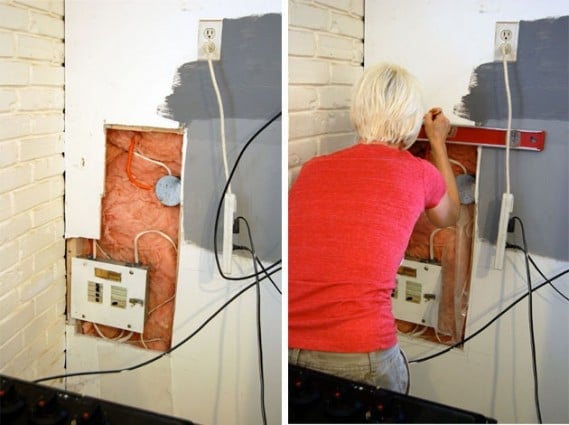
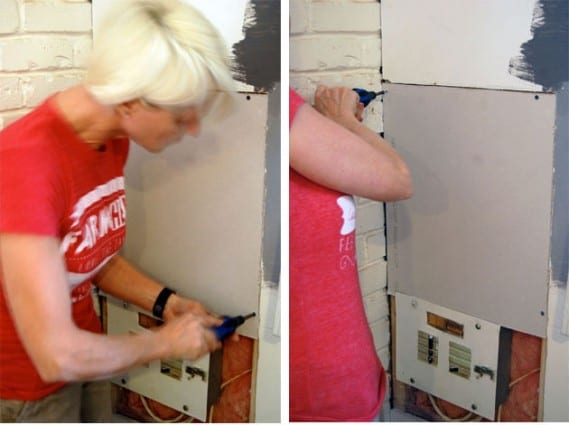
I had to have a small electrical panel in my kitchen moved. This left a big, uneven hole in my wall.
To make things easier for patching, cut your existing drywall out so that the studs are showing. You need to expose the studs, because this is what you're going to be screwing your new piece of drywall into.
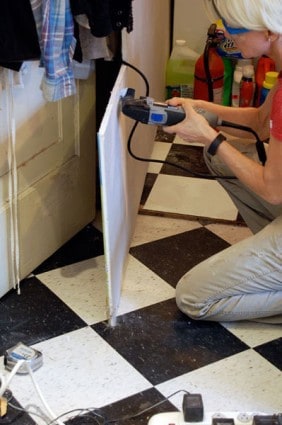
I used my Dremel Multimax for cutting the drywall while it was on the wall. Once that was done I had a nice even square to fill, with exposed studs all around for screwing into.
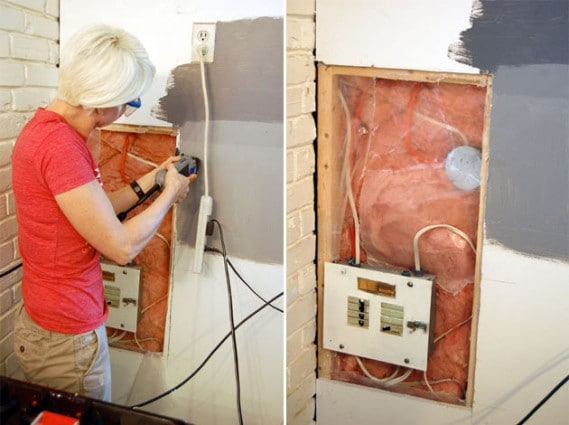
This job is a little trickier because there's the big, stupid electrical panel in the middle of my square, but I can work around it by filling with a succession of squares and rectangles. If you're really good with measuring and cutting you could cut one single piece to fit. I am not such a person.
Now that the big square on top is filled I have a small section on the lower right to fill with drywall. The problem there is I only have one stud to screw into on one side of the hole. I need something else to screw into.
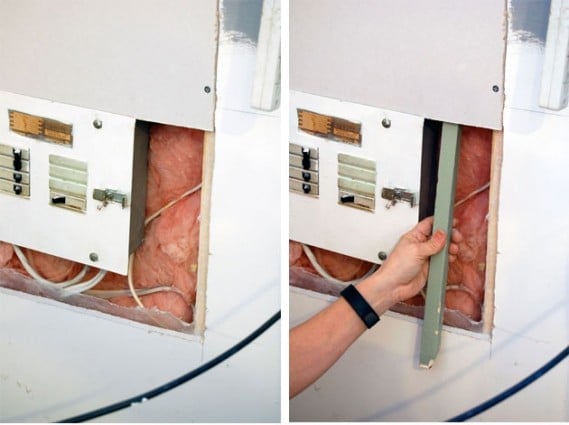
You can use this trick whenever you have a small hole to fill. It prevents you from having to cut out the drywall to the studs.
Just take a small piece of wood, in this case I used a rail I had just pulled out from my old cabinets, and place it behind the existing drywall.
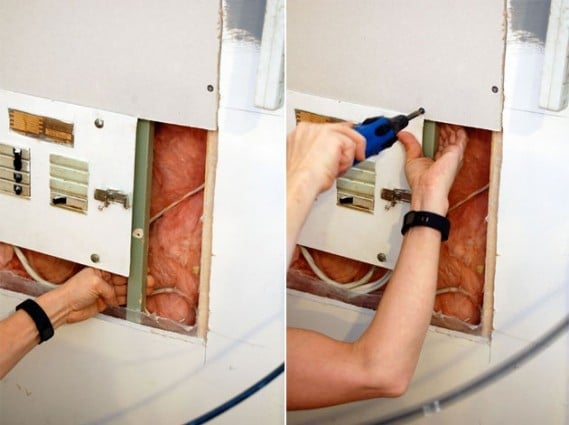
Once your piece of wood is behind the drywall, you can screw it into place by inserting a drywall screw through the top and bottom of the drywall, into the stick of wood.
You now have a secure piece of wood to screw your new drywall into.
Continue cutting and placing your drywall until your hole is filled.
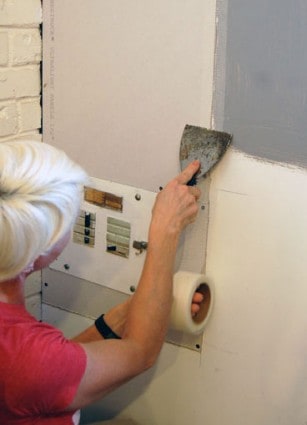
Once your hole is filled with drywall sheets, you need to tape the joints (seams) to make them invisible. You can either use sticky mesh drywall tape, like I'm doing here, or paper drywall tape.
Sticky tape sticks all by itself. Paper tape needs a very thin coat of drywall compound on the wall to act as an adhesive before you put it on.
Once your tape is on, go over it with a thin coat of drywall. Always work in thin coats, building up your layer.
The reason you use a 10" trowel is because even though you're only covering the 3" wide piece of tape, you need to feather the drywall compound out several inches further than the seam to make your repair invisible. If you only cover the actual tape you'll have a mound of drywall mud that looks like a bump on the wall. The wider the section of drywall compound to your seam, the more invisible your feathering out will be.
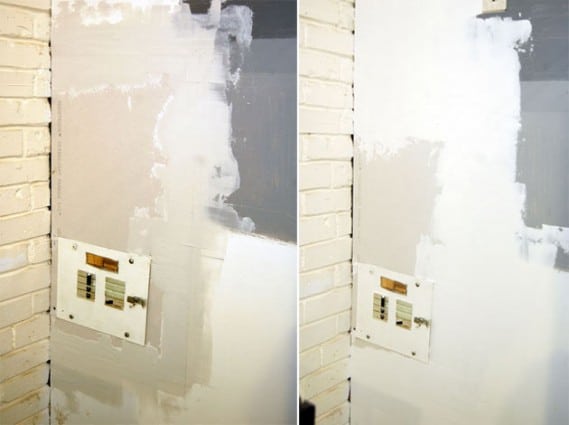
The first picture here shows my first coat of drywall compound. It's a bit messy looking, and that's because I didn't have a 10" trowel. The proper tools always, always make the job easier and better.
Once your first coat of drywall compound is dry you can sand out any large imperfections, then repeat the process 2 more times. Your final coat should look good and if you do it well won't need a lot of sanding.
You can either sand your final coat with regular 150 grit sandpaper or you can wet sand.
The final step is painting it and pointing out your handiwork to everyone who walks in the door. And people just passing by too. I find it's easier to lure them in the house if you're always baking cookies. Just a little tip from me to you.
And there you have it. You've just installed drywall yourself. Saved yourself hundreds of dollars. And secured the deposit on at least one Flying Wallenda.


Well done!
Good JORB! I like the idea of sticky tape vs paper tape. Unless you have a master drywall contractor to help you! I had plaster walls and took the entire wall down (just took a sledge hammer to the wall while hubby was at work one day) (WHAT A MESS) and put drywall in place of it in an old house we owned years ago. I loved the drywall process.... but I'm weird that way. My contractor friend made this makeshift bucket mud applier thingy for the tape and it made the mud go on the tape in an equal perfect amount...but "still " I like the idea of the sticky tape WAY better!
Nice tutorial. Unfortunately in most of my house I have plaster. Unless you count the room where we have no walls because my husband tore out most of the plaster so he could do the electrical. Someday. Honestly you make me less scared of dry walling. Not excited to tackle it but baby steps.
Ahhh. I hate drywall. But living in an old house, you get good at it or you go broke. The key to it, is not to be too fussy and use flat paint and funky paint techniques that hide the mediocre workmanship! That's what I do, and it seems to be working fine for me! haha Anyways, good job Karen!
Glad to hear the girls are all okay. You are probably too busy to fix an egg with the kitchen redo and all.
Yup, the things we girls have to do, you rock! I noticed two shades of gray painted on the wall...which one are you going with?
Patch job looks great. Also, whether intentional or not, this post was so full of code my coffee went part way up my nose reading it. Of course, it's possible I just have a completely juvenile sense of humour.
My house is 208 years old. The owner before us (who knows how many were before him!) took the easy way out and put up paneling everywhere. Sure am sick of paneling. We have a new furnace, roof (4 layers were on it-illegal), pitless water pump, & new wonderful windows. Got all the important stuff done, hope we can get rid of all that@#$%^paneling! Your drywall tutorial was great! Hope I get to use it soon. And very good advice about hiring out electrical work, for one. Thanks!
An excellent tutorial on how to patch drywall.
I have done this a few times and it is like art work to get it just right. I have discovered that in lieu of sand paper there is another implement available at hardware stores. I am not sure what carpenters call it but it has a trowel like handle and you attach a nylon mesh screening material and use it as you would sand paper. It produces a very smooth surface. On a particularly large surface it cuts the sanding time remarkably.
Since I'm reasonably safe from this distance, I can point out that the thing you keep calling a 'square' is actually a 'rectangle'. :-P
I know jack about drywall, but that patchwork job looks fab to me.
Oh my god! I don't want to be a funkiller, but seeing all those cables floating free in the insulation wool makes me shiver! If just one of those cables is malfunctioning and heating up your house will go up in flames! Please resonsider! But if this is the way you do things in Canada, go ahead! I warned you! Please ask an electrician you can trust!
LOL. You needn't worry. Cables inside walls always run that way. It's only if they're outside of a wall where they could get damaged that you run them through conduit. Also, fibreglass insulation isn't flammable. All the electrical work was done by a Master Electrician so you can rest easy. ~ karen
I have a gaping hole in my garage where some electic wiring needed to be fixed. The electricians simply left the big hole. Maybe now I can have the confidence to do the repairs myself. hahahahahaa. {she says at the top of her crazy voice while running through the house looking for cars keys.}
I've actually done the drywall repair thing but didn't use the sticky tape - if I ever do it again I want to try the sticky tape. Looks much easier than using paper tape.
cutting toward the cord with your dremel!!!!! Brave girl. :]
Thank you for this. My husband likes to use a drill to find studs when he "helps" me hang heavy things. I've stopped asking for his help and now hang stuff when he is not around.
I am so excited to see you working in the kitchen Karen, because that means the "big reveal" is on its way.
And that was a great tutorial! Not that I will ever do it because my son is a contractor but I can always impress him with a question like..."Will you need me to pick up sticky tape or paper tape?"
I am living in a funhouse mirrored house too! Hahaha!
Great tutorial - may I just add - prime then paint (or use a paint with built in primer)
Did I tell you I painted my kitchen Sunday!? I am still really excited about it. Too damn cold for people to be walking by my house so I can drag them in, so I took pictures & I am sharing it with everyone on FB.
Great, easy to follow tutorial, Karen.
Still and all, I really hope I never need to do that! Our attempts at diy do not end well!
I have done this a couple of times. Got tired of waiting for anyone to finish this sheet rock. I will be doing it again. Maybe with your pointers it will be the last time I will have to do it. Thanks Debbie
I have been meaning to ask how to do a repair like this. My house is much older and all I did was try to put a little nail in the breakfast nook wall to hang a picture. What a mess. It just started crumbling and now I'm left with a hole large enough for a small child to get through (seriously). This might be more than I can handle. Dunno. But at least I now know what I'm up against. Thanks for instructions.
If you have an old house, you probably have plaster and lath walls, which is a whole different deal. (The crumbling makes me think so.) You can patch the plaster, or take the whole wall down and replace with drywall... I guess it depends on how big a child can get through that hole. :)
Hi Deb! Like Pam'a mentioned you have plaster walls. So do I as a matter of fact in the rest of my house. But the kitchen was an addition years ago so I'm lucky to have drywall in there. To hang pictures on plaster you need different types of picture hangers. Here's a video I did on the subject ... https://www.theartofdoingstuff.com/hows-it-hangin/ ~ karen!
crap crap crap.....Pam'a and Karen. Yes, I have lathe behind there! Crikey, I need to follow the links. However, today we just welcomed latest granddaughter into world, so that hole will have wait. The newest granddaughter is not getting in there in the next few weeks or so, that's for sure.
Congratulations! ~ karen
uhhhh, Karen, I will remember the picture-hanging technique for the future. It surely doesn't help that I already tried to drive a nail in the wall. dammit *$@ #*%* crikey @##&#($)%+%%#** fartenagle. crap crap crap. Lesson learned. At least it's not over the fireplace or in the bathroom or something. And the picture I wanted to hang actually does cover that gaping portal into the unknown for the short term. crap. (that's my new cuss word). ok. time to follow the link.
I love you Karen, but I really hope I never have to know how to do this.
I learned how to do this a few years back and have never used it, Ruth, so there's a fair chance that you're save.
So Karen… why did you decide to use the sticky tape rather than the paper tape? How were the Girls while you were gone? You didn't come home and find bird-sicles, did you? Frozen Chez Whiz is not good!
Chickens are fine, not laying eggs though. I have a radiant heater in their coop now because it's consistently been below -20 at night. I chose the sticky tape rather than the paper tape for the simple reason it was the first one I found in my basement when I was doing this job. :) ~ karen