Sometimes you become immune to the ugly stuff in your house. Like old, gross electrical outlets. Fear not. There's nothing scary or hard about it. You CAN replace an electrical outlet. This tutorial walks you, a homeowner, through how to change an outlet in a real life situation.

Jump right to the Quick View Tutorial.
Isn't she a beaut? The elegant lines, the contrasting colour that makes her stand out and demand attention in the middle of the baseboard, the paint artfully slopped all over it. Outlet replacement was the only option. To make this look good I needed to replace the brown outlet cover and outlet with white.
At least it's near the ground. When I first moved into my house the majority of the outlets were 3 feet off of the ground, waist level on the walls for some reason. I suspect the previous owners had no knees.
I've wanted to move this plug closer to the corner of the room as opposed to being in the middle of it for ages but ... well I just haven't had time in the past 18 years. You know how it is.
I finally gave up on the bigger job of moving it and resolved to at least change out the receptacle to something less bossy.
I am a firm believer that you shouldn't do anything around your house that has the potential to kill you. Things like roofing work, installing an electrical panel or running on newly waxed floors while wearing socks.
But this? Replacing an electric outlet. That? THAT you can do without fear of death.
How to Replace an Electrical Outlet.
1. TURN THE POWER OFF to the area you're working on. Better yet. Just cut the breaker to the whole house if you aren't sure about which breaker or fuse powers the outlet you're working on.

2. Remove the face plate to the electrical outlet.

3. Remove the electrical outlet from the box by unscrewing the visible screws.

4. Pull the outlet away from the box.

Seems I got paint splattered on more than the receptacle. Heh. I'll deal with that later.
Don't even ASK me when this outlet was originally installed but there were some issues. For some reason the ground wire was broken. It either happened as I pulled the outlet out or happened when the outlet was originally pushed in. Either way it needs to be fixed. I'll get to that.
See? This is what happens in a real life situation as opposed to a sterile instructional video.
5. Remove the wires from the old outlet by unscrewing the screws they're wrapped around slightly. Just enough so that you can slip the wires off.

6. Throw that sucker out.

7. Now is the time to talk about the scary GROUNDING WIRE, which everyone seems confused by. Here are the two things you need to know.
a) The ground wire needs to be grounded to the box, AND
b) The ground wire needs to be grounded to the outlet.
First, how do you recognize the ground wire? It'll either be the green wire, or a bare copper wire. One of the two.
Before installing your new outlet you would wrap the ground wire around the grounding screw at the back of the metal box and then bring it forward to the receptacle.

Since my grounding wire is broken I've had to do something a bit different. I'll have to make the two independent wires work together as one.
8. I've created a loop in my stubby little grounding wire with pliers. Luckily it's just long enough to wrap around the grounding screw.

See that hole in the back of the box that the wire is coming through? There should really be a Romex connector there so the wire isn't rubbing the sharp metal edges. I didn't have one and wanted to continue with the post, so continued on without it for the time being.

9. Then I created the same loop on the longer, broken off part of the grounding wire.
** if my copper wire had been a tiny bit longer the better thing to do would be to use a 2 port Wago like this to attach the wires.**

10. I looped the shorter grounding wire around the grounding screw and then I looped the longer grounding wire around the screw so everything was touching. As long as the two grounding wires were touching behind the screw, I knew I'd have a completed circuit.
REMEMBER this was an anomaly because my grounding wire was broken off very short.
Most people will have a longer wire that will easily loop around the grounding screw in the box with enough left over to attach to the new outlet.
11. Get your new outlet and face plate ready.

I like the snap on face plates that don't have a visible screw to hold it on.
12. Attach your wires to the new outlet.
TIPS FOR WHAT WIRE GOES WHERE

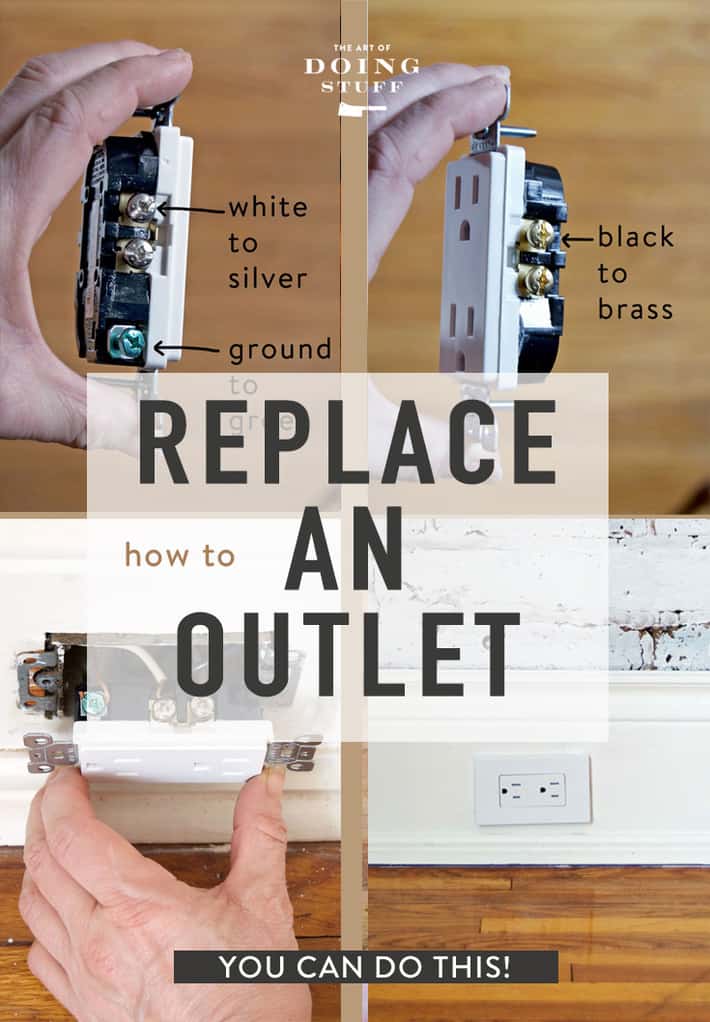
- Your outlet will have one side with brass screws. The other side will have silver screws and a green screw for the ground wire.

Attach your wires like this:
BLACK GOES TO BRASS
WHITE GOES TO SILVER
GROUND GOES TO GREEN

See how there are two silver screws? It doesn't matter which one you use. So don't fret over it. Just pick one. Try to do a little better than I did with the exposed copper wire though. The least amount of it should be exposed as possible. More should be under the screw. (This doesn't matter on the grounding wire as it doesn't conduct any electricity)
Hook your wires so they are going in the same direction as the screw is when turned to tighten. This will help clamp the wire down as opposed to pushing it off.

See how there are two brass screws? Again, it doesn't matter which one you use. Just pick one.
Also notice I did a better job of having less of the bare copper wire exposed.
13. Carefully push the new outlet back into the box.

This shot here nearly BLEW the minds of some electricians who read this post when I first published it. Why? Because I haven't wrapped the outlet in electrical tape. Some electricians (this is kind of a polarizing issue) wrap any outlets that are going into metal boxes with electrical tape.
This covers the metal screws and therefore prevents them from ever accidentally coming into contact with the metal box. However, there are other electricians who are just as adamant about not using electrical tape.
14. Rescrew the outlet into the box.

15. Cover with the face plate and you're done. Just turn on the power again and watch the room light up.

And just like that you know how to install an electrical outlet.
Here's a quick rundown without pictures so you can quickly check it for when YOU replace your hideous electrical outlet.
How to Replace an Electrical Outlet.
Step by step instructions on how to replace an electrical outlet.
Materials
- new electrical outlet
Tools
- wire strippers or scissors
- Screwdriver
Instructions
- Turn power to the outlet OFF.
- Remove the face plate.
- Unscrew and pull out the old outlet.
- Remove wires from the old outlet.
- Attach new outlet. White wire to silver, black wire to brass, Ground wire to grounding screw at back of box and then to green screw on outlet.
- Gently push the outlet back into the box.
- Screw the new outlet in place.
- Attach new face plate.
- Turn power back on and bask in the glow.
Now that you're an electrical outlet expert, you might as well learn how rewire a lamp.
There's only one question left to answer. No. I am not likely to wash the paint off of my floors in the near future. Not in the next 18 years anyway.
→Like to Sweat, Swear and do Stuff? GET MY POSTS emailed to you 3 times a week←


Madison electric boxes are my favorite products. I've been using these boxes for years. They are built solidly and intelligently, especially, they are easy to install in new construction or retrofit.
Thanks for sharing a great and very detailed post! I used to very struggle with that but now I know how to replace the outlet
I am replacing a outlet that has 2 screws on each side to presumably feed to the next outlet. The new plug (with USB ports) only has 1 screw on each side. Can I connect both wires to the 1 screw?
NO! One contact for one conductor, unless explicitly designed otherwise. You will need to make "pigtails" using some wire of the same composition and gauge and the existing wiring, and appropriate wire-nuts. Considering that you needed to ask this question, I strongly, strongly, with all my heart, ask you to hire a professional to do the job. When working with household wiring you are not only taking your own life and property into your hands, but also the lives of all others who enter your home.
This instructions and pictures provide the best help for my 1st try replacing 2 outlets. My caveat is our house hass aluminum wiring so we are using copper/aluminum 15A rated outlets. A male family member had bought copper only outlets but we discovered the issue in time and obtained the other outlets. If a house has aluminum wiring and GFCIs are being installed the GFCIs are only for copper wire directly but there is a safe-work-around. Not swearing to this, just saying if aluminum please research further.
I used to do this stuff a long time ago, but then I remarried and my husband did, now that he is gone it seems as though everything is needing to be replaced. I can do this, thanks for the Black to brass, I can remember that.
Fixed your name for you. ~ karen!
Thank you so much for this post! Very informative. I've been looking at an outlet I want to replace, have even bought the parts, but was just too nervous. You are both empowering and inspiring!
Thank you! :) And so are you. ~ karen!
When cutting power to the outlet, check BOTH sides with a plug-in lamp or voltmeter. Occasionally, you may find each side of an outlet is controlled by a separate breaker. Only made that mistake once! Also, keep that in mind if you are labelling and documenting circuits.
Some old electrical outlets will only have 2 hole receptacles for plugs without a ground pin. Do not replace an old outlet like that with a new standard 3 hole receptacle.
I was just thinking about attempting this in the next couple of days at a friend's house that my husband and I built a wall to add a bedroom off the living room. It's an old house with only 2 hole recepticales. I was only got ng to replace them with the standard 3 hole, no GFI or anything like that. Our friend told us he still has knob & tub!
This made me question the situation.
The outlets were three feet off the ground? Good lord. Haha. I've never heard of that before. I bet it would be easy to plug things in, though if you're sitting near one of them. Let me plug in my phone charger. I don't even have to move! Haha. Very informative and inspiring post as always. Thank you for sharing!
(From a retired electrician who has found that wisdom and experience is the result of years of ignorance and screwing things up in every way possible!) DO NOT use those easy push in wire holes on the backs of outlets. Always use the screws.
It can help prevent corrosion to use anti-corrosion grease on the connections, or a dab of vaseline is just as good(This is also helpful in devices that use batteries)
Most newer boxes are plastic(usually blue) and obviously do not require grounding to the box.
For the OCD readers, the outlet is slightly crooked. When you tighten the mounting screws, they are usually into the center hole, which is elongated and allows some tilt to level it before tightening.
Once you are finished, there should be no play or movement and the plate should be tight on the outlet. If there is wallboard, the "ears" on the outlet will be against the drywall and there will be a gap between the outlet and the box. There should be no play here. Sometimes you may have to place some shim material to make that space solid, especially if the wallboard or plaster has been damaged.
After the breaker is off, make sure there is no power at the outlet. You can plug something in and see if it lights. Then touch a screwdriver across the 2 sides. Then, when you touch anything metal there, touch it firs with the back of your hand. If it's hot, your muscles will contract and pull AWAY from the wire, not pinch it(done that!) There is also the possibility of a "backfed neutral". That is when the white neutral wire is shared among 2 or 3 circuits. If something is plugged in and on on another circuit, some lower current power can come back to the neutral at the "off" outlet.
Thanks Billy, for the added wisdom - I will definitely add the back of the hand touch to my arsenal! During the past month I've been replacing 60 year old outlets and switches with Decora ones and screwless faceplates, and I'm in total agreement with Karen, they look so much better.
thank you, Karen, I now have My Project for this weekend -- if it goes well, I may just go crazy and replace ALL the ugly, broken, loose outlets in my home -- WACKINESS!
ONE question -- do I have to have a cat nearby to assist? If I don't own a cat, may I rent one?
Cats are indeed helpful, but if you have a dust bunny around that'll work in a pinch. ~ karen!
When I moved into my 1953 house in 2001, there were fuses in the box and several boxes. I hired an electrician to replace the fuse box and "centralize" control in my garage. Then I turned on every overhead light in the house, and a lamp into every outlet. I methodically switched off each circuit and recorded the lights and outlets controlled by that circuit. That was the best thing I ever could have done. Now I know where the body is buried when I need to work on a switch. This record is stored in my computer and several other places. It was a bit of work, but oh so worth it.
I would then make up 2 charts, one in numerical order and one in alphabetic. A spreadsheet will make that easy. You can also write the circuit number on each outlet in fine sharpie. If you think that's ugly, you can write that under the plate.
Oh God, what a good idea to number the plates. I know what I'm doing this afternoon.
I did that with my place. There is a list with all the breakers numbered and what they control hanging from my box.
You are right - soooooo worth it.
If The outlet is several rooms away, plug in a radio...that way when you can't hear it you know you've shut off the proper switch. Radio in one socket...lamp in the other...all's good. Saves a lot of walking back and forth. Then mark those switches !
The radio is a great idea! Most people turn a lamp on but you still have to run to wherever that room is to see if the lamp is on. :) ~ karen!
When I go to buy the new outlets at the store, how do I pick what amp I need? I have white and want to change to black on a dark wall--so I have two spots that need outlets and one that's a wall switch. I see some outlets are residential vs commercial and 15 vs 20 amp and I don't know what to buy (I assume I don't have a choice with a switch and just choose the right size?). Thank you!
Hi Alison! In general it depends on where the outlet is located. In most homes there are only 20 amp outlets in the bathroom. (protected outlets) The rest of the house will have regular 15 amp outlets. It's O.K. to put 20 amp outlets elsewhere too, but you have to make sure that the circuit is also 20 amps. Make sense? The moral of the story is just replace the outlet with what's there now. If there's a 20 amp there, replace it with a 20 amp. If there's a 15 amp, replace it with a 15 amp. (this is assuming the person who put in the original outlets did it the right way). ~ karen!
Thank you, Karen!! So helpful and I won't look helpless when I go to the hardware store! I see that mine are 15 amps, so I will purchase that. Is there a difference between residential and commercial?
Also, I took the plate off my wall switch and don't readily see anything to give me a lead on that: on the hardware website some say 15 amp and some say 15/20 amp. It also looks like some rockers say 3 way. Any suggestions on how to properly choose one of those?
Final question (sorry!): have you ever swapped an outlet for one with an added USB port? Does that take extra steps to install or could we buy one of those and follow your steps in this blog post?
If it's just in the house and not in the bathroom it's a standard 15. If it's in the bathroom it's 20. You can also tell a newer 20 because one of the slots looks like a "T" instead of looking like a simple straight line. If you're really worried, just turn your power of (basically the most important thing :) ) , remove the receptacles you want to replace and take them to the hardware store with you. One of them will be able to tell you exactly what you need to replace it. But if it's just a standard receptacle that you'd have in your bedroom or living room lamp plugged into, a standard (residential) 15 amp receptacle is what you need there. I've never installed a receptacle with a USB port (although I have looked at them!) but I would think they'd wire exactly the same. You're just adding another place to plug something into it, not adding a separate port to plug into that's powered all on its own. Make sense? ~ karen!
I may be jumping the gun on this and maybe someone has answered this already. You can use a 20A outlet on a 15A circuit but not a 15A outlet on a 20A circuit. There are some older circuits that require a 'split' receptacle such as kitchen counter or a room where half the outlet is switched to control a table lamp etc. These will 'usually' have a 3 wire (red,black, & white)+ ground. The kitchen outlets should be protected with a double pole breaker or 2 separate breakers with a tie handle between them. Using your photo above on the brass terminal screws there is a small jumper between the screws. Using a pair of needle nose pliers simply break off the tabe to create 2 individual outlets. Leave the silver jumper intact.
oooops my bad. Please disregard the part about 20A and 15A outlets and circuits. Even though a 20A outlet on a 15A circuit would work the possibilty of a fire hazard exists. All circuits should be rated @ 80% of the breaker rating.
When putting in new circuits, i always make them 20 amp. 20 amp circuits require 12 gauge wire(instead of the smaller 14 gauge wire that 15 amp circuits use)
How do you know which wire is which when you have a cloth covered wire. I was changing the outlets in my house and in the living room, the outlets had only 2 wires. House was built in 1949. I replaced them exactly to the new outlet (no ground wire). Now only half the house has power. I don't know if I connected them correctly or a circuit blew when I turned the power back on.
What ever happened? I just replaced outlets in the study where there were only 2 wires exactly as it was on the old outlets but I did not see an extra wire so I guess there is no ground wire- so now power not working in there... I do not know if I should buy new outlets that dont have that grounding or hire someone to install grounding wire? Or did I blow the circuit?
I wish I could better express how grateful I am for this post. All three of my grounded kitchen countertop outlets stopped working, and local electricians were quoting me upwards of $250. I’m currently unemployed, so that was hard to swallow. Thanks to your super clear walkthrough, I was able to replace them for so much less. But more importantly, I think my dad—who would have been the one to help me if he were still around—would be so proud of me for doing it myself. I’m glowing in more ways than one thanks to you!
I had that same thing happen to me , it turned out that the outlets in the kitchen had a little sliver of metal that would shutdown all of them if more than one was in use at once.... Rather stupid in a kitchen I think, but maybe that’s just me wanting toaster and kettle going at same time...
Once that little sliver was removed I had no problem. Same electrical friend also helped figure out why door bell only worked occasionally. They had it wired to the mechanical room light so that it only worked when light was one.
Builders are not what they use to be ... neither are inspectors as far as I am concerned.
You would do well to read the comment left lower down the page by Tim. It demonstrates very well how a man can add a HELPFUL comment, without sounding like an arrogant, condescending arsehole.
Hi Karen,
I can't believe how behind I am - I am reading this post on March 1st!
Nice article. I had no idea there are snap-on face plates. Will hit Home Depot on the weekend.
Two comments:
1. It really bugs me that the outlet is a bit askew. Is there no way to fix that? (I can't help - that's my own ' wiring' at play here - I just like everything plumb and square [it's a disease!]).
2. Could you write a post on how to fix the cracked finish in between the floor boards? If you zoom in on the photo where you comment on the splatters on the floor - it shows there very nicely.
I think there is one fugly outlet in the basement - I will try to replace it following your instructions!
Thanks!
Hi Alena, Cracks between the wall and the baseboard can be filled with caulking. But between the floor and baseboard or quarter round there's always going to be a crack if it's wood against wood. Seasons change and the wood shrinks and swells. Humid = less crack, dry = more crack. ~ karen!
You've inspired me! This morning I didn't feel like waiting (& paying) for a plumber to come to relight the pilot in my gravity furnace. So I figured it out and did it my damn self. I felt like a total bad-a$$! Thanks for helping me feel like if those dummies can do it I can too.
I'm not, by any means, bad mouthing all plumbers, just the ones my landlord employs.
Ha! Oh there are dummies in every business from brain surgeons to tree planters. :) ~ karen!
One VERY important thing to do after flipping the breaker .... and perhaps I missed it in the how-to or the comments...... and this especially goes for older structures:
PROVE IT....either plug a reliable tool or appliance into the socket or use a voltmeter or multimeter to ensure there is not a volt of electricity coursing through that terminal.
Plugging into both sockets is a good idea, too, if you don't have a meter. Usually /3 wiring to outlets is reserved for things like kitchen counter-top outlets, but long ago I got zapped because someone had wired two circuits to a split outlet in the middle of an upstairs hallway. To code, those breakers would have had to be tied, but they were not and I was a naive university student who didn't think to check the second socket.