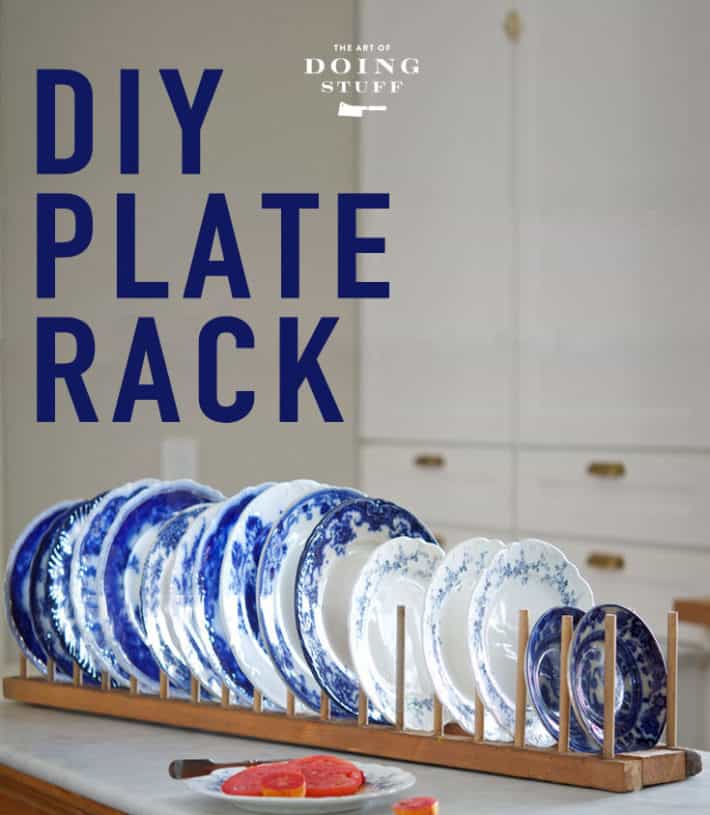
Have you always lusted over antique plate racks? Yeah. Me too. But I always seemed to be too cheap or too late to buy one. So I made one instead and you can too. I think. I mean I don't really know your skills all that well, but if you can drill and glue you'll do fine.

O.K. If you're interested but scared let me calm you down. This is a reproduction antique plate rack. That means it's supposed to look rustic. That means, you can make mistakes, cut your angles wrong, break off a dowel by accident - and it'll only add to the charm of it.
So don't worry about it. We're not building a walk in closet for J Lo here people, we're making a clunky wood plate rack.
But it'll be pretty. Don't worry. Calm down.
You might think that flattering overalls are the rarest thing in the world but the rarest thing in the world is actually a half decent looking plate rack.
For the past 3 years I've spotted a multitude of plate and platter racks at antique shows but they either aren't for sale or they've already been sold. Either way the vendor goes home with a black eye and an unfortunate memory of me. I go home without a plate rack.
Please understand I don't curl up my fist and punch the vendors, I mean we're all civilized here. I'm at an antique show, not a cage match. I hit them with a wood rolling pin.
A few years ago I finally decided to just make an "antique" plate rack. It's a couple of pieces of wood and some dowels. How hard can it be?
Turns out, not very hard at all.
And now that I've figured out the measurements and everything, it'll be even easier for you.
Put your unflattering but you feel cute in them anyways overalls on, it's plate rack making time.
Table of Contents
DIY Plate Rack
You can make this antique plate rack to be any size you want. It can be wider for platters or shorter if you just want it to hold a few dishes.

MATERIALS 🪜
- Wood dowels ( cut to 6" lengths, each approximately ⅜" in diameter )
- 2, 24" lengths of 1" x 1" wood
- 2, 3" lengths of 1" x 1" wood
- Wood glue
- ¼" dowel pins (¼" refers to the diameter)
TOOLS 🪚
- Saw
- Drill
- Drill bits
→ QUICK REFERENCE ←
- Cut dowels to 6"
- Cut 1x1s to length (2@24" and 2@3")
- Drill holes every 2" down the centre of your long pieces of 1x1
- Lay drilled long pieces down and attach short pieces to inside to create a box shape
- You can attach the short ends by using wood dowel pins or just glue, screw and clamp.
- To finish the rack, using wood glue, insert 6" dowels into all of the holes.
STEPS
If you already understand how this is made really all you need to know is that your dowel holes need to be 2" apart to properly support a plate or display a platter. For everyone else ... these are the steps.
- Cut your dowels to length. To speed this process up, I tied several together with an elastic band on both ends and cut through them. I got my dowels at the Dollar store in the craft section.
- Cut your 1"x1" to length. I suggested 24" but you can make your plate rack whatever length you want.


- Starting 1" in from the end, mark the centre of the wood rails every 2" with a Sharpie. This is where you dowel holes will be drilled.
- Drill straight through the wood rails at the Sharpie marks using a drill bit the same size as your dowels. In my case it was a ⅜ths of an inch drill bit for my ⅜ths of an inch dowels.
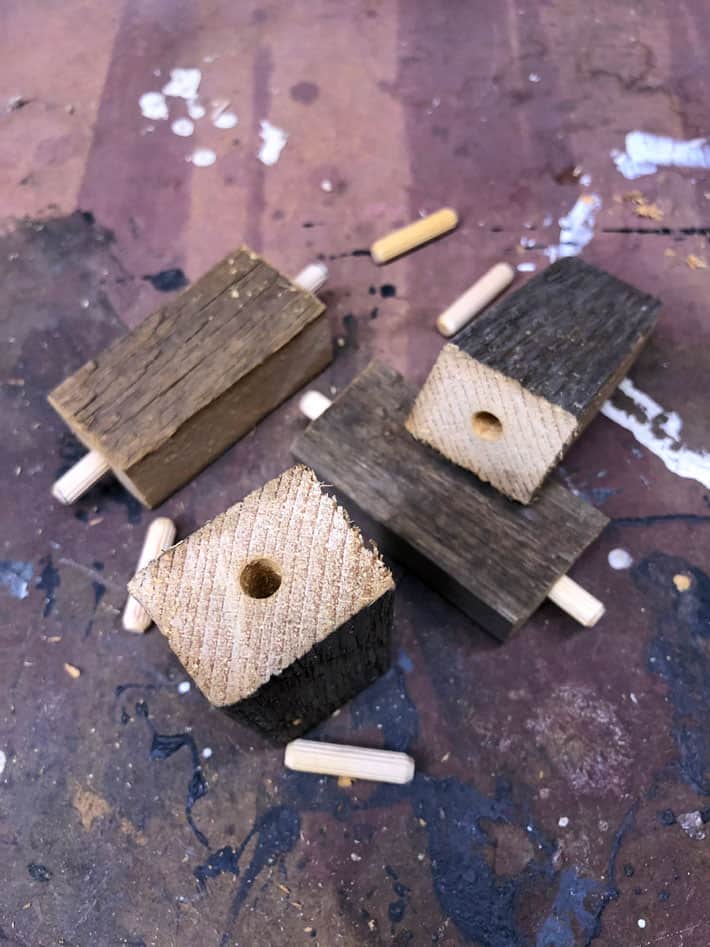
- Change to a ¼" drill bit for your dowel pins and drill through the ends of your shorter wood pieces. Don't drill all the way through. Just go in 1" or so.
- Drill corresponding ¼" holes in your long strips of wood and check to see everything lines up and fits.
- Assemble your plate rack by gluing and clamping the ends together and inserting the dowels into the holes. There's no need to glue the plate dowels into place. That way, if you happen to have a really large platter you want to hold, you can just pull out two dowels to make a larger space.
- Stain your dowels to match your wood if you like. Since I was using strips of old barnboard and brand new dowels, I stained my dowels with my DIY barnboard stain made out of steel wool soaked in vinegar. It doesn't stain the wood, but instead creates a chemical reaction which instantly darkens it.
TIP
You can also just screw the ends in with 1 ½" screws from the outside of your rails into the end piece but you'll have a screw head showing from the outside of your plate rack.
To minimize the look of the screw head, countersink the screw which will create a small pocket. Mix some sawdust together with wood glue and fill the pocket. Once dried it'll resemble wood and camouflage the screw head.
You can see an example of that in my DIY egg rack post.
This Photo Shows it All
All of those intricate steps makes this project seem really hard, so if that's the case for you and you're more of a visual learner, this photo pretty much sums it up.
If you understand this photo, you should be able to tackle this without even using the instructions.

You can read about how to make steel wool stain and how it works here.
You're done. You now have a plate rack.
Using a Drill Press
This is where I tell you that you should get a drill press if you have room for one. Just a little one. You don't *need* one for this DIY but it does make your work faster and more accurate.
- a drill press guarantees all your holes will go straight down and not at a weird angle.
- a drill press is incredibly easy to use.
- you'll use a drill press more than you think you will.
TIP
If you're using a drill press don't forget to clamp some sort of fence to the plate. You'll use it as a guide to make sure all your holes are aligned perfectly.

See? That's all there is to it. It's fun really. I mean, for me it's fun. Our definitions of fun might be slightly different.

The only thing that's left is filling it up.
I made my plate rack REALLY big. Because I'm hoping to be able to use it on the lower shelf of my new antique hardware store cabinet. I also made 2 of them because I wanted the plates to go from one end of the cabinet shelf to the other, but one long plate rack wouldn't have fit into the space.

MEASUREMENTS
Length of entire piece - Anything you want.
Width of entire piece - 5"
Space between dowels - 2" from centre
Length of dowels - 6" but you can make them as short as 4" if you like.

OTHER USES
- platters
- cookie racks
- spools of ribbon (make your dowels further apart for big spools)
- pot lids
- books

If you happen to come over ...

and you like my plate rack ... (and wood rolling pins)

They're not for sale. But I have a pair of overalls that are.
→Follow me on Instagram where I often make a fool of myself←


Karen,
I love your blog and the way you write! I love that you are not afraid to try anything. Keep on! All of it!
Being a contractor, I wanted to caution you about your saw technique :-) you are "cutting off the limb you are standing on" in the picture you posted. You have set yourself up for a pinched cut and possible kickback which can rather quickly reduce the number of fingers on your left hand. Or worse. Being a blogger and extremely capable person would be much much harder with only five fingers.
Don't cut pieces that are too small, and cut with both hands on the saw as much as possible. In your picture, you are cutting backwards from how you should be, and things can get dicey pretty quick :-) A girl with your talents should buy a chop-saw. You will love it as much is your drill press and it will give you something else to write about--as well as allowing you to keep all ten fingers!
All of my sliding compound miter saws were stolen from my shed last year. I'm waiting for the perfect one to replace them. (a wall hugger) ~ karen!
(and yes, I should have been on the other side of the table, but with taking pictures, etc. it's sometimes hard to configure things so everything works for a photo) ~ karen!
Sorry to hear you had some stuff stolen. Makes you insanely mad doesn't it? Especially for you and for contractors like me, it's not a saw they took it's a livelihood!
If you have the space get a flip-over-saw, I love the DW743 so much. A rip saw and a cross cut saw in one machine (bit pricey, although it'll last forever). It makes this tired old bricklayer a 'nearly' carpenter... (pretty big though, you'd need about 30" by 30" of floor space...).
Yup. Don't have that space. I'm waiting for a wall hugger sliding compound miter saw. Craftsman makes one but they aren't available near me right now as does Bosch but it'd be around $1,000 with tax. :/
I love that idea.. though my kitchen doesn't have room for plate racks and my cupboards are too narrow for cookie sheet racks. "Sigh". I would LOVE to have my own little workshop with all my own tools. My BIL has multiples that he has purchased at yard sales and pawn shops so I'm sure he would help me build my inventory. Now I just need the place. If my hubby would sell his '69 Barracuda that he hasn't had going in over 20 years and is taking up the whole garage, then I could use that space. "Sigh"... maybe someday.
If your husband selling his Barracuda is plan A, have a feeling you better go to plan B 🙄
I have been looking for a drill press for 2 years but (on and off); I'll need to step it up.
Fortunately, I have an amazing next door neighbour who has almost every single tool there is and he encourages me to borrow anything I want (but I still want mine).
Since I have 4 plates (and another 4 somewhere in the basement, just in case) I am not in a need of a plate rack but I very interested in the table/stand in the picture with a bottle of glue and the two racks (one done, one clamped). Karen, where did you get the metal base for it? I assume you cut the plants for the top yourself.
That is an old Ikea clothing hamper that I took the hamper off, painted the base and put it on its side to make a table from. It's the footrest for my Constellation Chair I also stand it upright with smaller bits of wood to make a high table.
Hah! That was a brilliant idea. I recently found something at the curb, it looks like metal (not sure) with some strange plastic coating and it's not in the best shape, I will need to clean it up a bit.
Dish dowels...….I like the sound of that but not sure why?
Those are dowels used for breaking dishes I assume? ~ karen!
My kids would recognize that phrase...
oooohhhh look at THAT!
AAAack, cost HOW much?!
Screw it, I'll just make one myself.
Then I get the humble brag rights to it.
I am envious, I have no drill press nor even a saw nor room or place for either. So I will once again live vicariously through you Karen.
I suspect that if you have or can borrow a hand drill, you could do a pretty good job of drilling decently vertical holes with some practice. You could perhaps drill the holes just slightly larger to allow for some adjustment, add some latex caulk to the holes to help hold the dowels in place... After drying, peel off excess caulk.
What a cool project. Thanks for the details, now I can make one for my dessert plate collection.
I need dessert plates! I only have about 4 of them. Obviously I'm not a big enough dessert fan, lol. ~ karen!
I am crowning you The Lady (because I saw a glimpse of "The Lady" in your dining room)....who can-who will and who does. No thinkin about it,pondering,buying tools she can't find because the sons think the old lady doesn't need tools so I'll just take these to my house!@#$%. Nope you just think it and presto change-o it is done. I am astonished by your skills and acumen but durn you make me feel just a little bit inadequate. I cheered myself up by reassuring myself that gals like you gotta be one in a million? Although your fans seem pretty durn handy themselves. Back to feeling-I'll just buy the !@#stuff and support capitalism!!!!!!
Support capitalism. May I use that?
The world needs all kinds. ;) I would have been happy to buy one of these but no one would let me, lol. ~ karen!
Karen you are a genius. That is a lovely plate rack! I'll be making one soon, or five...moving to a new house and the plate rack will be an excellent little thing!
Dear lord it’s brilliant, I say. brilliant! Don’t mind me... I’m going to be measuring all of my shelving for pots, pans and glass bakewear for this business. It’s going to be pretty darn spectacular.
Pretty plates! I don't think I have ever seen a photo from that angle in your kitchen before. The dining room orientation is opposite to what I had imagined.
I had the same dilemma finding racks for my cookware. Hubby had the same idea. My expensive cookie sheets won’t get scratched! Happy wife happy life!
What is that tiger striped delicious looking edible? Tomato? Is it as delicious as it looks? If so, may I know the variety so I can grow my own delicious stripy _____?
Thanks!
That is a Speckled Roman tomato. It's technically a paste tomato but I just use it for anything. When it's truly ripe it's dark, dark red inside. ~ karen!
It's like you are in my head!! It's gotten to the point that I think, "I better see if Karen has written about this!" I totally want a drill press!
As for the overalls, have you seen GardenGirlUSA? They are so comfy and you can bend and move without showing a plumber butt! I love mine.
Two things:
1) overalls were, in fact, one of the best things I purchased this year. Plus, they're cute. Plus they're THE BEST to garden in.
2) first thing I thought about when you said where you were putting your racks (heheheheh) was "not with toddlers"...because i have them. I'm envious. Maybe in 10 years.
I Love My Drill Press!
Nice job on the plate rack Karen. I love your vintage plates they are beautiful.
A few years a go husband wanted to buy exactly what you were talking about.... I talked him out of it thankfully. An you are right they are easy to make an when you do you get them exactly to measure bonus in my books any day of the week.
You are a genius. Great job as usual. Love it.
You are a genius. Great job
I want a drill press. I do actually have a baby drill press for a Dremel! Sometimes I want a bigger one, though. Now I also want a plate rack. Easy peasy, right?
Pretty much, yup. :) ~ karen!