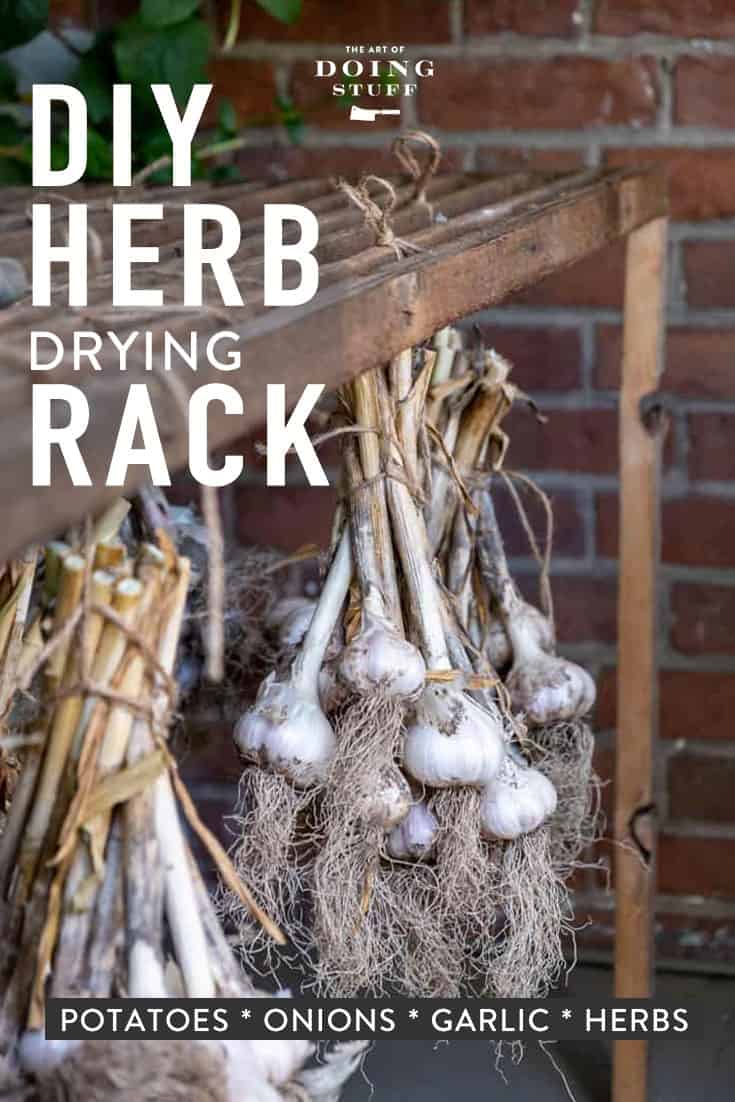
An antique looking herb drying rack that you can also use to cure garlic and onions. Hang it from the ceiling or use it standing on a porch. Perfect for drying all those summer herbs for winter use.

I grow my own onions and garlic. You know that about me. I grow herbs. Also ... quite a well known fact. What you might not know is that I hate my porch.
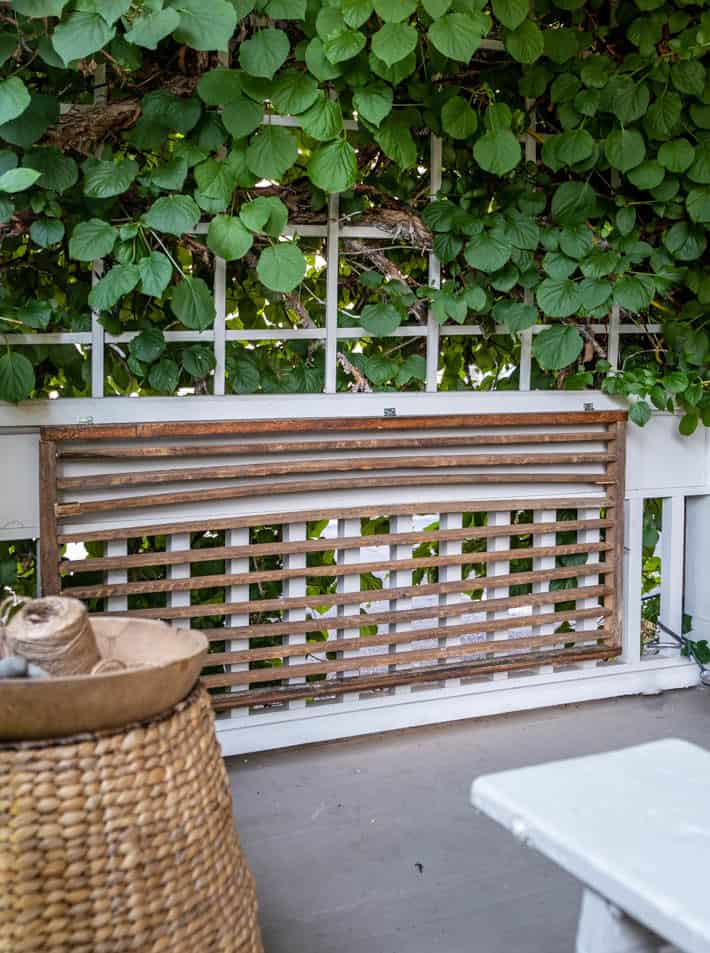
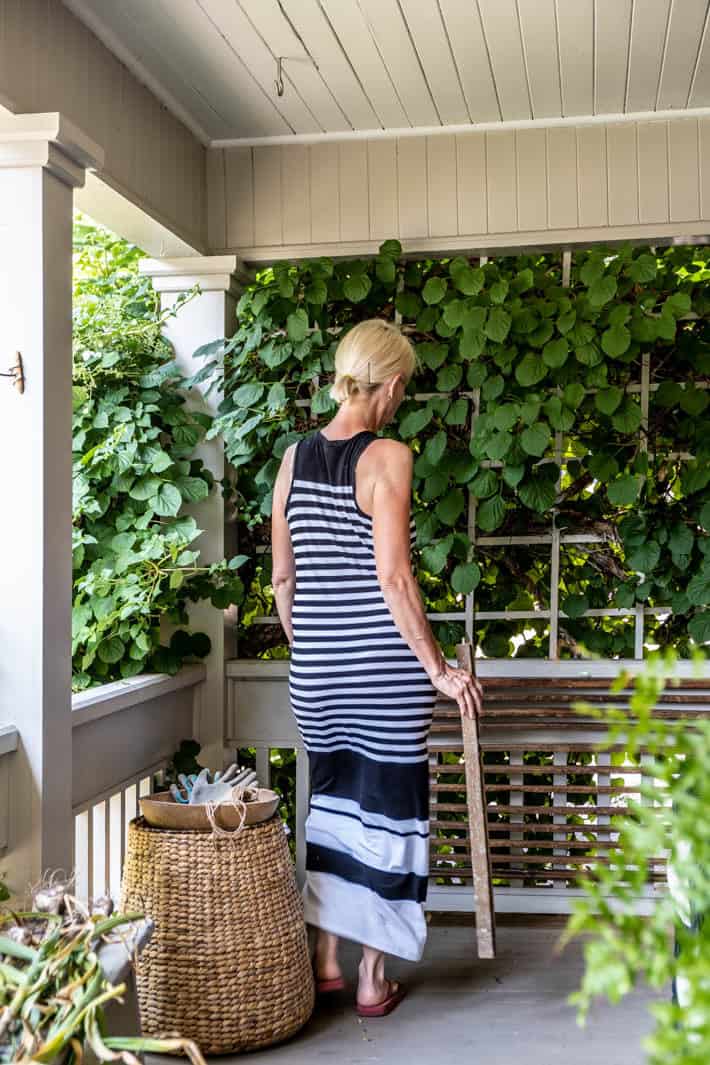
So what's the correlation between these two things? This herb drying rack made me realize what was missing from my front porch. And yes, what was missing was an old timey, antique looking herb drying rack. My porch is long and skinny with everything lined up in a row because there's no other way to line things up.
Adding this herb drying rack to the end of the porch creates something running in the other direction plus visually it shortens the length of the porch.

Also it has a purpose, which is pretty important in a house that's only about 1,000 square feet.
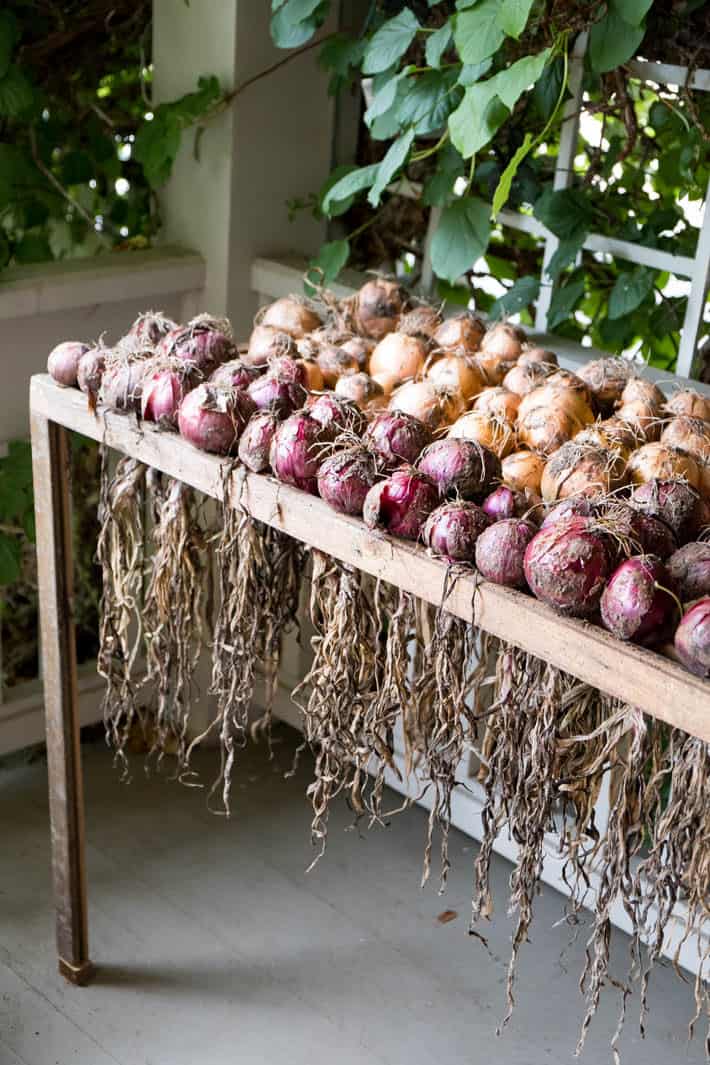
Growing what can only be described as a pathologically large garden for someone who lives alone, I preserve a lot of what I grow to use later in the year. Green beans get canned of course, cucumbers are turned into pickles, tomatoes are roasted for freezing, onions are cured and herbs are dried!
And of course there's garlic. I grow hundreds of bulbs and they all have to be hung and dried for several weeks. Here's a tutorial on how and when to dig up garlic if you aren't familiar with the magical growth of garlic.
This ventilated drying rack lets me cure vegetables and dry herbs. Plus it folds out of the way when I don't want to look at it. Which will be never because as I mentioned ... it makes my porch look better.
Table of Contents
Wooden Herb Drying Rack
Materials
- 10, 4' lengths of 1x2
- 2, 50" lengths of 2x2
- 2, 20" lengths of 2x2
- 2, 28" lengths of 2x2
- 3 small hinges
- 30, ¼" fluted dowel pins
- Wood glue
Tools
- Drill
- ¼" drill bit
- Screwdriver
- Hammer
Detailed Instructions
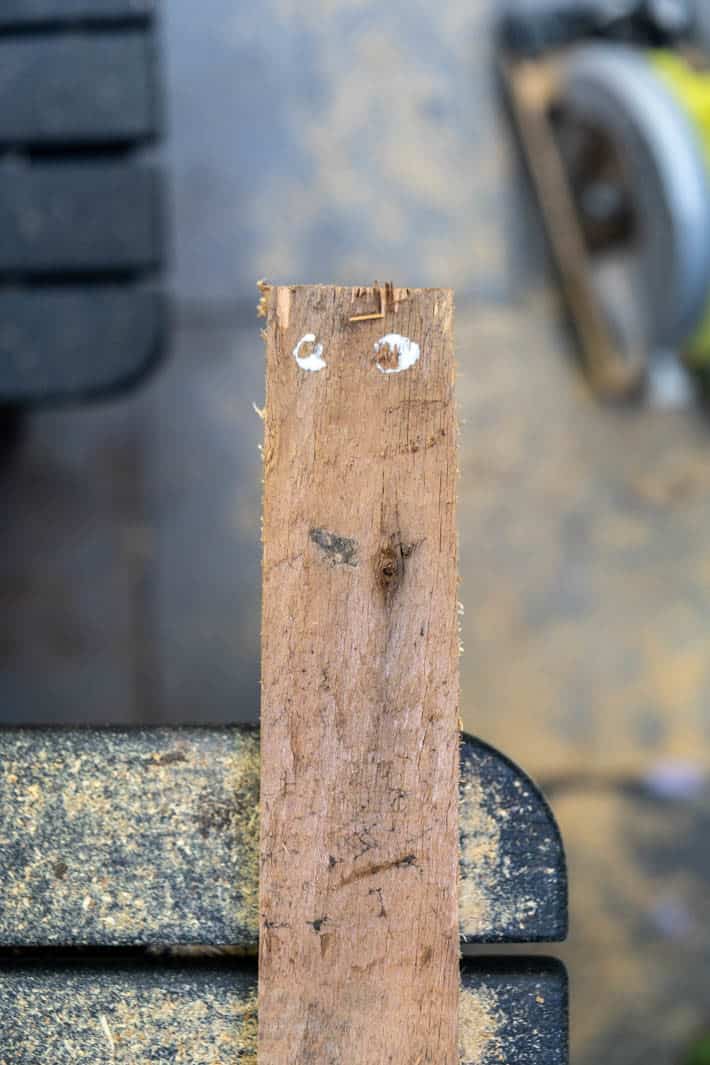
- Drill ¼ holes into the very centre of both ends of all the 1x2s. To make your holes at least partially accurate, make a little slide for your drill to run along, making sure the drill bit lines up in the centre of the ½'s.
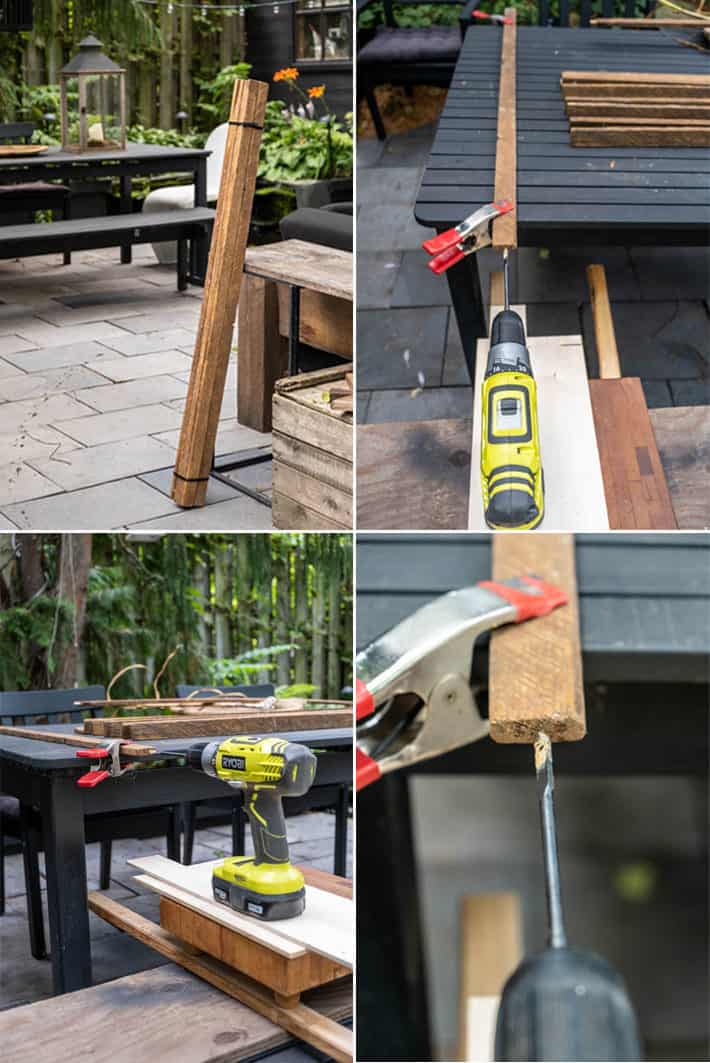
2. Squirt a bit of wood glue into each hole and insert a dowel pin into all the holes
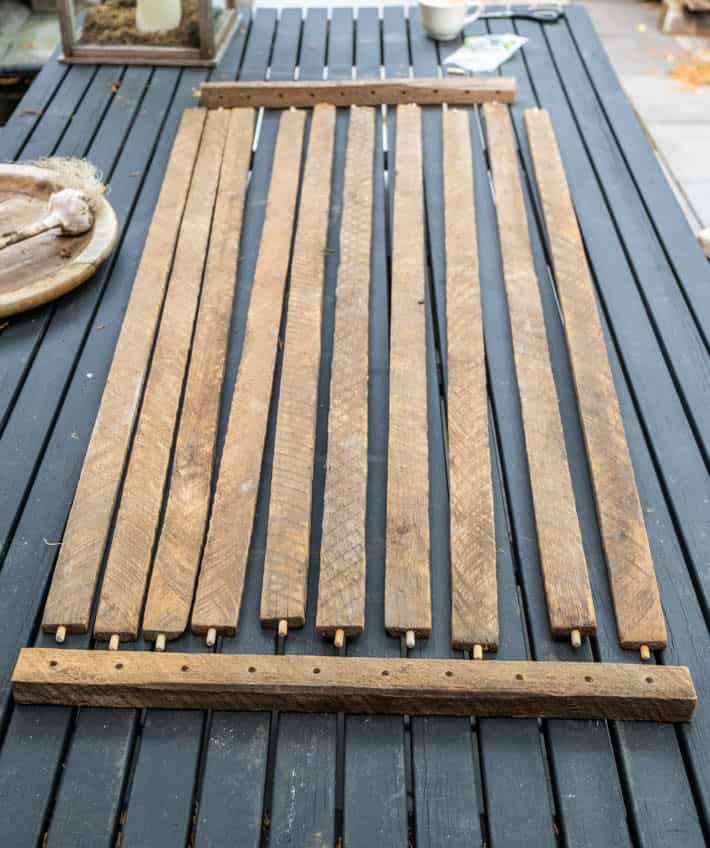
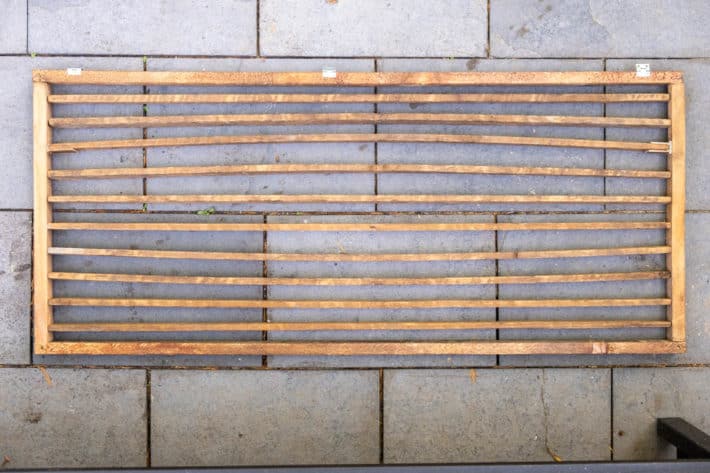
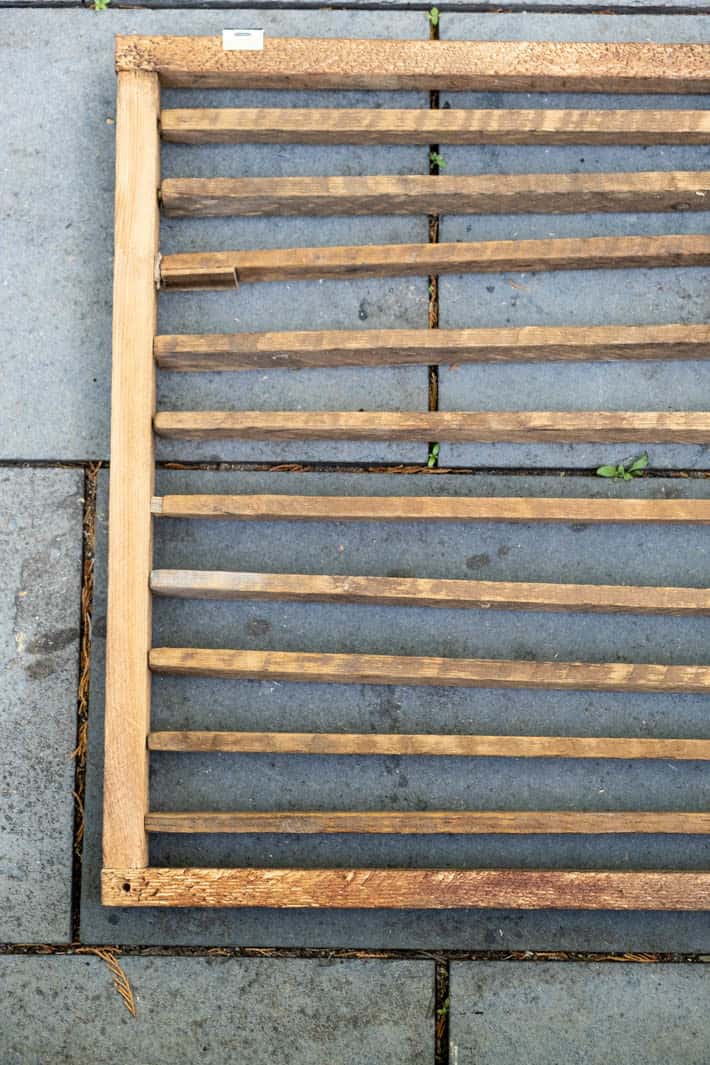
3. Drill 10 holes, spaced evenly into the 2, 20" lengths of 2x2. Squirt a bit of wood glue into each hole you just drilled into the 2x2s and insert all of your 1x2s.

4. Tap with a hammer to make sure everything is set tightly. Drill 2 holes into the each cut end of the 20" 2x2s. (you will have 2 holes in each end, for a total of 8 holes)
5. Squirt a bit of wood glue into those holes and insert a dowel pin into each.
6. Turn the rack on its side and dab glue onto the ends of the dowels that are sticking up. Carefully lay a 50" length of 2x2 on top so the glue transfers to the wood, marking where you should drill your holes. These will be the long sides of your herb drying rack. You can make this even more accurate by clamping a piece of wood to the sides of your 2x2s to make sure you're laying your top piece of wood straight down.
7. Drill holes where the glue has indicated you should. Repeat with other side and other 50" length of 2x2.
8. Attach the 2, 50" lengths to the drying rack after squirting a bit of glue into the holes, and screw your 3 hinges in, evenly spaced.

9. Let the rack dry overnight
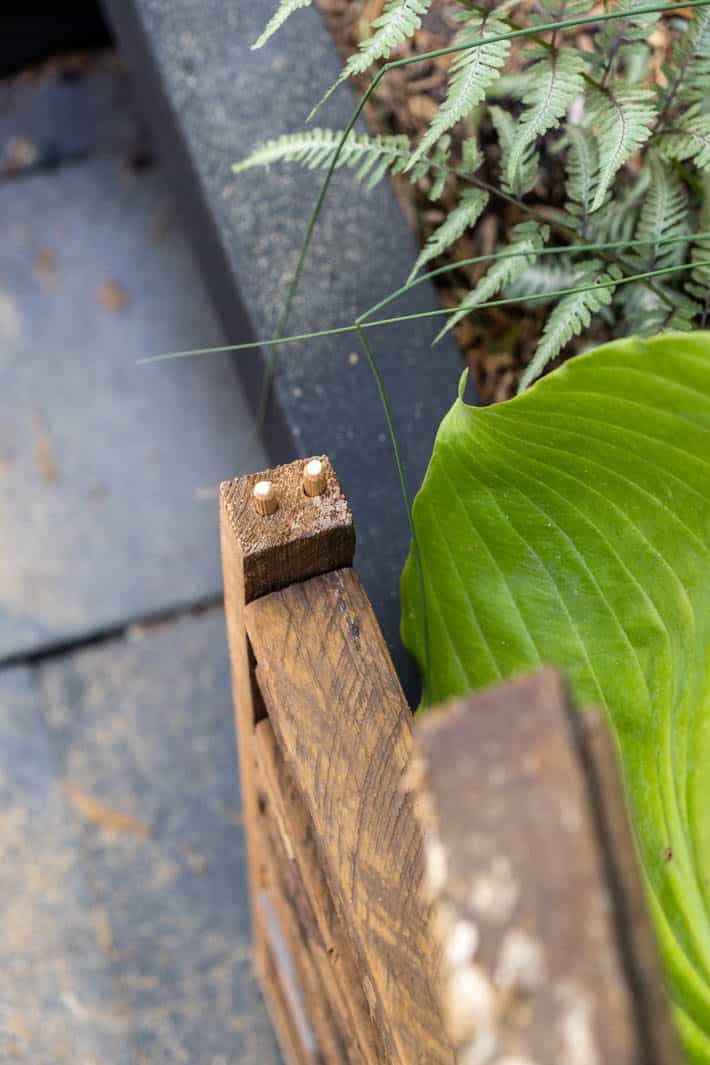
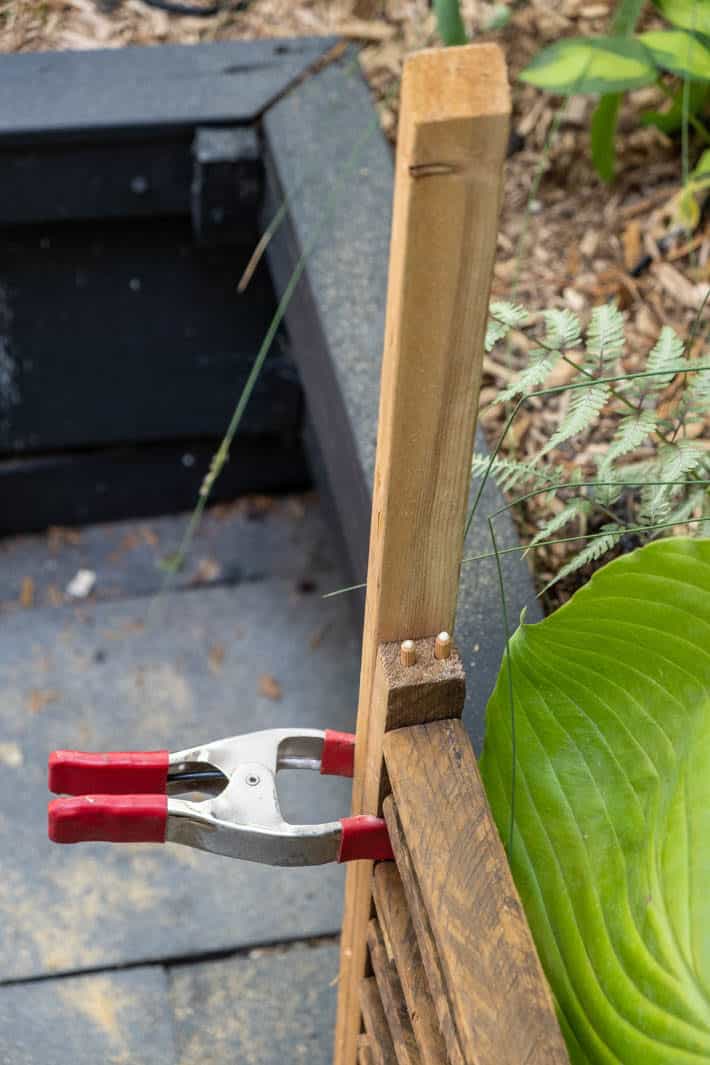
10. Drill 2, ¼" holes into the underside of the drying rack. One on the left corner and another on the right corner. This is where your legs will attach
11. Drill a ¼" hole into the ends of the remaining 2x2s - 28" lengths. Insert glue and a dowel pin into each hole. Let dry.
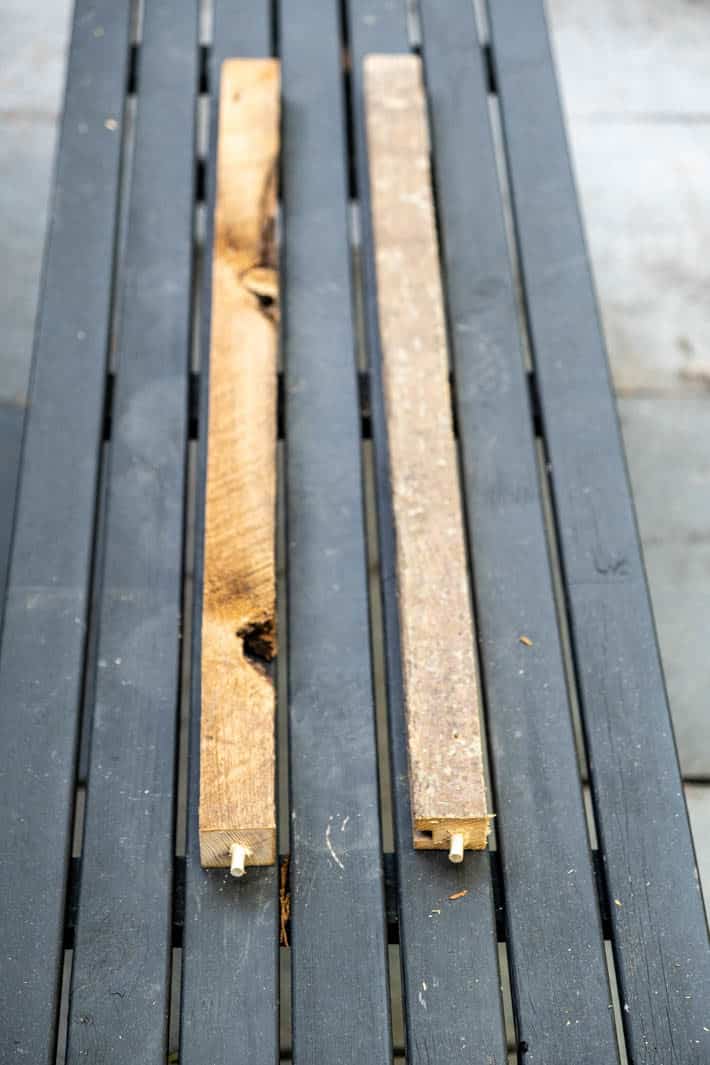
12. Hang your drying rack 28" off the ground.
13. When you're ready to use it, pull the rack up into place and insert the wood legs with dowels into the holes underneath.
14. Remove the legs and fold away when done.
Simplified Instructions
I've given you measurements and all kinds of complicated instructions but all you're really doing is making a wood rectangle and then running more pieces of wood in the middle of it. You don't have to use dowels to piece it together, you can use screws or nails or whatever you want.
- Screw together some 1x2's to form a rectangle of the size you want.
- Measure the interior width and cut as many lengths of 1x2 as you need to fill the interior with slats that are 1-1.5" apart.
- Screw the slats inside your rectangle, making sure you pre-drill your holes first to avoid splitting the wood.
- Hang it with rope. (no need to make legs that way)
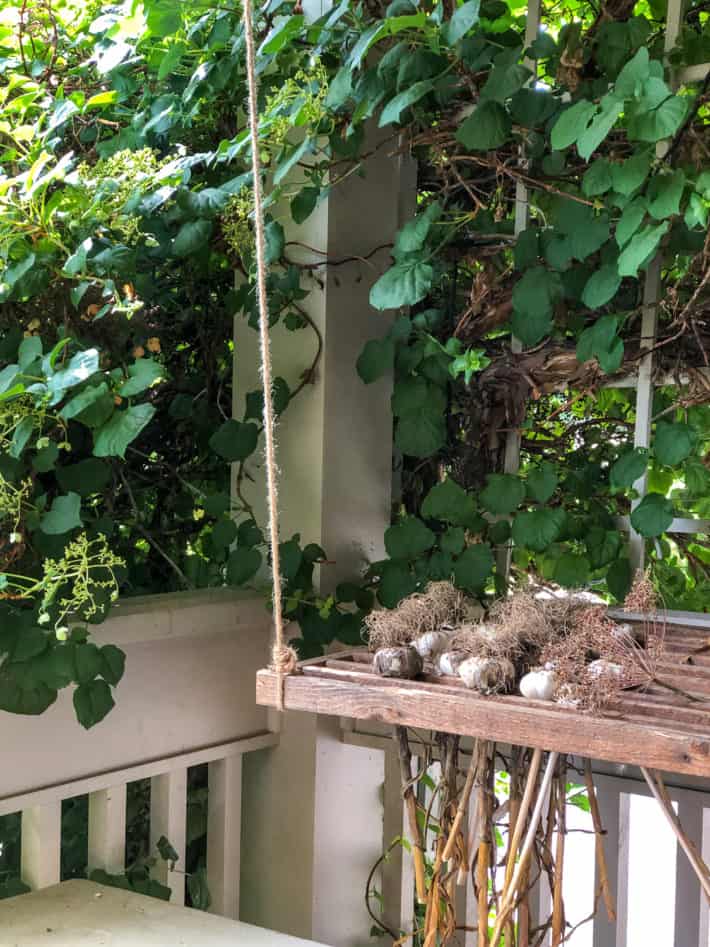
Here I've hung my drying rack instead of using the front legs. This on account of the fact that I stepped on one of the legs on my porch last winter. It was hiding under the snow.
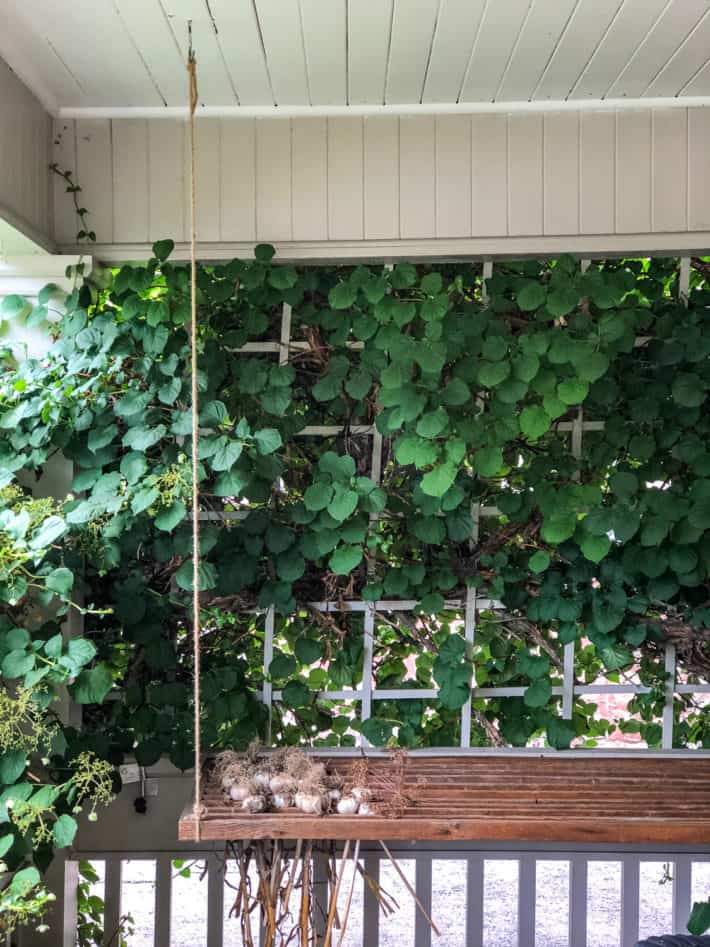
To hang the drying rack in your house just screw hooks into the ceiling (find your joists people) and tie rope to each corner of the rack.
Hanging this over a kitchen island will give you somewhere to dry herbs indoors, away from bugs and outside dirt.
It'll also give your home instant olden days charm.

It can be as wide or narrow as the space you have for it and if you really want to save time you can forget the hinges and legs and just rest it on a couple of sawhorses for your herb drying needs.
Do you have herb drying needs or am I living in a world that imagines people have herb drying needs?


Make an Herb Drying Rack (that's ALSO A Fold Out Table!)
Make an antique inspired herb drying rack for drying herbs and curing garlic and onions. Also works as a folding table!
Materials
- 10, 4' lengths of 1x2
- 2, 50" lengths of 2x2
- 2, 20" lengths of 2x2
- 2, 28" lengths of 2x2
- 3 small hinges
- 30, ¼" fluted dowel pins
- Wood glue
Tools
- Drill
- ¼" drill bit
- Screwdriver
- Hammer
Instructions
- Drill ¼ holes into the very centre of both ends of all the 1x2s. To make your holes at least partially accurate, make a little slide for your drill to run along, making sure the drill bit lines up in the centre of the ½'s.
- Squirt a bit of wood glue into each hole and insert a dowel pin into all the holes.
- Drill 10 holes, spaced evenly into the 2, 20" lengths of 2x2. Squirt a bit of wood glue into each hole you just drilled into the 2x2s and insert all of your 1x2s.
- Tap with a hammer to make sure everything is set tightly. Drill 2 holes into the each cut end of the 20" 2x2s. (you will have 2 holes in each end, for a total of 8 holes).
- Squirt a bit of wood glue into those holes and insert a dowel pin into each.
- Turn the rack on its side and dab glue onto the ends of the dowels that are sticking up. Carefully lay a 50" length of 2x2 on top so the glue transfers to the wood, marking where you should drill your holes. These will be the long sides of your herb drying rack. You can make this even more accurate by clamping a piece of wood to the sides of your 2x2s to make sure you're laying your top piece of wood straight down.
- Drill holes where the glue has indicated you should. Repeat with other side and other 50" length of 2x2.
- Attach the 2, 50" lengths to the drying rack after squirting a bit of glue into the holes, and screw your 3 hinges in, evenly spaced.
- Let the rack dry overnight.
- Drill 2, ¼" holes into the underside of the drying rack. One on the left corner and another on the right corner. This is where your legs will attach.
- Drill a ¼" hole into the ends of the remaining 2x2s - 28" lengths. Insert glue and a dowel pin into each hole. Let dry.
- Hang your drying rack 28" off the ground.
- When you're ready to use it, pull the rack up into place and insert the wood legs with dowels into the holes underneath.
- Remove the legs and fold away when done.
Notes
- I know. It's overwhelming instruction. Just make a rectangle with thin wood, then fill it with slats. You can just predrill holes and screw it all together instead of fussing with dowels if you want.
- Use your rack for drying garlic, onions, herbs or even potatoes.
Ways to Dry Herbs
- Tie them together by the stems with a string and hang them upside down in a dry area until they're crispy.
- Lay flat on dehydrator trays and dehydrate at 110 F (43C) until fully dry and stems snap instead of bend.
- Lay in a single layer on a baking sheet and put them in your oven at its lowest setting. Check very 30 minutes.
Storage
When the herbs are dried, using whichever method you chose, you can either leave the herbs hanging on their stems, or you can run your fingers down the stems to remove all the leaves and store them in airtight container. If the jars are clear like mason jars, store them in a dark area like a cupboard.
Surely you have garlic curing needs, I mean, you aren't a gaggle of fancy rich people who just go out and BUY garlic willy nilly are you? Oh. You are.
O.K. well, I happen to know everyone needs a cute little flip out table. It'll fit on a balcony, in a garage, shed or porch.
And if it's going on your porch ... it'll definitely make it look better.
→Follow me on Instagram where I often make a fool of myself←


I have absolutely no need for this, but if I had a porch I'd hang it on an exterior wall anyway because I think it's beautiful.
That is a slick trick to mark the holes for drilling by putting glue on the dowels!!
The harvest is bountiful this year!!!
Karen, you never cease to amaze me. Your tips on clamping and getting things to line up correctly are great...and after I read them....so obvious...smack...I should have had a V8! LOL
Thank you as always.
Imagine an 1,100 square foot house with five people in it! I need this table EVERYWHERE! I'm going to adapt it to be freestanding, so I can use it when I iron the fabric yardage for sewing projects. And for sweater drying. And drying the kids paintings. Yeah, I *definitely* need at LEAST one of these... XD
Such a lovely table that I, personally do not have a use for, but I love the look of it!
I thinking a stool I rigged up could have been used for something like this. I had a broken chair, no back, and the wicker rotted out of the seat. I wound old clothesline someone had kindly gifted to me, around in a figure eight, over and under from side to side. Then I had other wire - this happened to be long strings of wire from burnt out strings of Christmas twinkle lights after removing the lights portions. I wove those through the clothesline, and came out with the cutest chippy paint extra seat for my patio.
I’m thinking an old broken chair might be another starting point for a small drying rack.
Perhaps not - it just reminded me of using what you had around…and coming up with a useful thing! Love this, Karen. It looks very homey, antique-y and fun on the end of the porch. I’m guessing it’s time for garlic harvesting pretty soon?
Garlic harvesting time happened a while ago. :) Now we're onto onion harvesting. ~ karen!
I think it’d make a great bar on the porch! And then I could just buy a cheap laundry drying rack for my veggies.
Are the sticks from the antique fair? I think I remembered some sticks being involved....
Where does one find antique tobacco drying wood?
Because I'm thinking that the appearance of the wood is more than half the charm!
It wouldn't be authentic, but you can age wood by rubbing it over with steel wool dipped in vinegar!
Love it!I don't have a porch but I put all my herbs for drying into mesh onion,fruit etc bags and hang them from the ceiling in my laundry room. You are very clever! I enjoy your blogs. Keep up the good work.
what a great fold-away table!
Oh shit. I grew garlic this year.
*runs out to check on garlic*
That is a very clever idea and I love the improved porch.
I will definitely use this.
Thanks!!
Dear Karen,
Lovely tip for anyone with summer plant containers who have wee beasties that love to destroy them looking for insects or just our pretty plants. Grow extra garlic to put one bulb in each planter. Trust me please, as I share my meadows and gardens with a family of bears, raccoons,deer, fishers so on and so forth. An elder gave me this hint and I have yet to experience any theft or displacement of any pots since then while I still have all the beasties with one new addition, a very large gorgeous moose. Yesssss, I now plant extra veggies to allow for those munchkins. Fences are so out of the budget that this works for me very cheaply in the long run. I shall cease blathering now. Do enjoy the rest of summer and our lovely fall. Regards, Linda
i love it. i am going to have to make one too. i don't have an enclosed porch but i certainly will find a place to put it.
Cute table, love the old wood you used! And even though I love old wood, is that black table you worked on a resin picnic table and benches or painted wood? A new tap house here has super resin tables on their patio and they impressed me. If it’s resin, where did you find it? Thanks!
Hope you had a lovely break. Oh, and I want your striped dress when you are tired of it! 😉
Welcome back, Karen! Hope you've had a nice mini vacation. Missed your blog. This is such a useful project. Love it!
Thanks Jane! I ended up working quite a bit :/ but did get to take a break from writing and photos! ~ karen
Clever. The Instagram story on how you rigged up a drill press for this project was really helpful as well. Thanks.
Thanks David! The slide for the drill was a bit of a hack but it worked! ~ karen
I LOVE this design! Thank you for sharing. Plus, love your porch too!
Thanks Jennifer! ~ karen
Thanks for showing me how to use those little connecting dowels! I love fold-down tables and I DO have garlic and herb drying needs too. ;-)
That really IS a cute little flip out table. I'd like mine in chippy white paint, please. And now I must find a place to put it!