Are you hungry? I'm hungry. Specifically for a hamburger for some reason. A big one. My wish for a hamburger has nothing to do with VCT tiles by the way. I just thought I'd mention it since you're here and we're talking and all.
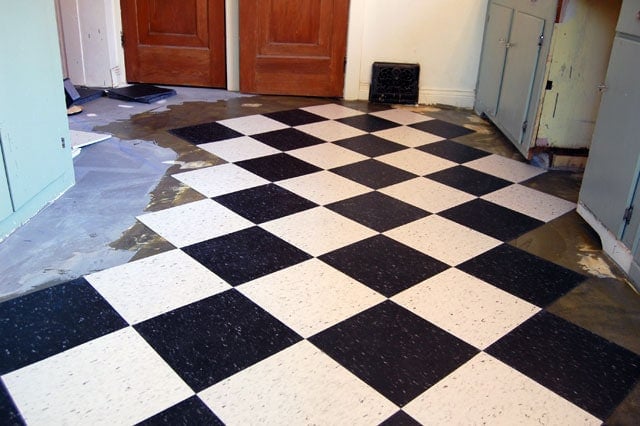
My floor is finished. Done. Complete. I love my VCT (vinyl composition tile). Here's why ...

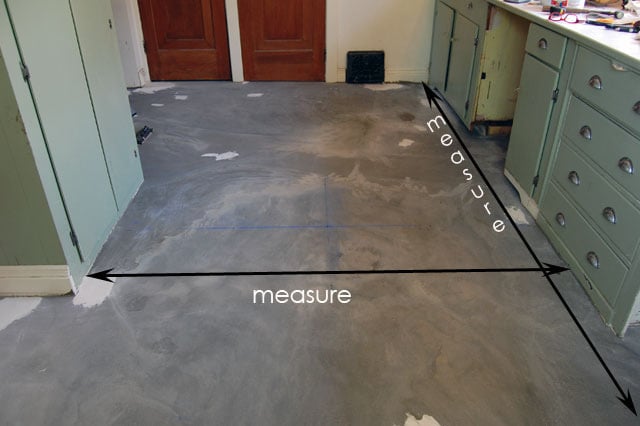
The biggest pain about laying the tiled floor is figuring out the line you're going to lay the tile on.
This is going to get a bit confusing so pay attention.
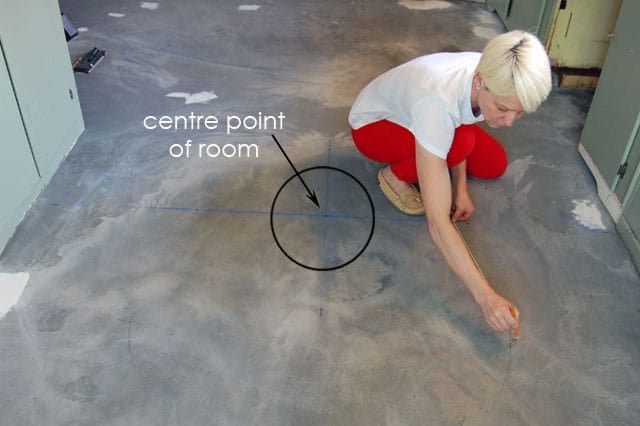
You need to figure out the centre width of your room, and the centre length of your room. Where these two lines dissect is the centre point of your floor. The centre point in the photo below is where the two blue chalk lines cross.
So that's pretty easy actually. And that's all you need to do if you're laying a "checkerboard" floor. Just snap your chalk lines and start working.
If you’re laying the floor in a diagonal pattern like I did, you need to do a little more measuring. You have to get your two diagonal lines. To do that, measure from your centre point to the nearest wall. In my case that measurement is 3 feet. Then make a mark that's ⅓rd the length of that measurement. In my case, that's 1 foot.
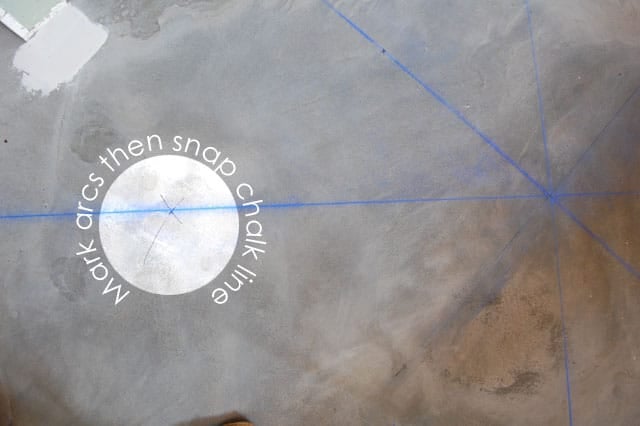
Cut a piece of string that measures longer than 1' and less than the remaining 2'.
Your measurements will be different, but the principal will be the same. 10' from centre point means a mark point of 3'3" and a string length of around 4'-5'.

You're going to tie a pencil on the end of this string and use it to mark your arcs by holding the end of the string on your "x" mark and running the pencil into an arc. Do this on all of the "x" points and where the arcs intersect will be where your diagonal lines are.
I fear I'm not explaining myself well.
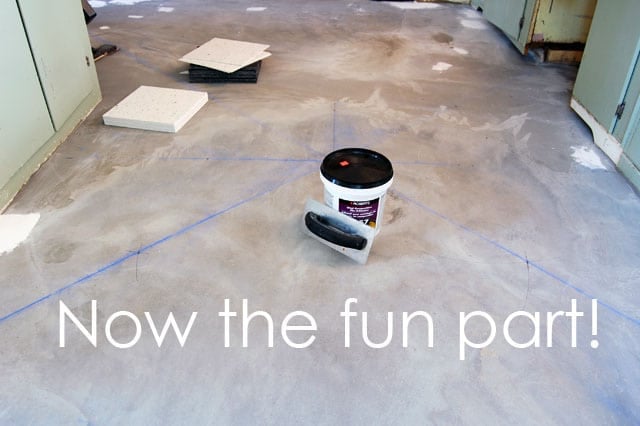
Once you've figured out your lines, the hard part is done. Now you have the fun part of laying the tile to look forward to.
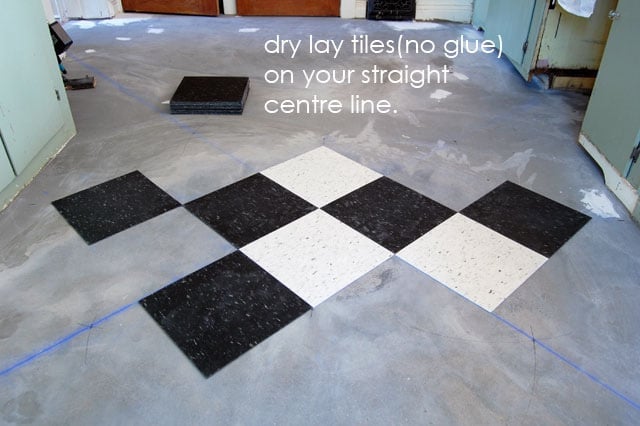
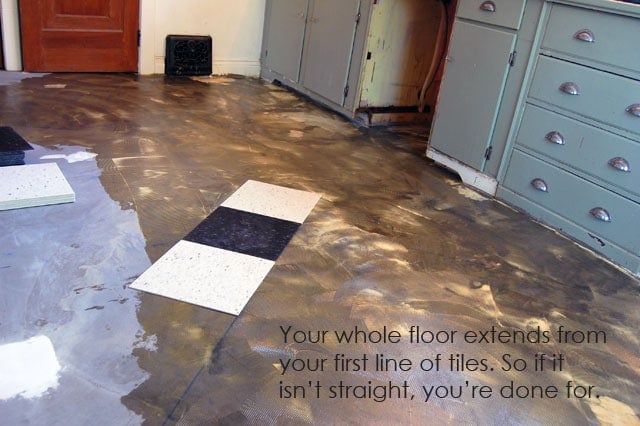
The first thing you should do is dry lay some tiles along your straight line. I'm referring to the row of black tiles in the centre of the room. You'll have two choices. Lay your first tile so it is centred over the centre point, or lay your first tile so the tip touches the centre point (like I did). If you've got your centre points right then you'll have the exact same distance between the walls and the ends of your final full tiles.
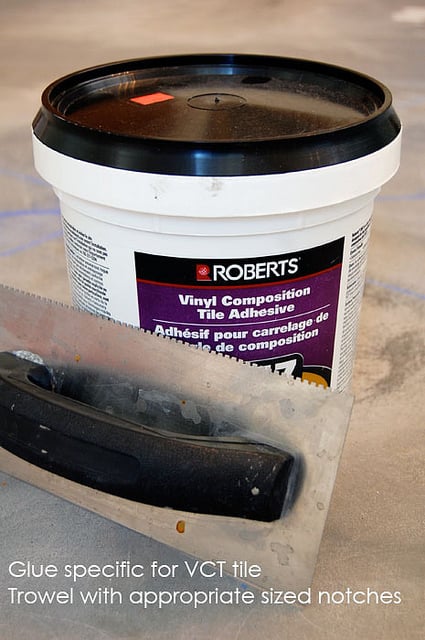
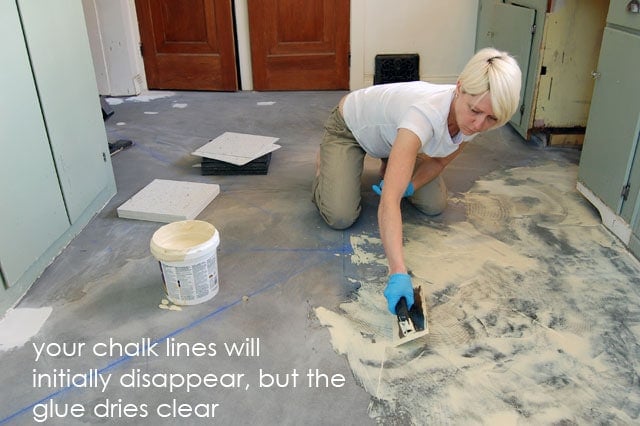
Once you've determined your straight lines are good, it's time to grab your glue and start laying tiles! Buy the glue when you buy your tile and ask for help to make sure you're getting the right glue for the tile you're using. Also read the bucket of glue to see what type of trowel you need. All trowels are not created equal. The distance between and depth of the notches make a difference. Only use the trowel size that's specified on the back of the bucket of glue.
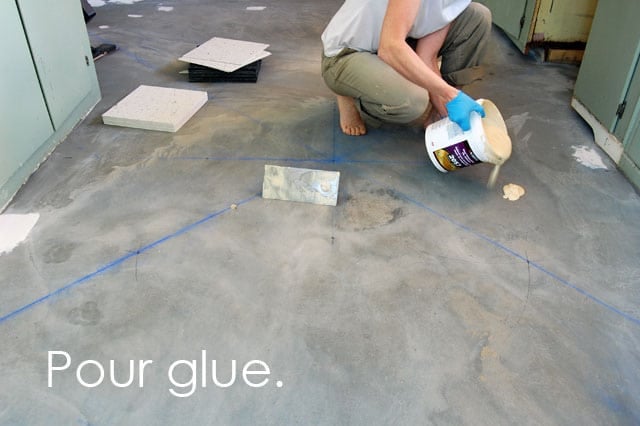
Open up your glue and pour a big glug on the floor.
Trowel it out.
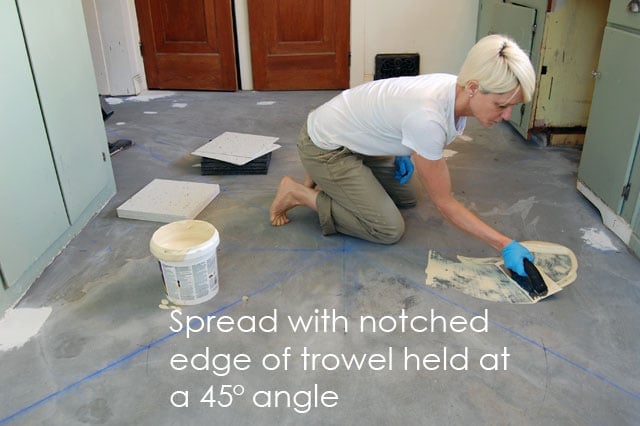

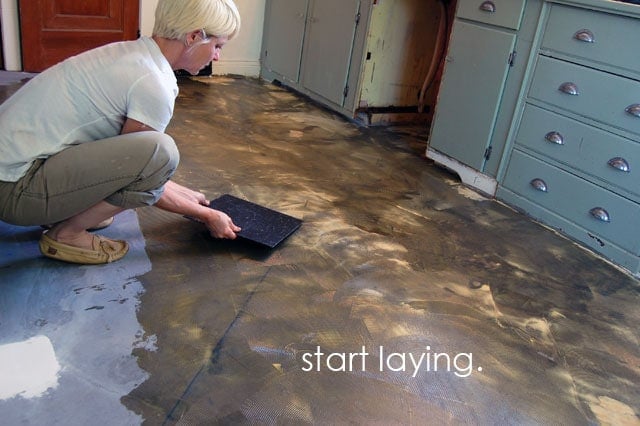
It'll take an hour or two for your glue to get tacky enough to lay your tiles so go take a walk. Or taunt your cats. Or learn a new language.
Once your glue is tacky, it'll stay that way for dayssss. So you literally have a work time with this glue of 2-3 days.
Carefully, carefully lay your first tile. Make sure it is *perfect*.
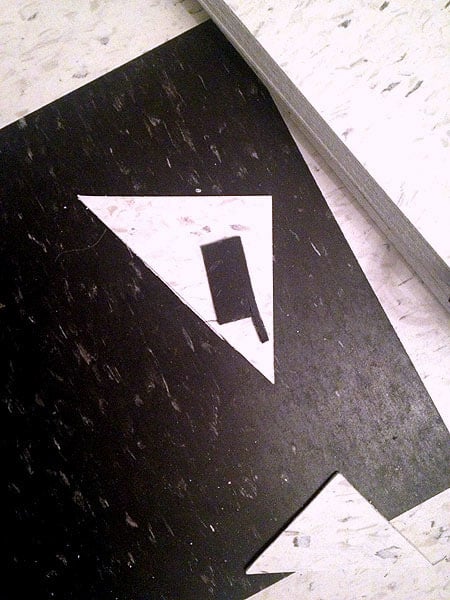
Midway through laying my floor I looked down and saw this, exactly as you see it now. A black cleaver on a white tile. I saw it as a sign. I'm not at all sure what it was a sign of, but it was definitely a sign. It either has something to do with cooking or killing. I haven't decided yet.
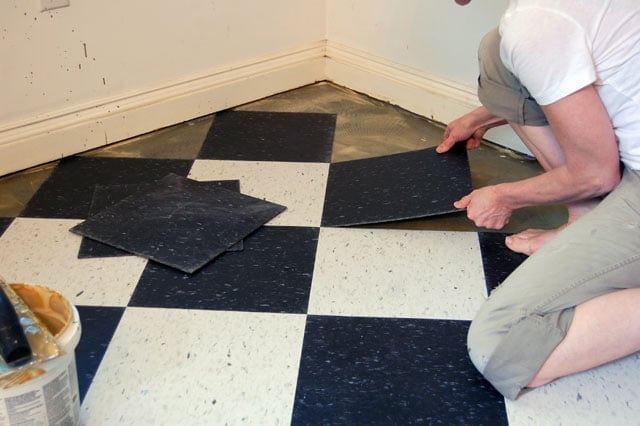
The laying of all the centre (full) tiles will go fairly quickly.
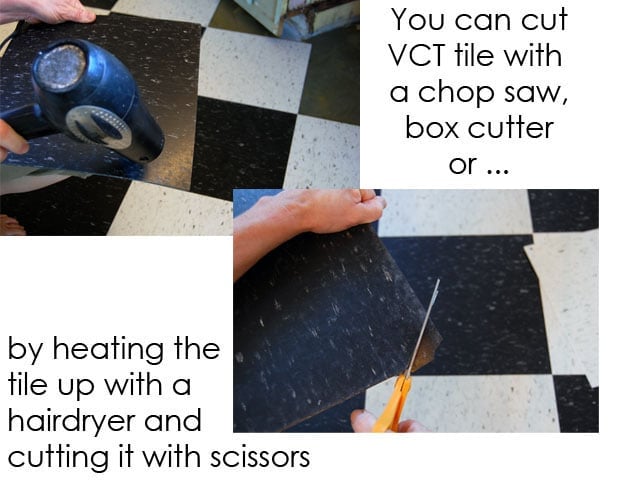
You will eventually get to the point where all of your full tiles are laid and you now need to lay the edge tiles which need to be cut. Some cuts are as easy as cutting a straight line, others that have to go around corners or curved baseboards will be more elaborate cuts.
There are at least 3 ways to cut the tile, but I found the easiest way was to heat it up a bit with a hairdryer and then just cut it with scissors. Next week I'll be doing a short video post on how to cut the edge tiles of a diagonally laid floor. There's a little trick that makes it really easy.
You may find the odd time you've laid a tile that doesn't butt right up to the tile beside it. Sometimes the tiles move while you're kneeling on them, or maybe you just made a mistake.
No problem. It's easy to fix.

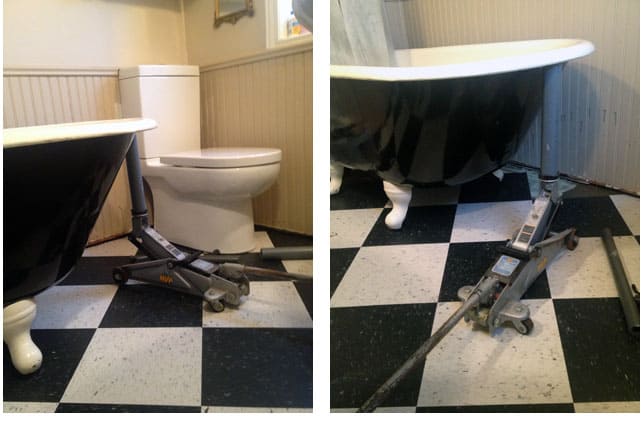
Wondering how one would deal with tiling under a cast iron bathtub?
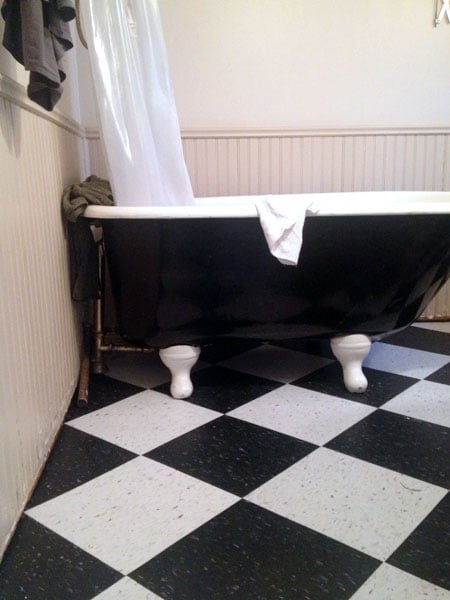
A car jack. After you've trowelled glue underneath and let it set, lift the tub *just* enough to slip your tile underneath the feet.
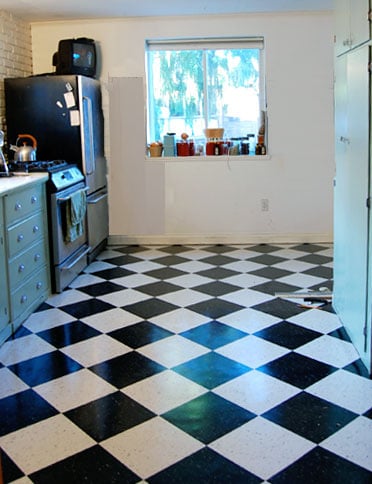
Done! This is not the final reveal picture of the kitchen, it's just a quick look at the completed floor
This completes my Big Spring Project 2013. I had planned to finish redecorating the mudroom and get new fixtures for the bathroom ... but I've run out of time. It is now summer and I don't want to be doing indoor construction projects. I want to be doing OUTDOOR construction projects. The first of which, will be constructing a rather large hamburger.


hey.. why not just coat the cement with epoxy?I'm struggling with the idea of pouring cement floors .. just a bit afraid of having the floor fail. how did this job stand up through the years?
Hi Travis. The floor is still perfect. ~ karen!
I cant find $.85 tiles—I am seeing Armstrong brand at $4.xx a square foot! What brand? If you bought online, can you provide a link? MANY THANKS...it looks fantastic!
Hi Julie. They're Armstrong VCT (vinyl composite tiles) tiles. I bought mine by the box at Home Depot. :) ~ karen!
I am going to do this in the laundry room of my 1925 bungalow! Thanks for the tips! Which version of white tile did you use? There is only one black but so many different whites!
Now that your kitchen floor is a few years old, I'm wondering how happy you are with it. I have always wanted a black and white floor in the kitchen, and I am totally remodelling right now. We need a thin floor, so the vinyl would work, but I want it to last and be easy care.
Karen, I've just discovered your blog and IMMEDIATELY drove to Lowes to buy a few samples as I'm in the middle of a kitchen reno myself. Question: there are two shades of whitish tiles. did you choose the "greyer shade" with the bigger flecks or the warmer shade with very small flecks?
I love ur style of writing too and your taste is divine! i think we would get along.....
Just put down vct, wondering what product(s) to use to seal/wax!? Definitely not enough residential info out there. (100 sq ft kitchen)
ok, so I know this post is old, but I'm looking to put down new b/w vinyl tiles in my kitchen, just like this. But I want it to be pretty and shinny, like in your finished photos! How did you get yours to do that?? Did you seal the tiles, Wax? Whats the secret? I'm having trouble finding info online...
Just put down vct, wondering what product(s) to use to seal/wax!? Definitely not enough residential info out there. (100 sq ft kitchen)
Hello, did you add a wax or seal to the top of the tile?
Hi Karen... we are considering putting colorful VCT tiles in the kitchen of a house we are buying for my daughter and son-in-law to rent and I'm wondering how you feel about the upkeep of the floor at this point. I'm worried that they won't be as interested in the waxing and buffing routine and that if they don't the floors will be covered with scuff marks from shoes, etc. I'm sure they will take pride in their place but whether or not they will want to spend hours of time waxing and buffing, I'm not so sure. Any thoughts you may have, now that you have lived with the floors for almost two years, would be greatly appreciated!
Hi Kathy. I actually just rewaxed and buffed my floor. It isn't that bad to do really especially since you only have to do it once a year. But you do have to do it or it won't have any shine. The other thing you have to keep in mind is the floor can sometimes yellow if it gets too dirty before washing it because the dirt literally gets ground into the wax. Having said that I'd still say it's a low maintenance floor that withstands a lot of crap! I don't notice any scuffing in particular. Maybe if you were to really drag something across it but under normal conditions I don't notice it. I still love it and find it way more comfortable to stand on than ceramic. I hope that helps. ~ karen!
Yes, thanks so much!
Karen, I'm just in awe of your vision and hard work. Beautiful practical space! I'm clearly backtracking thru earlier posts. Question please: just purchased a prefab garden shed with an insulated plywood floor and I'd love to use part of it as a fair weather study/office ( in New England), and as storage / potting room. Do you think this floor would do fine for such uninsulated place? Or would it buckle in no time?
Thanks!
Almost a year later, somewhere in SW Ontario, I'm looking for ways to work around taking out my clawfoot tub when I put down my VCT. Google finally offered up your site and I am glad I did. I've used the tiles in the kitchen, love it but was hesitating about getting started with my bathroom project. I knew in theory that jacking up the tub could be done so when I came across this, I just DID it. I've decided I'm not going to remove/loosen the taps unless I absolutely have to. I've got some tiles to practice with and am bound and determined to get things just right around the three openings, thanks to the magic of the heat gun. And thanks to your post I am back to my usual try anything once self ;-)
Excellent! When I posted about lifting the tub with a jack I was actually hoping it would help someone in the same situation one day. :) ~ karen
Karen,
You are amazing The floor is so awesome. I just had 300 sq feet laid in my kitchen sunroom. There has been a lot of workers finishing the other renovations. The fiord is so dirty. Can you tell me what was you use and how you apply. I also have ab few scratches antsy suggestions. I live it but I am nitj liking the finish as if today. Can you help me?
Hi Lori - Have you waxed it? The floor comes with a pour on wax that's clear. Before you first use the floor you're supposed to apply 4-5 layers of wax. You pour the first layer and then buff it with a floor buffer. Then repeat 3-4 times. I don't own a floor buffer so I used a hand held car wax buffer I own. ~ karen!
Wonderful job, they look great! It is impressive that you can heat them up and cut them with scissors unlike traditional tiles. I think when tiling with ceramic tiles the most important piece of equipment is the tile cutter, to make sure that they have a professional finish.
LOVE this floor and planning on doing the same thing in the kitchen of the house we just bought. Every flooring store I go to I get the same thing: "Really, you want VCT tile?". Yes, people!! Just sell me what I want already!! :) Can you tell me what colors the Armstrong tiles are? Thanks!!
Hi Staci - The colours are classic black and classic white. My Home Depot seems to carry the classic white all the time, but I had to special order in the classic black. ~ karen!