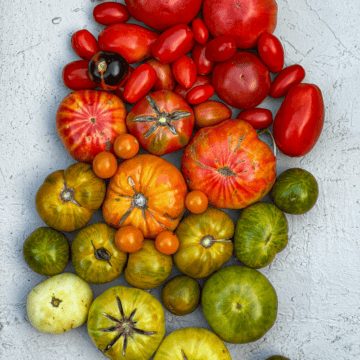
Welcome to canning season. Easily recognized by the sight of vegetable gardeners running screaming from tomato plants and pressure canners spitting and sputtering in homesteaders (and wanna be homesteaders) kitchens across the land.
One of the comments I get a lot from readers, friends and neighbours is ... really??? Really. You DON'T like Game of Thrones. I do not.
The second most common comment I get is ... "I wish I weren't so afraid of pressure canning".
Today I'm going to tackle the canning.
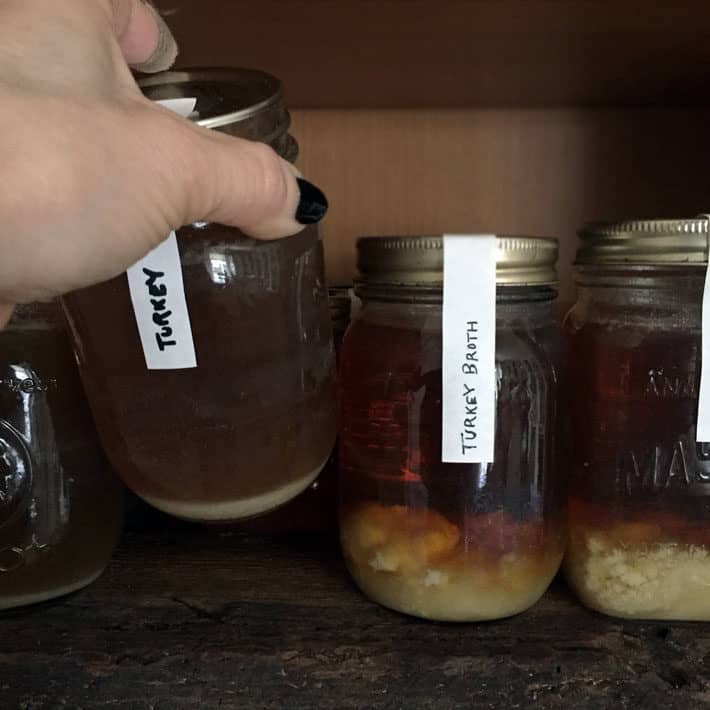
For years when I made chicken broth I would put it into baggies and shove it into the freezer. Just fill the baggie, lay it flat to freeze and then you can stack them all up in the freezer so they're all in there nice and neat.
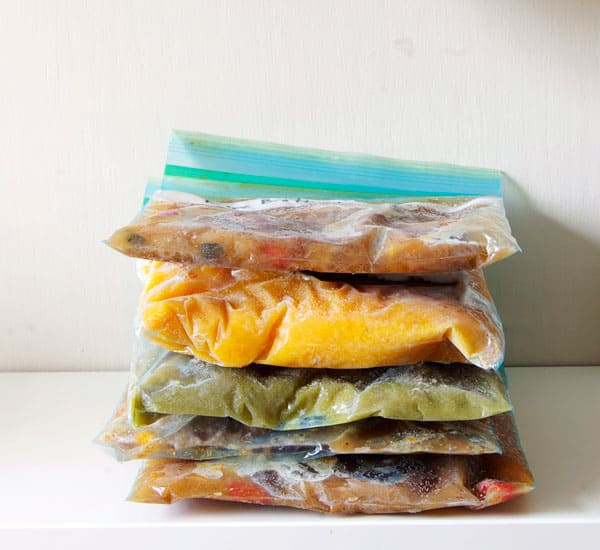
I do the same thing with soups, stews, chili ... anything liquidy. And it works great.
Except they slip. And slide. And when you want to use them you have to defrost them.
I wanted instant chicken broth. The kind where you just pop the top and pour it into your soup, stew, cereal or whatever.
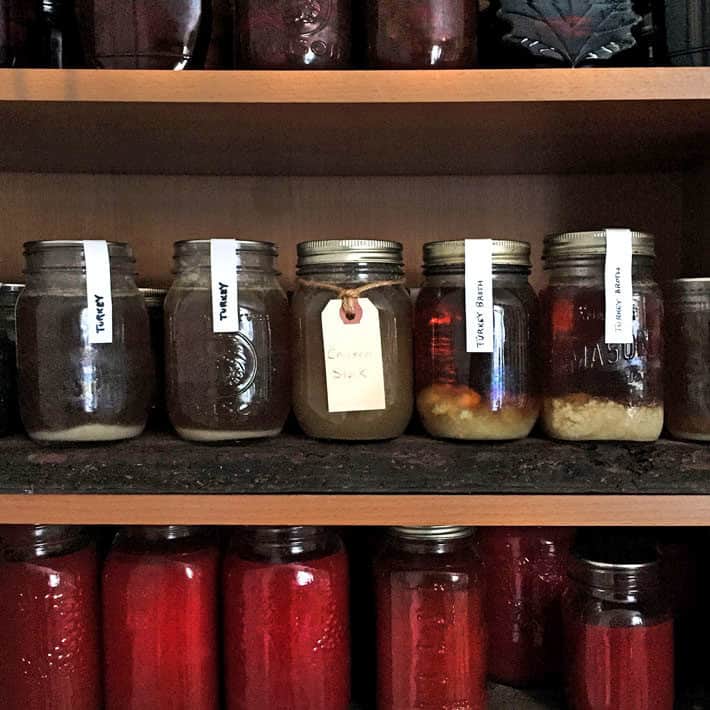
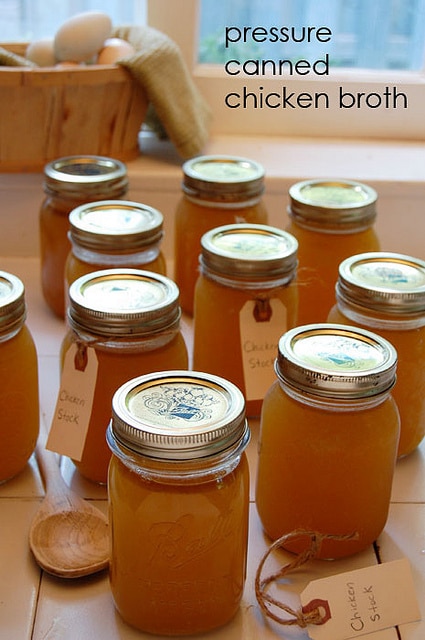
So once I got my pressure canner I started to can my broth and I haven't looked back (into the freezer) since then.
Pressure canning is not difficult, not dangerous and not all that time consuming.
And at the end of it you have beautiful jars filled with stuff that's even more convenient than stuff from the store because it's already in your house. I know. You're afraid. That's probably a good thing, but you don't need to be.
Today I'm going to walk you through the basics of pressure canning your own chicken broth. If you're interested in doing more of this sort of thing you'll need a couple of things. A pressure canner (duh) and a good, tried and true, book on canning. I have a few. My favourites are The Ball Complete Book of Home Preserving and Ashley English's Canning & Preserving.
I am by no means a pressure canning expert. I've been preserving and canning since I was young but just like with gardening there's always someone who knows more than me. That's pretty much true of everything actually. 
First things first. You need to make some chicken broth. Here's my recipe which is really more of a guide of what to throw into the pot. When I buy or make roast chicken I never eat the leftovers. Instead, after one meal I put the rest of the carcass into the freezer for making chicken broth with later. It always works out that by the time I've used up all my chicken broth, there are enough frozen chicken parts in the freezer to make broth again. The roast chickens are great to use because they have that roasted flavour to them which is perfect in broth. PERFECT I SAY!
I make the broth the day before I know I'm going to can it. Making broth and canning all in the same day is for crazy people.
I USE THIS MIRROR PRESSURE CANNER.
It's among the lower priced pressure canners and has always worked very well but has the WORST instruction booklet probably ever made.
If you want to go high end, the best of the best, The All American Pressure Canner is the way to go.
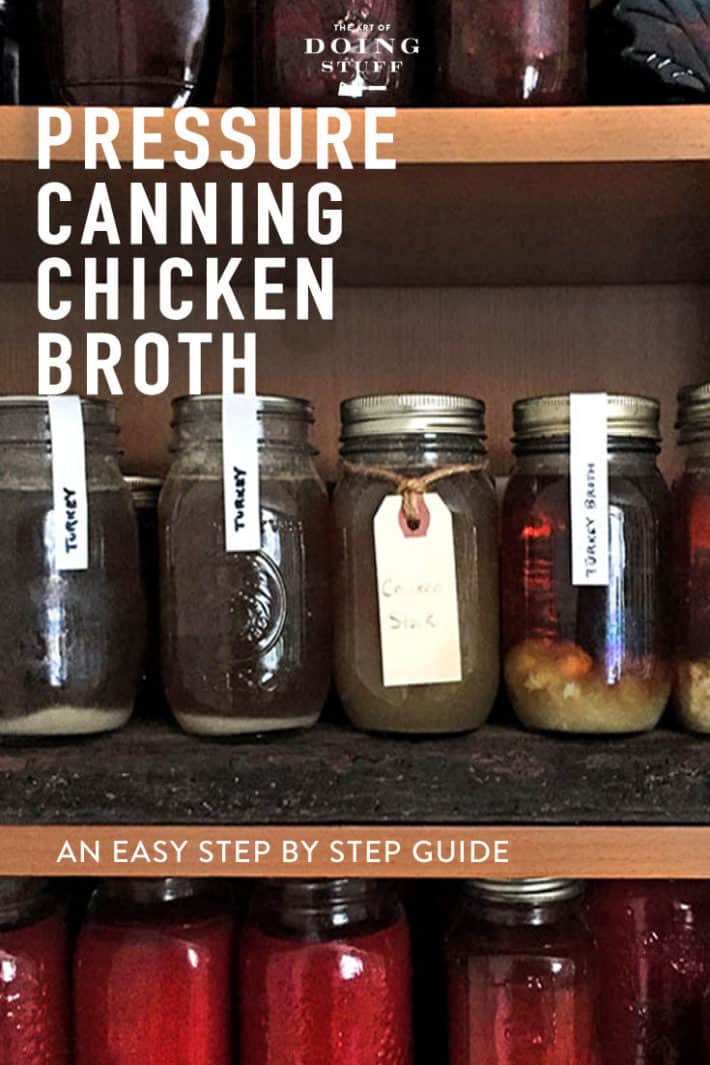
How to Pressure Can Chicken Broth
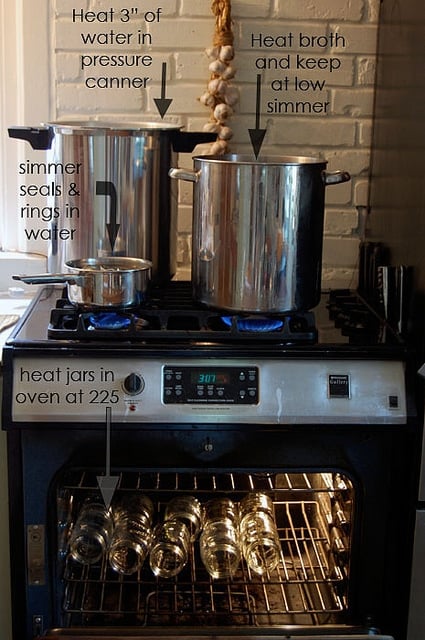
Organize yourself. Get everything ready.
Prepare
- Heat 3" of water in a pressure canner.
- Heat your broth in a large pot and keep at a very low simmer
- Put your canning seals and rings in a pot of barely simmering water. Not boiling!
- Stick clean canning jars in a 225f / 105 c oven.
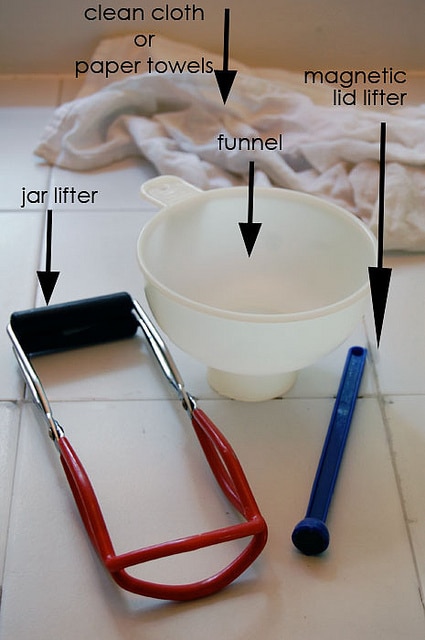
What You'll Need
- funnel
- magnetic lid lifter
- jar lifter
- damp cloth or paper towels
- canning jars
- canning jar seals and lids
You can buy a kit with the jar lifter, funnel and magnetic lid lifter for about $10 on Amazon.
Steps
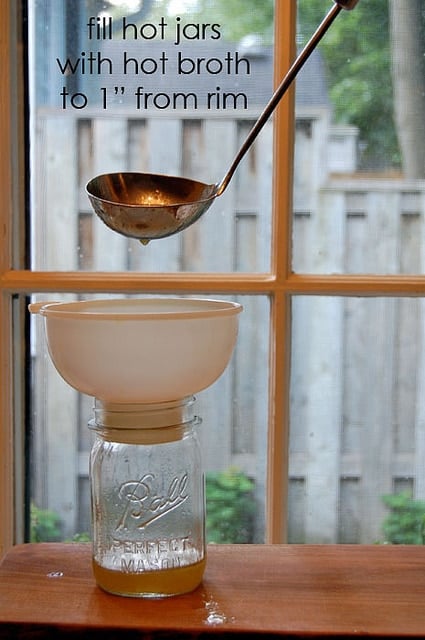
- Fill your jars with hot broth making sure you have 1" of headspace between the broth and the rim of your jar.
TIP
In canning, the "headspace" is the amount of space you leave between the rim of the jar and whatever you're filling it with. Each thing you can requires a different headspace. For example canning tomatoes might require a ½ head space while canning chicken broth requires an inch. Usually the thinner the liquid the more headspace it requires because it pulls up towards the lid easier when under pressure. The reason you leave headspace is so the liquid isn't pulled all the way out of the sealer when under pressure. This would prevent a seal from happening.
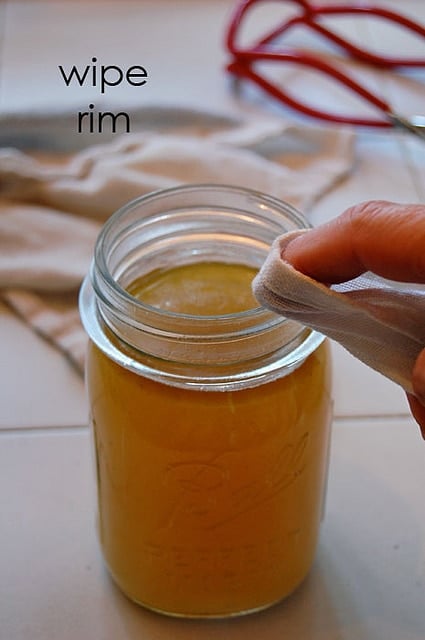
2. Wipe the rim of the jar with a damp towel. If anything at all is left on the rim the jar will not seal.
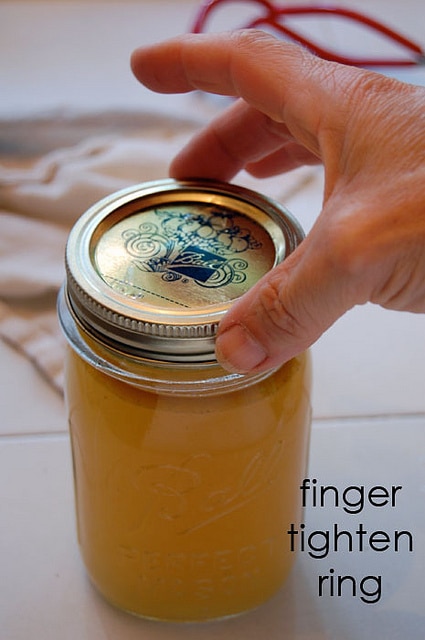
3. Using your magnetic seal lifter, pull out a seal from your pot of hot (not boiling) water and place it on the jar.

4. Put your ring on and finger tighten. You don't have to put your rings in the pot of water. I just do it because I always have.
TIP
Do not over tighten your rings. As a side note, once your jars have sealed you can remove the rings. There's no reason for them to remain on the jar. The seals are what keeps the jar sealed. The rings are only needed during the actual sealing process.
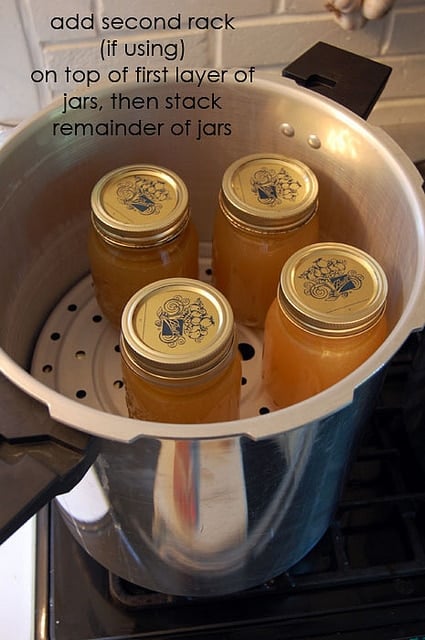
5. Using the jar lifter, place your hot packed jars into the pressure canner. Different products and sized jars require different processing times.
For chicken broth in 500 ml jars (pint) you process for 20 minutes.
If you are using 1 litre (quart) jars, process for 25 minutes.
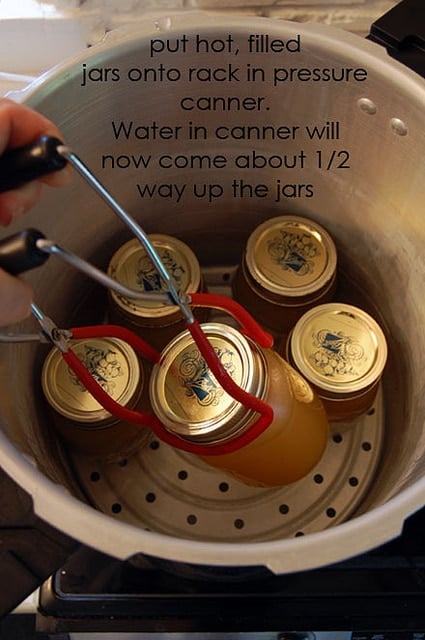
Use a second rack if necessary.
NOW you start canning.
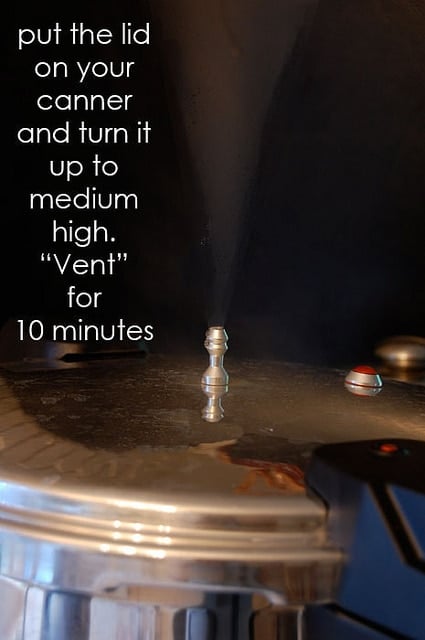
- Before processing you need to "vent" your canner. Get rid of the air/steam inside so you can build up the proper pressure. To vent your canner:
6. Put the lid on your canner (without the weight on it) and turn it up to medium/high. When steam starts coming out of the top, set your timer for 10 minutes.
Once those 10 minutes are up your canner has been properly vented and you're good to go.
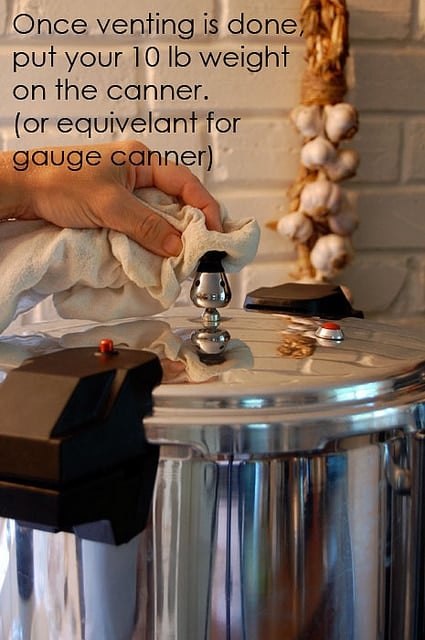
7. Put your 10lb weight on the canner* and wait for it to come to pressure. When the weight jiggles or knocks a few times every minute, your canner is up to pressure. Only start your timer for processing once your canner is up to pressure.
Getting a canner up to pressure can take several minutes.
Once your weight is jiggling and you're at pressure set your timer.
* NOTE: If you live anywhere above an altitude of 1,000 feet you'll need to change the weight used when canning. This page has a great adjustment chart and link to finding out your altitude.
20 minutes for 500 ml (pint) jars
25 minutes for 1 litre (quart) jars
8. When your timer goes off and your jars have finished processing, turn the stove off. Leave the lid on and allow the pressure canner to return to normal pressure. Once the pressure is down to normal you can remove the lid. Wait another 10 minutes and then remove your jars.
The only time canning is dangerous is when you don't follow the directions. You MUST follow the instructions exactly. If you under process you'll be in trouble. If you don't use the proper headspace you could be in trouble. If you don't use the exact ingredients called for you'll be in trouble.
But as long as you can follow the rules ... no trouble. Just don't wing it.
I've had my canner out on the stove for the past few weeks and I imagine that's where it will stay until the end of fall.
It's a big gawdawful looking thing sitting on the stove. And I love it. That big gawdawful production, Game of Thrones? Not so much.
disclaimer: Yeah, I know you love Game of Thrones. You cried when it ended. It's the best show ever made. I understand. I just don't like it.
→Follow me on Instagram where I often make a fool of myself←
This brings back memories of canning days growing up on a farm in western Kansas.
We canned tomatoes, pickles, ketchup (that one was not good tasting). I don’t remember canning a lot of different things, but we had lots of jars on shelves down in the cellar. The one thing I do remember was how huge and heavy that canner was. Tiny house, lots of kids, and the canner lived under the double bed that three of the eleven kids slept in. One of the littler ones had to crawl under and way in the back to drag it out when needed. Built the new house and it had its own room in the basement with all the canned goods. Lots more room so we could can lots more stuff. Thanks for the memory nudge. Karen, I know you have a small house as I have forgotten where you keep all your jars-o-goodies? How many jars are you able to store? Knowing you, many are given as gifts, I’m sure! You have a generous spirit, including sharing your wealth of knowledge. Thanks.
Erm, there is no need to simmer lids before canning. Just wash them before use -- one less pot on the stove, no need for a magnetic lid lifter, and less effort on your part!
(From the Ball website: "After comprehensive testing by our Quality Assurance Team, it was determined that it is completely safe to skip pre-warming lids in the canning process. While it is still safe to simmer your lids before use, you should never boil them. Our recommendation (for over 40 years) has always been to simmer (180°F) – but not boil (212°F) – the lids. In 1969, we switched our sealing gasket from a latex base to one of Plastisol. Latex requires preheating to soften the material before canning to create an effective seal. The Plastisol does not require preheating, but doing so will not damage it.")
Please note that this refers to Ball brand lids-other brands may still use latex. I warm them up regardless.
That's for Ball lids. In Canada we use Bernardin. Not sure about the composition of them. ~ karen!
bernarden is owned by Ball
Thanks for the info. I had to purchase a new pressure canner and I cannot find instructions on how you to know which weight gauge to use. 5, 10 or 15?
Can you help me to know? Thanks.
My grandmother used to can poultry before the pressure canner was thought of. And, vegetables. She boiled them for a long time :)
But, I did get a pressure canner when I lived in BC and got salmon from my Native friends to can ($4 per fish in those days). I should get it out again, because that was about 30 years ago. I'd prefer to have liquid broth instead of frozen (though I'm using the canning jars to freeze it in)!
When I was married in 1978, one of the gifts was a pressure cooker; it's still brand new. Guess I should put on my big girl panties and figure it out, too.
Have been canning for 2 years but have become a fanatic.. Have an All American 921 that will hold 7 quart jars at a time. Have canned smoked salmon, use it to make "bone broth" by pressure cooking beef (we raise cattle) and poultry bones (which become a powder that I use for bone meal). I then pressure can the jars of broth. Have solar electricity only so can't always depend on the freezer. Going to be doing this with shellfish bones tomorrow. Seems I never have to throw anything away.... Love it... I was afraid of the pressure canner at first too.....
Hi Karen,
I just came across your blog. Never really thought to can my chicken broth but, I wanted to ask you if you can the chicken broth how long is it good for?
Nusrat
Hi Nusrat. I can't say I've had my broth in my cupboard longer than a few months because I use it all the time, but it lasts for up to 2 years if you keep it in a cool (lower than 70 degrees), dark place. So just don't store your cans in direct sun where it gets hot and you're good. Give it a shot. I love having jars of broth to pop open instead of having to thaw bags of it (I used to freeze it). ~ karen!
I have the same canner you do, and i used it for the first time the other day. My weight never jiggled! It was steaming and up to pressure, so I called the customer service number and they said they don't jiggle anymore - just vent. Does yours actually jiggle?
I'm so glad to see someone else using this canner successfully. I also didn't know about the pressure monitor on the handle, and because it was red I was nervous my canner was at too high of pressure and turned it down. Another call to customer service told me it was to help monitor pressure (that's mentioned on the box but not in my book). Needless to say the elk meat I processed was a fail. :(
Hey Kim! Yeah it's definitely not the most user friendly canner in the world, but really it's one of the few on the market. My weight does jiggle (bangs really) and my canner is about 4 or 5 years old. Quite frankly I don't think they know how their own canners work. And see, if that were me I'd be happy the elk meat failed, lol. My dad brought home hot venison pepperoni once and I've never been able to stomach game meat since then! ~ karen!
I need one question answered please. Should water cover the jars when canning or not? I did chicken broth as you instructed, but books say water should cover the jars. You said that the water should come up at least half way when put in the canner. Which, or is both correct.
Thank you,
Susan
Hi Susan - It depends on what method you're using. There are two canning methods, each for different purposes. There's a boiling water bath (where the entire jar is covered), or pressure canning (where a smaller amount of water is put in the canner and then it's brought up to pressure). For absolutely anything that includes meat (because it's so low acid) you should be using pressure canning which gets to much higher temperatures than the boiling water bath in order to kill any bacteria, pathogens etc. Hope that helps. ~ karen!
Thank you for a great blog - you are hilarious and very resourceful. I love DIY projects.
I tend to do things and only read instructions once I mess up. I have the huge 22 quart All American canner. I canned tomato meat sauce for pasta and also roasted tomatoes using the pressure canner this year. Tomatoes I only pressure canned as I roasted them with olive oil. Now I covered jars with boiling water (an inch over the tops) and it took forever to bring this humongeous pot to full pressure (and that is with a commercial gas range). When I opened the cooled canner, the water was greasy and red from the tomatoes. The jars are sealed so I presume they are fine.
Now, if I am reading your column correctly - I only need to have water halfway up the bottom jars. That would considerably speed up my canning time and hopefully eliminate the oozing from jars. I probably erred by overfilling them too.
If the smaller amount of water is fine for all pressure canners, I will definitely use mine more often.
I've been canning now for about 2 years, I started because my husband sails on the west coast and one year did a circumnavigation of Vancouver Island and need food for almost a month that didn't need refrigeration. I've been processing chilli, spaghetti sauce chicken pie filling and even took on a boeuf bourguignonne that they raved about. It's been one of my most successful experiments. As I write I have 8 jars of condensed turkey broth on the go. I've read that all meat products need 70 minutes at 10lb pressure, is that what you'd recommend?
I enjoyed the dialogue here! I have two compelling reasons to pressure can: 1. Freezer malfunction. My freezer had a meltdown of unknown origin and I lost everything. 2. I can reuse the jars...no plastic bags or containers in the landfill. No chemicals from the plastic. I have an All American pressure canner. I love it. Spend your money on quality and it's American made! Happy canning and healthy eating!
Glad you liked the post Jeri. But I'm Canadian so the made in America thing isn't necessarily a selling point for me, lol. ;) ~ karen!
I have just canned some broth and soup. I have a large Pressure cooker and did a double layer of pints. My bottom layer is lighter in color (the same as the pre-canned color) the top layer is darker and clearer. Is this normal?
Hi Sandra - I've never heard of that before. Did you pressure can it or hot water bath it. I assume you pressure canned it with the normal 2" or so of water in the bottom. The only thing I can think is that when you were ladling your broth into the jars you weren't stirring it, so the last jars you filled had all of the darker bits from the bottom of the pot. That's quite a stretch though, LOL. I'm afraid I really have no idea what happened! :( ~ karen
Ok, so I followed this recipe exactly, about a month or two ago. We've eaten a couple of cans of broth since then, but we just opened one up to find some dark grimey stuff on top. Seems like we shouldn't eat it. Looking in from the side, the remaining jars all seem to have this issue. Did I do something wrong? Or does this always happen and they are ok to eat?
Hi Theresa - If it's greyish dots they're fine. It's probably marrow. And if it's lighter it's probably fat. Take it and squish it between your fingers. You'll be able to feel right away if it's fat because it'll be greasy. The marrow will sort of mush apart and appear to be mushy grey stuff. It's very hard to tell you what to do though, since I can't see the jars and wasn't there when you made it. But as I said, if it's as I described it's normal and will all disappear once heated. ~ karen!
A few years ago I began canning apricots, plums, and peaches from my trees in a water bath. This year I took the plunge and bought a pressure canner. I've canned split pea soup, lentil soup, and goulash. This weekend I plan to can chili made with ground turkey. I love the pressure canner. It's a little scary the first few times, but I just read the instructions very carefully and very thoroughly every time and haven't had any problems. I turn up my water heater to "high" when I'm going to be canning, and fill a deep dishpan with very hot water, then heat my jars in that.
What is the brand name and where can you buy a pressure canner that holds more than 7 quart jars. I noticed that you canned with two layers of jars.
Hi Teresa - Most pressure canner brands carry a variety of sizes. The biggest difference between pressure canners is whether use read the pressure inside through a gauge or a weight on top of the canner. Mine is a 22 quart weighted canner by Mirro. It's advantage is you never have to have it adjusted. Another great large canner is 22 quart gauge canner by All American. Good luck. ~ karen!
I'm writing a blog post on making chicken broth in pressure cooker and found your post. I also prefer canning my chicken broth rather than freezing and never thought about heating my jars in the oven! What a great idea!
Respectfully, some of your terminology is wrong.
One does not "jar" tomatoes, one "cans" them. Regardless of the container in which food is preserved, it's "canned" food, not "jarred" food. (If you want to "jarred" tomatoes, slam them down on the counter, or call their mother a cucumber.)
This may seem like a nitpick to some, but using made-up words makes the speaker sound foolish and ignorant.
Really? That's fine. I'd rather be considered foolish and ignorant than pompous and unlikeable. ~ karen
This was awesome. This is my first visit to your site and I'm subscribing now based on your reply here!
Hah! Thanks! ~ karen
Karen, You and me both. Love your site :)
LOL, thanks Corinne. I'd forgotten all about that comment *and* my reply. ~ karen!
"put in a jar, as preserves" is a verb definition listed for "jar" in Webster's Second International dictionary. so this usage has obviously been around for a while.
Er... newbie pressure canner here... I have a guage on my pressure canner - am assuming it needs to be at 11 pounds, same as for fish? Reading through the above, can I ask, I was told only high acid food can be hot water bath canned, but meat, fish etc needs to be pressure canned only to kill the bad bugs? Also, I cook in a pressure cooker (have done for years even though was V scared to begin with) but bought a proper pressure canner to do meat, fish etc... also from the west coast, so my first shot was fresh caught coho and it was sooooo much better than the store bought stuff when we opened it!!PS love your blog.
Penny. If your altitude is 0 - 1,000 (normal) then you would have your gauge at 10 lbs. If you're 1,001 - 2,000 ft you would go to 11 lbs. Good luck! ~ karen
Pressure canner even
It's Friday
I'm sorry.
Starting to freeze my bones - am excited to make real chicken broth - i may not have room for a pressure cooker but now I know how to get rid of the icky fat and make yummy broth
Thank you
We can using the hot water bath. And now you have convinced me to use this method for chicken broth. Yum!!