Chicken Broth
How to make chicken broth and preserve it by pressure canning it.
Servings 22 cups
Calories 160kcal
Ingredients
- 2 chickens
- 3 medium onions cut in half
- 4 large carrots
- 1 bunch celery use 4" of the root end. Just cut it off.
- 1 cup parsley stems only (I tie them together, you don't have to)
- 4 Tbsps salt
- cold water to cover ingredients by 2 inches
- 12 peppercorns
Instructions
- Put everything into a large stock pot. Cover with cold water by 2 inches and bring just to a boil. Reduce heat and simmer uncovered for 3 hours. Skim surface guck for the first 15 minutes if necessary.
- Your broth will have reduced by about ⅓rd by the end of 3 hours. Strain everything through a colander and then again through cheesecloth. Add salt if necessary.
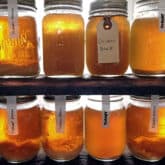
- Refrigerate broth overnight to solidify the fat. After refrigeration, remove fat from top of broth with a spoon or paper towel. Measure into baggies and freeze or continue on to pressure canning instructions.
PRESSURE CANNING
- Heat 3″ of water in a pressure canner.
- Check your jars for cracks or chips. Get rid of any that have either. Heat the good jars in the oven at 225 F / 105 C oven. Leave them in there until you’re ready to use them.
- Heat your broth in a large pot making sure it comes to a boil then keep at a very low simmer.
- Pull one jar out of the oven using tongs and then place a funnel in the top. Fill with hot broth using a ladle. Fill the jar so there is 1″ of headspace.*
- Wipe the rim of the jar with a damp towel to make sure it’s clean. Place a new sealer on the jar and finger tighten a ring on.*
- Using the jar lifter, place your hot packed jars into the pressure canner.
- Vent your canner for 10 minutes.
- Add 10 lb weight to canner and heat until at pressure.
- Process 500 ml jars for 20 minutes or 1 L jars for 25 minutes once the canner is at pressure.
- Once the time is up, turn the stove off and wait for the pressure to reduce. Once it does you can remove your lid. Wait 10 minutes and then remove the jars with tongs. Leave the jars undisturbed for several hours while they seal and cool down.
- Before storing, remove the rings from the jars.
Notes
- In canning, the “headspace” is the amount of space you leave between the rim of the jar and whatever you’re filling it with. Each thing you can requires a different headspace. For example canning tomatoes might require a ½″ of head space while canning chicken broth requires an inch. Usually the thinner the liquid the more headspace it requires because it pulls up towards the lid easier when under pressure. The reason you leave headspace is so the liquid isn’t pulled all the way out of the sealer when under pressure. This would prevent a seal from happening.
- Finger tighten means tighten the ring as much as you can while using only your index finger and thumb.
- Don’t over tighten your rings. As a side note, once your jars have sealed you can remove the rings. There’s no reason for them to remain on the jar. The seals are what keeps the jar sealed. The rings are only needed during the actual sealing process.
- If you live anywhere above an altitude of 1,000 feet you’ll need to change the weight used when canning.
Nutrition
Serving: 1cup | Calories: 160kcal | Carbohydrates: 3g | Protein: 12g | Fat: 10g | Saturated Fat: 3g | Cholesterol: 59mg | Sodium: 1330mg | Potassium: 224mg | Sugar: 1g | Vitamin A: 3020IU | Vitamin C: 7.3mg | Calcium: 21mg | Iron: 1.2mg