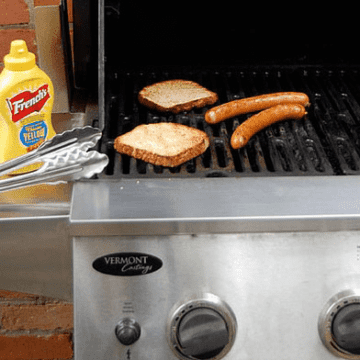
You probably don't think you need a personal fire pit. And you're right. Although come to think of it, fire is an essential element. I'm rethinking this - it's possible you really DO need a personal fire pit. You just don't need a massive expensive one. A little tabletop cheap fire pit? You could probably use one of those.
My name is Karen and I haven't lit anything on fire in 5 months. I'm sure I deserve some sort of a chip or something for that.
You see ... I'm a bit of a pyromaniac. Technically I'm not a *real* pyromaniac I guess. I mean, I only light things on fire that should be lit on fire. Like kindling and hardwood and pretty much anything with Hello Kitty on it. And of course all of Rush's 1980's albums where they dabbled in "New Wave".
I light fires in the fireplace every night here in the old Casa de Karen from October until April. 6 or 7 face cords go flying up that chimney every year. But as deep and strong as my love of the log runs, I couldn't bring myself to buy an outdoor firepit when they first came out.
They were hilariously expensive at the time and really in my climate not all that useful. In the last decade or so the weather in Canada has changed.
We used to get Spring. Spring is now a fleeting moment that takes place between the hours of 4 and 5 p.m. in late May. When we wake up the next morning our guts have liquified and the garbage cans have maggots crawling out of them.
Once the season for fire rolls around it happens almost as instantly. And by then I want to be inside laying on the sofa with a hot chocolate and a plate full of cinnamon toast on my chest. Not outside being bitten by the limp stingers of aged mosquitos.
But still. There are 3 or 4 weeks when it makes sense to have a little personal fire pit outside.
So what was a pyromaniac girl like me to do when it's cool out, but not cool enough to trap myself in the house all night with my cat, tv remote and fire tongs?
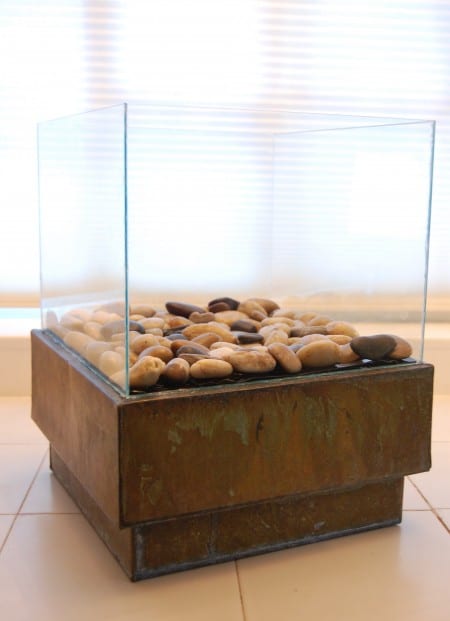
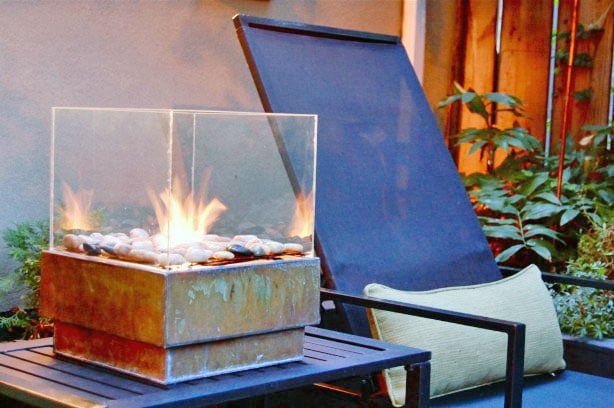
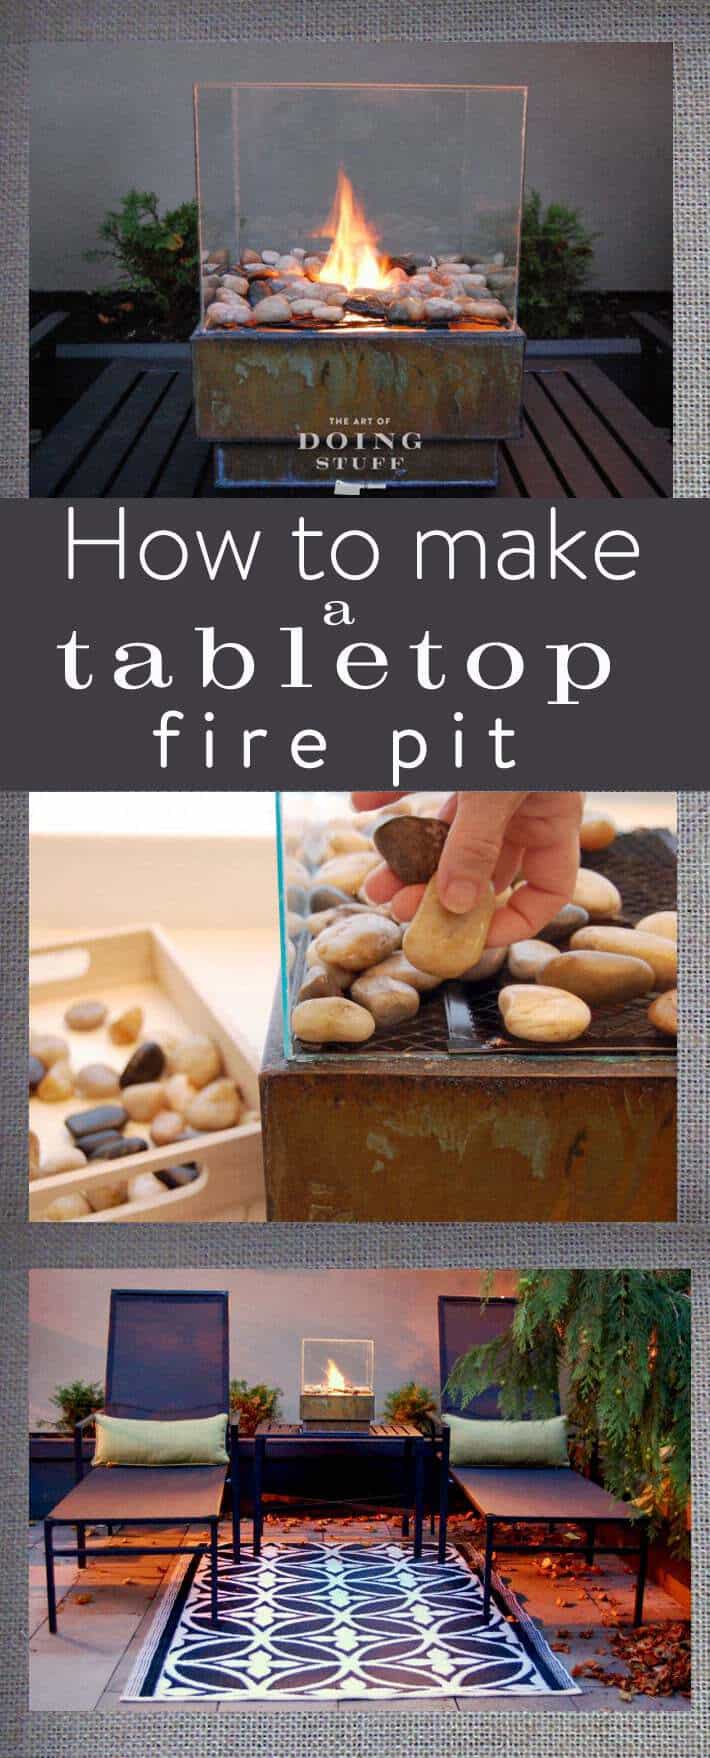
The Answer ... The Personal Fire Pit. (as designed by my sister ... I saw hers and then immediately came home and made my own exactly like the one she made.) It's easy and inexpensive to make. I used to say it's a lot nicer than any fire pit you've seen for sale in stores, but now that 10 years has passed since I originally made this fire pit a lot of stores are carrying ones that look - how do I say this - completely identical.
Here we gooooooo ...
How to Make a Personal Fire Pit
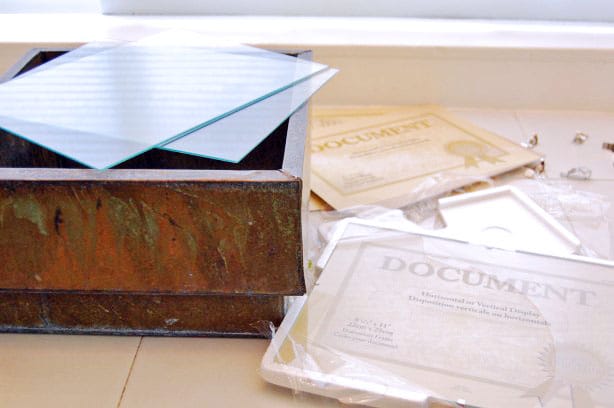
Materials you Need
- Marine Silicone
- Small rocks
- 4 pieces of glass (I bought 4 cheap picture frames from Dollarama and used the glass from those)
- Metal Mesh
- Gel Fuel (recommended) or 70%+ isopropyl alcohol
- Square planter (with a bit of a lip on it)
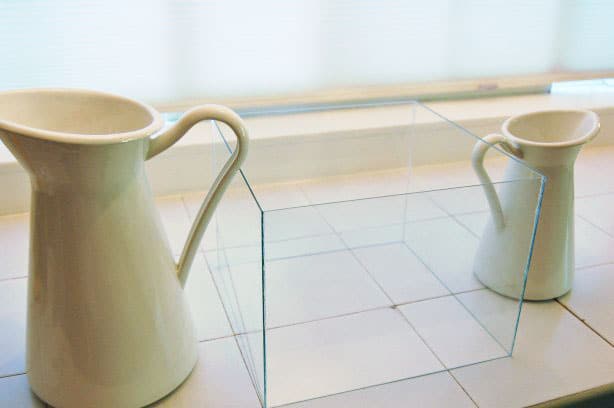
Step #1 - Making a Glass Box
You need to make a glass box. To do that just run a bead of silicone around the edges of your glass, and place them together.
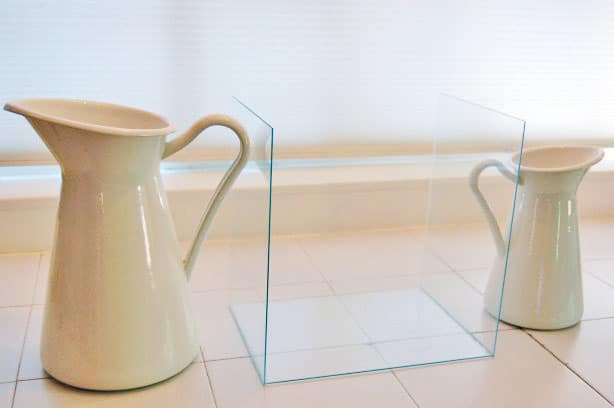
Do two sides first and hold them in place somehow until they dry.
Position them so your final side will be easy to silicone.
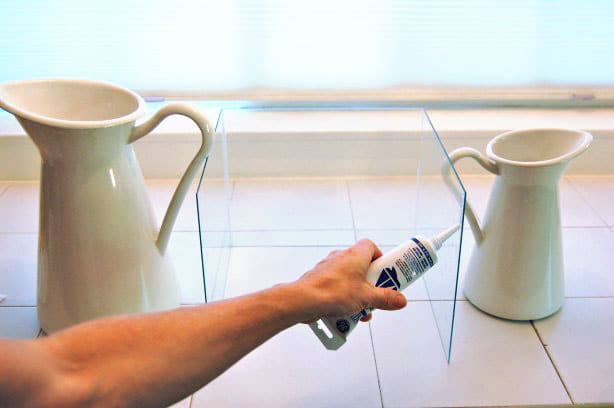
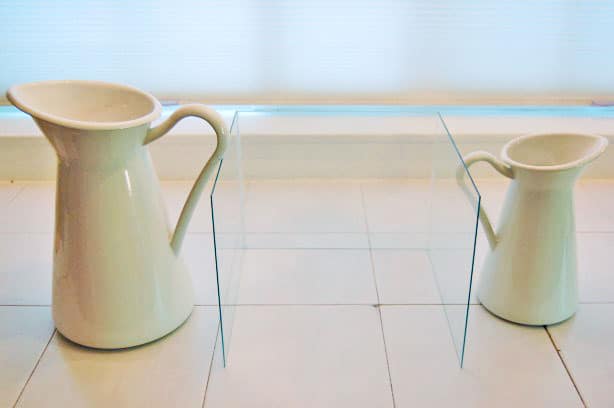
Run another bead of silicone and place your last piece of glass.
When you're placing your glass, try to be a bit careful about it. You don't want to smear the silicone around on the glass because it's a HUGE pain to get off. Just take your time.
Run a final bead of silicone all around the bottom edge of your newly created (because you're kind of great) glass box.

Flip the box over then place the siliconed edge on top of the metal planter, making sure there's enough edge in the middle left over for some metal mesh to rest on it.
Would you like to save this stuff?
Update: Everyone seems to be in fits over the fact that the glass will EXPLODE from the heat. It doesn't. I'm not going to say it never will but 1) only tempered glass EXPLODES. This isn't tempered glass. 2) Glass breaks through stress either from dropping it or by extreme, fast temperature changes. Neither of which you should have with this project. 3) Thin glass is less likely to break from stress than thick glass. ** I know that seems counterintuitive.
Step 2: Making the pit.
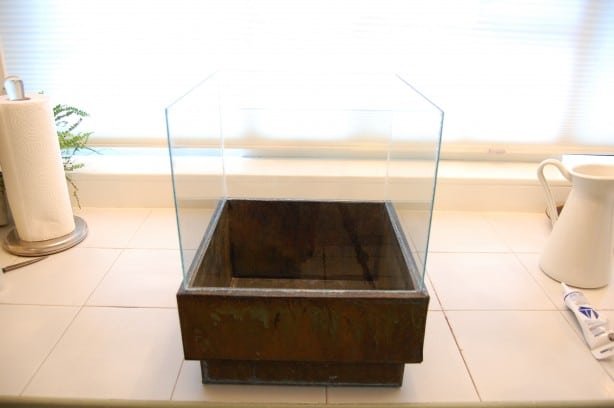
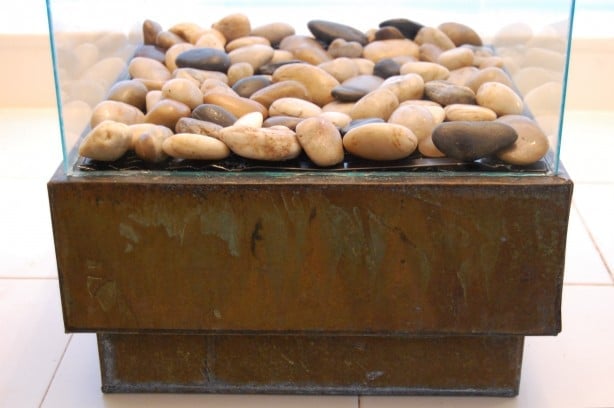
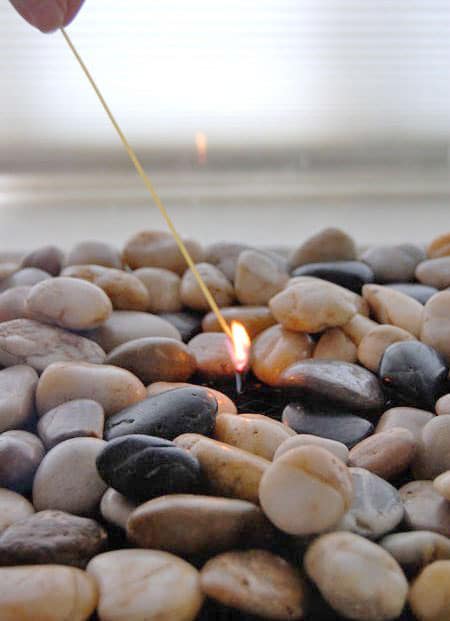
Your box is made so now you move onto cutting your mesh that will fit inside. The only purpose of the mesh is to support some rocks, which in turn hide the fuel can beneath.
Once your piece of mesh is cut your structure is complete and you just have to "build" the fire.
Put an opened can of gel fuel into the centre of your fire pit. If you're using Isopropyl Alcohol pour some into a leakproof metal container like an old, clean paint can.
Rest the mesh on the inside edge of the planter.
Finally, start putting down your rocks to cover the hideous mesh. If you're using rocks that you aren't sure about don't put them directly over the flame. Rocks with moisture in them can explode as can shaley rocks.

Cover mesh loosely with rocks (you need some space in between the rocks to allow for oxygen so the fire will stay lit).

Update: since writing this post originally, fire pit rocks have become available. They're 100% safe so you don't need to worry about keeping the rocks away from the flame.
You're almost done

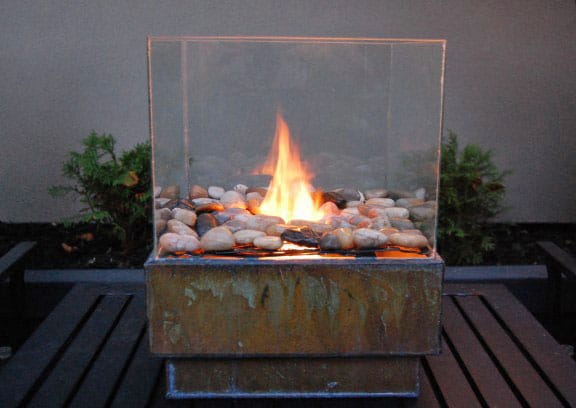
Firsty ... admire what you've done for about $25.
Step 3 - Light your fire
Clear the rocks away from above the gel fuel can and carefully light the gel fuel. I use an advanced technique. I light the end of a piece of spaghetti. Whole wheat of course.
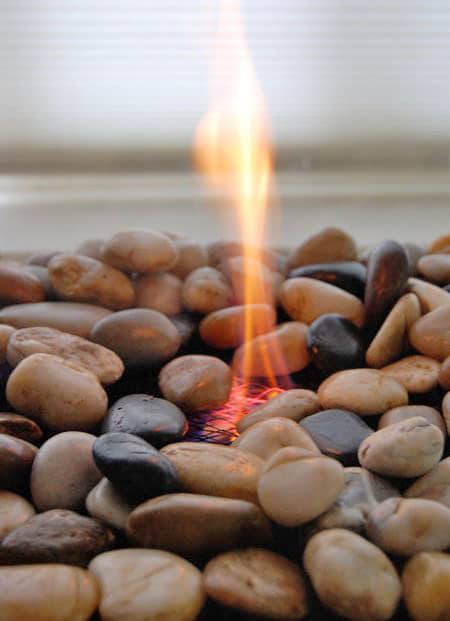
I would rule on Survivor, provided I'm allowed to bring a piece of spaghetti. Push the rocks away from the flame a bit (even a bit further than I show here) because some rocks can shatter when they get too hot. Or buy the fire pit rocks that are now available.

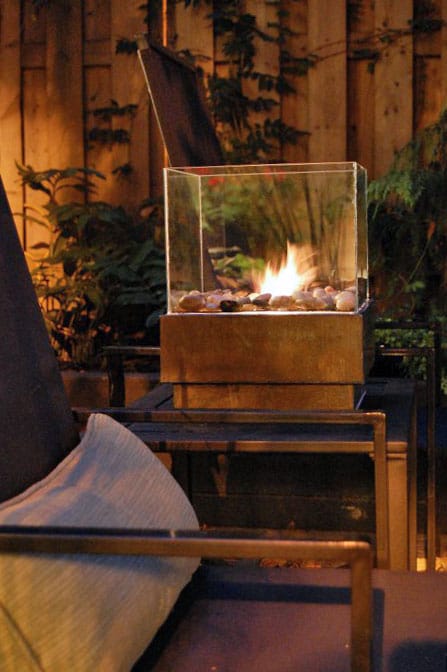
There you have your fire pit! $25. Plus as an added bonus, depending on what type of fuel you use, you can also use this fire pit *indoors*!!!
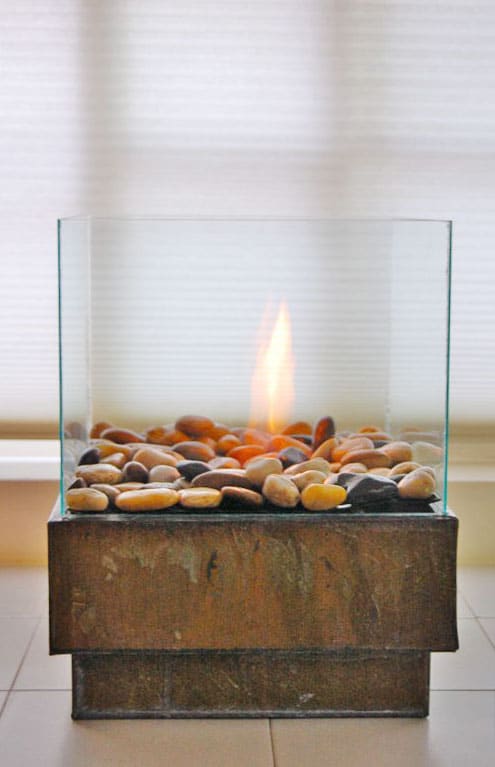
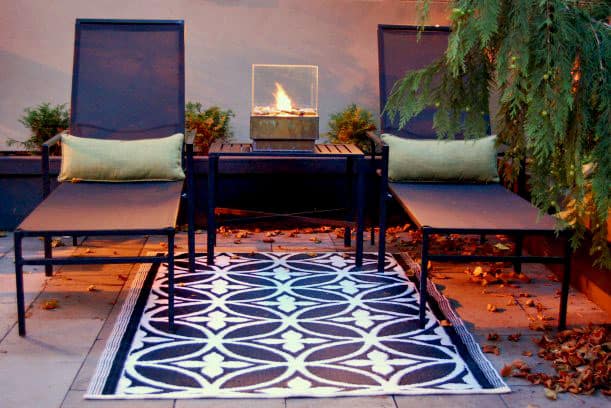
What makes this fire pit so amazing is the glass. The flames reflect against it creating dancing flames all over the place! Before I get to the final pictures with the fire pit in it's rightful home in my back yard I wanted to let you in on a few tips.
1. Make sure you buy gel fuel that's meant for gel fireplaces. Gel cooking fuel will not work because it usually only creates heat, not an actual visible flame.
2. Like I said, if you use a proper gel fuel (Real Flame for example) you can actually use this fire pit indoors. Be careful to place it on heat resistant fabric so it doesn't scorch your furniture. The metal conducts the flame heat a lot!
3. Make sure your rocks are heavy for their size. Rocks that are light are full of air and may explode!
4. You can use any metal planter for this. This was on sale, so this is the one I got for this little fire pit experiment. Black metal square planters that are probably on sale at garden centres right now would look fantastic with white rocks.
5. The gel cans last for about 3 hours, if you'd like to stop the flame earlier, just place something non flammable over the glass box to snuff out the flame. Cans can be relit at a later date or time.
.
WARNING
Use common sense. Don't wander off, leaving this burning and never EVER try to refill it when it's still burning. Snuff out the fire and make sure that it isn't hot or burning before refuelling. Otherwise you can create a firebomb. You can see that here.
That's it! That's all it takes to make your own personal fire pit. $25, about an hour, and a piece of spaghetti.
Update: A lot of people are having trouble finding a metal planter similar to mine. Remember you can also use terra cotta or ceramic.


Adriana Gutierrez
How much heat does this generate? How close shoudl you sit?
Karen
Hi Adriana, it isn't anything that's going to keep you hot. It does give off heat but more of a hand warmer situation. ~ karen!
Marilyn Boyer
Just a thought Karen, an aquarium just popped into my fuzzy brain. Cut a hole in the bottom of the aquarium, mount on base for gel container to have room and or height and viola! A large as you like firepit. I'm thinking on the deck where I had a gazebo installed with furniture and curtains, the coffee table has a glass top and would make a very nice focal point plus add some warmth in the evenings. See what you've done Karen? You've actually made me think!!! I like the oil lamp chimney idea too but in a nice sized aquarium, used of course to keep costs down no need. We have a firepit under the deck on a large concrete flooring I would like to do some cooking over just for the fun of it. I even bought a 5 gt cast iron footed dutch oven with lid for such an occasion. We used to be campers so I have all sorts of idea's from those days. Our walkout basement is placed under the deck floor is solid so as not to allow rain. I think it was used as a carport once, I want to enclose it as it's 17.5x17 ft and the concrete extends. I also want to install a wood stove in the basement for heat should we lose power, and I cooked on my woodstove from the past too. We heat and cook with natural gas but still it's good to have options and planning. It could also be easier to do a lattice and screened area since it's roofed to enjoy our lovely back yard overlooking a City Park without actually leaving our home. It is private but the lattice would be a lovely touch.
whitequeen96
This is such a fabulous idea! And what a great Father's Day gift!
Mary
What is the dimensions of your metal planter box? Thank you!
Stacy
Hi there, just found your site through a site about firepits, and am so glad I did. This is a wonderful idea and I can't wait to look through all your posts and get to know you better blog wise:-)
Karen
Welcome to The Art of Doing Stuff Stacy! ~ karen
PMK
I'm a little late at the table here but I have to say this fire thingy is lovely. I'm definitely going to make a couple of these for my soon-to-be backyard oasis. I like the square design but, for the faint of heart (not me), this could be made round and an oil lamp chimney used which one would expect to be heat resistant. That's if the lamp chimney has a diameter large enough to fit over the tin of gel fuel.
BTW, the links for buying the gel fuel and rocks don't work anymore. Not a problem; I can Google with the best of them.
Karen
Thanks for letting me know PMK. I'm sure the links are out of date, lol. Old post. I always forget to go back and check through things like that. :) ~ karen!
kouten07
Great idea and classy DIY. Love it! Would love to make one if I ever find a similar metal planter. :)
Karen
Don't forget you can also use anything that won't burst into flames! So a nice concrete or ceramic planter too. ~ karen!
Lynn
Love, love, love this! Just found your site and I'm definitely doing this for our outdoor area. (Am subscribing to your site now.) Thanks for a wonderful and beautiful idea.....
Karen
Well, heck thanks Lynn. Glad you found my site and good luck with the fire pit! ~ karen
Becca
Do you think I could use a small concrete planter? I am so excited to get started!
Karen
Absolutely Becca! That would be perfect. Have fun! - karen!
Mike
this is the most stupid and dangerous thing i have seen on pinterest ,do this at the risk of having hot glass shattered where ever you put it .some people should not be allowed to post on this site.
Brenda
huh? instead of making a nasty comment with no substance, why don't you explain where the plan fails and perhaps then someone could suggest something to help fix the issue!!!
sydney
I was wondering where you got your planter
Karen
Hi Sydney. I got it from a local store around me. It isn't something you'd be able to find anywhere else (unless by chance) but you can find similar ones at your local garden centers, Homegoods ... that sort of place. Also remember that you can use anything that isn't flammable like ceramic or terracotta. ~ karen!
Jamie at RenoCompare
5 years on this is still such a great project and I don't suppose we'll be the last to share it either! Thanks Karen
http://www.renocompare.com/2015/07/making-your-own-fire-pit/
Dan
Love this idea. May try and make one in miniature for use with tea candles.
Wonder if crushed up scent sticks that you burn soul work well in something like that??
Karen
Hi Dan! I have no idea if the scent sticks will work but I love the idea of the mini fire pit! ~ karen
Allan
Great idea! I've been looking to do something like this for use during fire bans, when I can't build a bonfire.
Just a cautionary note about the rocks. Some people may be tempted to collect their own, and should be reminded not to pick them up from damp areas like seashores, river banks, etc. The rocks will contain moisture and, upon heating, may explode from the expansion of the moisture inside of the rock.
Robyn Boykin
I LOVE THIS IDEA!
Dave Watson
I just ran across this idea and thought it was quite clever. It would add another dimension to our deck at night. However, there are a few points that need to be addressed. I worked for many years in a glass processing factory that dealt in tempered glass. In your article you stated that you could cut have tempered glass cut to your dimensions. Unfortunately you cannot cut tempered glass. You must first remove the temper if you wish to cut it then retemper it. Also, tempered glass is infinitely more resistant to heat stress than "plain" glass. The reason these are probably not available commercially is that safety liability would be tremendous. Thin, untempered glass would be extremely dangerous around children, easy to break and then easy to get cut on. I'm not trying to throw cold water on your idea, just want folks to understand all the safety ramifications! If you want to learn the facts on glass go to
education center.ppg.com/glasstopics/heated_aspx
Cyndi
Great idea! While I would like a big fire, this might do. I kept searching and found this place that sells fireplace glass, including colored and clear glass that is heat-proof. http://www.moderustic.com/Toppers.html