You probably don't think you need a personal fire pit. And you're right. Although come to think of it, fire is an essential element. I'm rethinking this - it's possible you really DO need a personal fire pit. You just don't need a massive expensive one. A little tabletop cheap fire pit? You could probably use one of those.
My name is Karen and I haven't lit anything on fire in 5 months. I'm sure I deserve some sort of a chip or something for that.
You see ... I'm a bit of a pyromaniac. Technically I'm not a *real* pyromaniac I guess. I mean, I only light things on fire that should be lit on fire. Like kindling and hardwood and pretty much anything with Hello Kitty on it. And of course all of Rush's 1980's albums where they dabbled in "New Wave".
I light fires in the fireplace every night here in the old Casa de Karen from October until April. 6 or 7 face cords go flying up that chimney every year. But as deep and strong as my love of the log runs, I couldn't bring myself to buy an outdoor firepit when they first came out.
They were hilariously expensive at the time and really in my climate not all that useful. In the last decade or so the weather in Canada has changed.
We used to get Spring. Spring is now a fleeting moment that takes place between the hours of 4 and 5 p.m. in late May. When we wake up the next morning our guts have liquified and the garbage cans have maggots crawling out of them.
Once the season for fire rolls around it happens almost as instantly. And by then I want to be inside laying on the sofa with a hot chocolate and a plate full of cinnamon toast on my chest. Not outside being bitten by the limp stingers of aged mosquitos.
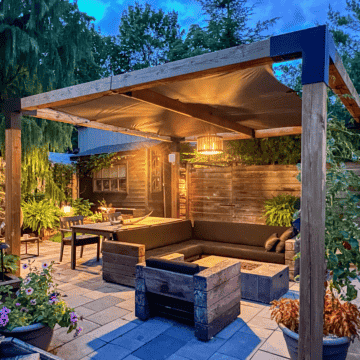
But still. There are 3 or 4 weeks when it makes sense to have a little personal fire pit outside.
So what was a pyromaniac girl like me to do when it's cool out, but not cool enough to trap myself in the house all night with my cat, tv remote and fire tongs?
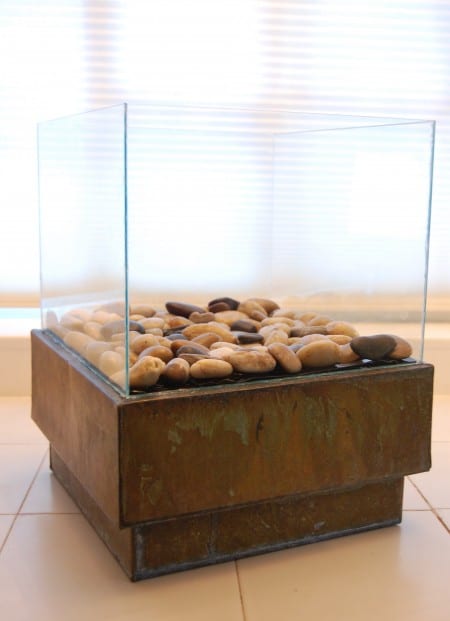
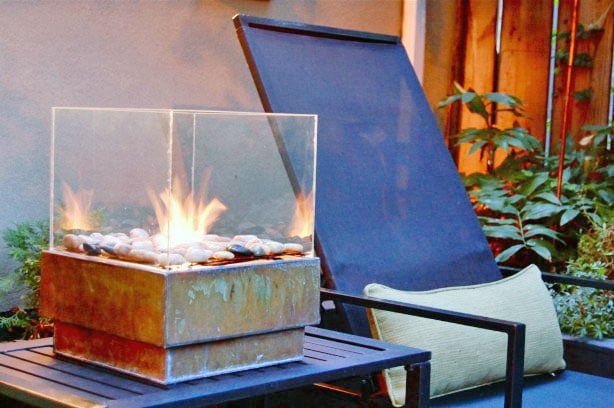
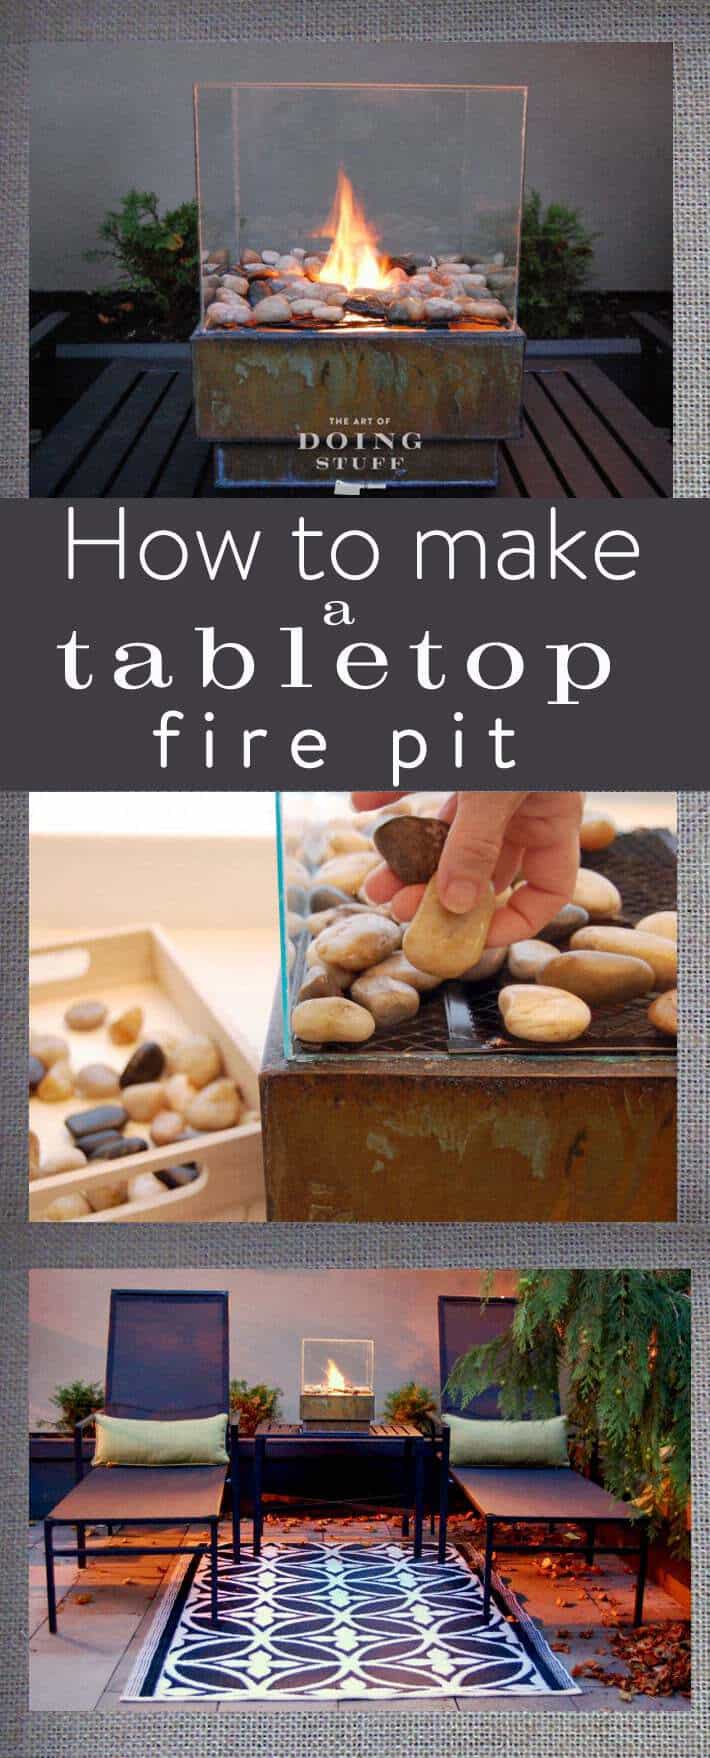
The Answer ... The Personal Fire Pit. (as designed by my sister ... I saw hers and then immediately came home and made my own exactly like the one she made.) It's easy and inexpensive to make. I used to say it's a lot nicer than any fire pit you've seen for sale in stores, but now that 10 years has passed since I originally made this fire pit a lot of stores are carrying ones that look - how do I say this - completely identical.
Here we gooooooo ...
How to Make a Personal Fire Pit
Materials you Need
- Marine Silicone
- Small rocks
- 4 pieces of glass (I bought 4 cheap picture frames from Dollarama and used the glass from those)
- Metal Mesh
- Gel Fuel (recommended) or 70%+ isopropyl alcohol
- Square planter (with a bit of a lip on it)
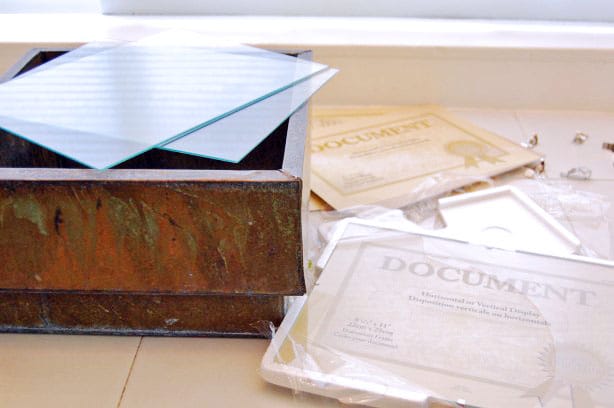
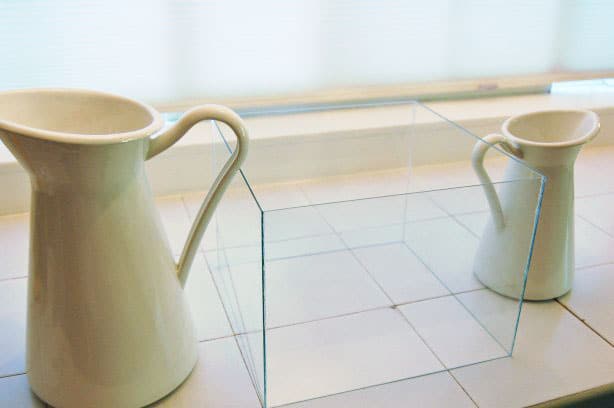
Step #1 - Making a Glass Box
You need to make a glass box. To do that just run a bead of silicone around the edges of your glass, and place them together.
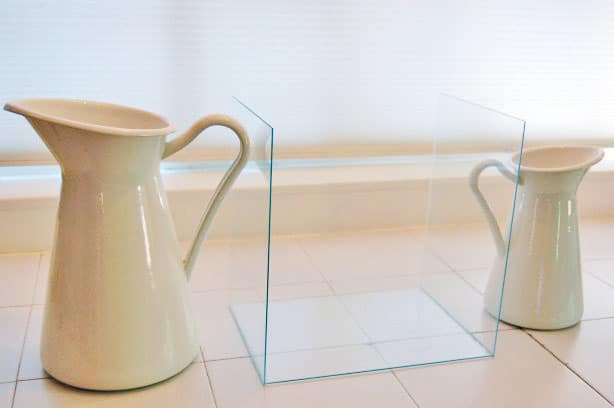
Do two sides first and hold them in place somehow until they dry.
Position them so your final side will be easy to silicone.
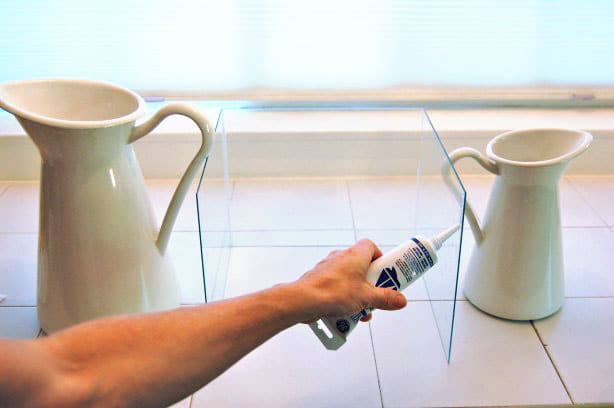
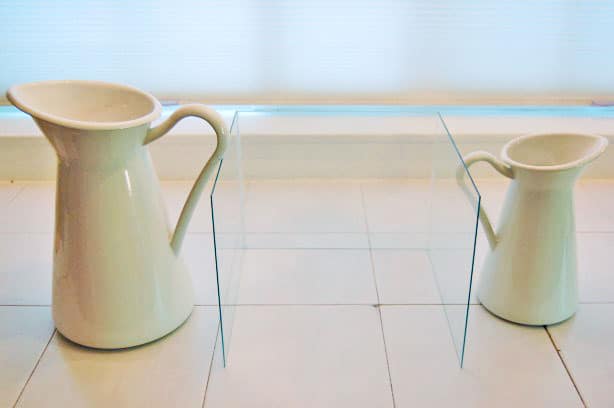
Run another bead of silicone and place your last piece of glass.
When you're placing your glass, try to be a bit careful about it. You don't want to smear the silicone around on the glass because it's a HUGE pain to get off. Just take your time.
Run a final bead of silicone all around the bottom edge of your newly created (because you're kind of great) glass box.

Flip the box over then place the siliconed edge on top of the metal planter, making sure there's enough edge in the middle left over for some metal mesh to rest on it.
Would you like to save this stuff?
Update: Everyone seems to be in fits over the fact that the glass will EXPLODE from the heat. It doesn't. I'm not going to say it never will but 1) only tempered glass EXPLODES. This isn't tempered glass. 2) Glass breaks through stress either from dropping it or by extreme, fast temperature changes. Neither of which you should have with this project. 3) Thin glass is less likely to break from stress than thick glass. ** I know that seems counterintuitive.
Step 2: Making the pit.
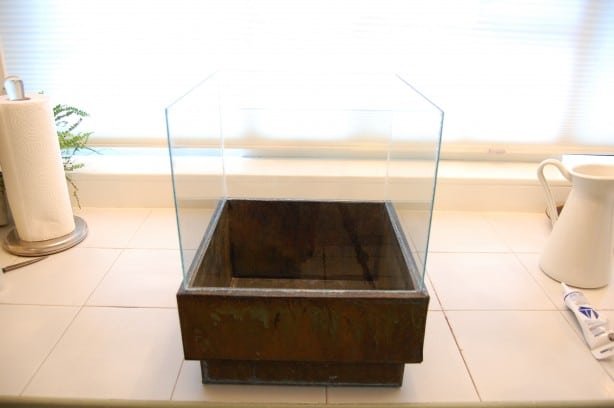
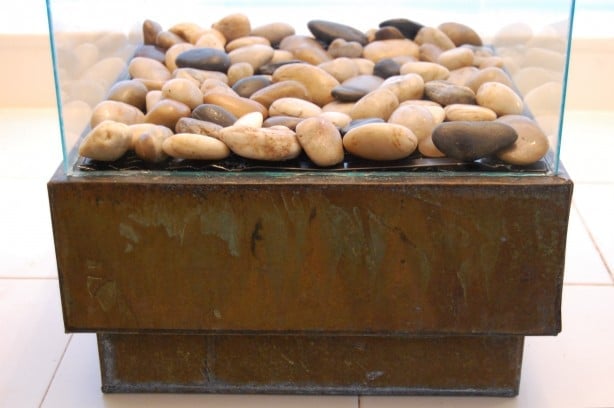
Your box is made so now you move onto cutting your mesh that will fit inside. The only purpose of the mesh is to support some rocks, which in turn hide the fuel can beneath.
Once your piece of mesh is cut your structure is complete and you just have to "build" the fire.
Put an opened can of gel fuel into the centre of your fire pit. If you're using Isopropyl Alcohol pour some into a leakproof metal container like an old, clean paint can.
Rest the mesh on the inside edge of the planter.
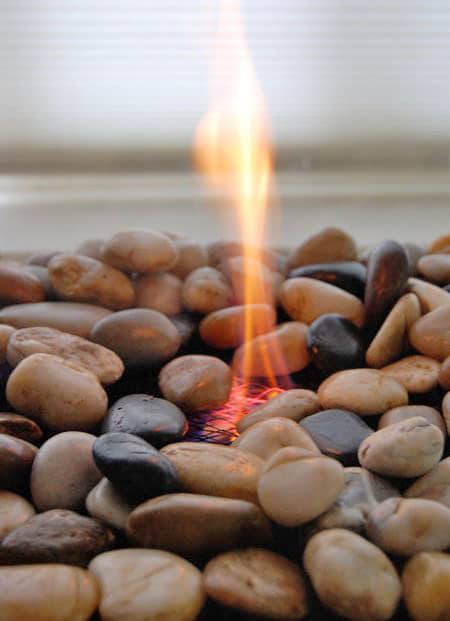
Finally, start putting down your rocks to cover the hideous mesh. If you're using rocks that you aren't sure about don't put them directly over the flame. Rocks with moisture in them can explode as can shaley rocks.

Cover mesh loosely with rocks (you need some space in between the rocks to allow for oxygen so the fire will stay lit).

Update: since writing this post originally, fire pit rocks have become available. They're 100% safe so you don't need to worry about keeping the rocks away from the flame.
You're almost done

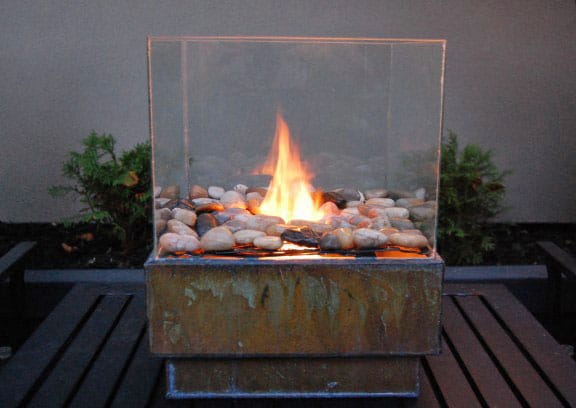
Firsty ... admire what you've done for about $25.
Step 3 - Light your fire
Clear the rocks away from above the gel fuel can and carefully light the gel fuel. I use an advanced technique. I light the end of a piece of spaghetti. Whole wheat of course.
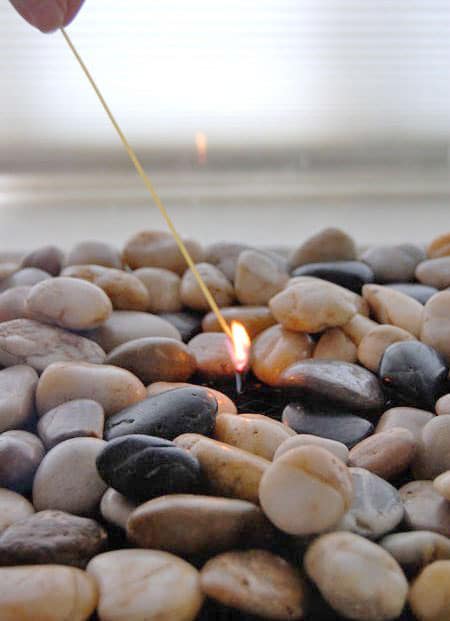
I would rule on Survivor, provided I'm allowed to bring a piece of spaghetti. Push the rocks away from the flame a bit (even a bit further than I show here) because some rocks can shatter when they get too hot. Or buy the fire pit rocks that are now available.

There you have your fire pit! $25. Plus as an added bonus, depending on what type of fuel you use, you can also use this fire pit *indoors*!!!
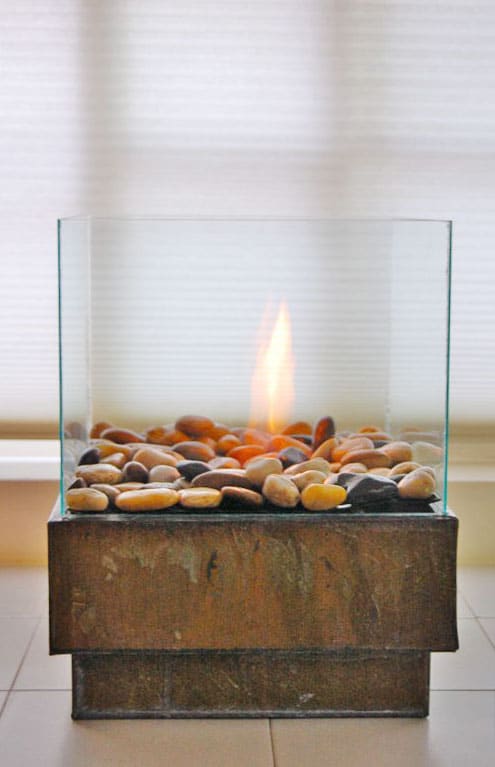
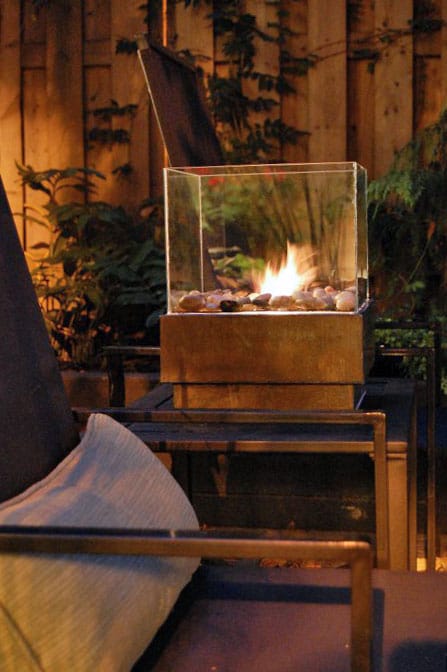
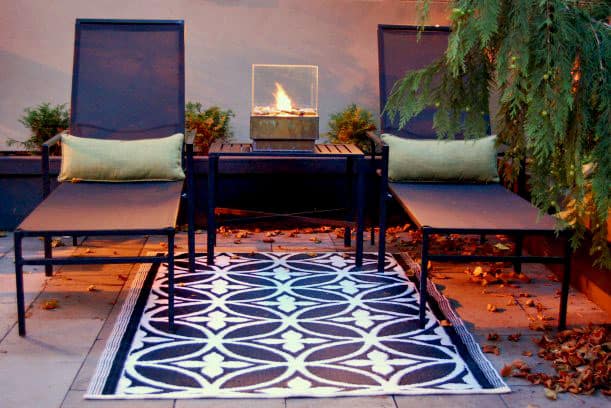
What makes this fire pit so amazing is the glass. The flames reflect against it creating dancing flames all over the place! Before I get to the final pictures with the fire pit in it's rightful home in my back yard I wanted to let you in on a few tips.
1. Make sure you buy gel fuel that's meant for gel fireplaces. Gel cooking fuel will not work because it usually only creates heat, not an actual visible flame.
2. Like I said, if you use a proper gel fuel (Real Flame for example) you can actually use this fire pit indoors. Be careful to place it on heat resistant fabric so it doesn't scorch your furniture. The metal conducts the flame heat a lot!
3. Make sure your rocks are heavy for their size. Rocks that are light are full of air and may explode!
4. You can use any metal planter for this. This was on sale, so this is the one I got for this little fire pit experiment. Black metal square planters that are probably on sale at garden centres right now would look fantastic with white rocks.
5. The gel cans last for about 3 hours, if you'd like to stop the flame earlier, just place something non flammable over the glass box to snuff out the flame. Cans can be relit at a later date or time.
.
WARNING
Use common sense. Don't wander off, leaving this burning and never EVER try to refill it when it's still burning. Snuff out the fire and make sure that it isn't hot or burning before refuelling. Otherwise you can create a firebomb. You can see that here.
That's it! That's all it takes to make your own personal fire pit. $25, about an hour, and a piece of spaghetti.
Update: A lot of people are having trouble finding a metal planter similar to mine. Remember you can also use terra cotta or ceramic.


Ted
Where did you get your metal planter at? I can't seem to find any metal plants like that.
Thanks
Ted
Karen
Hi Ted. I got the planter from a small local store. The best place to look for them is garden centres. And don't forget, any square, box like planter will work. Ceramic, terra cotta, … anything. ~ karen!
Krystal
Amazing!!!! Quick question, if I had a large lantern could I use that and place rocks and the gel instead of a planter and picture frame glass and just take the top off?? I've been looking for a good use for my lantern for awhile now...Thanks!
Karen
Hi Krystal! I'd have to see the lantern, but maybe! Send a pic to karen@theartofdoingstuff.com Sounds doable though. ~ karen!
Jessica B
do you need the glass? or could you just do the project with out it....
Adriana Gutierrez
Great question. Is the glass simply for “safety”?
Karen
No, it reflects the flame and is what makes it remarkable to look at. ~ karen!
Jessica
Thanks for the amazing tutorial!
It cost us more like $40 as we don't have the awesome Dollarama's here in NYC, but still way less than buying anything. Plus it was a fun project.
https://www.facebook.com/profile.php?id=672730765&sk=photos&collection_token=672730765%3A2305272732%3A69&set=a.10152155883630766.1073741856.672730765&type=3
Karen
Jessica! It looks GREAT! Good job. Yeah Dollarama is pretty much the best resource around. :) But it looks like you did just fine without it! ~ karen!
johnna
Can u email me instructions on home made fire pit
Barksdale
Ok...LOVE this idea and it is perfect for my apartment. I have made it and I love the way it looks. One thing I did was use soil in the pot to help so far as the heat radiating. Also works well for different sized cans of fuel. Only problem I have is I have not been able to find anywhere near me the gel fuel you mentioned. I have obviously found Sterno and and every off brand of that...but nothing that makes the yellow flame like yours does. Any recommendations on where to get that without having to buy a 24 pack online?
Karen
Hi Barksdale. I've found mine at any of my local hardware stores like Lowes or Rona. You may have an easier time finding it now because they're popular for summer use. Look for the cans in the seasonal section of your local large hardware store. Good luck. ~ karen!
Christa
Does this give off a strong fire smell? I live in an apartment and we are not suppose to have propane grills or fire pits so was wondering if it has a strong smell to it?
Anthony
Can I put multiple gel canisters in the firebox to make multiple flames? If I buy a little bit longer rectangular shaped object? Does it matter if the cans are touching a little bit?
Karen
Hi Anthony - Yes, a rectangular firebox would be great. The cans touching each other shouldn't be a problem, just make sure the flames are kept away from the glass and stones. ~ karen!
Anthony
Thanks for the quick response, this looks really cool and easy to make? Can the liquid gel be transferred to a different container? So if I find a small long container to fit inside so that I have one long flame or is this a solid gel that I need to leave inside the can? Also how high are these flames?
Karen
Leave the gel in the cans Anthony, they're built to withstand the heat of the flames. It's difficult to judge the height of the flame because you're seeing it through the glass which distorts it, plus it changes as it flickers. Generally around 6"-8" though. (total guess based on memory) ~ karen
kimmie
I absolutely adore your firepit! You also have a fantastic sense of humor! I really love reading your posts and being inspired by your work!
Tracy
Love it! I work selling fireplaces ect. and one thing I would caution is the use of the stones. They too can explode. In any fireplace installations they use a true poris basalt stone or man made stone. Proper fire glass rated for fire pits would be nice as well.
Karen
Hi Tracy - Thanks for the input. Yes, people have to be careful about the stones. I tend to just move them aside from the flame, but official firestones would be good. As for the glass it doesn't actually even get warm. And believe it or not, since it's so thin it has less of a chance of breaking. The thicker the glass, the more likely it is to break from the shock of cold to hot. Weird, huh? ~ karen!
Kaitlin White
Karen- I know this post is now 4 years old but it is still AMAZING! I do have 2 questions. I found a concrete planter do you think that would be suitable? I could not find metal anywhere locally and of course I am buying at the worst time since it is the height of the season and have to pay full price (but this post is so cool its worth it!). Also my planter is 10X10X10 is that big enough? Your pictures make your firepit seem bigger than that but then you posted the glass size and I am thinking the 10X10 maybe enough. Thank you so much!
Liz
great idea! does it supply enough heat outside? does it keep you warm? would it be good for smores?
thanks!
Maria
Karen, brilliant! You AND this diy :). I have NO questions to ask. None. Why? Well, 1) if I have questions, I'll re-read, in case I've missed the information I'm looking for, 2) I ALWAYS, ALWAYS read the comments because 3) someone, or many, many someone's, have already asked the same question and you've answered it, at least once, and sometimes, many, many times, 4) AND THE BEST PART, because there are usually many fantastic ideas, substitutions, additions, LOTS of useful feedback on attempts and successes, and even links to where one can find the supplies, and/or something similar!
Love this blog! And by way of loving this blog, I guess I love you too! You ROCK!
Jennifer
Once you light the can, are you able to put it out? How are you doing this without burning yourself?
Karen
Hi Jennifer - To put the flame out you just need to smother it. So put anything over the top (across the glass) that will stop oxygen. I use a large baking sheet. ~ karen!
andrea
thank you to show me this nice thing,i will build it tomorrow
Dana
Awesome idea - so clever! I want to do this :)
Linda
If you used this indoors would there be a problem with it smoking up your ceiling or walls? I have never used gel fuel before so thought I had better ask.
Karen
Hi Linda, I've only lit mine inside on a few occasions so I can't completely vouch for the claim but apparently gel fuel doesn't smoke. :) ~ karen!
Gina Marie
What a great idea, thank you. Does the metal planter ever get too hot? I'm just wondering if I could move it around well, if I needed to. Thanks Great site
Karen
Hi Gina - Nope! The metal planter doesn't get hot at all actually. ~ karen!
Patricia
I found it a bit odd that you were able to get glass the exact size of the metal planter how much luck was involved in making this fire pit? You would need to find a planter the exact measurements of the Glass you are using. Luck? 9x10 glass frames? or larger? The planter would have to be bought first and measured then find the glass in that size right?
Karen
Hi Patricia. It isn't really that hard. The planter is going to have a lip on it of at least 1". Plus you can overlap the glass when you make your square and position it depending on what fits best. So there's a lot more leeway than you would think. And yes. Buy your planter first and then go out to your local dollar store and start searching through the glass frames. Do NOT buy expensive glass. Contrary to what most people think, thinner glass is less likely to break from heat/cold temperature changes. ~ karen
Sheri Lien
Hi and thank you! What are some options for sitting the completed fire pit on?
Karen
Hi Sheri - You can put the fire pit on anything. A side table, a picnic table, ... anything that won't knock over and cause a fire if you bump it will work just fine. ~ karen