My niece snorted at me the other day when I showed her this latest DIY of mine. Not because she didn't like the end result, but because I told her I copied it from one I saw and loved in Country Living Magazine.
"Did you ever think you'd see the day when you'd be looking at Country Living Magazine?"
She has a point. But I don't think I've changed. I think Country Living Magazine has. Gone are the days of chintz and dancing roosters on the kitchen counter. There's a certain country charm to every single one of the pages.
Without, you know ... conjuring up images of Hee Haw.
I'd have to say it's my all time favourite magazine right now. House Beautiful and Architectural Digest has some stunning design but ... a lot of times I can't imagine living in those rooms. Country Living however ... I could move right in, throw a blanket on the couch and watch a movie. They do country chic. Elegant country decorating that always looks modern and up to date. Not corny or cheesy.

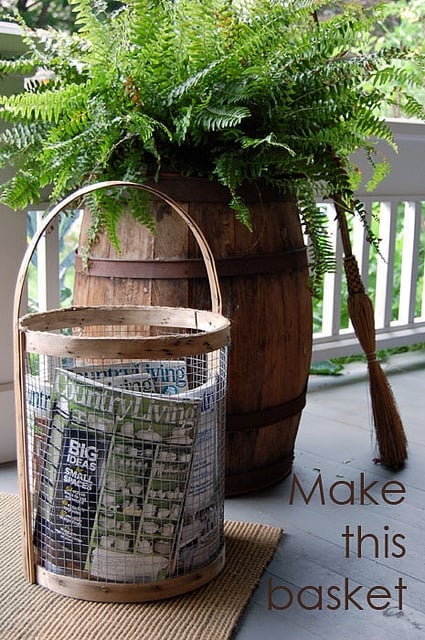
So when I saw this basket in the June issue I knew I had to make it. Firstly because I loved it and secondly because it looked ridiculously easy to make.
I started out making a version that involved steam bending wood. Then I decided if I was going to share this DIY with all of you ... chances are only one of you would ever consider making anything you needed to steam bend wood with a homemade steam bending contraption. So I nixed that idea.
(if you're that one person, let me know ... we'll talk)
Instead I found a way to make a reasonable facsimile out of everyday objects you can find quite easily. I found all of these materials in my potting shed. But most of you will have to buy/scrounge/find a few of the materials.
You'll need:
1 peach basket (local produce or grocery stores will have and gladly give you one. Farmers markets try to hold onto theirs but I'm sure you could persuade someone to sell you one for a couple of dollars.)
1, 12" round cork mat I bought mine at the hardware store for $5, but they're also available in craft stores. Dollarama in Canada has 9" ones for $2)
A long length of jute twine, string or bailing twine. (again ... available in hardware, craft or Dollar stores)
Hot glue gun
2, ½" wood screws
Hardware Cloth or Chicken Wire (available at hardware stores and sometimes garden centres)
2 wood paint sticks, or other thin, 1" - 1½" scraps of wood cut to fit height of basket. (15" in my case)
Wire snips
Scissors
I N S T R U C T I O N S
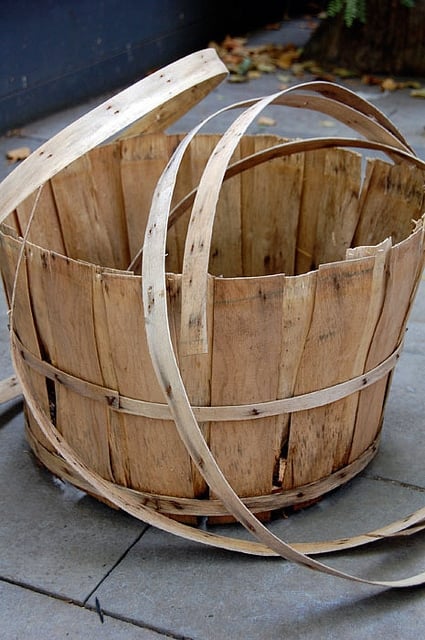
1. Carefully pull your peach basket apart. All you'll be using are the round, thin pieces of wood that go around the top and bottom of the basket. Using your wire snips or a screwdriver pull the staples holding it together out. Be careful to not break the long length of thin wood.
2. Cut a piece of hardware cloth to fit whatever sized piece of cork you have. For a 12" piece of cork your hardware cloth will have to be 38" to wrap around it, by however high you want your basket. I made mine pretty big at 15" high.
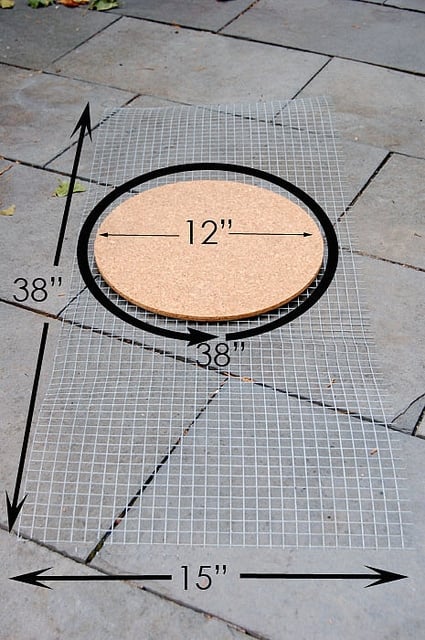
3. When cutting your hardware cloth make sure you leave one of the long ends with the pointy bits still in tact. You'll be bending these over to act as support for the cork at the bottom of your basket. Just bend them at a 90 ° angle with your thumb.
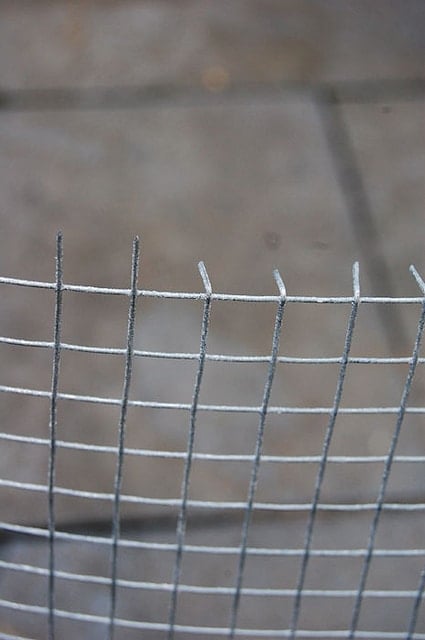
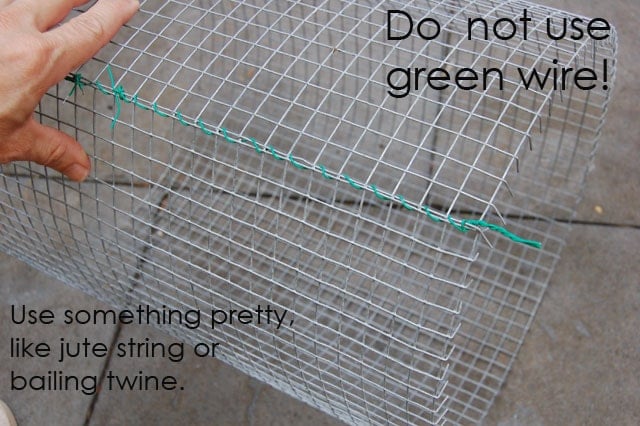
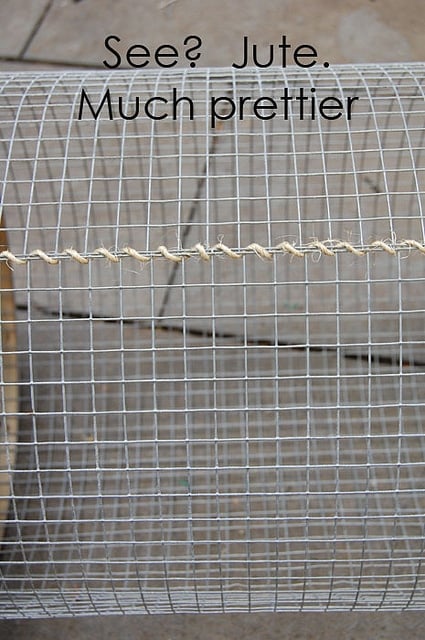
4. Once you've bent the ends down, roll your hardware cloth into a tube and tie the edges together with a piece of string or jute. (I started off using green coated wire thinking you wouldn't be able to see it but changed my design midway through the basket to something where you would see the wire. So I took it off and replaced it with jute string)
Would you like to save this stuff?
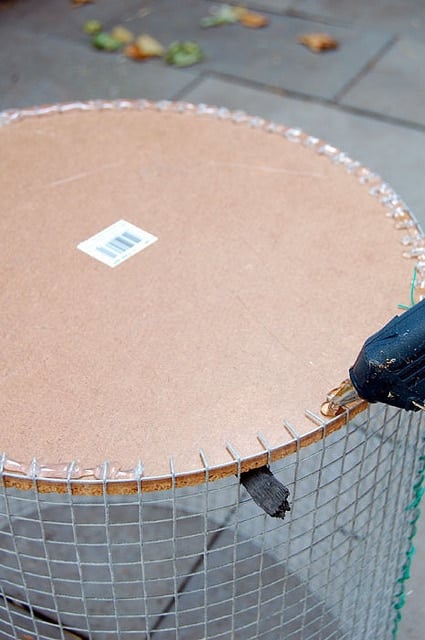
5. Stand your cylinder on the ground and place your cork bottom inside.
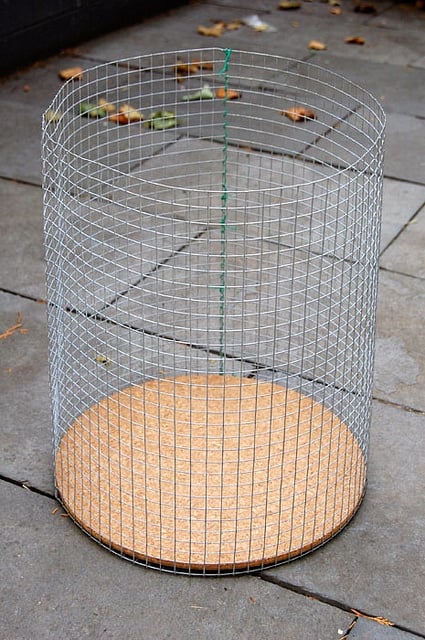
6. Make sure your tines are pressed up tight against the bottom.
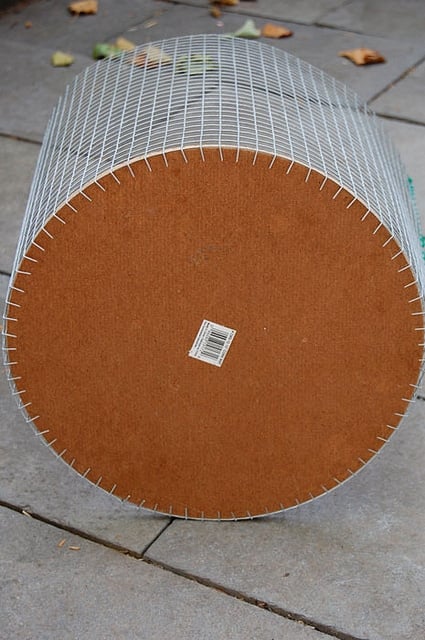
7. Hot glue the tines to the cork. If you need to, shove something in between the hardware cloth and the cork bottom to keep it pushed up tight against the tines while you're gluing it. I've just used a bit of mulch.
8. Cut the ends of your peach basket strips so they're straight.
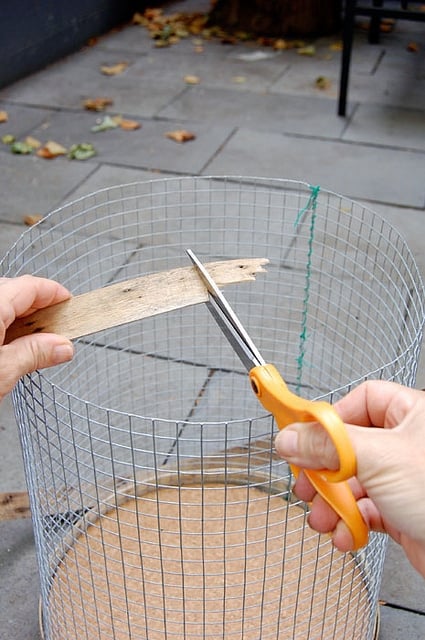
9. Hot glue the strips along the bottom and top of your cylinder. Use clamps if you need to to hold the strips in place.
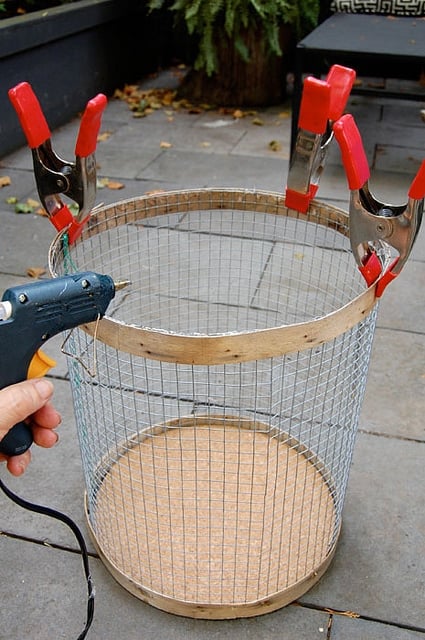
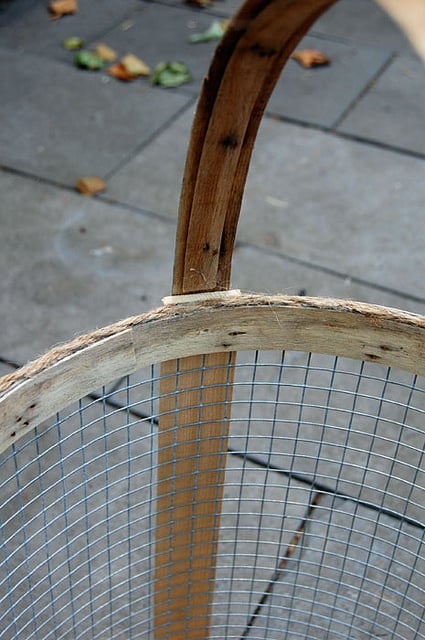
10. Place a final wood strip around the inside of the top of the basket and hot glue it.
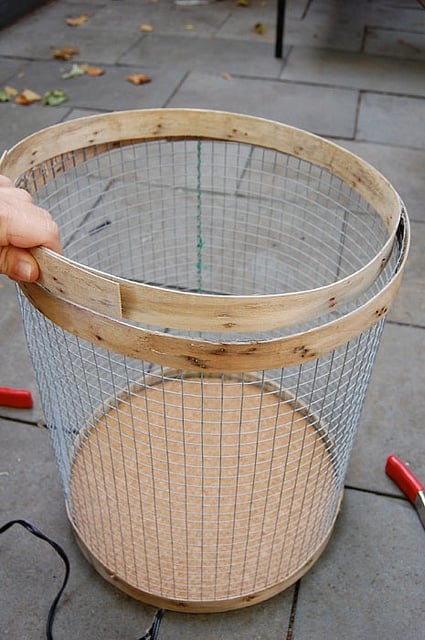
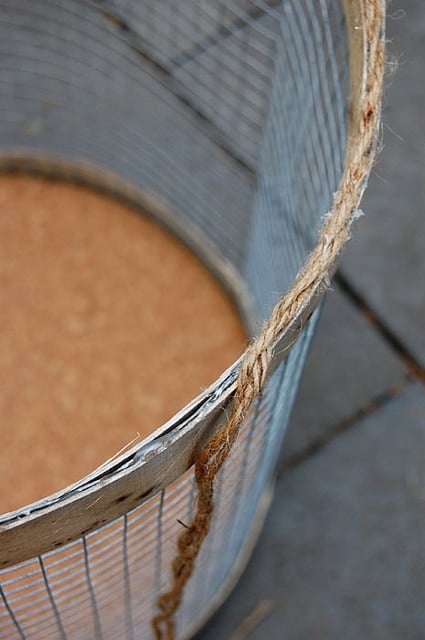
11. To finish the top edge of the basket (cause all that hot glue and wood is messy looking) just run a length of twine or string along the edge and hot glue it. If your twine isn't thick enough to cover the whole edge, just double it up and twist it.
12. Cut your thin pieces of wood or paint sticks to fit the height of your basket. In my case, 15". Dab hot glue on each end ...
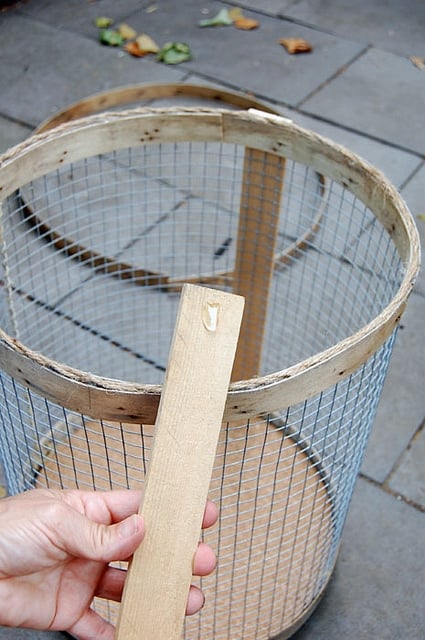
... and stick them to the side of your basket. Like so.
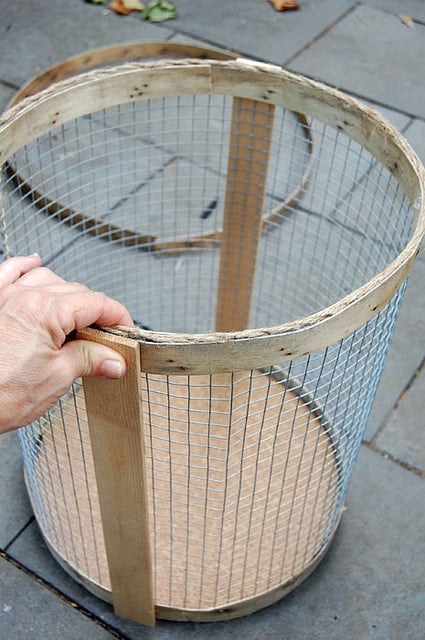
13. Hot glue your final piece of peach basket wood to the sides of your basket, leaving enough for the handle. Just eyeball whatever looks good for the length of your handle.
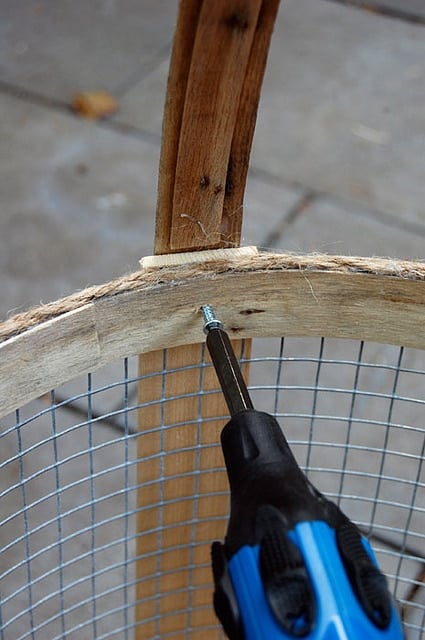
14. Since the peach basket wood is so thin, reinforce the handle by gluing another one or two pieces of peach basket wood to the underside of the handle.
15. Screw a ½ screw on the inside of the basket to hold the handle in place, so you aren't relying on the powers of hot glue alone.
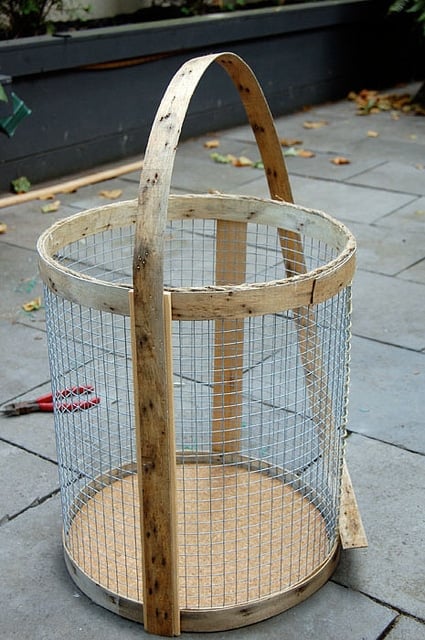
And admire.
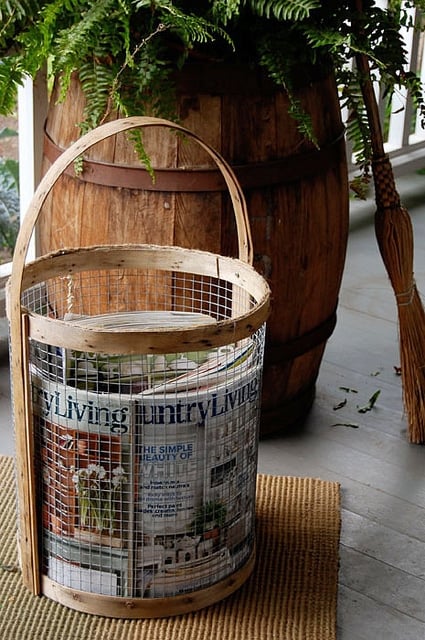
I'm already planning on making another one of these. Mainly because this one turned out a LOT bigger than I thought it would. This one I'm going to use inside in the winter beside the fireplace for kindling and rolled up paper.
In the summer it's on the porch with magazines in it.
The smaller one, I plan on making this weekend will be for gathering vegetables from the garden.
The difference between my basket and the one in Country Living, is the one in the magazine has "feet". But I decided I liked the look of the basket with just the two strips of wood along the sides where the handles run (as opposed to the 4 the basket from the magazine has). To make feet for the basket to stand on I'd need to add 2 more strips of wood to the outside of the basket. I didn't wanna. So I didn't.
What I actually like better about my basket is it already looks old and worn. That comes from using an old, worn peach basket. Keep that in mind when you're picking your peach basket out. If it's old and worn that's how your basket will look. If it's new and clean, that's how your basket will look.
Country Living. Snort. Not only am I looking at it, I've subscribed to it. In more ways than one.


Laura
Hi Karen, I really enjoy your creativity and spunky attitude. You are hilarious!
I'm so late in seeing this DIY. Cruising thur your site and finding something new is always worth it even if it's old news. I'm wondering about the hot glue you use. The stuff I use doesn't last for very long. It just fails to hold up to temperature changes, and weight bearing actives like a basket would have to deal with. Please, what are you using?
Regards, Laura
Karen
Hi Laura! I've had that too, but not always. So I'm not sure if it's the glue or conditions that cause it. But this basket in particular is STILL in good shape so whatever glue I used (probably just dollar store) worked great. The only other thing I can think of is it's maybe the gun not getting hot enough to properly melt the glue? ~ karen!
Laura
Thanks for your reply. I didn't think about the fact that my glue gun is not hot enough...It is several 100 years old! Think it's time to get a new one.
Laura
Susan Mercurio
Um, you said that if someone wants to bend wood with steam, to let you know.
So here I am.
And your wire/peach-basket basket is great!
Christina Chin
Hey Karen! Do you mind if I use your images in some poster designs I'm doing? It would be to inspire those who see it and as a selling point.
Karen
Hi Christina. I'm sorry I do not allow the use of my photos. ~ karen!
Carole
This is so cool. Thanks for sharing.
My husband used to make reed baskets, so is used to the bending technique, only with hot water. I can make rims out of flat reed. So excited to try!
Karen
Have fun! It was several years ago that I made this and it's still going strong! ~ karen!
Amy
Great job. I couldn't tell from the first picture if it was the original or the knock-off.
Karen
Ha! Thanks. :) Yeah, it turned out really well considering it was made out of a cruddy old falling apart peach basket and other junk I found around the house. ~ karen!
Susan
You are a genius! Thanks for the tutorial! I'm making one myself!
Susan
Karen
Thanks Susan! ~ karen
Nicole
I love the basket!! I am going to try this for sure! I was looking for a way to make a Garden Hod but this is a close second! If you ever want to try a garden Hod for veggies in the garden I would love to see those plans too. Just a hint;)
Karen
Hah! I was actually given the Lee Valley garden hod this winter when I spoke at a Seedy Saturday event. So I'm not sure I'll be making one. :) It's probably be easy enough. I'd start with bamboo, chicken wire or hardware cloth ... Uh oh. ~ karen!
Katie
This is so awesome and I actually like yours more! Thank you for the tutorial :)
~Katie
Karen
Hah! Well thank you. :) ~ karen!
Comet
I am a bit late to the table here but--To steam wood --not in your tub either---get a piece of galvanized PIPE bigger and longer than your wood.
Get the end pieces threaded. You can buy pre-made pieces this way or the store can do it for you if you need a really odd size--just make sure that your wood will fit in it both width and length wise. Get the SCREW ON CAPS for the ends.
Wet your wood--and add SOME water to the tube when you place the wood in there. Not too much!
Place your pipe on your grill or your fire or I would think one of the small burners like Karen used for the Maple Syrup project would do--and if it is too short prop up one end and then cook until you feel the wood is pretty steamed up. Make sure you are extremely CAREFUL when you open this and you should let it cool down some. Eye protection and body/hand protection needed here--just in case! Then remove your wood and when you determine that it is properly soggy to bend use some thing in the same shape and size to bend it around--or use a pattern--and tie it; clamp it; stake it--to let DRY and take he curve.
I think this is from the Southern series done back in the 70's of "old timey mountain ways" which titles I am sure I will remember oh about 3 in the AM. They tell you how to make 'shine; baskets; weave--I am sure a quick Google would find these for you. Several volumes and all were as I remember amazing.
Eileen Conklin
They were called the Foxfire Books. 12 volumes by Elliot Wigginton. Published in the 70s.
Julia at Home on 129 Acres
Finally, six months after you first posted this project, I've made my own basket! Mine is an umbrella stand instead of a magazine/kindling basket. Thanks for the great tutorial and the inspiration!
evie
i admit it... i too would just use the peach basket and call it a day.
Beckie
Ok this turned out very cool, what a useful item and very creative! I'll have it up on my FB!
Karen
Thanks Beckie! ~ karen
beth
Yours is the funniest blog i've ever read! You are hysterical! Thank you for sharing all of it! I have been laughing for the last hour!
Karen
Thanks Beth. Feel free to pass that sentiment on to anyone and every you know. Even people you don't know would be O.K. I mean, they might think you're a bit of a whack job, but ... that doesn't really affect me so I'm O.K. with it. ~ karen!
Jae8888
That's neat. Which issue of Country Living did you find that project?