There are 3 ways to make the home you live in look derelict. Broken windows, saggy gates and standing on your front lawn in a bathrobe throwing jelly beans at everyone walking past. Extra derelict points if you're wearing banana peels as slippers.
I have no broken windows and gave up on throwing jelly beans at my neighbours years ago when I realized (judging by the fist shaking) not a single passerby seemed to like jelly beans.
I do however have a saggy gate.
I've been meaning to brace these gates since the day I built them. But I've had other very important things to do that didn't involve bracing a gate. Mainly this is because I had no idea how to brace a gate. I had a general idea I guess, but it wasn't the sort of thing I knew exactly how to do or what to buy. I'd go to the hardware store the odd time and kind of look at the wires and twisty things and know that these were indeed the sorts of things I'd probably need, but there were so many sizes and little parts involved that I inevitably turned on my heels, grabbed a bag of jelly beans and left the store.
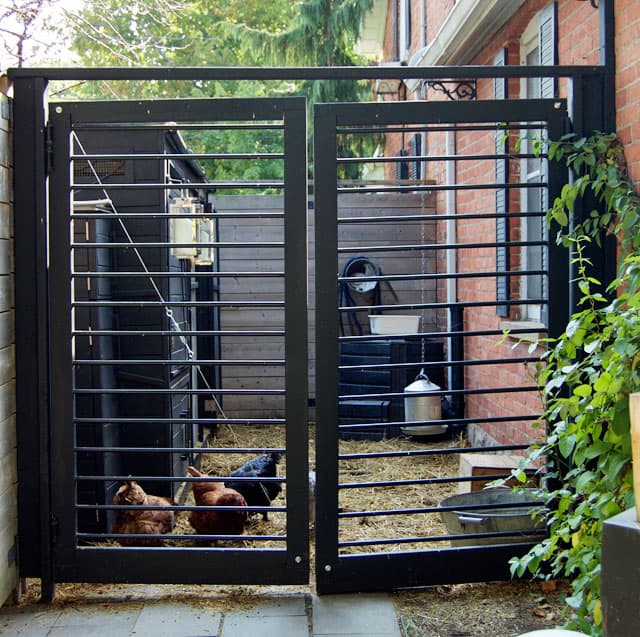
The difference. Left side after bracing. Right side not braced.
Every few months or so my neighbour Grant would take a look in my backyard and say "So. Haven't braced those gates yet, eh?". I'd tell him, NO! Which he couldn't hear on account of his ears being filled with jelly beans by the time I responded.
Finally, after a few years of being pelted with jelly beans, Grant offered to take me to the local hardware store to show me exactly what I needed to buy.
I agreed because Grant has a super-cool car.

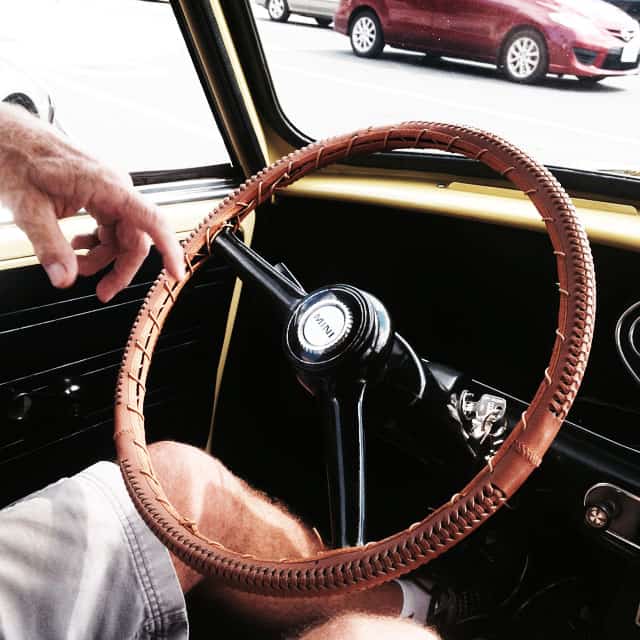
If Grant drove a Corolla you'd be reading about how to make soup today.
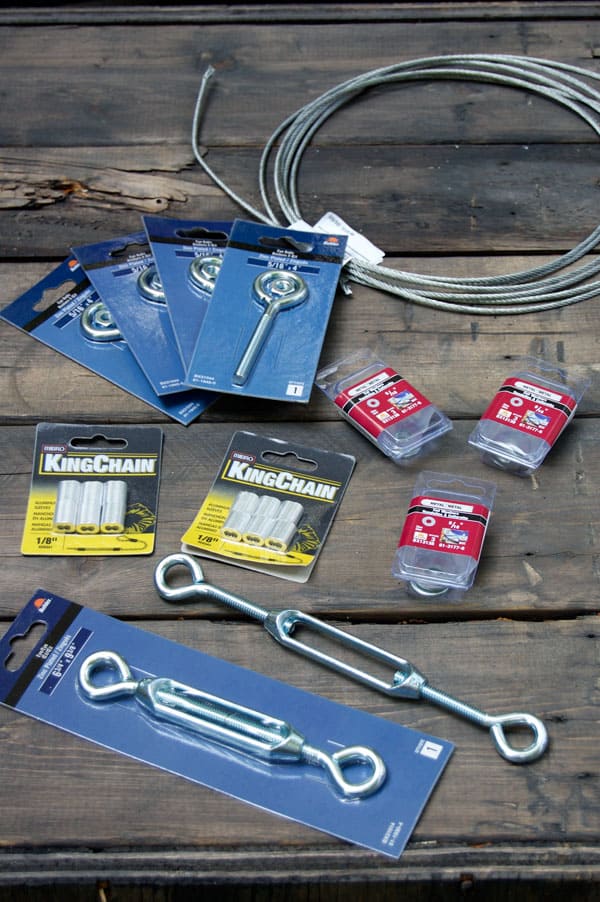
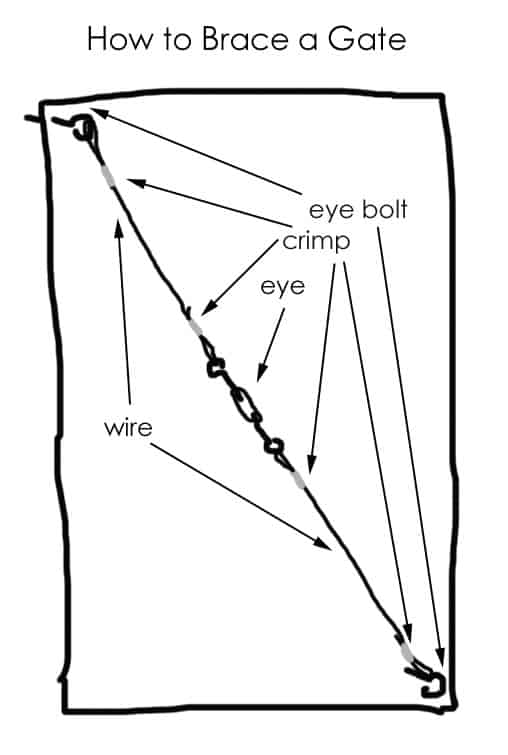
How to Brace a GATE.
Materials (per gate)
(2 x ) 4/16ths eye bolts
(4 x ) ⅛th" crimps (aluminum sleeves)
⅛th wire (length of the diagonal measurement of your gate plus a couple of feet)
(1 x) 6 ¾ x 9 ⅜ths eye
Tin Snips or cutters
Electrical tape
I was going to end the post there with that diagram I drew because I suddenly wanted to try to make biscuits. But you people have a tendency to be super-needy always asking for clarification and instructions and actual photos and such. Since I find it very difficult to throw jelly beans through my computer I will comply.
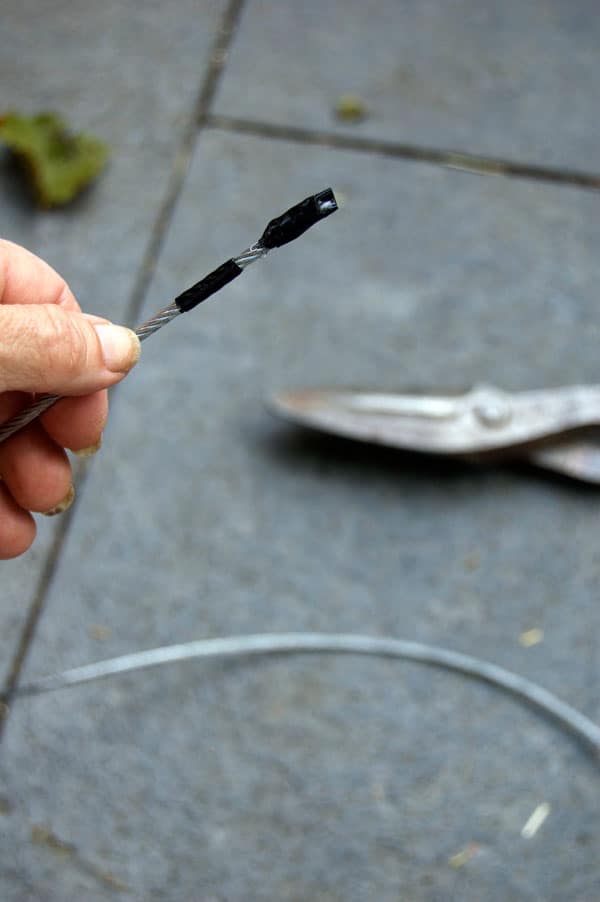
The first thing you need to do is cut your length of wire in half. You'll be using half on one side of your gate brace and half on the other. If you measured correctly across the diagonal of your gate plus added another 2 feet you should have the right measurement for each side of your gate simply by cutting your length of wire in half.
Would you like to save this stuff?
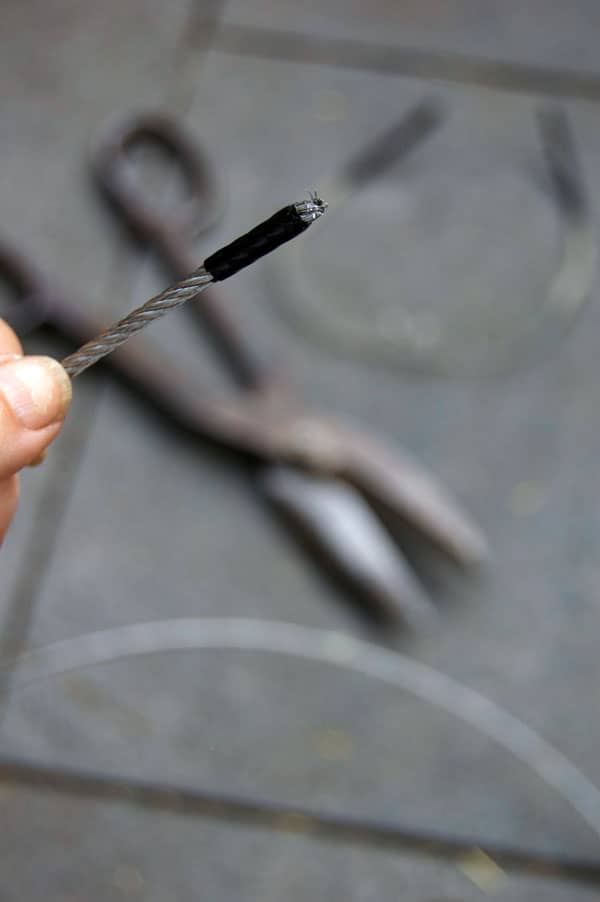
This wire is insanely pointy and sharp once you cut it so to make things a tiny bit easier on yourself use a GOOD pair of tin snips or cutters. You can also tape on either side of the wire that you want to cut with electrical tape. This will keep the wire from unravelling (which seems to be when it's at its sharpest and angriest) after you cut it. Just cut between the tape.

Maybe do so while sitting on the ground looking pensive and thoughtful. With a blotch of black paint on your leg.
The other thing using the tape does is keeps the wire as tight as possible when you're cutting it. It has a tendancy to splay out when you cut it which makes it almost impossible to thread through your crimps. Which are actually called aluminum sleeves.
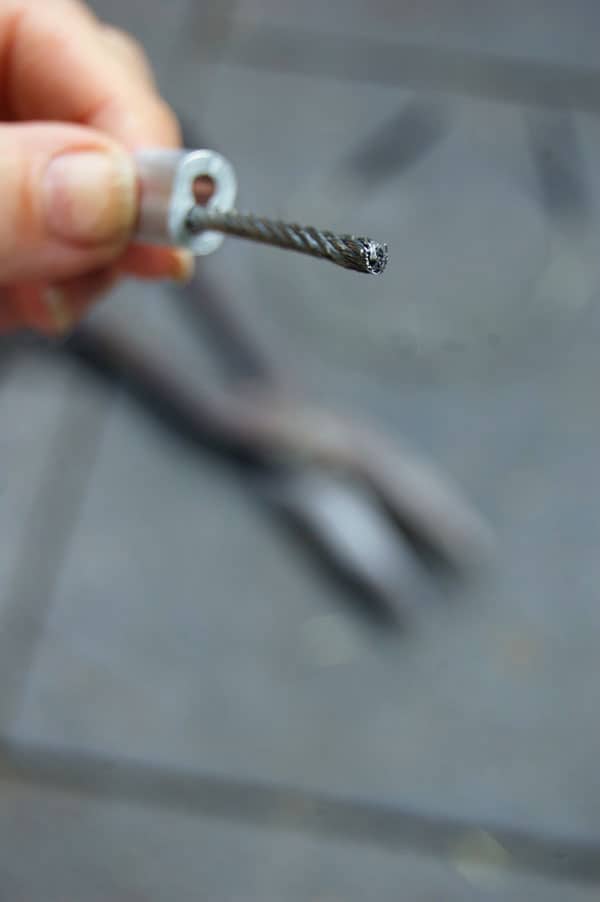
Once your wire is cut in half, apply a sleeve to each end of the wire.
Run the wire through once, hang the eye bolt off of it, then continue the wire through the sleeve.
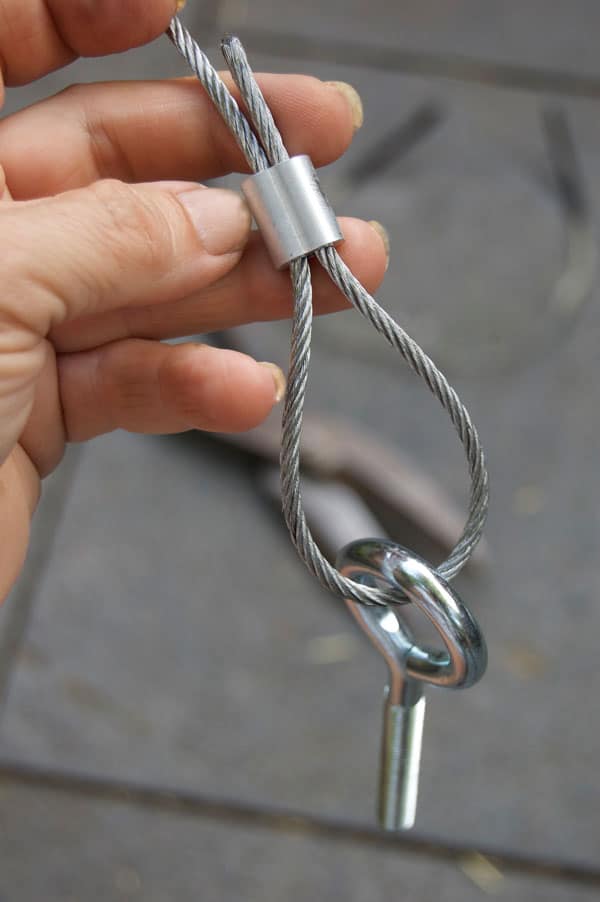
Keep your loop as small as possible. This will allow you to have as long a wire as possible which will ensure your wire is long enough to run the full diameter of your gate. Crimp the aluminum sleeves closed with either a crimping tool or a mallet.
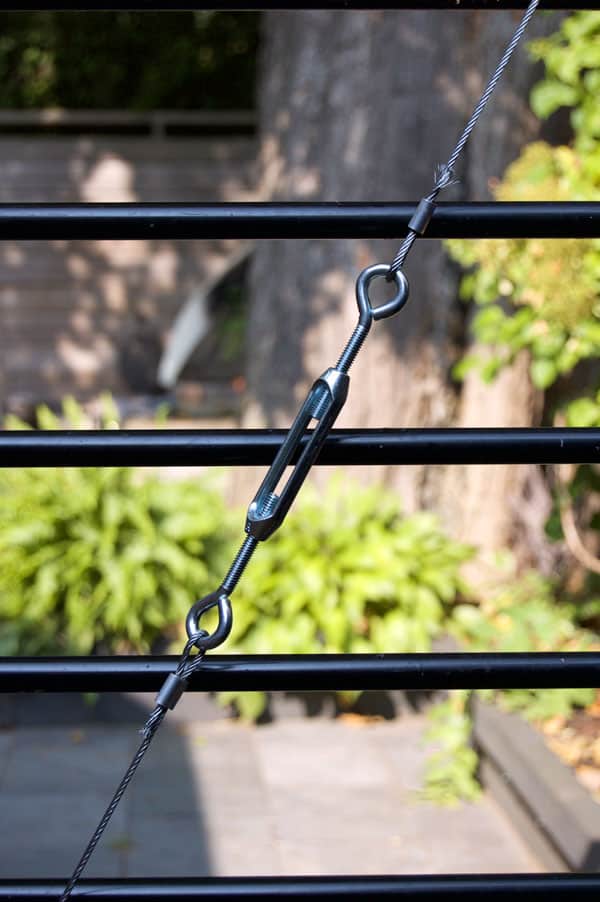
Once you have eye bolts and sleeves on the ends of your two separate wires, you can then attach the sleeves and adjustable eye, making one continuous connection, like you can see in the photo below. Crimp your sleeve the same way as before.
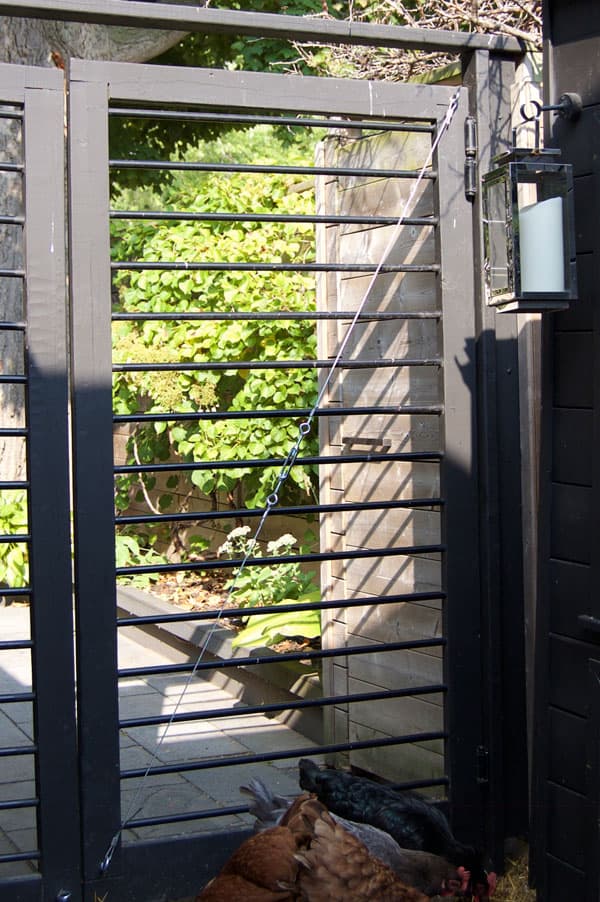
Lay the wire on the ground while you drill a hole on opposite corners of your gate.
You want a hole on the edge of the gate that's dipping (which will be at the bottom of the gate) and a hole on the gate diagonally across from that hole. Just go look at the picture I drew and it'll all make sense.
Notice below how I don't have huge loops.
Once your holes are drilled all you need to do is push the eye bolts through the holes and secure with a nut (and washer if you're the type to do things right). Tighten.
You can now "brace" your gate by tightening the adjustable eye in the middle by twisting it. The more you twist it the tighter the wire will get, lifting the bottom of your gate up as it goes.
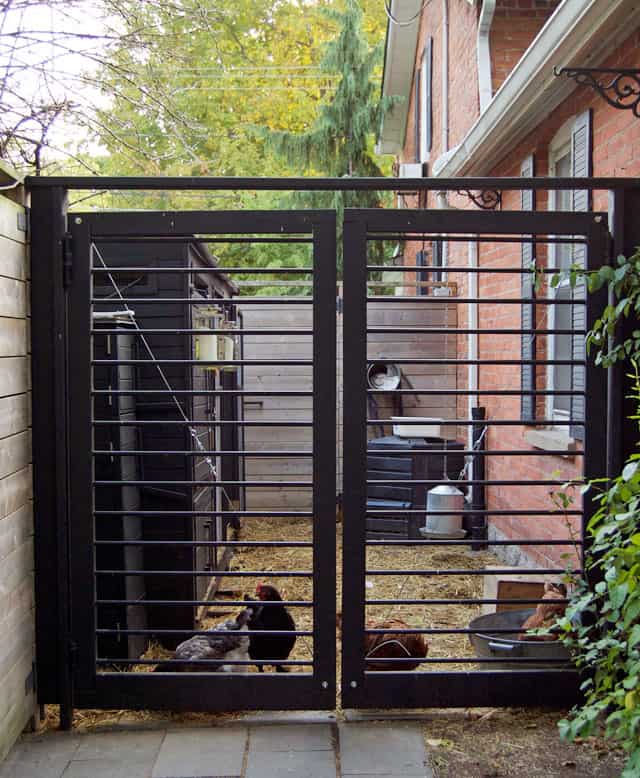
If you go back up to the top of the post and compare the sagging gate to the lifted one you'll see what a big difference it makes.
I'd have done this years ago if only someone had mentioned it to me.


Alberta Gal
You have the best blog I have ever seen, in every way. Thanks so much for sticking with us.
I have a pile of those wire tensioners, and now I remember why I bought them! Need to straighten the main farm and garden gates, and some corner fence posts. Now I know how to do this job, once, correctly.
I have to install a new toilet, and was wondering how to do it. Your post showed up just in time!
And yes, I butter both sides. Keeps the moisture in the filling from soaking the bread, and I use mayo, too, on top of that, and sometimes mustard. 'Butter is Better'! So they say.
Karen
LOL, you've been busy reading. :) Yes, the toilet took me less time than bracing the gate! ~ karen
Barbie
It's nice to have great neighbors! I once owned a mini....when I lived in Scotland! Loved it!
Rondina
I should have asked you how to do that years ago when the original ugly gate was here. Fortunately, a dump truck that hauled off the pile of destruction that was the inside of the garage apartment hit the gate and brought one side down. A couple of hundred dollars for 6x6 metal posts and a rounded top and I had a brand new one paid for by said dump truck company. It's not the wrought iron gate of my dreams, but it was almost free. The old one had these on it. They apparently were not installed correctly as they had huge wire loops.
Now for the important question. Grant drives a super-cool car. It should be featured on Jerry Seinfield's "Comedians in Cars Getting Coffee." (There are a lot of Canadian comedians down here. I think because we have so many things to make fun of.) What kind of car is that?
Karen
Well that is fortunate. Maybe a dump truck will run over my neighbour's tree that shades my front yard garden. Just kidding. Kind of. That car is a Mini. :) ~karen!
Jody
The banana peels help my calluses.
Jody
Love Grant's name because that was my single name. Love his car. Love the little ash tray on the dash. And he has over 800,000 km on that puppy. Yikes! Did he let you drive?
Keelea
I'm with Paula. I'm ready for that biscuit recipe! Gates look fab, btw!
Nancy Blue Moon
What kind of soup...turkey soup right..of course...it's leftover week in Canada...
Wisconsin Gal
Karen, I'm going to print this out and take to Home Depot, come home and get out the drill. At that point, my husband will take over and (finally) fix our sagging gate. I've been mentioning it twice a year for five years now, since I've run out of things to throw at him. (And jelly beans don't work.) Thanks for giving me the tools to get the ball rolling!
Dale
Lauren, just buy a bag of jelly beans, (or walk past Karen's) pick a color to match the color (colour) of the tile, chomp a few times to get them nice and goopy, slap them under that tile and smoosh it back in place. Good for a quick fix but Gorilla glue would last longer and can be used for more stuff in the future.
Jennie Lee
Dale, I'm afraid Gorilla Glue would not be a good choice because it expands as it dries. That's nice when you're gluing things that don't fit neatly together, because it fills up the space, but the tile should be a neat fit. I'd suggest a bit of clear silicone caulk.
Lauren
Don't have any Gorilla glue - or jelly beans, so this comment saved the day. I think I know in my heart of hearts I SHOULD spring for a small tub of thinset, chip off the old thinset, etc. I may try the silicone caulk in the interim though cuz I've got some hiding out in the garage.
Karen
K I've held my tongue long enough. Just use the thinset, lol. It's easy, fast and will fix it properly. Plus you'll get that feeling of accomplishment and I'm sure you'll find othe things you need at the hardware store. ;) ~ karen!
Melissa in NC
Jelly beans, droopy gates and droopy boobs what a great post.
Lauren
You explain how to do these things better (and way funnier) than just about any body else. I've got a big crush on Tommy Silva from This Old House, so that's why you got the 'just about'.
I had one tile pop off from a too short clamp whilst making pasta with a 25 year old pasta maker. Would you recommend using Elmer's to put the damn thing back on or do I have to go buy a tub/pkg of thinset?
BaconBleuCheez
Yeah, Tommy Silva is super hot, but neighbor Grant's legs look pretty good in those khaki shorts.
Tigersmom
We're only super-needy because you've made us that way.
SusanR
I don't have any gates or doors that need to be un-drooped, but I do have a very large walk-in closet in the bedroom that will ultimately be a crafts and sewing room, and I've had this idea of putting wire across part of the open ceiling space to hold tubes of wrapping paper, but I was wondering how I could make sure the wire was taut enough. I think I now know what to do! Thank you, for once again schooling me in the nicest way. :)
Lauren
Su have you considered using dowels instead of wire? That way you can simply lift the dowel up and out when you need to change paper rolls. With wire I think you might have to undo something, which could be annoying. You can buy doweling that's skinnier than standard closet doweling and the holders to fit at any Home Depot, etc.
SusanR
Thank you for the suggestion. I wasn't thinking of "stringing" the paper onto the wires, I was thinking of creating maybe a 3-4 wire crisscross, and then just setting the rolls of paper on top of that, perpendicular to the wires. I will be using dowels for the many "rolls" of lace that I've acquired over time and rolled onto old toilet paper cardboards. But those will be in a wall rack.