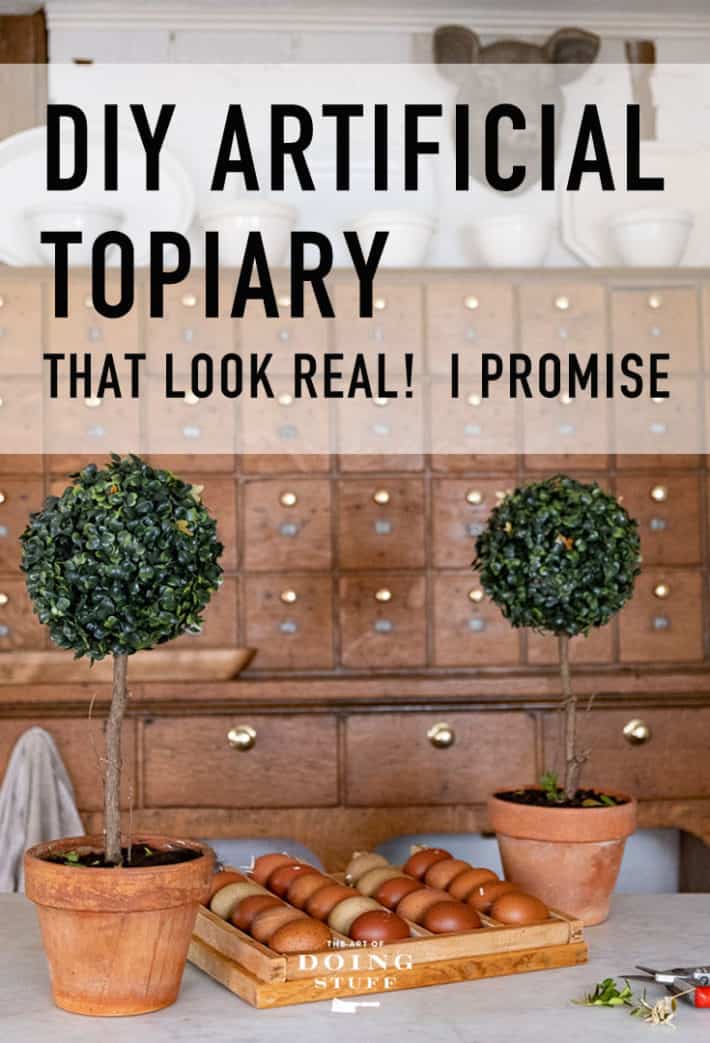
If you have 5 minutes and $5 you can make a boxwood topiary that never needs watering and couldn't care less about how much light it gets. Before we begin you'll need to get over that distain for artificial plants that you (I) have.

I don't like artificial plants inside a house. They're hideous, tacky and defeat the entire purpose of indoor plants which is to provide me with something to kill every so often. One or two artificial plants is permissible if you live in a home that has no windows or running water. Other than that? I think all fake plants are gross.
And yet, today I bring to you a little tutorial on how to make your own fake plant. I know. I'm filled with contradictions, but they're cute, like when an Asian person has freckles.
This idea came about during one of my many vacations to the dollar store. I don't go anywhere plus I work from home so I consider any time I leave the house to be a vacation. The dollar store had very small topiaries for sale that looked about as realistic as Dolly Parton's hair. I scoffed loud enough for people around me to hear (because I wanted them to know I was too good for ugly dollar store topiaries) and kept walking. Once I had picked up my dollar store cat treats, cookies and wrapping paper, which I am NOT too good for, I made my way down the back aisle to head up towards to cash registers.
The back wall of my dollar store is dedicated to all things fake floral. There's greenery, leaves, and fake flowers the size of garbage can lids. Just below all of this were 6" fake boxwood balls.
And just like that I was buying a couple of them. A day later I'd made my own dollar store topiaries that FAR surpassed the ones they had for sale.
DIY Boxwood Topiary

Materials
6" artificial boxwood ball ($3 at dollar store)
6" pot
18" branch/stick
Twigs (just a few)
4-6 cups of gravel or sand
Ground cloth or plastic bag
Soil
Matte (clear) spray paint.
Hot glue/gun (optional)

If you really can't be bothered to shove a stick into a pot and fill it with sand the you have the option to just stick the 6" boxwood ball into a 6" pot. Done.
But if you want the whole topiary experience, here's what you do.

Instructions
- Cover the hole in the bottom of your pot with something. An old mason jar lid works great.

2. Insert your stick into the centre of the pot.
TIP
Using an old pot helps make these topiary look more realistic. Click here to see my tutorial on how to age a brand new pot.

Would you like to save this stuff?
3. Fill the pot with gravel or sand to stabilize the stick.

4. Cover up your gravel (or sand) with landscape fabric or a circle of plastic. This will stop the soil from mixing down into the gravel and keep it clean.

5. Cover the landscape fabric with soil.

6. Push your topiary ball centred onto the stop of the stick until the stick reaches the top of the topiary ball. if your stick is thick enough the ball will fit tightly and not move around. If it does wiggle, just use a few dabs of hot glue to keep the stick in place.

7. At this point I WOULD have sprayed the entire ball with a clear matte spray paint, but I didn't have any. I thought I did. But I didn't. I'll do that some other time.

8. To make the ball look more realistic stick a few dead boxwood leaves into the ball and scatter them onto the soil. Also stick a tiny little twig into the soil at the base of the branch to give the illusion of some growth.

9. The end. You're done.
I'm really being thrown by the shiny leaves. I'm gonna have to fix that.

I made these for my front porch but liked how they turned out so much I'm going to keep them inside until I'm spending more time outside. They'll probably make it into the backyard or on the front porch in the next couple of weeks.
I'm woman enough to admit I've grown quite fond of how good these artificial topiaries look. They require ZERO care and always brighten my days.
I'm really going to miss them later today when I go on vacation to the grocery store.
→Follow me on Instagram where I often make a fool of myself←


Liz
Hi- I actually snip a few off so they aren't perfectly round. Then painted section slightly paler green to appear as new growth. I like your idea of the twigs and dead boxwood :) Nothing in nature is ever perfect.
Carrie Krumrie
I am sure you rescued the deer head from a boring dust filled antique store, way in the back!!!
I’m sure it had been dead for a little long time. I also like be the topiary!!!
So, if it looks great, enjoy it!!!
I forgot to thank you for the Tough Linen site!
Loving my aqua linen summer throw, sheet set, and napkins!!!
B.
OMG - DD51 - Love that story so much! Happy Friday ;)
Etta
The matte spray had me going for a minute. Great idea!
The pig in the kitchen isn't real .....is it ? (lol )
marilu
I can admit here among the crafty that matte spray completely eluded me. Thank you once again Karen for opening another realm of ways to beautify the environment while vacationing - or in my case, attending my sporadic 'therapy' session. The bright lights, shiny baubles and dollar price tags never fail to dispel gloom.