Looking to do something with the space under your stairs? Throw up a few boards of wood to make under stair shelves. It's an easy, hour long job, so don't start getting nervous on me now.

I live in a 180 year old house. As anyone who owns an old house knows, this means 3 things: really curious plumbing, foundation holes large enough for a circus clown to get through and no storage space.
When you don't have any closet space it means you have to find places to put everything normal people would put in a cupboard or closet. Things like my cookie making supplies, extra garbage bags, wreaths made entirely of actual bones and other perfectly normal stuff. You can learn how to make your own bone wreath here, I know you want to.

We all have those things in our houses. I'm sure you do too. The cobweb that's been there since 1982 that you never noticed until your mother-in-law helpfully pointed it out. My stairs are one of those things. They're horrific but they've been this way since I moved in (they've probably been this way since 1840) and for some reason I just accepted that this is how they always had to be.
One sad little shelf on the left as you go down the stairs, chipping paint and crooked stairs, three of which have indoor outdoor carpet stapled to them. I have no idea why, only 3 stairs were carpeted but I'm guessing whoever had this house before me had a really intricate and interesting way of going down stairs. Like hop, hop, hop, JUMP. Something like that.

A few years ago I finally got sick of wrestling my food colouring away from the centipedes so I cleaned up the area leading down to my basement and created some storage under the stairs by adding in shelves.

Job number one was removing everything that was shoved around the stairs. I obviously didn't need to clean the area because as you can see even though it was messy I had always done a fantastic job of maintaining the cleanliness of my staircase.
I wiped and Windexed and washed the staircase for an hour. For overkill you understand. And then I painted and vacuumed the rubble walls of Chez Centipede because it was either that or try to book an exorcism.
Once the area was prepped, I could build the shelves.
Building Under Stairs Storage
To build some quick shelves under your stairs you just need some brackets or pieces of 1x2 to support the shelves and any wood that's as wide as your staircase.
Basic flat boards that are 12" wide will work well, but you can use multiple boards. Three 4" wide boards or two 6" wide boards for example.
In my case I had a junky piece of ½" plywood to use for both the shelves and the supports.

Would you like to save this stuff?
- Measure the width of your stairs and cut your wood ¼" shorter to account for wonky walls. Paint them if you're feeling ambitious.
- Screw 12" long strips of wood or standard shelf brackets into the wall under the stairs.
- Place your shelf on top of the supports. Screw or glue the shelves in place.
Done.
Build Extra Storage Space into Your Basement Stairs.
Throw a few boards up under your basement stairs and gain extra storage space in just an hour.
Materials
- 12" wide boards (or the equivalent)*
- Shelf brackets or 1" x 12" strips of wood for support
- Screws
Tools
- saw
- drill
Instructions
- Cut the 12" wide wood to the width of your staircase.
- Screw brackets or strips of wood into wall to support the shelves, allowing enough room to set the shelf on top.
- Rest shelves on top of supports and screw in to secure.
Notes
* If you don't have a 12" board you can use three 4" boards or two 6" boards to get 12" of width.
My stairs still look like a bit of a nightmare but it's way better than it was and I have extra storage.

When I was done with the shelving I also did something crazy. I carpeted EACH AND EVERY STAIR. I know. Extravagant.

The stairs are still wonky and there's nothing I can do about that. They feel safer now and cleaner.

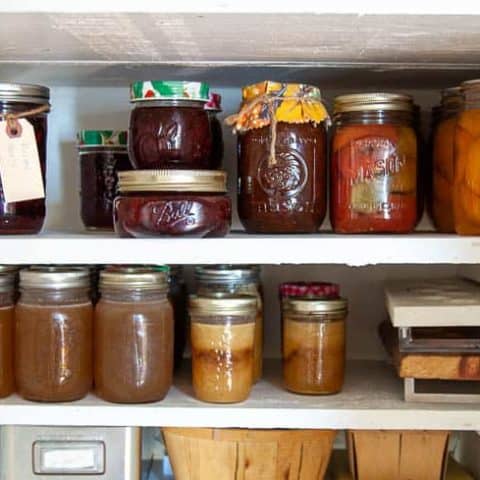
Plus now instead of being creeped out every time I have to go into the basement I kind of like it. I'm greeted by smiling jars of jam, chili sauce, peaches and tomatoes beneath the stairs. The pickled beets don't really smile. They're moody.

There are some people who will be able to take this very idea and apply it to their own home. For the rest of you, let this be a reminder that sometimes awful things can be fixed fairly quickly. Sometimes you don't even notice the awful things so maybe take a day to actually look for them in your house. You know. Before your mother-in-law does.


Darcy
I don’t see how you reach the string on the top shelf...... says a short person!
MrsSW
I love your blog and look forward to reading your posts. I am not an overly scaredy-cat type person but the pictures of the stairways are the creepiest things you have on the blog.
Keep up the good work!
Sheila
Karen
LOL! Yup. They're creepy. Great for scaring kids. I just have to tell them to go in the basement for something. ~ karen!
Grammy Kate
I love the transformation! But I have one question. How do you get to the items directly above the staircase? Ladder?
Karen
It must seem further away in the photo, lol. It's all within arms reach if I'm standing at the top of the stairs. ~ karen!
whitequeen96
I really took the time to look at this project again, and I see you also painted the stair rails(?) and generally made everything look beautiful. I love seeing how you use your creativity to do things without spending a lot of money!
What I want to know is how you reach the top shelves, especially the very top one with the red jars and roll of string on it. Do you use one of those claw things or, God forbid, balance a stool on the stairs and climb up? Or do you have arms like Stretch Armstrong? Please answer this, as it will keep me up nights worrying about you!
Karen
There's no danger, so don't you worry about me. Everything is from within arms reach either from one of the steps or from the top of my stairs. :) ~ karen!
Jessie
Ok. Ummmm... so aside my awkward howdy-hello... (gawd, please tell me you'll be able to delete that on your end!!)... ahmmmm... ha. I HAD intended on telling you that I love your site, and I'm so happy I ran into it. You are absolutely hilarious, and I feel soooo relatable. But that was until I couldn't help myself but to visibly share my laugh about your wall of bone wreaths... after I had already been laughing at your bugs (truly, I can't even say their names.. those exact ones.. nope.. they are the one thing that can keep me up at night.. if I've seen one remotely near and in my home)... and proceeded to plant an actual face-sized image of moi splat on your page. Soooo... I will refrain from saying those things (teehee), so as not to enforce the creepy vibe... and ummm... ask you the other part I had intended.. lol... So I am actually looking to do the exact same thing (oh.. well.. sure.. yeah, let me do that... ok, how about - I actually want to do nothing remotely similiar to that... but just was curious as to... lol ), and aside from laying random scrap boards all around, am stuck as usual at this phase of a project. I don't know if it's perfection issues or what, but something holds me back. BUT if it's the basement steps... and I convince myself that whatever I do is fine, and slap those babies up as you seemingly effortlessly did! Anyway...
... I have a bunch of 1in by 3/4in (those are the actual measurements... I am sure there's a different name that makes no sense, but 1"x3/4" is what my tape measure read) and am now wondering if those are not big enough to use as the slats holding the shelves..? I have managed to collect some other size long pieces... but as I am not experienced with my circular saw (nor have one of those things to hold the board steady), I would be a bit afraid to use it to cut skinny boards skinnier (lengthwise). If the 1x3/4 may not be enough, do you suppose it could work if I used two screwed into each other? Let's say I would store my random tools there.. so I should try to at least have a lil weight bearing capacity...
On the other part of my 'serious note,' your site is awesome... and I personally think it's awesome to know there are other tough tootsie's out there that ummm... can still admit to bug issues, like myself. You made my dog lift her head and look at me like I done lost my mind... laughing out loud by myself. I know she just inched a lil further away... ;))
Julie
You just crack me up with you little comments!!!! I think this post has been my favorite thus far! Shared your site with my friend as she too loves old homes-plus a girl not afraid to tackle a home improvement task.
Love your site!!
Pauline
Too many comments to check to see if someone suggested this. For safety reasons, perhaps you can place a "cage" over your light bulb so that the bulb can't be hit. Otherwise love your idea and wish I had a staircase like yours - - - could use the extra shelving. Continued success.
karen
your blog is such a release from shame and guilt. i thought i had the only older-than-dirt-creepy-basement-cetipede-dwelling-yard-in-need-of-an-overhaul house. four years in and i feel so much better now. and much inspired. thank you!
Heather
I love the lovingly hung framed photo hung in the spider cave. Who is in that lovely photo?
Karen
That's a photo of me and one of the many people I interviewed during my television career. His name is Henry Rollins. ~ karen!
brett
Great job, looks better and better use of space. I love the way you write as well. I want to bring up one little thing and you may hate me for it. LOL. Those rock walls? They look so much better when painted as well. You really have to spray the paint to do it right, but well worth the effort.
Karen
You mean my basement walls? I actually considered it, but the wall would have to be rechinked and that is definitely not on the list for this year. Some people also have problems with painting those walls because the rocks hold/have moisture from the outside which can screw up the paint. I do agree they look good painted though. Don't hate you yet. ~ karen!
pat
Good job girl. As usual. Every now and then we need that sister, mother-in-law, guest, whoever, to make us re-evaluate our space with a critical eye because, as you said, we just don't see it anymore. My front door has been crappy for too many years and we all walk through it every day. Broken decorative accents, mis-matched brass hardware, ugly off white paint that didn't match the trim around it. One day I looked at it from a stranger's point of view; ugh, what uncaring slobs live here? It's now painted a fresh white colour to match the trim, all the hardware has been spray painted oil rubbed bronze, decorative accents are mended and painted. It says "welcome" instead of "go away". Critique is what we require sometimes.
Karen
Yeah. We need it. We don't really like it , but we need it, lol. ~ karen!
Hailey~FurnishMyWay
What a useful post! I was mostly concerned about the whole centipede problem, but at the end I admired how you transformed squeaky, old stairs into a a great storage space!
Karen
Yeah, centipedes are gross. And abundant here in very humid Southern Ontario. I did a quick spray with something rather deadly so that should help. I'm all "organic this and that" until centipedes come a marchin'. Then I'm all, I HAVE TO KILL ITTTT WITH ANYTHING!!!!! ~ karen
Jordan
I love this! It's not only really useful, but it really makes the space look more gorgeous. Would definitely love to have something like this underneath our stairs!
j
You are a genius and the people who read you are genius also!! Love reading you, and look forward to it,,,Two thoughts--the plug in things that are supposed to make the rodents and spiders unhappy enough to move, forget-a-bout-it! I bought three and put them all around! My rodents and spiders quickly decided that they could live with the plug in things easier than vacating my abode. I also keep everything possible sealed in plastic Tupperware kind of stuff to keep the mouse poops and dead spiders off everything. [I will try the peppermint, cloves, cinnamon, even hot pepper.] Second thought-in Mexico on a ruin with a million stairs-they had a heavy rope tied running top to bottom. If you fell, when your hand hit the stairs, there was the rope to grab on to. Just a thought, but when you fall what ever you are carrying falls too, so you can grab the rope. Believe me free falling a flight of stairs is to be avoided if possible!
Karen
Well! I love you too. Kind of. I think. It's really more of a fondness I think. ~ karen!
Penley
I just recently did something similar; not adding shelves but cleaning out, dusting, vacuuming and wiping down the (scary) space under my stairs. It was ridiculously pleasing to have all the space back again. Plus we vacuum more now because the thing can actually be dragged out. I'm inspired by your post - I think I might have to add more head height shelves!
Karen
Go for it! It's a ton of space that you can gain. ~ karen!
Mindy
That stairway is horrifying. And you're right, you really only needed the first photo, 'cause I couldn't get past it. I'm pretty sure it will work it's way into my dream state tonight. That being said, I'd love an old house like that.
Kate S.
For some reason, the stairwell leading to my basement is like a cramped, but bustling, dust factory. I have shelves installed like yours and also on the wall directly across from them, floor to ceiling (my basement door opens from the side and you turn to go down the stairs). Basically, I use the shelves to store the exact same things you do--seed potatoes, onions, garlic, preserves and some random kitchen items that don't fit anywhere else. But I swear I've spent half my adult life just dusting the goddamn place. I don't even know where the dust comes from, but everything in that nook is totally covered in dust the minute I turn my back. There's obviously a very dusty poltergeist living there.
Lesley
Now I'm just imagining you doing this, with salesmen, only in your basement.
Elen @ Elen G
I'd say this is more than a marginal fix. Pretty damn good fix. I don't see a centipede or spider in sight, so I could actually go down those stairs now, or reach up and pluck one of those jars off the shelves -- though that might be stealing -- without having to carry a hammer in my hand for the killing of c & p. Boom!
Death of a Quailsman............... bwahaaha!
Andrea
Love it! But now that you have put in so much work why not go all the way. I say add a lamp cover to the bare bulb and paint some fun sayings on the wall. (I'd say add artwork but too narrow!). And couldn't you add a rail by installing a long dowel type piece of wood from the underside of the upper stairs (where they stop) to the floor? Much less scary. In for a penny in for a pound. :)
Karen
Ha! No. A girl's gotta know when to stop otherwise nothing else will get done. This is all I need. Also for the hand rail (which someone else mentioned) I don't need one because I'm always either carrying something up or down the stairs so my hands are always full, lol. Also, the staircase is a total of 18" wide. A handrail would narrow it even more. As it is now my Tupperware bins of Christmas decorations scrape the sides of the walls. I have a lot of Christmas decorations. ;) ~ karen!