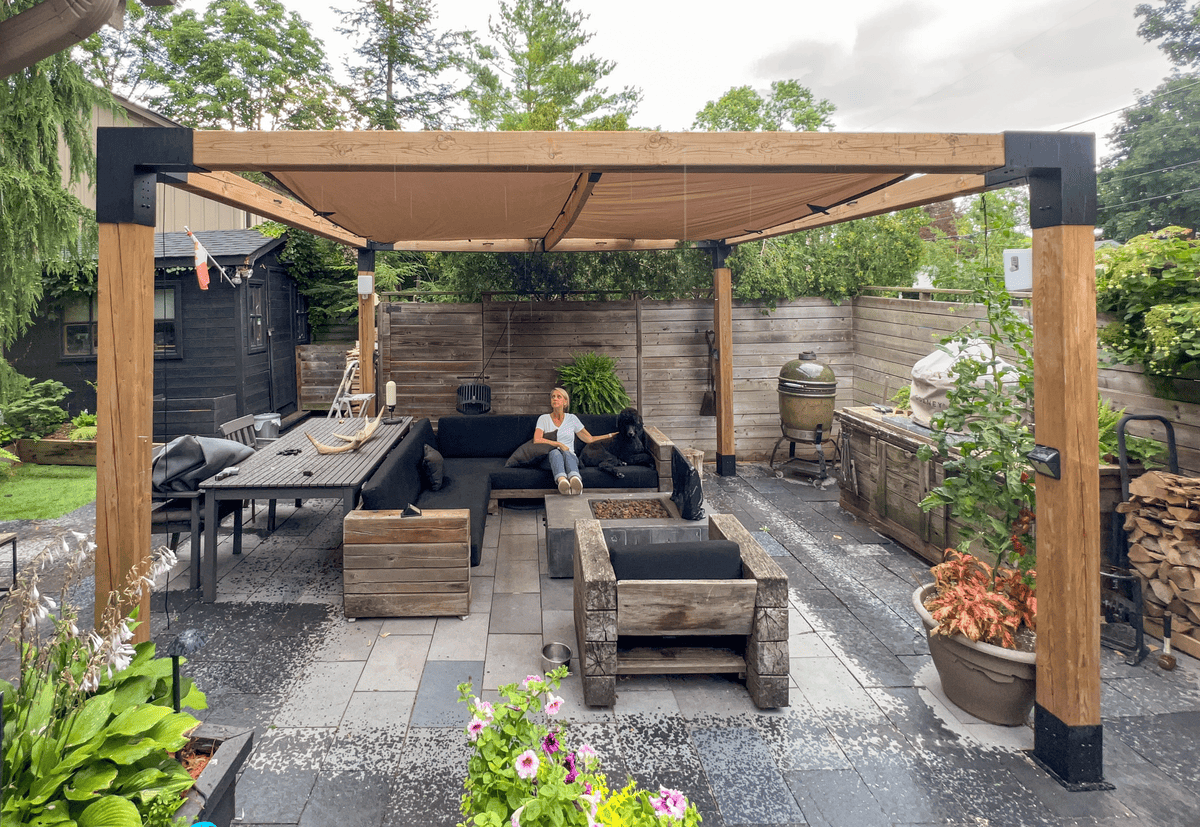
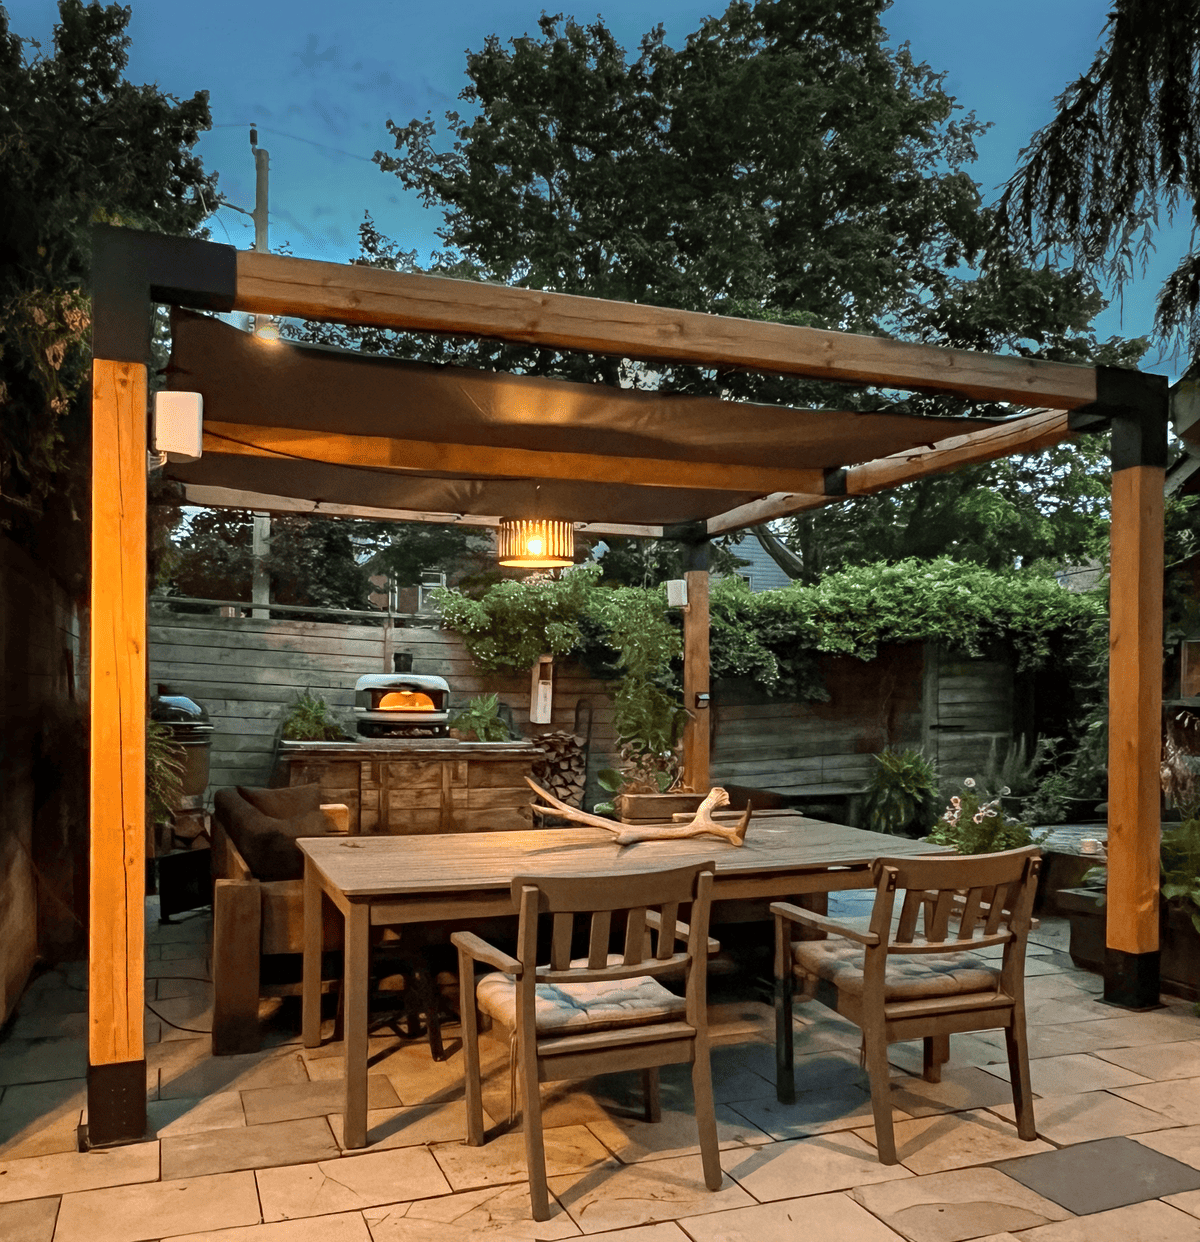
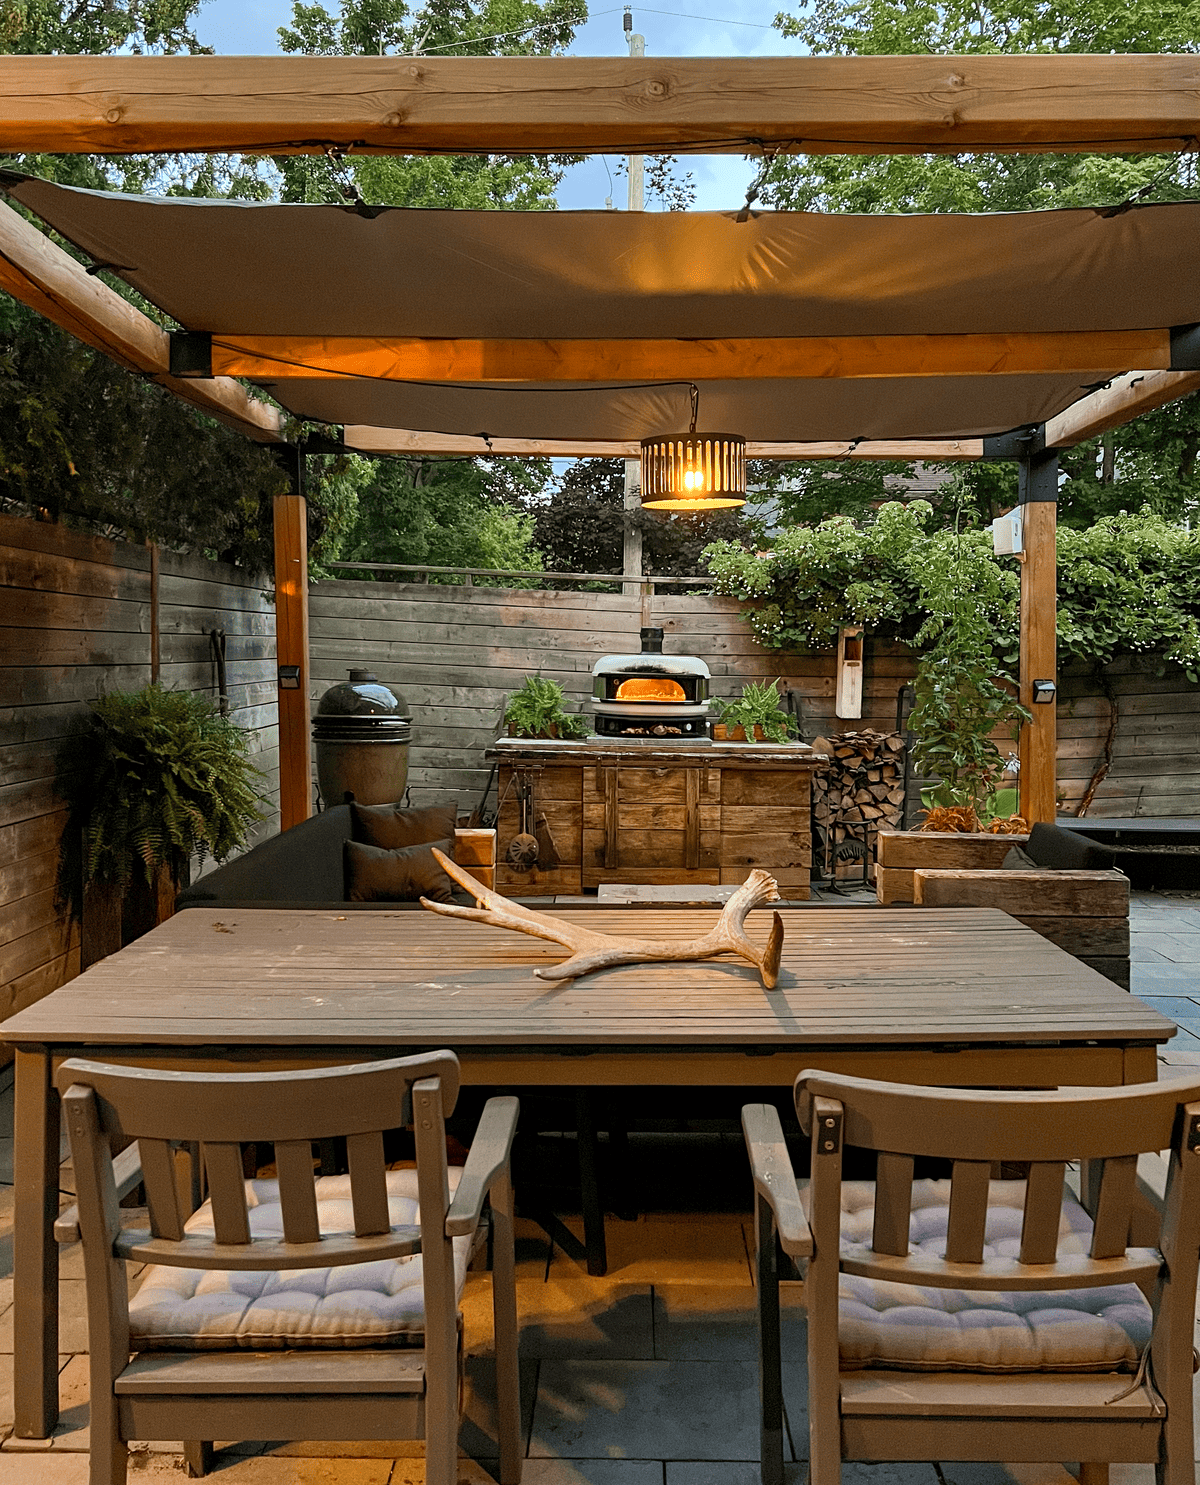
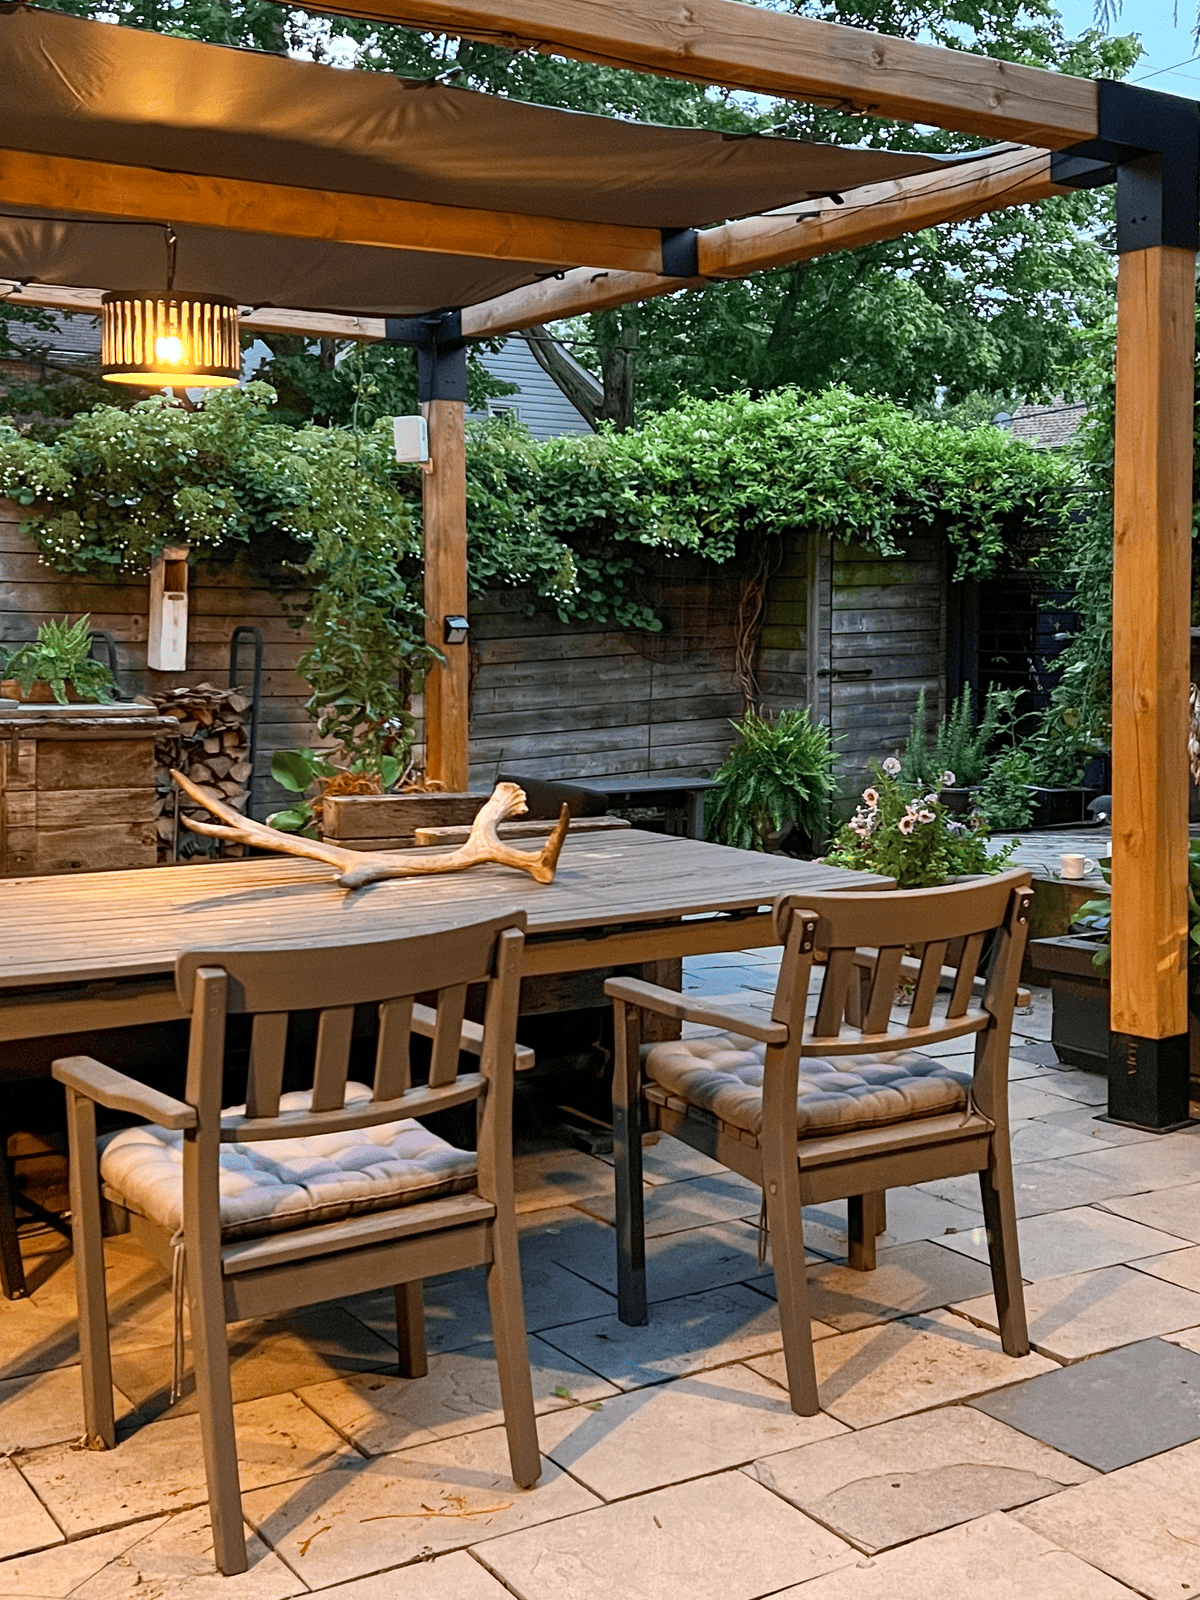
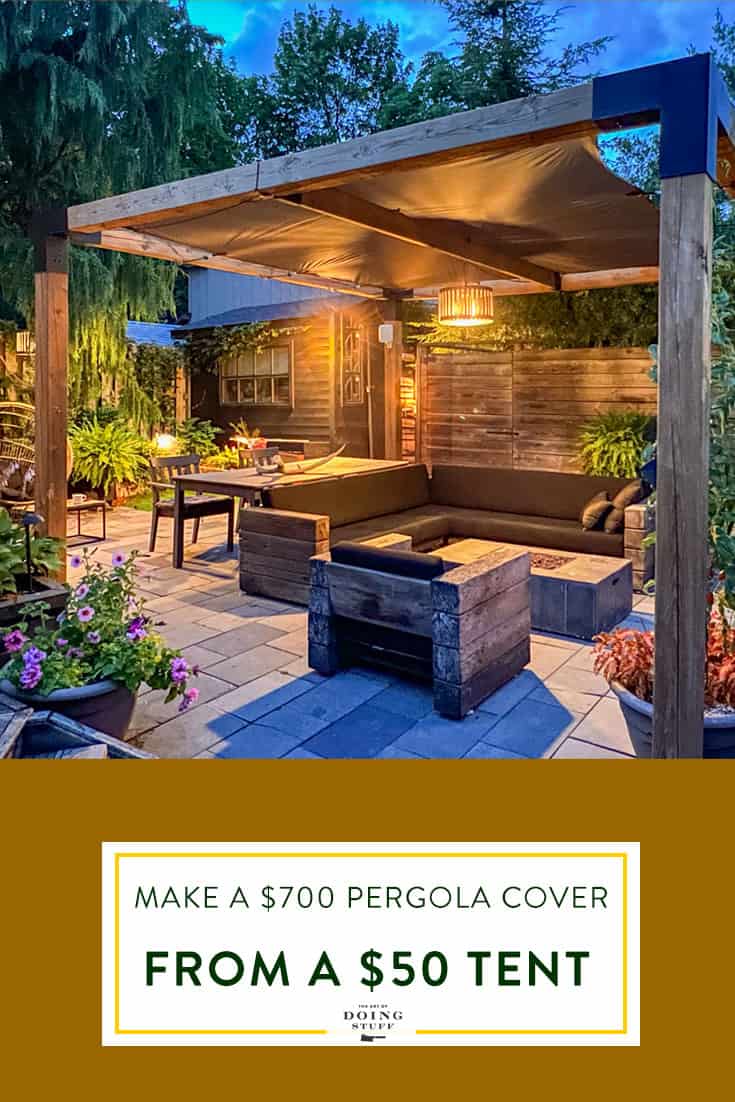
A waterproof cover for my pergola was going to cost $700. It is a square piece of waterproof fabric with tabs. I refused to buy it on principle. Instead I made one out of a 10' x 12' fly tent. It was $50. And it worked. But did it hold up?
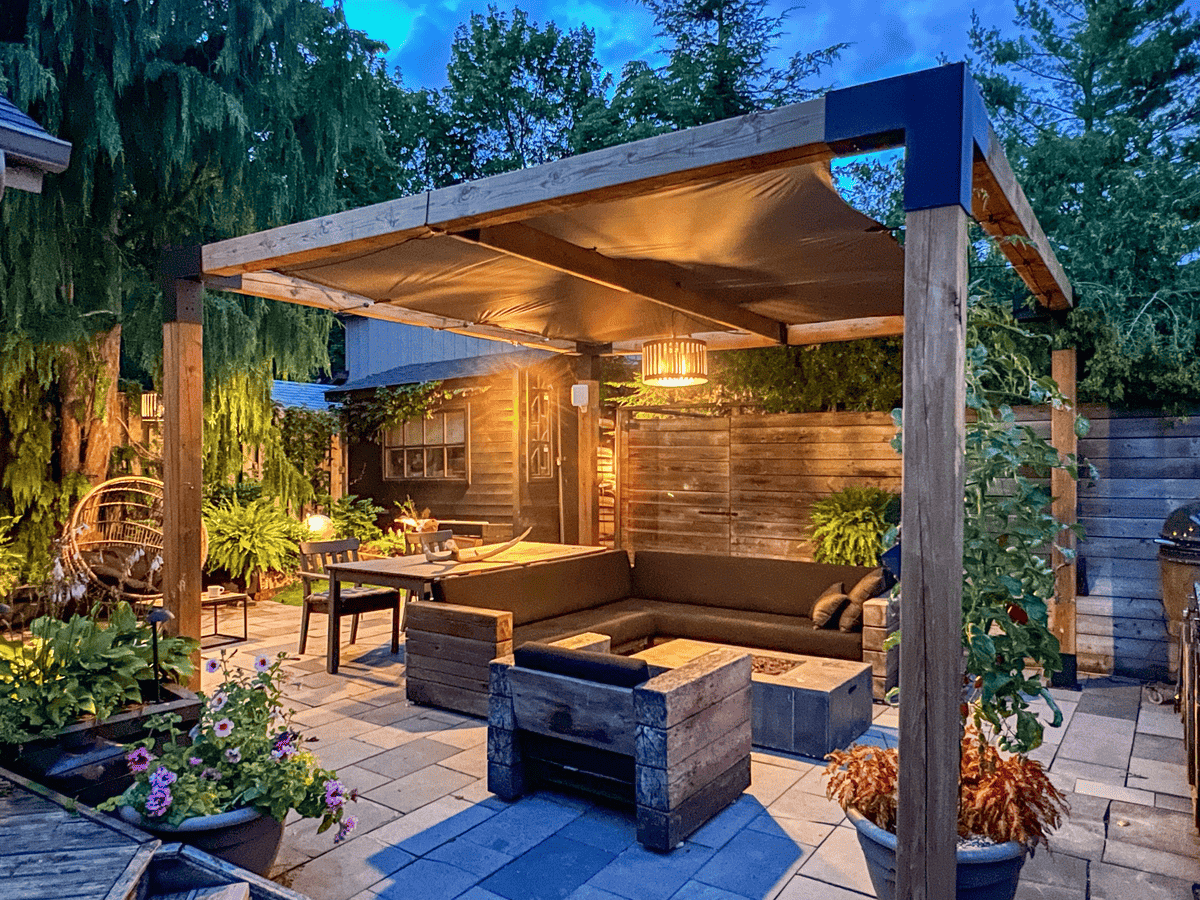
Using ratchet pulleys and D-rings I turned a $50 fly tent into a waterproof pergola cover in 1 hour. And you can too. I'm going to teach you.
I'm not spending $700 on a piece of fabric that doesn't even have enough pizzazz to get me in the back door of the Met Gala. To be precise, $745.80 CA ($560 US) would have been the total for a 12' x 12' cover for my 12' x 12' pergola.
The same cost outrage a few years ago led me to build my own Restoration Hardware outdoor furniture which a lot of readers have built for themselves since.
I built this pergola last summer with the Toja Grid bracket system. You buy the very expensive brackets, shove posts into them and you're done. I bought a shade cloth as well, but with the extreme heat and rain this summer I wanted a cover with more sun & rain protection.
Table of Contents
No More Wet Cushions Ever
Yes please, that is what I want. I would very much like to not have to run outside when it starts pouring rain even though the forecast said 0% chance of precipitation.
IN THE VIDEO BELOW for instance IT IS 1 O'CLOCK IN THE MORNING.
Normally I'd be running outside to cover the cushions.
INSTEAD I was running out to watch my cushions stay dry.
How to Make a Waterproof Pergola Cover
Materials
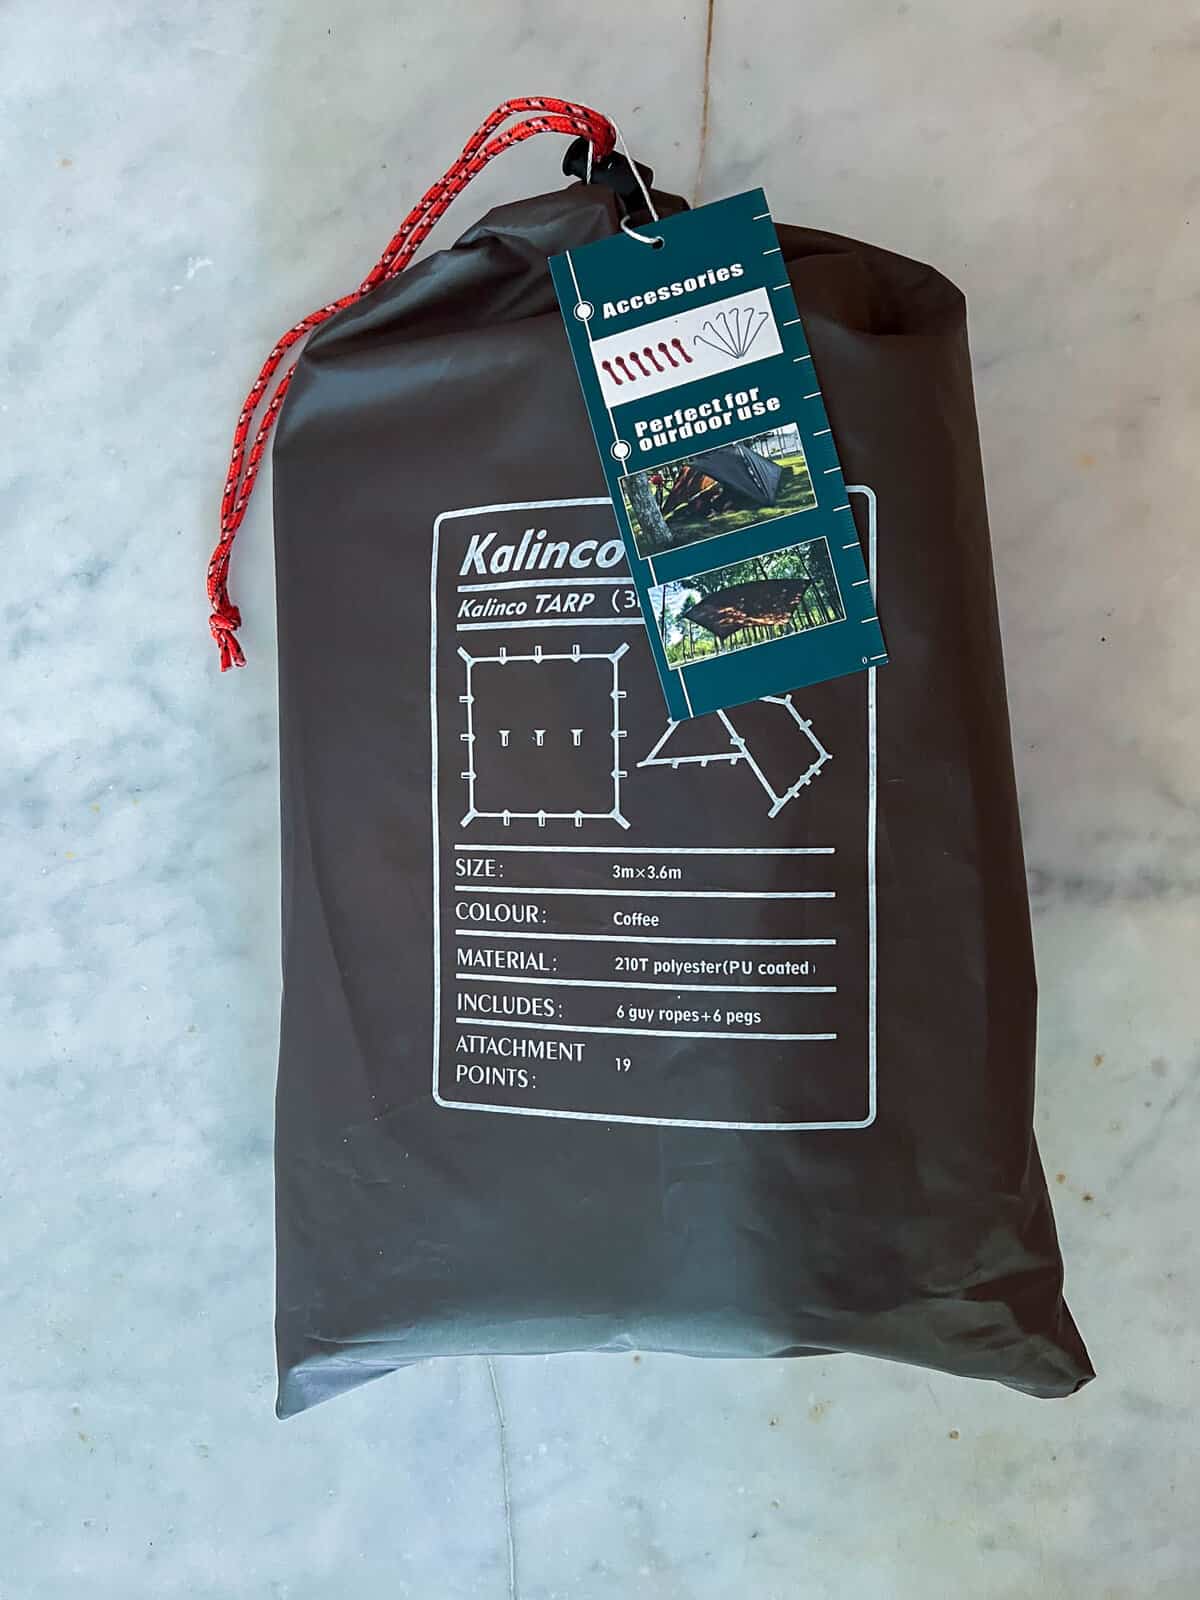
FLY TENT
The size of tent depends on the size of your pergola. Ideally, my 12' x 12' pergola requires a 12' x 12' tent. However, I could only find a 10' x 12' tarp so that's what I went with.
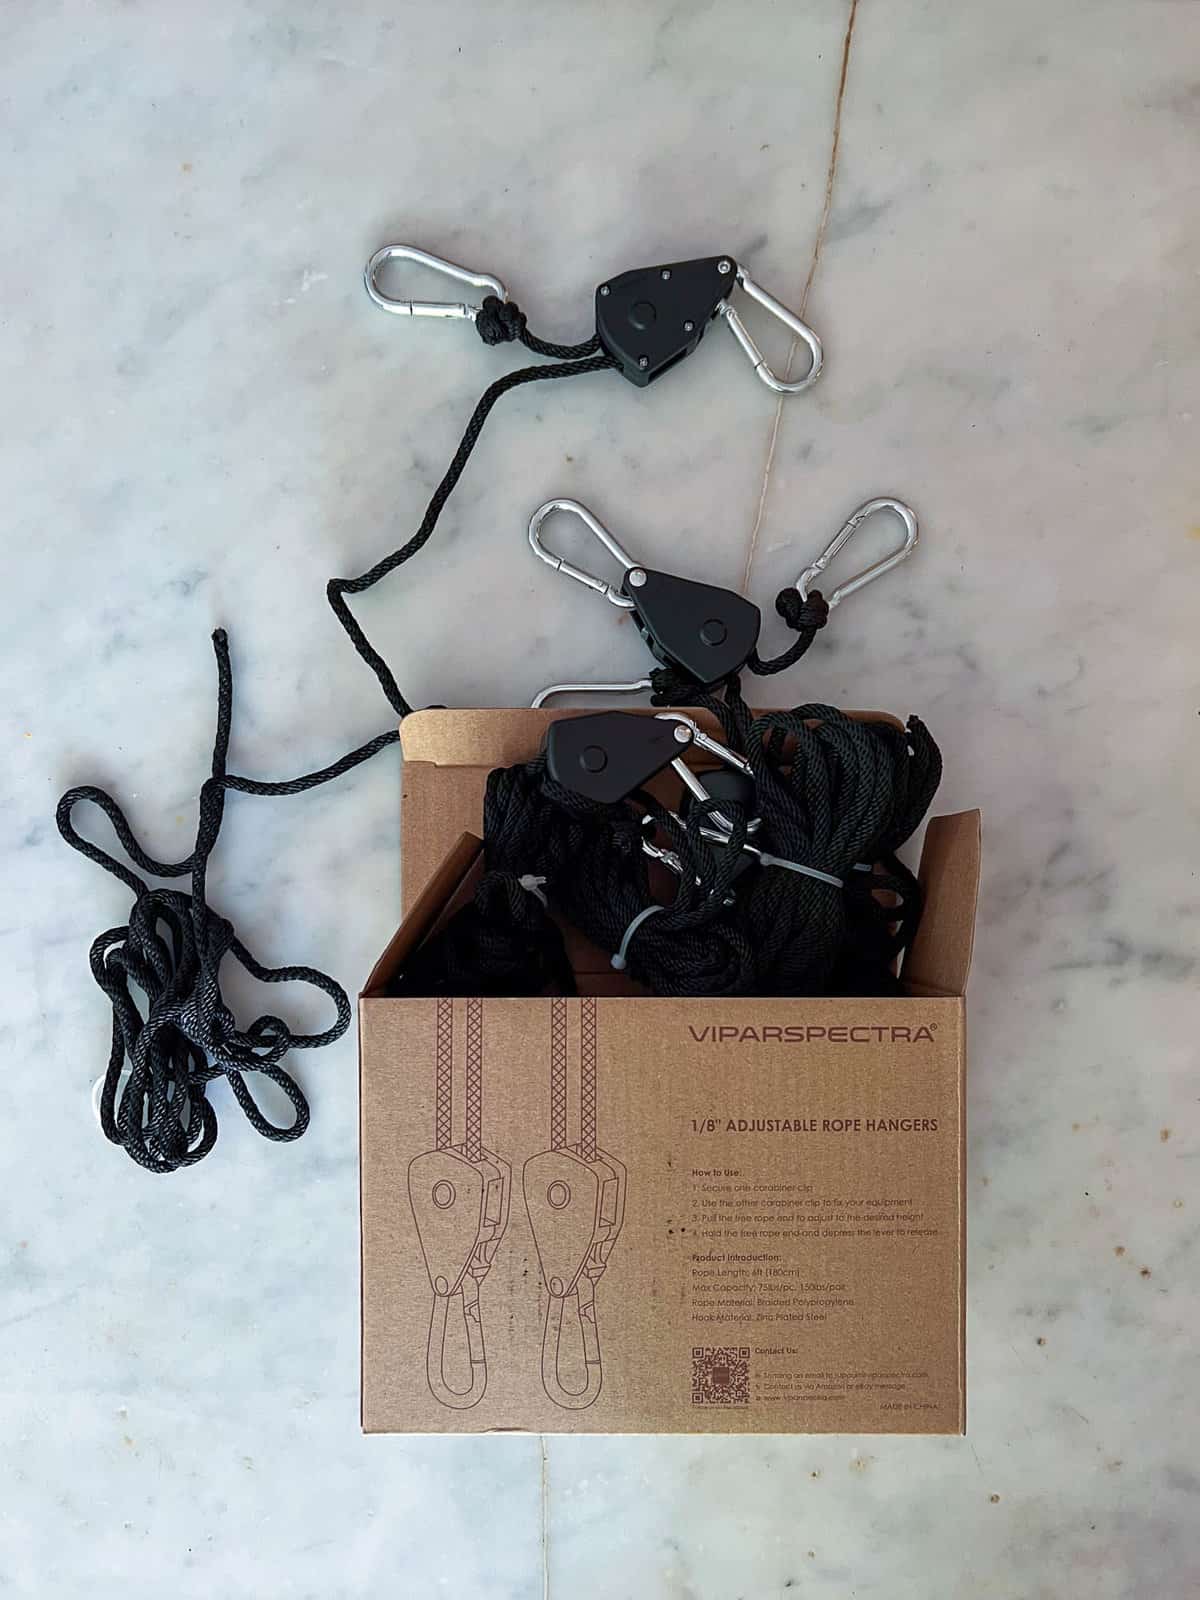
PULLEYS
Ratchet Pulleys make tightening the tarp easy.
THESE are the same pulleys I love and use for my grow light setup.
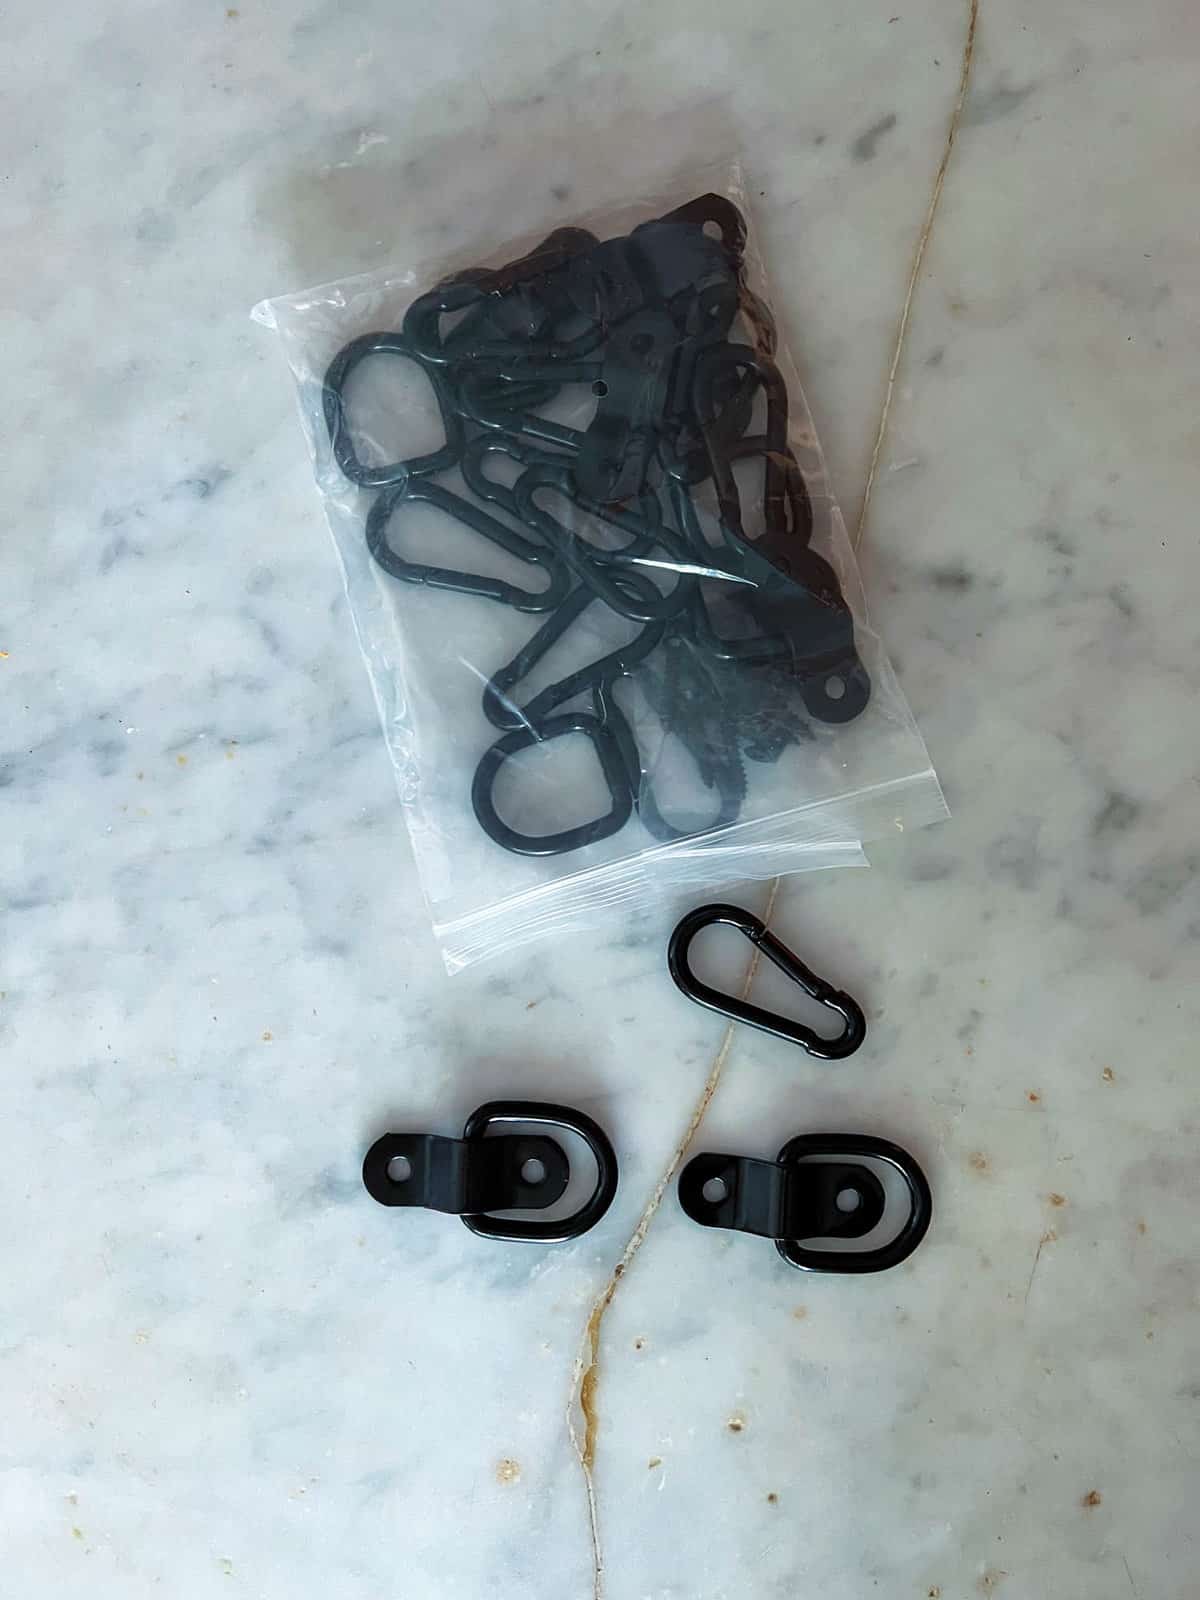
D-RINGS
D-Rings are what you'll screw into the pergola to clamp the pulleys to.
Canadian Links
🇨🇦 Fly tent
🇨🇦 D-Rings
American Links
🇺🇸 Fly tent
🇺🇸 D-Rings
Tools
- Drill
Would you like to save this stuff?
Instructions
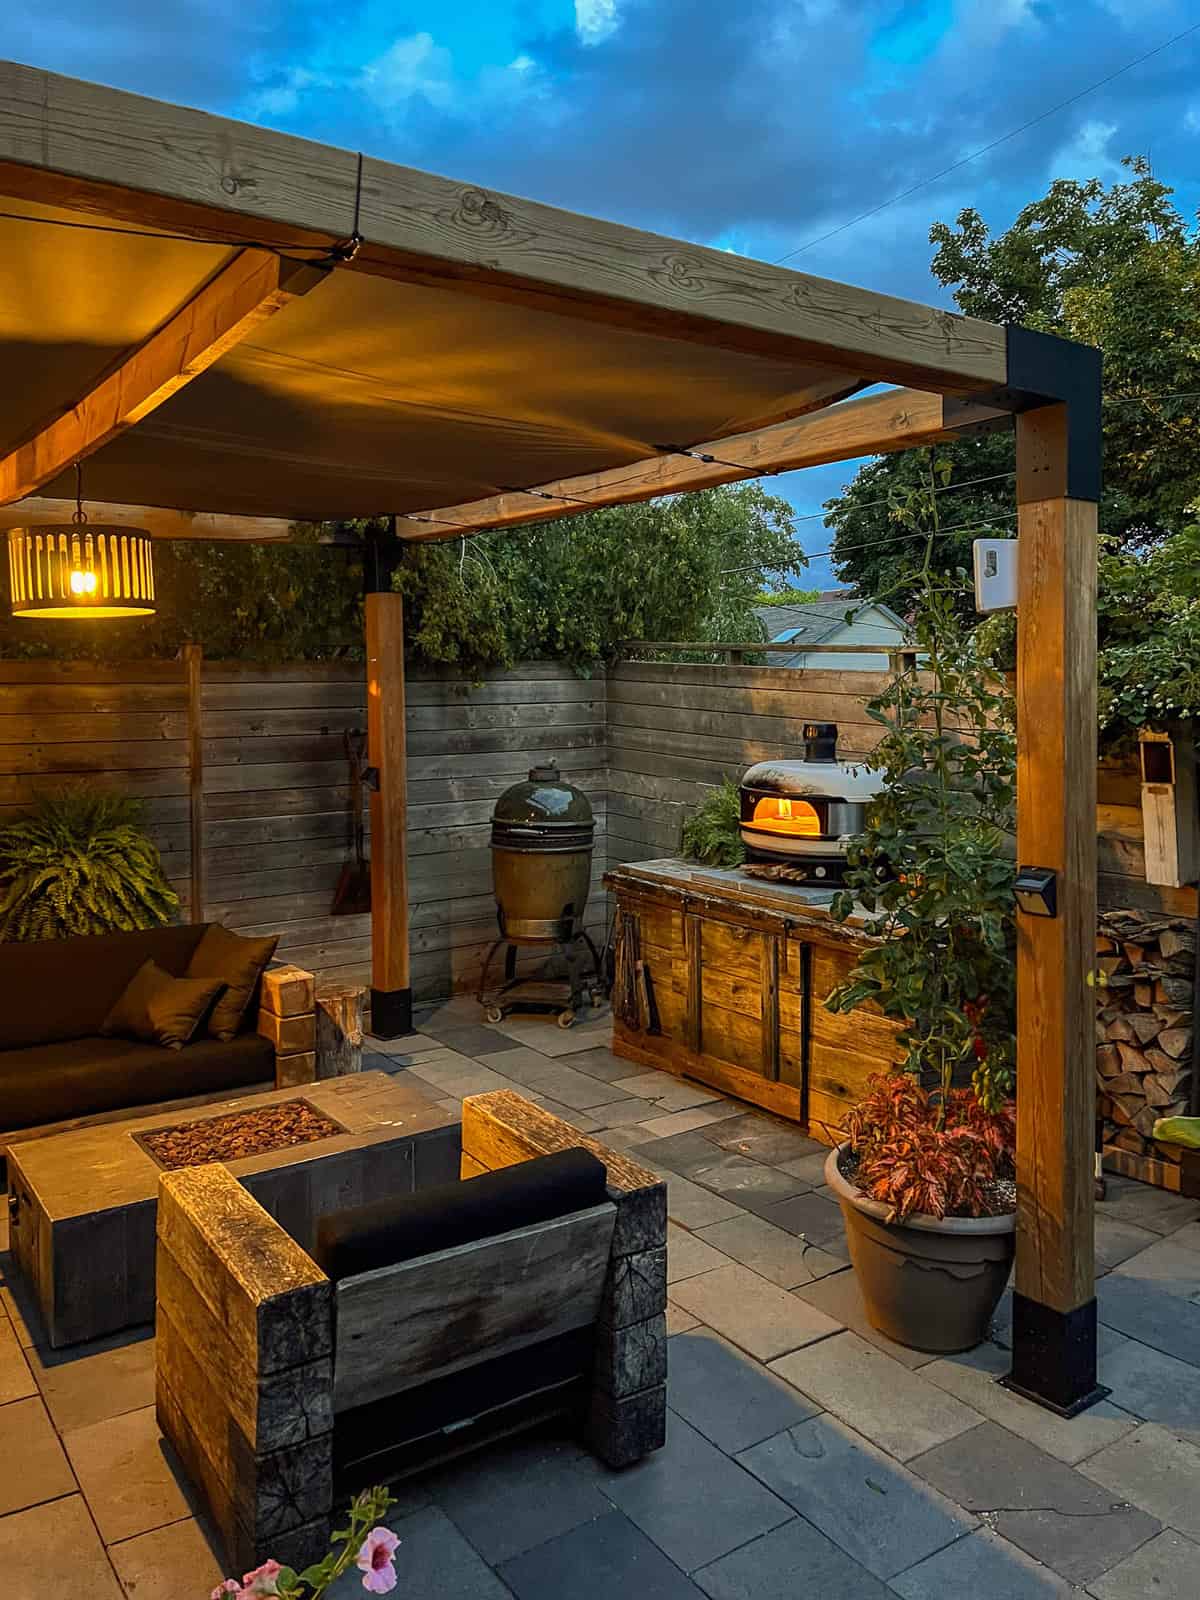
I already had a shade cloth (an expensive shade cloth) over my pergola, but the shade it provided wasn't heavy enough and rain could get through it.
I WANTED SOMETHING TO PROTECT EVERYTHING UNDERNEATH THE PERGOLA FROM RAIN.
This is that thing.

- Throw the tent over the middle support bar of your pergola. If you don't have one just skip this step.
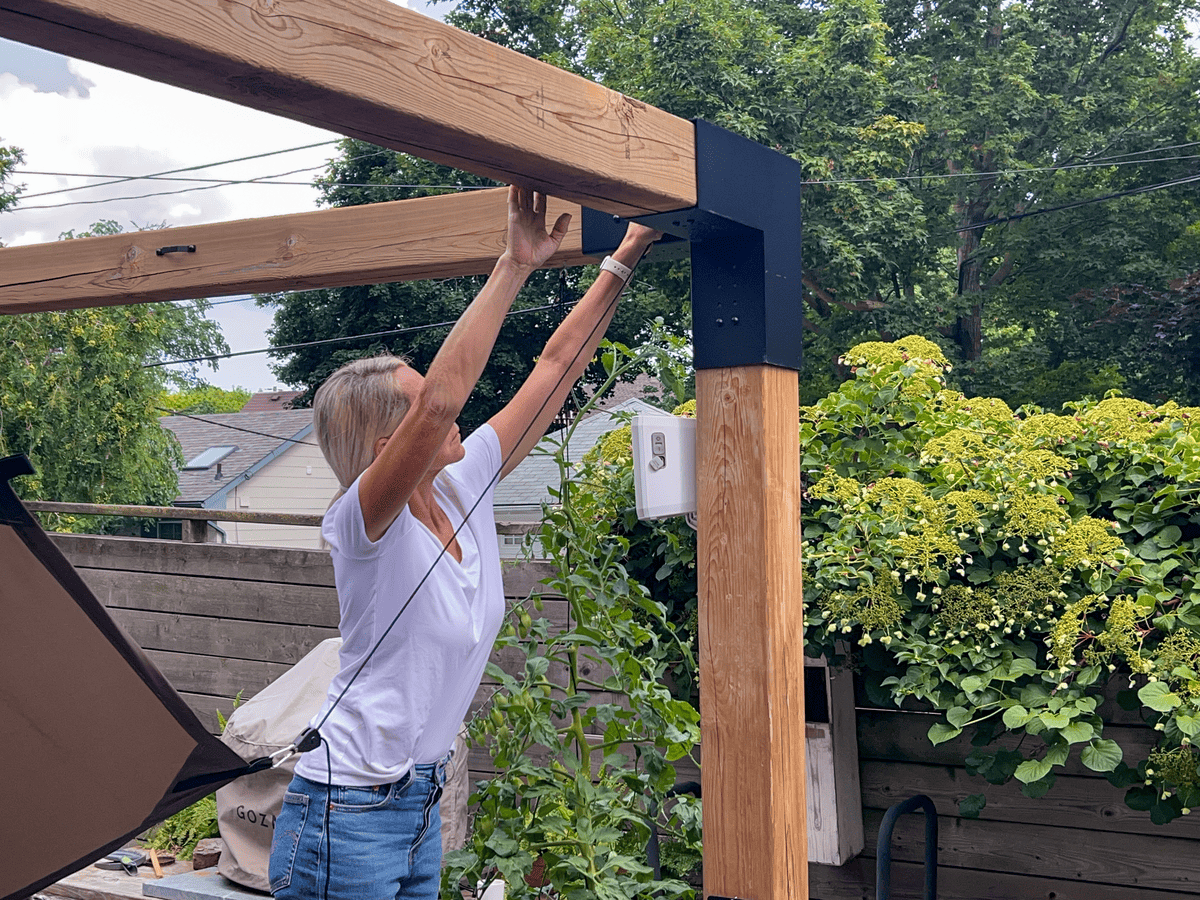
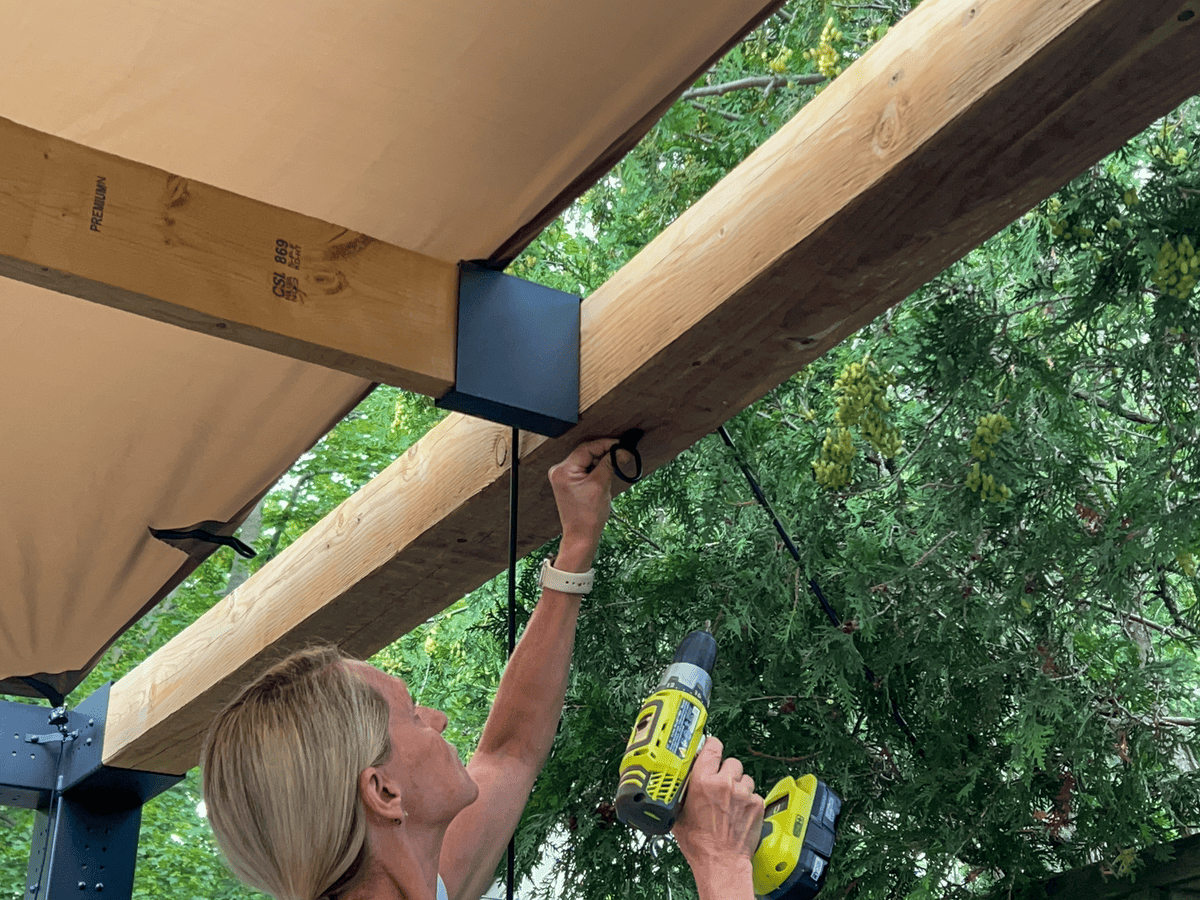
2. Attach ratchet pulleys to the corners of the tent. One clip on the tent, one clip to the pergola corner. I have corner brackets so I could clip to that. If you don't, you'll need to install D-Rings on each corner.
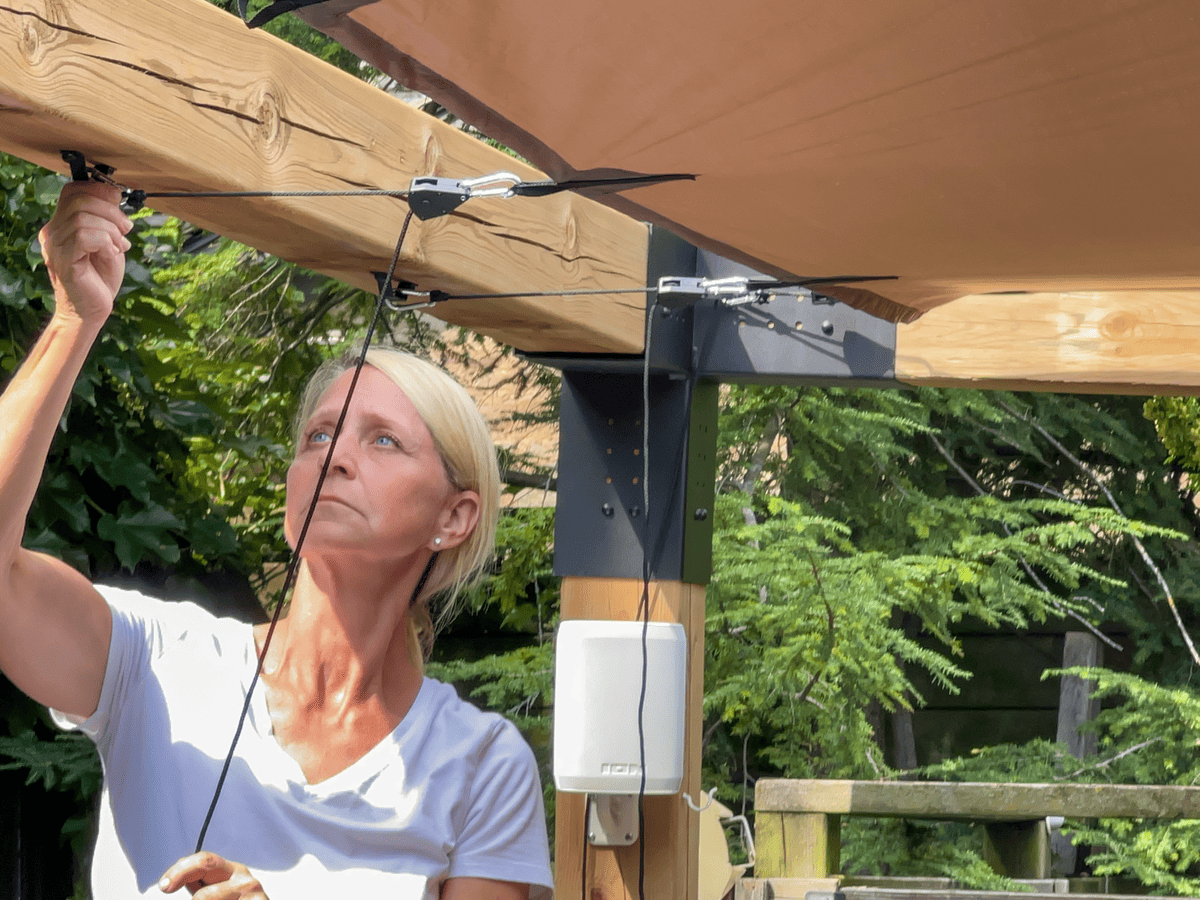
3. Once the tent is secured to all 4 corners, pull each pulley to tighten it up. Now you can move onto the sides.
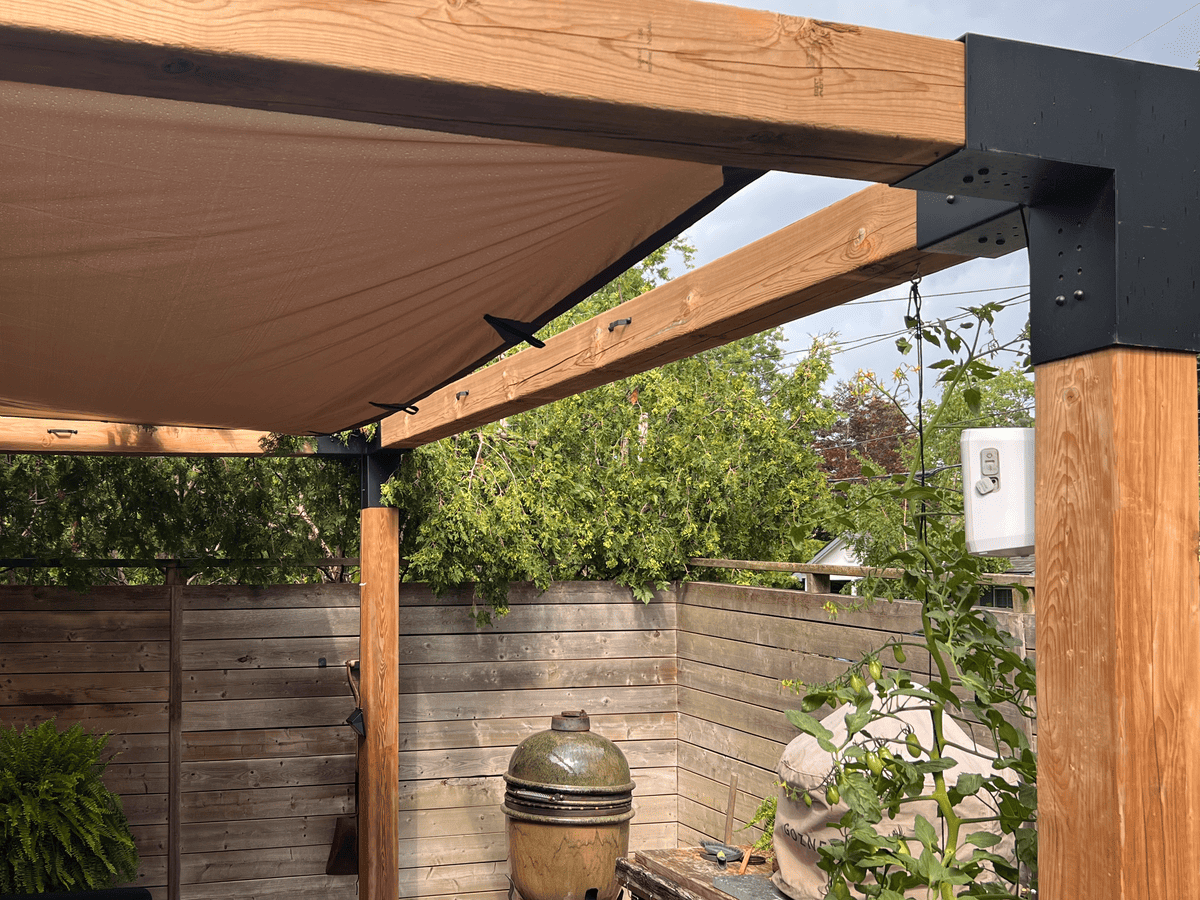
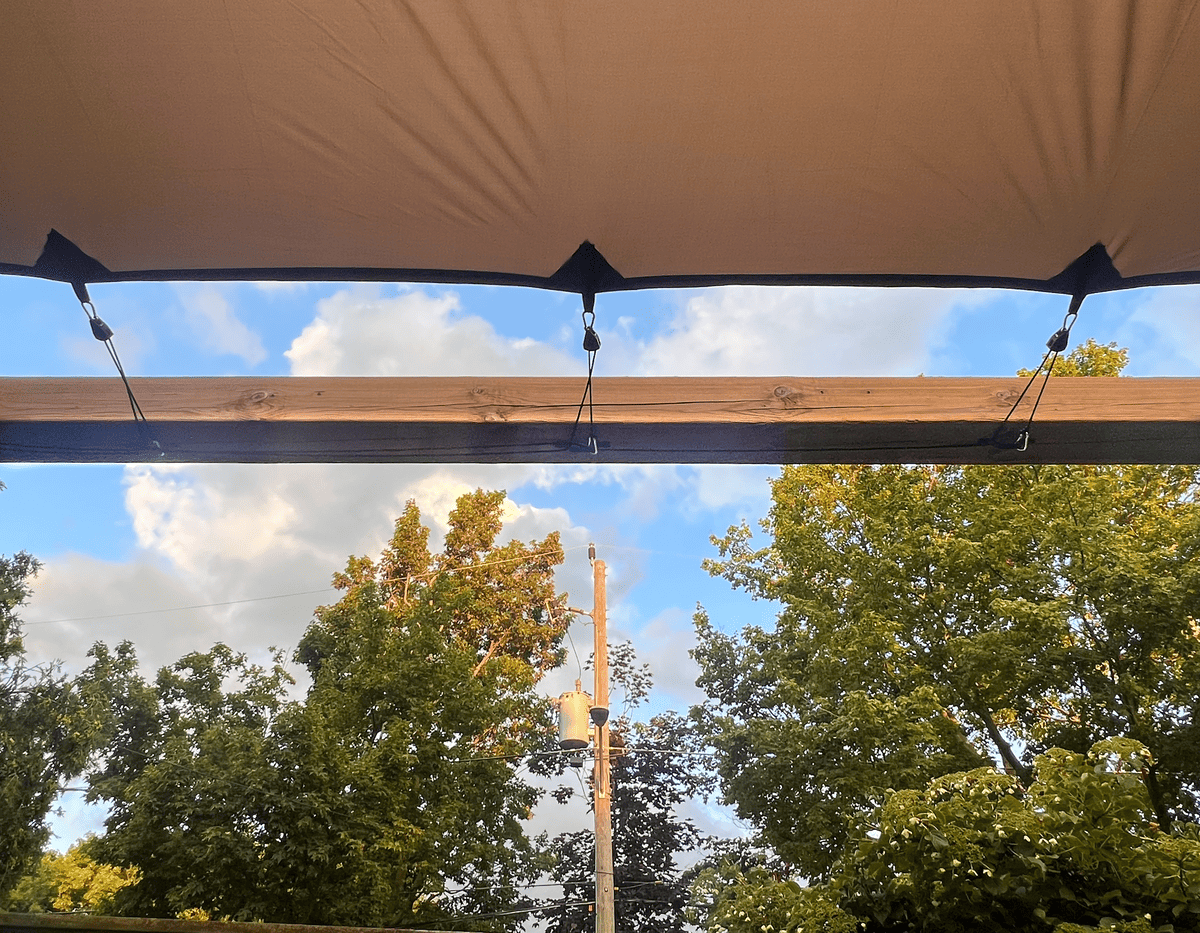
4. Water needs to flow OFF of the tarp. It needs to be tight and 2 sides need to be a few inches lower than the centre so water doesn't pool.
Time out break when it started to rain in the middle of installation.
5. For the 2 remaining sides, secure the top line along the middle.
Use the same method of pulleys and a D-ring.
This is seeming a lot more complicated than it actually is.
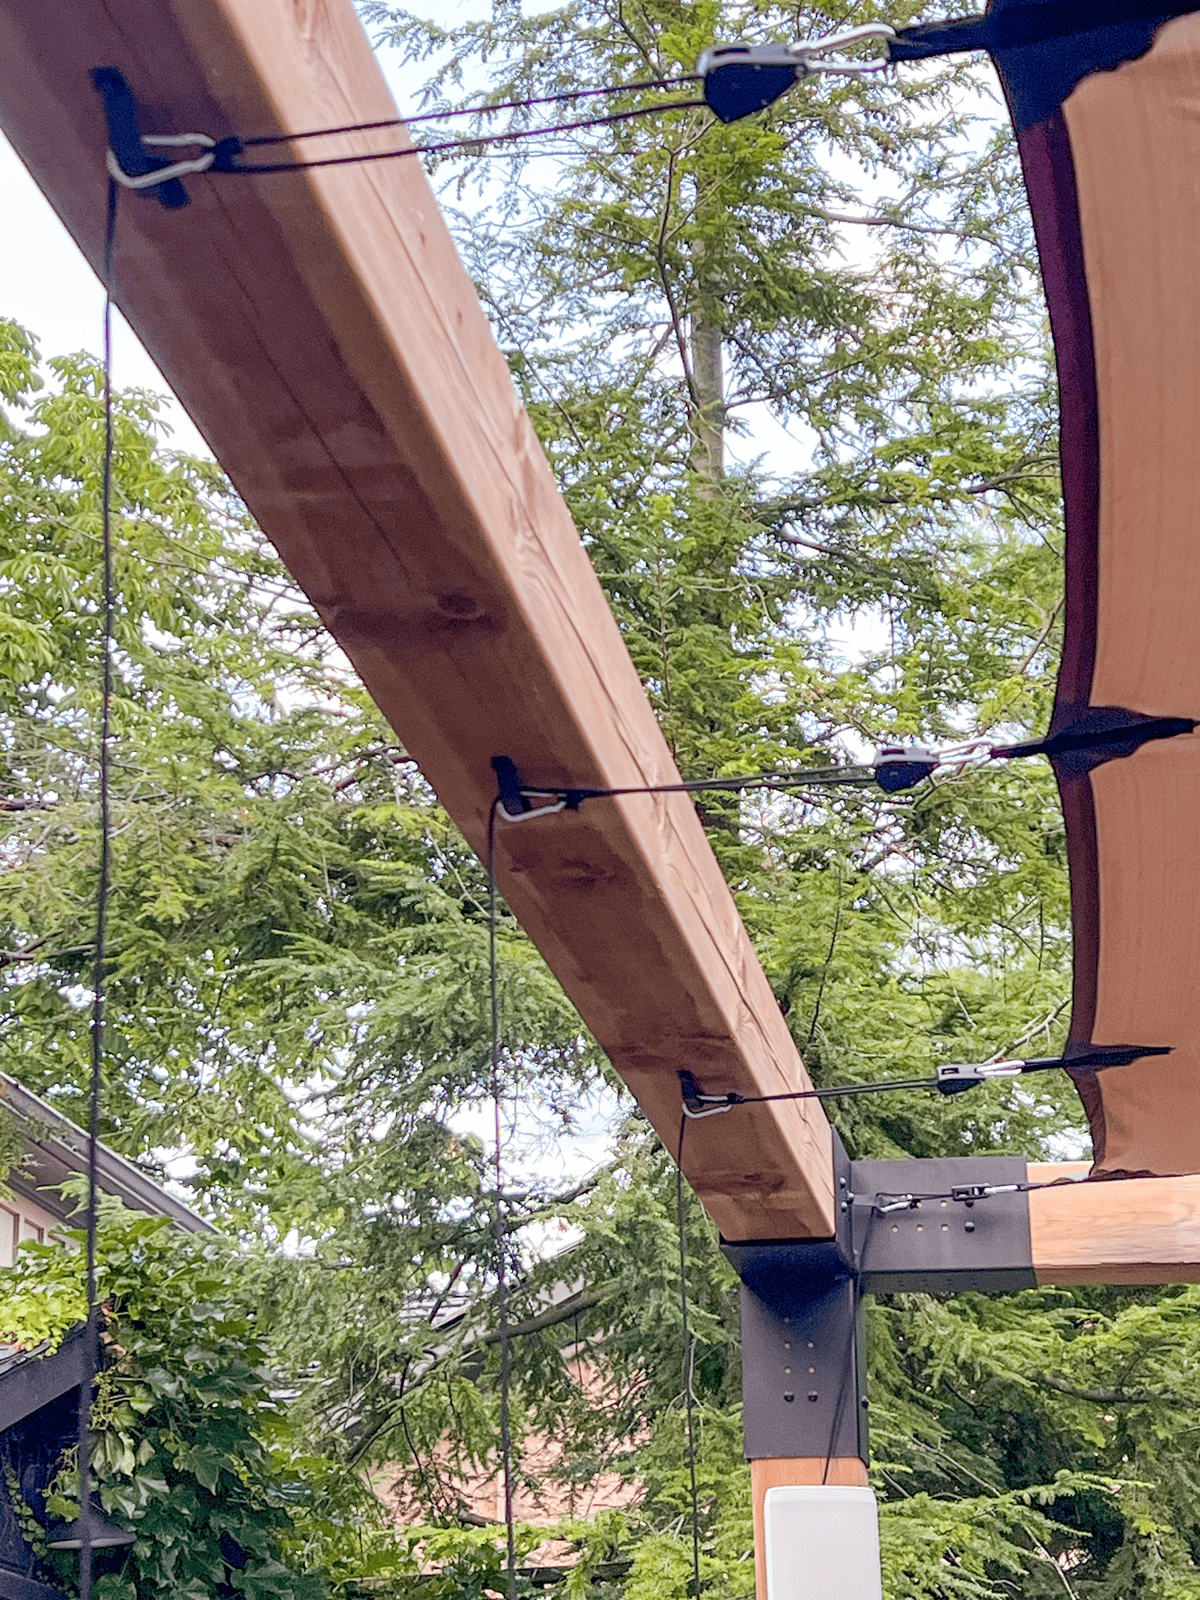
6. Once all the pulleys are in place, tighten each one little by little to get the cover as flat and tight as possible.
Hint: The cover will stretch a little bit so keep your lines hanging for a couple of weeks to make tightening it easy. Once it has stopped stretching, tuck the cords away. I ran my cords along the underside of the top beams.
Test it Out
You can spray a hose onto your cover to see where the drip line is to make sure nothing is getting wet underneath. If it is, adjust as necessary. You may need to increase the pitch of the cover by lowering the sides more.
When I made it rain (heh) on mine the water poured off onto the dining table and splashed onto the back of the sofa. I pulled the table back a few inches to solve the problem.
Learn From My Mistakes
I forgot to take the cover down in the fall and it was immediately covered in thick, wet snow which stretched the tent out and eventually ripped the tabs. That tent is now a tarp for my wood.
I bought a new tent, reinstalled it and in the next fall remembered to take it down.
And there you have it. How to make a waterproof pergola cover for $50 out of a tent. Sticking it to the man, one DIY at a time.


elena
Hello! What a wonderful idea to stumble on in my googling. It was extra good when I realized that a fly tent is also known as a tarp. A tarp?! …what a great idea. I wonder if I can get a light colored one that allows some light in, but keeps the rain off. I’m so excited to look around. Thanks so much for posting this.
Karen
Good luck Alena! And remember to make sure the tent is tight and angled down on both sides. The fly tents allow a fair amount of light through. ~ karen!
MaryPat
Karen, we have a very similar pergola in our backyard, but we tried a different route after two failed attempts at cloth coverings. We spent a bit, but just a small bit, more than your project. We bought corrugated sheet metal at Lowe's and overlapped the sheets over the pergola beams. We stacked 2x4's on one side to facilitate runoff. It is now in its third year and stands up to 10 inches of snow and 70 mile an hour winds, gotta love Missouri weather! Just another idea for when you get tired of seasonal changes.
Karen
Hi MaryPat! Thanks! That sounds like a perfect solution. You should upload a photo for everyone, I know I'd love to see it. ~ karen!
Jo-Ann Pieber
Love All about this post - the frame of mind, the sources, the guidelines and the Pretty! Pictures! :) of your backyard oasis.
One question that I hope doesn't seem too cheeky? Why go for the very expensive bracket system vs. the seemingly equivalent ones for much much cheaper that are available on the 'zon? I like that the ones you chose are Canadian made - but some $800? more cost? well, that's not even Dream-able on my meagre budget. Is the quality That much better?
Karen
Hi Jo-Ann! They're ridiculously expensive and I believe overpriced, but - they're Canadian. They were the original manufacturer and inventor of this particular type of system. I'm just not sure about the quality of the others, but there also weren't as many to choose from when I purchased. If you don't have the budget (it took me years to pull the trigger) then go ahead and try the cheaper ones! You don't know until you try. ~ karen!
ROBIN CARTER
I purchased the tarp and I did this set up last year when you posted this. I have to say the key to this setup is the "Center brace" Down the middle of the tarp which needless to say, I did not have... 😬 I too Went out to look At two in the morning In the middle of a huge downpour to see how it was working. Just in time to see a probably 500 pound water balloon Hanging from my pergola and the side of my house! I took a Large push broom Trying to swish the water out So I could Unhook one corner And relieve the pressure but it was way too heavy! Long story short... that was the end of my vision of the waterproof tarp!😂
Karen
That's no good! And thanks for leaving a comment so others can learn about potential hazards. The tarp/tent has to be really tight and on a good enough slant/slope that water runs off doesn't collect. But you're right, the centre bar over a 12'x 12' area relieves a lot of pressure and allows the water to run off in opposite directions. The good news is, I've been looking and the waterproof pergola roof covers are getting cheaper (one of the few things it the world). ~ karen!
Carol
Do you think this could withstand winds that come whipping through my yard?
Jackie
What a great idea! I have been thinking about getting a sunsail, but all the connection points on a rainfly...genius!
Frani
What a spectacular idea to cover a pergola!!! Karen, you are a genius!!! Thank you for sharing this great idea!!!♥
Roz
Karen, you're just amazing. What a genius idea. Not just the pergola cover, but the entire set, including the pizza oven, up created by you. Simply inspiring.
I'm about to start the budget on my "Karen" backyard retreat.
Thanks a million Karen, for all your genius and well executed ideas throughout the years.
Scotty Crawford
As a big dumb man, I would have just grabbed one of the industrial silver side/black side tarps intead of realizing that there might be such a thing as a tarp that would look like bronzed cloth when it's up. Well done.
dddd
Hey Arem, JERK! much
SUSAN COADY-BUTLER
As always, a perfect and well executed solution. Enjoy relaxing in your wonderful space.
Debbie
Great job. I love it
We have a sun sail over our deck but yes everything gets wet!!! This is a great ideals. Here's to nit running out to cover the furniture. Those chair, sofa covers are so expensive let alone the sun sail. Great job
CathyR
This is pretty cool. We’ve been mulling over how to get shade in our back/ side yard. It’s in Southern Az and gets to be 110°F sometimes for weeks at a time. Plus we get monsoon rains and high winds that took out a 50’ tree in 2022. Anyhow I do t know that we could build the Pergola ( though I love yours) because we have to preserve the view the neighbors have of the mountains. It’s an HOA thing. But with this fly idea we could whip up a fly and perhaps relax in the shade.
At least in winter!
Sherri
Hi Karen
I LOVE this idea and am going to try a version of this for our back deck. It gets full afternoon sun so our kitchen is always roasting through those long summer afternoons. Quick question: now that it’s been a couple of years, how is the fly holding up? Still waterproof? Or did you have to treat it to keep it WP? I’m guessing you take it down for the winter.
Karen
Hi Sherri - O.k. So. The first one I didn't get taken down before it got covered in 2' of snow and that put a damper on that one, lol. The second one is still going but it's only been a year. The good news is the first one was good enough that I can use it as a tarp to cover my wood. ~ karen!
Caralyne
You may have mentioned this in a previous post and I just don't see it. Your backyard pavers....did you lay those yourself or were they already there when you bought the house? If you did that job, how did that go? What was your process? Pros? Cons? Maintenance?
I'm trying to find a more cost-effective alternative to pouring concrete in my backyard.
Always love your posts!
Karen
Hi Caralyne! I laid them myself. They were difficult to lay because they're square cut flagstone. That also made them more expensive. But the reason they were a pain is because it's a natural stone and all slightly different sizes. That means each stone has to be laid and levelled individually and more carefully than a manufactured paver that are all the exact same size. So if you want ease and cheaper, go with a manufactured stone. The area needs to be levelled, with it levelling down to areas out gates and away from the house for drainage. Then a coarse gravel needs to be spread out over the whole area and compacted. Then a layer of something finer to lay the pavers on. Once they're in place you sweep another type of sand over them that settles into the cracks between them all. ~ karen! You can reference this post on me doing my backyard.
Deborah Harsha
Would this work as a temporary privacy wall for a pergola/hot tub area?
Karen
Hi Deborah. This tent would make a great privacy wall for something like that, just make sure it isn't going to be in a wind tunnel type area. A tarp that big can catch a lot of wind. ~ karen!
Michelle B
Fantastic!!!
This may be the solution I've been pondering - oh so much! Your patio looks quite inviting, indeed! The last quote I received for replacement fabric on a retractable awning was $1000+.
The squirrels keep chewing into the rolled fabric to make nests, so I had to ditch that. Thanks so much Karen, another great tutorial on "Doing Stuff" Yippie!!! All the best from your fan in Virginia Beach, Virginia, USA
Roz
Arem, your unwanted and totally unnecessary mansplaining is NOT needed here. Please leave?
Shelby H.
What a brilliant and resourceful solution! Spending $700 on a cover sounds outrageous, and your idea to use a fly tent instead is genius.
Arem
Not enough close ups, not enough information about the middle center beam and how you raised it - and no photo to show that! Confidence to follow your idea is not supported by this. In my opinion you need to think practical and less about show and think from the point of view of the viewer than the teacher, this is what makes a good teacher, reviewing one's own educational video pragmatically, not with a mindset that you understand it because you know it, but from one of "what if I didn't know anything about it". Following what you've put in this article, it would be left to the viewer to do there own problem solving of designing how to make it work and not fill with water! My personal conclusion is that it's very impractical as is and with a little teasing out of the details on the center beam it could work. I think you fell short. IMO. FWIWorth. Nice try. Keep up the pretty, we love pretty. 🙂 Our fabric 'roof' on our pergola needs a lift to allow sheeting of the rain, instead of balloons of water in between the many beams.
Jon
Using a fly tent is GENIOUS! We will definitely try using this method on a few custom pergolas for http://www.tulsa-pergola-pros.com
chris
suck less
dddd
JERK! much
Scotty Crawford
USE your intelligence, Arem!
Then, get a life.
Roz
Arem, your unwanted and totally unnecessary mansplaining is NOT needed here. Please leave?