This weekend I replaced the shut off valve to my outdoor water line. And if you have a dripping outdoor tap, you might want to think about doing this too.
My name's Karen and I can fix stuff. Now I want you to say that sentence out loud but replace my name with your name. Good. Now that I've convinced you that you can fix stuff too we can move on.
Just because something is scary (like eating a spider or taking apart your plumbing pipes) it doesn't mean it's hard. So yes, you TOO can replace something like your outdoor shut off valve if you can get past the worries.
Table of Contents
DIY Plumbing Worry #1
"Holy shit, nononononono, what if I break it and my whole house fills with water and people drive past for entertainment because they can see me swimming from floor to floor through the windows, like an aquarium?"
That's not going to happen. You will definitely drown before you become a spectacle. So don't worry about that.
Although while you're in the basement you might want to take a second to make sure your condensate pump is clean and working if you're the sort to worry about your house flooding.
DIY Plumbing Worry #2
To absolutely and definitely prevent flooding, drowning or dog paddling out the front door just turn off the main water supply to your house. If you do that then no matter what you do you're not going to get a flooded house.
DIY Plumbing Worry #3
I don't own a blowtorch, flux or solder and wouldn't know what to do with them even if I did.
It's alright, with the invention of compression fittings you don't need any of that. You just screw things together instead of soldering them.
Great. I've convinced you all to become weekend plumbers so let's get to work on your leaky tap.
Fixing a Leaky Tap
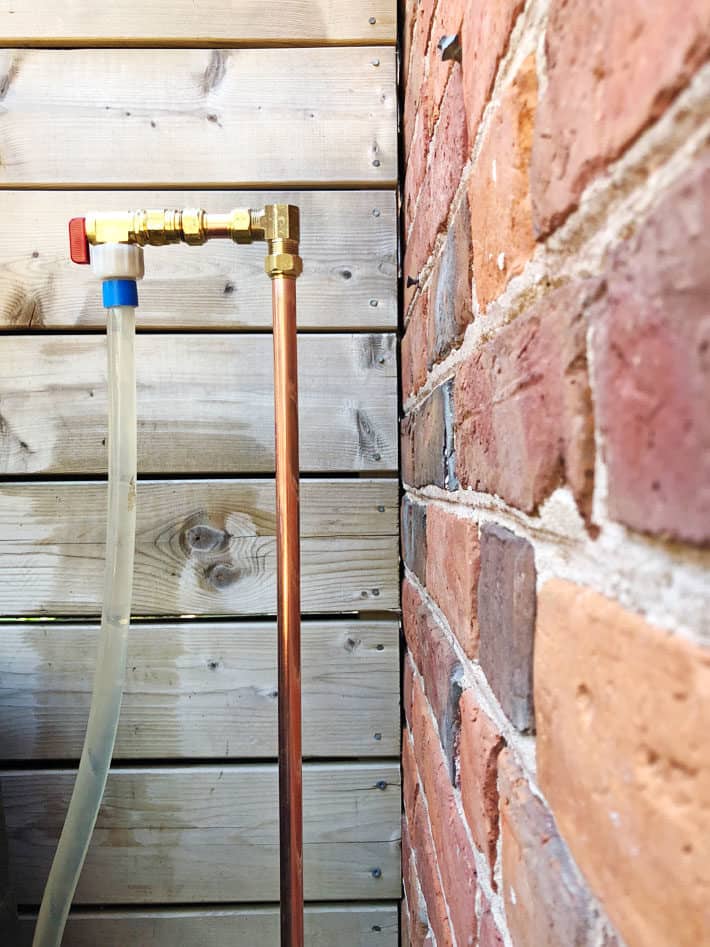
A couple of years ago I replaced my outdoor tap with with long copper tubing and new fittings to raise everything up off the ground to make it easier to attach water timers, diverters etc. You can learn how to move your outdoor tap using compression fittings in this post here.
Last fall I noticed that even when the outdoor tap was shut off it was still dripping. No matter how hard I turned the knob (which you should never have to do) the outdoor faucet kept dripping.
I figured I'd be replacing the faucet handle this spring.
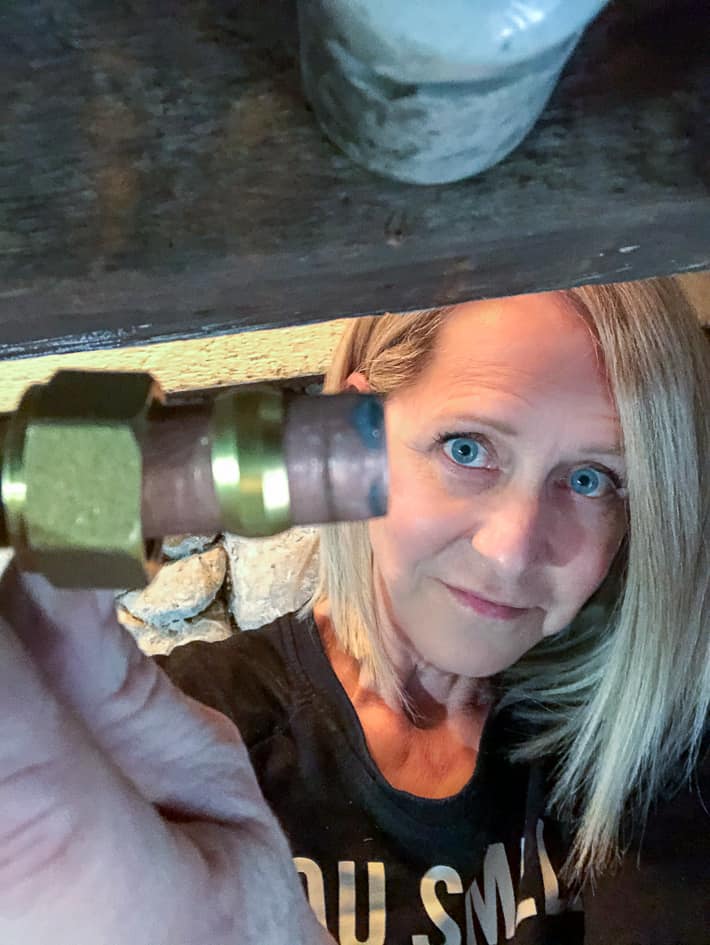
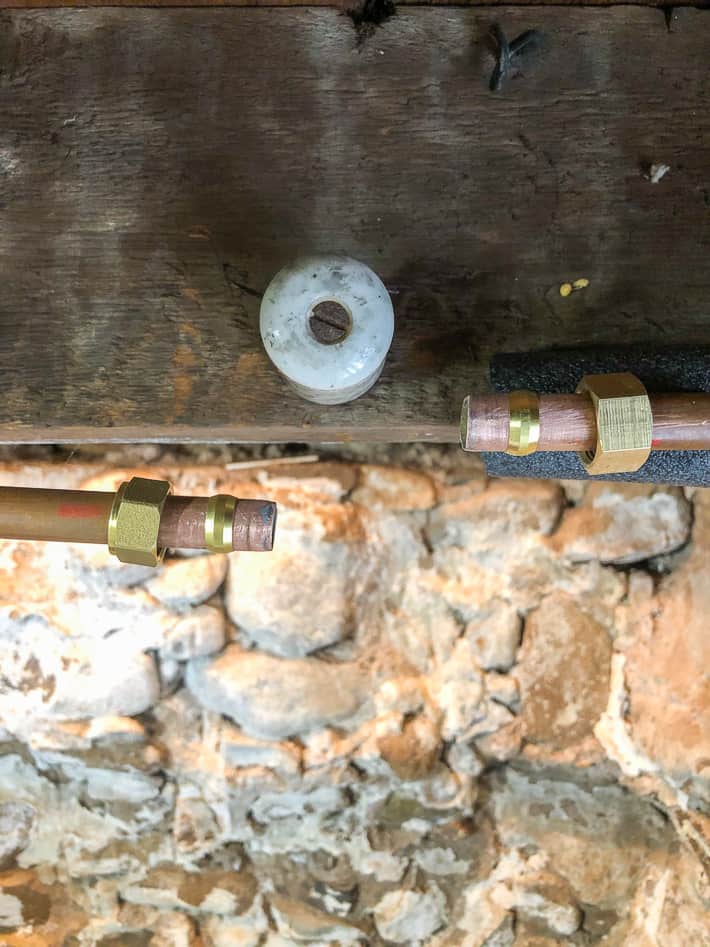
It didn't occur to me that the problem wasn't with the shutoff valve outside. But when my connection burst apart at the end of winter it was made pretty clear. Water still had to be making its way into the outdoor pipe which meant:
My outdoor dripping tap was caused by a defective indoor shutoff valve.
Even though I shut off the water to outside in the fall, water was still getting through to the outside tap. That then froze and exploded my pipes outside. The expansion from the water freezing to ice blew the compression fitting right apart.
I have NO idea what was wrong with the shut off valve to my outdoor line, I just knew it wasn't working so it would need to be replaced. I've done bits of plumbing work before but not this particular job so it was exciting to try it.
I understand you may not be as excited about the prospect of doing this, but you'll understand the elation once you're done the job and are cruising on a 100% natural plumbing high.
How to Replace a Shut Off Valve
- Take photos of both sides of the part you are replacing. Your part will probably have the size of it stamped right on it. Chances are also good that your part will be for ½ pipe, because that's the standard size for plumbing branches in your house unless you live in a McMansion in which case it *might* be larger.
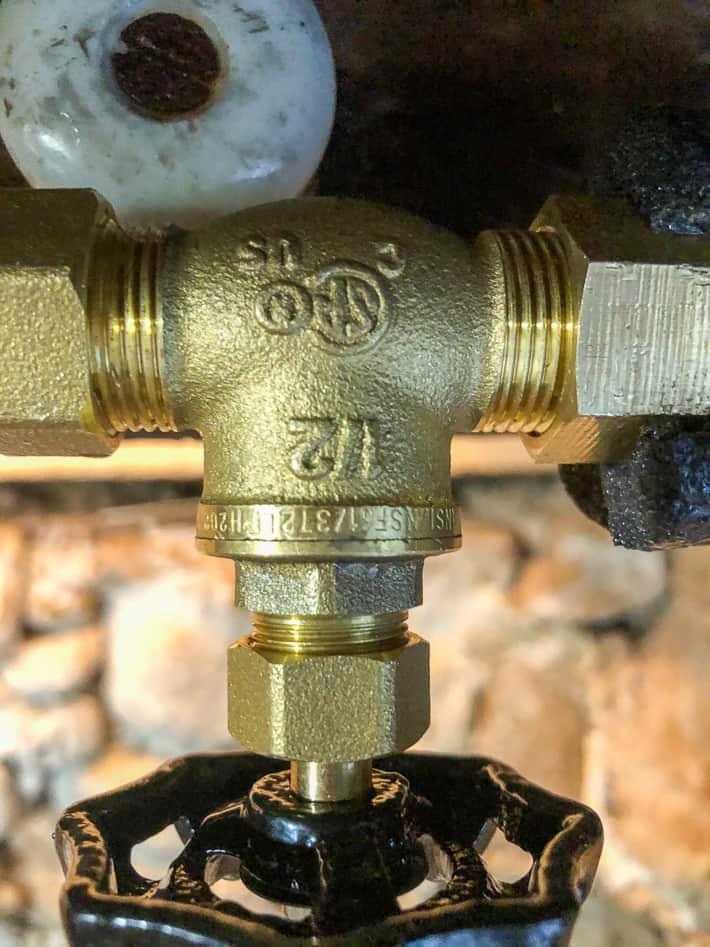
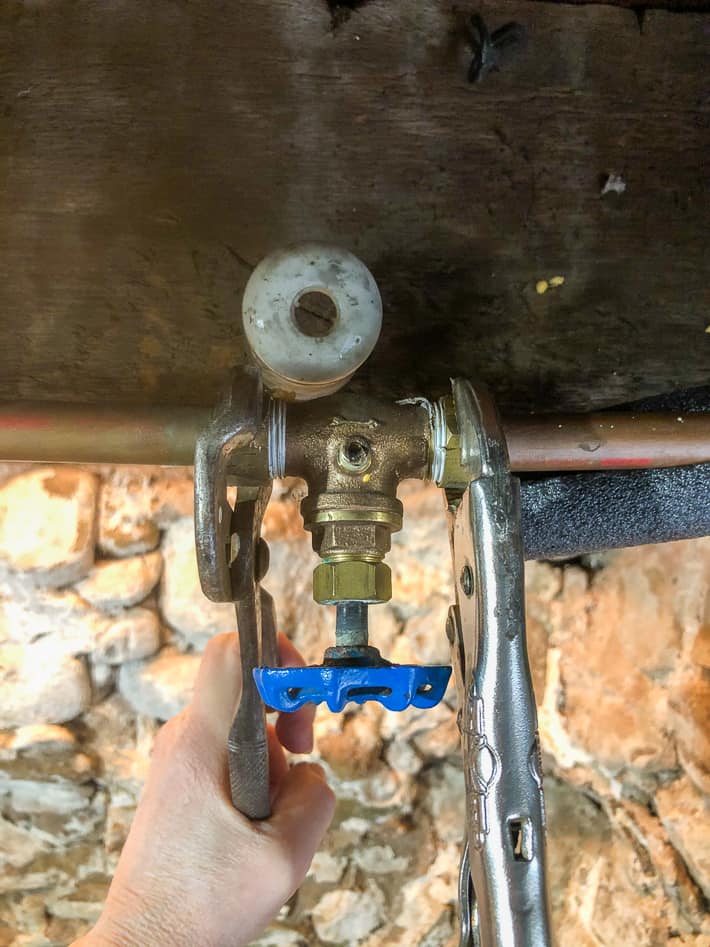
2. Go to the hardware store and buy the exact same replacement part. In this case I was looking for - a ½" shutoff valve with compression fittings and a drain.
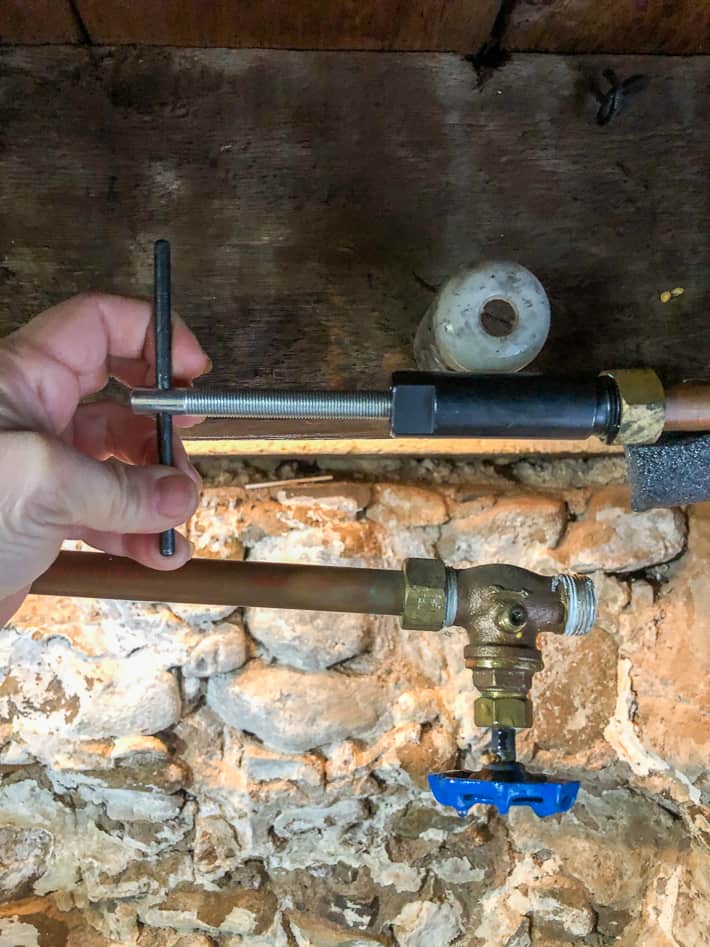
If your shut off valve is for controlling water to your outdoor tap make sure you get a shut off valve that has a little drain knob on the side of it. Like this ...
That knob in the centre is where you can drain the outside line after shutting the water off so your pipe outside has NO water in it at all to freeze during the winter.
NOTE
If you're replacing a shut off valve on a line within your house, not one that goes to the outside you don't need the drain on it.
If you're at all unsure of what you're buying, find someone in the store with PLUMBING EXPERIENCE to double check what you're buying with the photo of your original part.
3. Once home, get your tools out. You'll need 2 wrenches, a bucket, the new shut off, and a hacksaw or a compression fitting remover tool.
4. Shut off the main water supply to your house and test it by turning on a tap to make sure it's all the way off.
5. Place a bucket under where you're working and unscrew the drain knob to allow water left in the pipes to drain out.
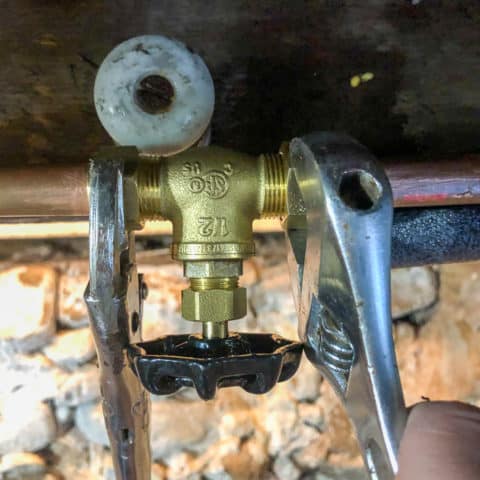
6. Once the water has drained you can remove the old shut off valve. You need to remove it by loosening the compression fittings. Do this by securing a wrench to each nut on either side of the valve. Hold one wrench tight so the pipe and fitting don't move while you use the other wrench to loosen a nut.
Do this for both nuts on either side of the valve. Once they're loosened enough you can unscrew them completely by hand and push them aside on the copper pipe.
Would you like to save this stuff?
HOW TO LOOSEN A STUCK PLUMBING NUT
Water deposits and time can cause a nut to seize up and you think you'll never be able to undo it without breaking something like the pipe or your hand.
- Try tightening the nut instead of loosening it a tiny bit if you can. This will help break whatever is causing it to seize up. Then gently rock the nut back and forth, loosening and then tightening until it frees completely.
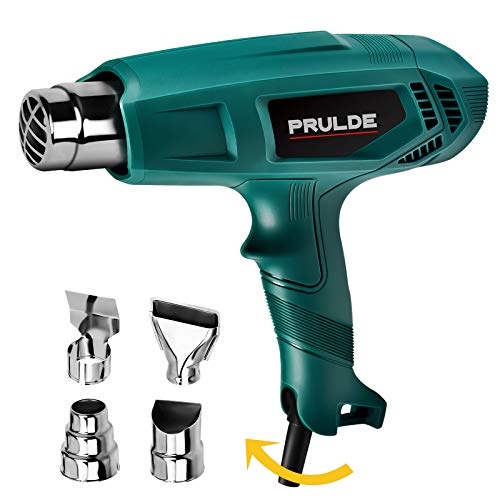
- If that doesn't work use a hairdryer or a heat gun to heat the stuck nut up. This causes it to expand and break its own seal. Apply the heat directly on the nut from all angles then using a wrench (while the nut is still hot) try removing it again.
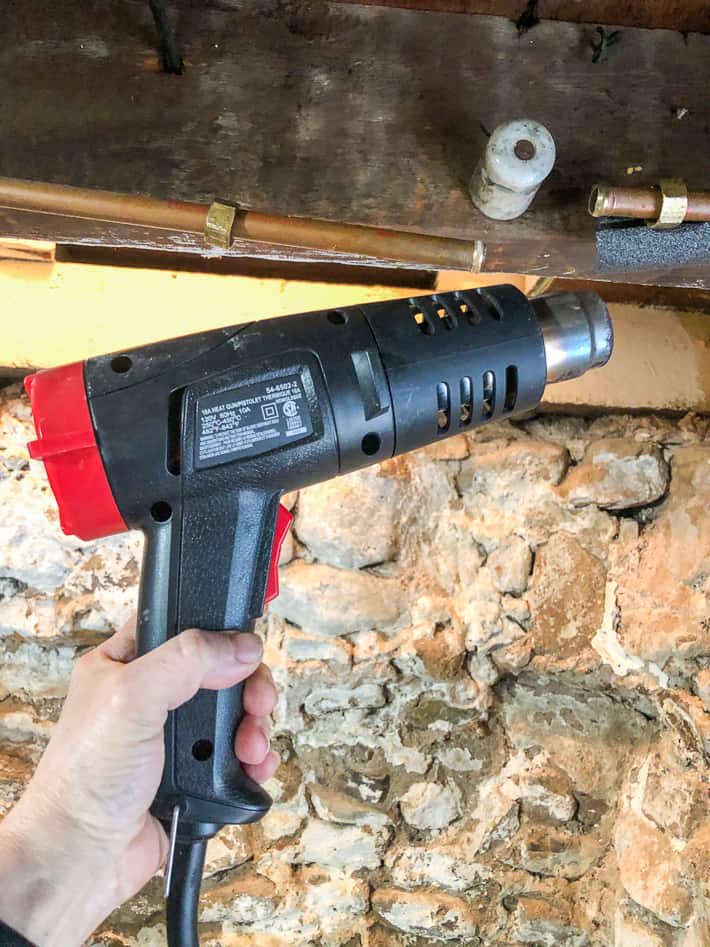
One of my nuts came off with no problem at all. The other one I didn't think was ever going to come off, but the heat gun trick worked on the second try.
- If it STILL won't budge, you can try applying WD-40 and letting it sit for a couple of hours. Try again. If it still won't loosen, you can WD-40 one more time and leave it for another hour. If at this point the nut won't come off you'll either have to cut the copper pipe or call in an actual plumber.
7. With the fittings undone you can now remove your old shutoff valve.

8. Remove the old compression fittings.
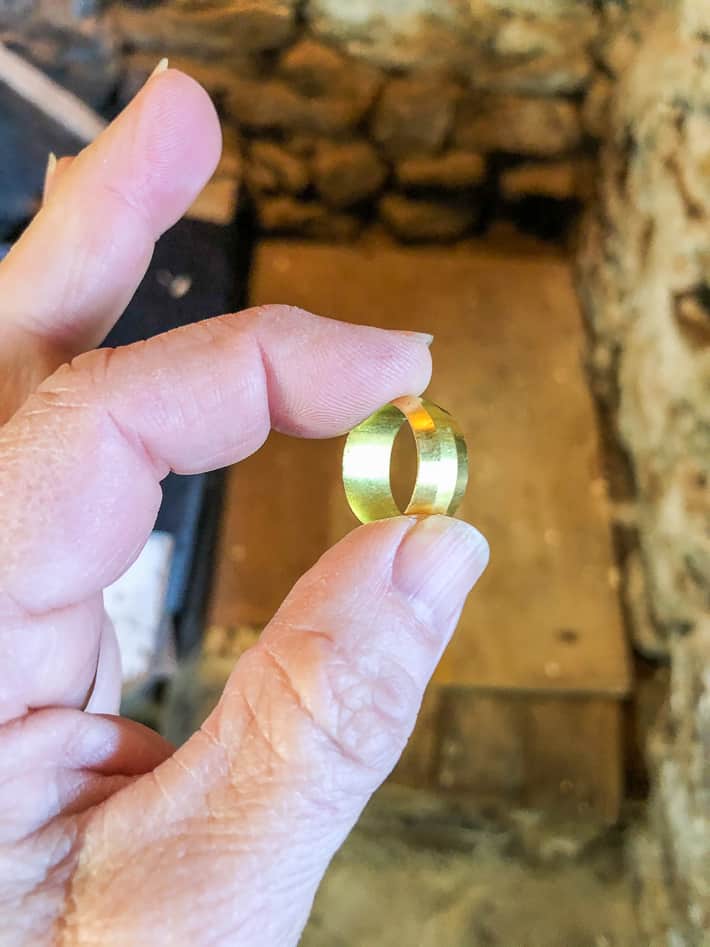
Compression fittings work with 2 main pieces - a nut and a ferrule, also called an olive. The ferrule is a brass ring that fits under the nut. When the nut is tightened it squishes the ferrule tight against the pipe making a watertight seal.
HOW TO REMOVE A FERRULE (OLIVE)
The problem with compression fittings is that the ferrules are a bit of a pain to remove. You can either use the a compression pulling tool which screws into the nut and uses it to push out the old ferrule or you can use a hacksaw to carefully cut through the ferrule so you can pull it off. CAREFULLY. You don't want to cut into the pipe below.
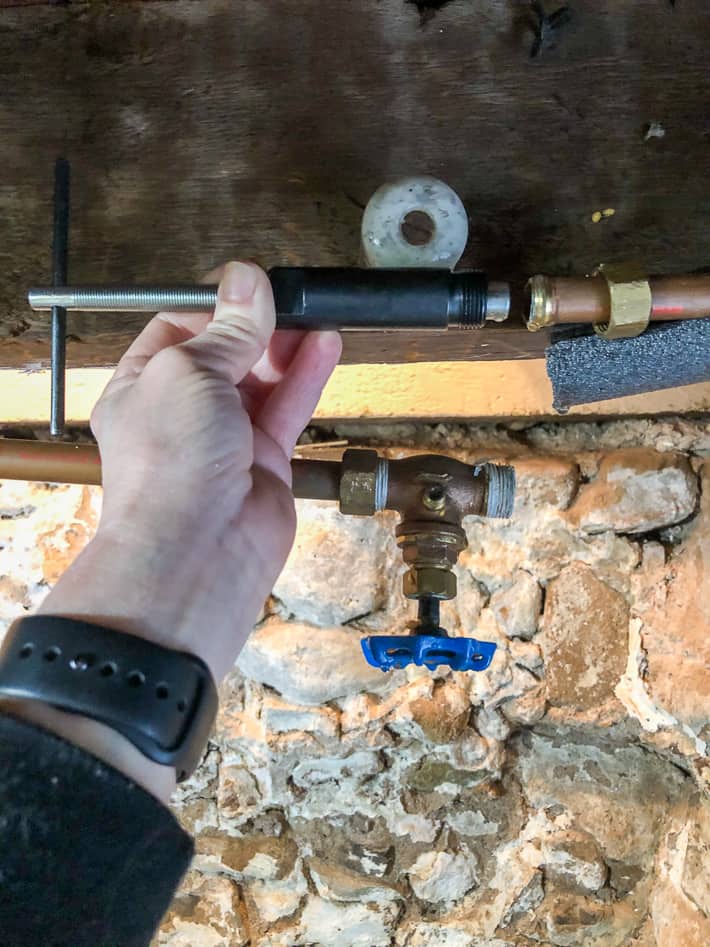
Method 1
Insert the ferrule removing tool into the copper pipe. Screw the loose nut onto the end, and then turn the handle on the end of the tool until it pulls both the nut and the ferrule off the pipe with it.
Method 2
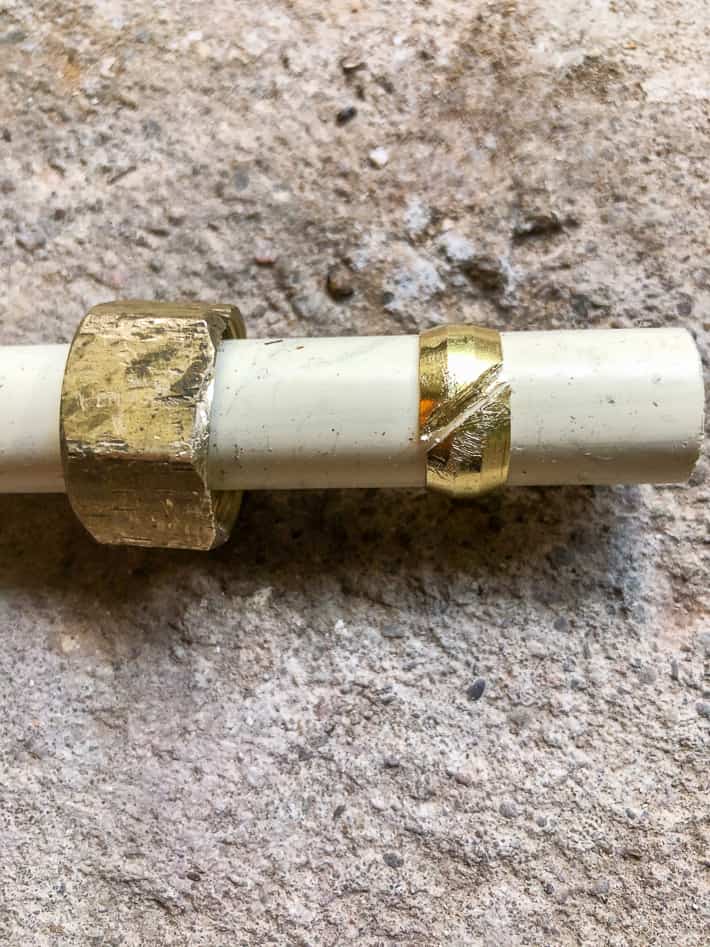
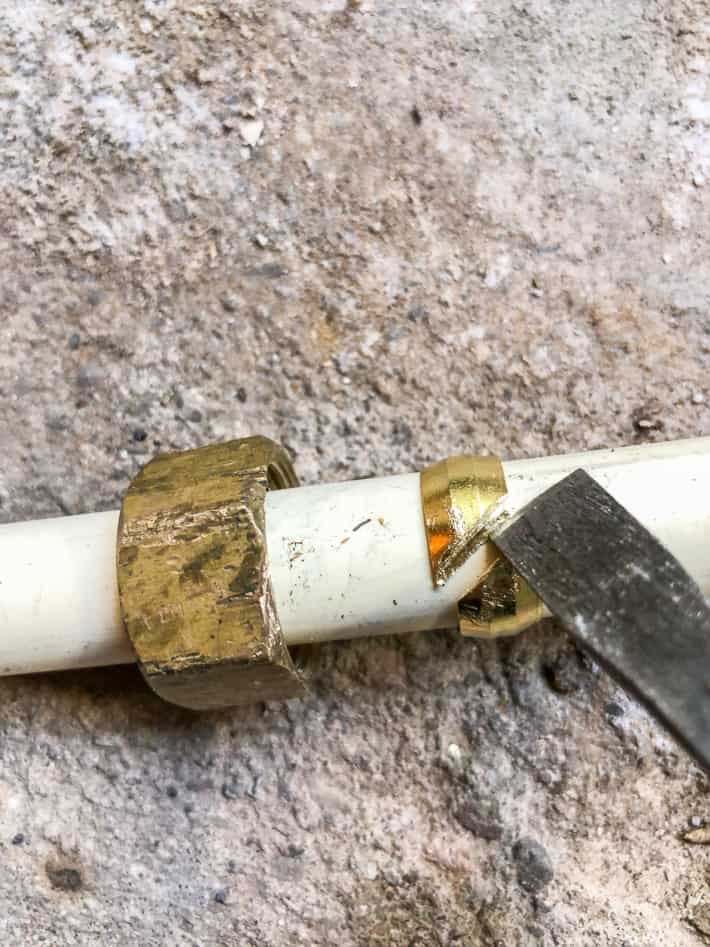
Using a hacksaw cut through the brass ferrule. It's brass, which is soft, so it isn't hard to cut through. Be careful not to cut the pipe beneath. Using a screwdriver or chisel just pry the ring apart and pull lit off.
9. With the compression fittings off you can now prep the pipe for its new shut off valve. With fine grit sandpaper, lightly sand the pipe so it has no burrs or bumps.
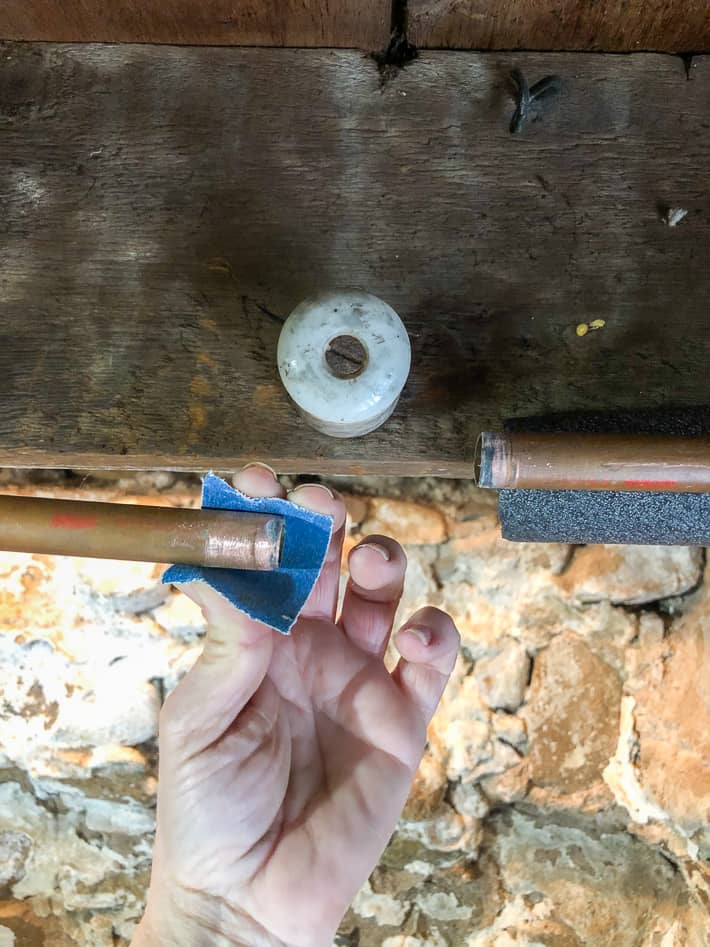
Make sure to feel around the cut end to make sure it's smooth.
10. Slip the new compression fittings over each pipe end; first the nut then the ferrule.
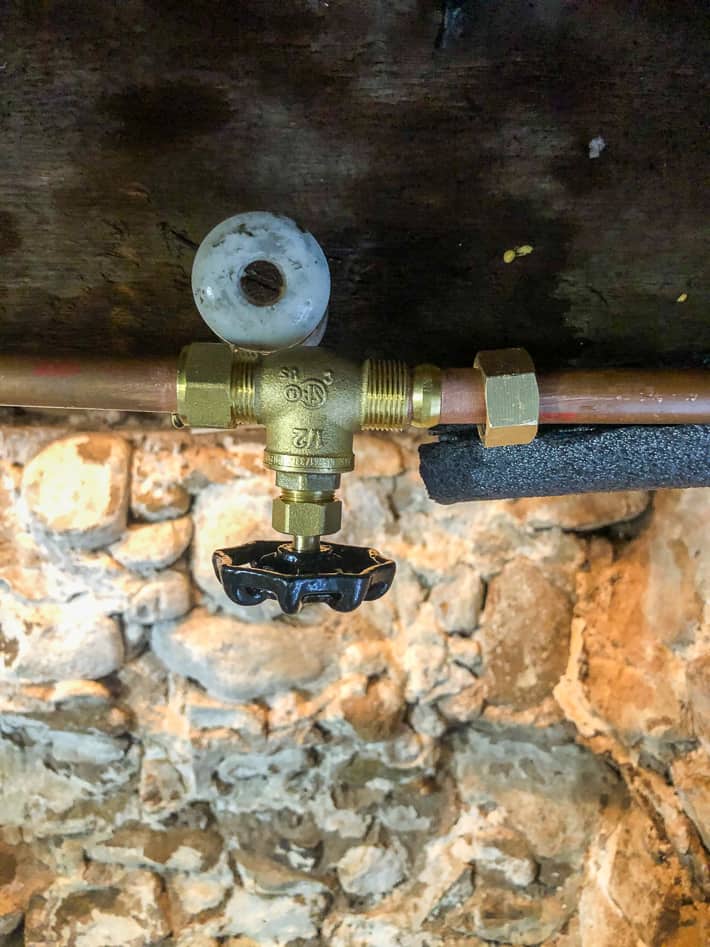
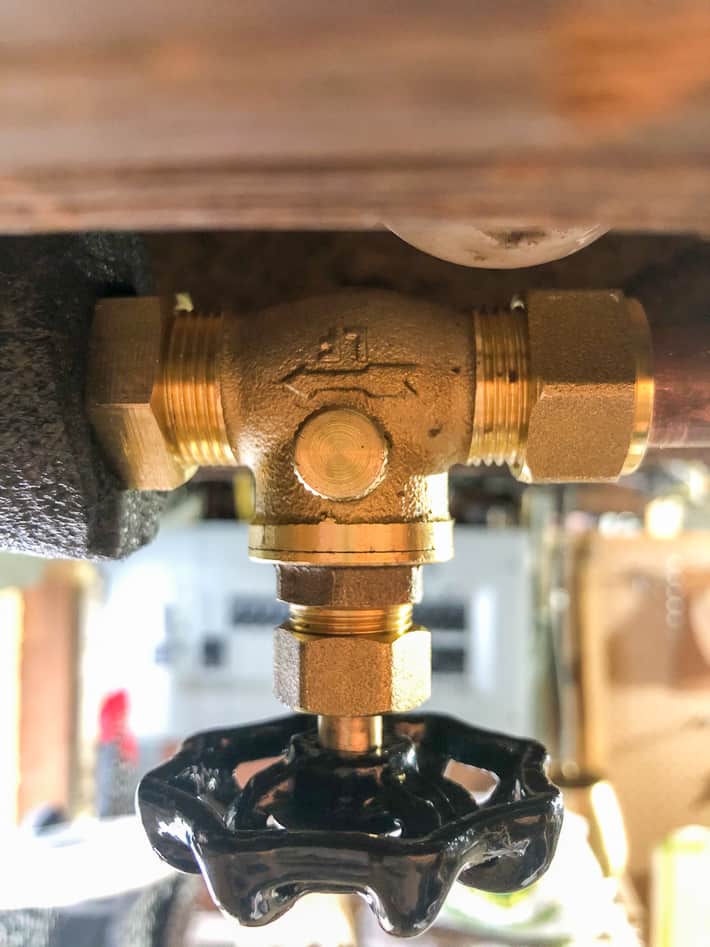
11. Add your new shut off valve MAKING SURE YOU PUT IT ON THE RIGHT WAY. There will be an arrow on it somewhere indicating the direction of the water flow. Make sure the faucet is running the right way.
You can see the arrow pointing to the left because that's the way the water flows through the pipe.
12. Finger tighten the nuts on either side then give ½ a turn with your wrench. DO NOT OVERTIGHTEN. If you overtighten you'll ruin your seal and it will leak.
13. Make sure the drain cap is on and the new knob turned to off.
14. Time to test it. Turn your water supply back on slowly and check for leaks. If you have a leak and you're absolutely sure you didn't overtighten your fittings, you can turn the main water supply off again, and give the leaking connection another ¼ turn.
15. You should now be good and have a perfectly working, brand spanking new outdoor water shutoff valve ALL without once having to swim past your neighbours.
Good job.
WARNING
Compression fittings are prone to leaking if you touch, move, or wiggle them after installation so only use these in areas where there isn't going to be any movement to the pipe. And once you fix it DON'T wiggle it "just to make sure it's working". Leave it.
How to Replace a Leaky Shut Off Valve
Materials
- Replacement shutoff valve with compression fittings and drain
- Bucket
Tools
- 2 wrenches
- fine grit sandpaper
- hacksaw or
- compression fitting remover
- hairdryer or heat gun (may be needed)
- WD-40 (may be needed)
Instructions
- Take photos of both sides of the part you are replacing. Your part will probably have the size of it stamped right on it. Chances are also good that your part will be for ½ pipe, because that’s the standard size for plumbing branches in your house unless you live in a McMansion in which case it *might* be larger.
- Go to the hardware store and buy the exact same replacement part. In this case I was looking for – a ½″ shutoff valve with compression fittings and a drain.If your shut off valve is for controlling water to your outdoor tap make sure you get a shut off valve that has a little drain knob on the side of it.
- Once home, get your tools out. You’ll need 2 wrenches, a bucket, the new shut off, and a hacksaw or a compression fitting remover tool.
- Shut off the main water supply to your house and test it by turning on a tap to make sure it’s all the way off.
- Place a bucket under where you’re working and unscrew the drain knob to allow water left in the pipes to drain out.
- Once the water has drained you can remove the old shut off valve. You need to remove it by loosening the compression fittings. Do this by securing a wrench to each nut on either side of the valve. Hold one wrench tight so the pipe and fitting don’t move while you use the other wrench to loosen a nut.
- With the fittings undone you can now remove your old shutoff valve.
- Remove the old compression fittings either by carefully cutting the ferrule with a hacksaw or using a compression fitting removing tool.
- Slip the new compression fittings over each pipe end; first the nut then the ferrule.
- Add your new shut off valve MAKING SURE YOU PUT IT ON THE RIGHT WAY. There will be an arrow on it somewhere indicating the direction of the water flow. Make sure the faucet is running the right way.
- Finger tighten the nuts on either side then give ½ a turn with your wrench. DO NOT OVERTIGHTEN. If you overtighten you’ll ruin your seal and it will leak.
- Make sure the drain cap is on and the new knob turned to off.
- Time to test it. Turn your water supply back on slowly and check for leaks. If you have a leak and you’re absolutely sure you didn’t overtighten your fittings, you can turn the main water supply off again, and give the leaking connection another ¼ turn.
- You should now be good and have a perfectly working, brand spanking new outdoor water shutoff valve ALL without once having to swim past your neighbours.
Recommended Products
I'm an Amazon affiliate some I get a few cents when you buy something I've linked to.


Tools Specialist
It's really stressful to see leakage in our shut off valve. Good thing this article will guide us how to replace it with the right tools you needed. Thank you for sharing this article!
dave
After cutting the pipe you can use bread stuffed in the pipe to stop the drips. Once water is turned on it will dissolve and flush out.
You're welcome
Benjamin Hepple
I already died reading worry number 1 and couldn't get any further...
Randi Jean Veiberg
Hi Karen!
(Loving the longer hair!)
Hubs bunged up the water line feeding to my dishwasher - do you suppose I can fix it?
Linda
I’ve learned, the hard way, not to attempt any plumbing repairs on the weekend. Last time I tried to replace an o ring on an old washing machine shut off , had to call the plumber on a weekend. Dad said it was easy, it wasn’t
M.C. Athy
One word on the ultimate in plumbing repairs (well, two words made into one to save space):
https://www.sharkbite.com/
The last repair job I had to do was a leaky copper pipe behind a 40 gallon water heater (clearance space of three inches) working through a wall from about two and a half feet away. Talk about cuss words, but SharkBite saved the day and it was so easy and so much fun I thought about making random cuts in other pipes just to prolong the joy! Don't know if they sell the line in Canada but it's very much worth the search.
Keep on doin'!
Karen
Yup, they sell shark bites here. :) I've used them in other applications and they're great! ~ karen!
Terry
I have 2 grandsons who each live less than a mile from me and they're both plumbers! How do you fix a leaky faucet? Call Elijah. How do you fix a clogged drain? Call Isiah. Leaking hot water heater? Call both of them. LOL Yes, I do DIY around my house but not plumbing.
Billy Sharpstick
As a cheapskate homeowner, I hate to admit that I know far more about plumbing than I ever wanted to! I have some observations and suggestions:
1. I always replace old valves and faucets with quarter turn ball valves. They are easier to operate and last longer.
2. For shutoff valves, I prefer the ones with a long handle.
3. When loosening or tightening valves or fittings, It's best to put the stationary wrench on the fitting itself instead of the compression nut on the other end. And usually essential when loosening the second one.
4. Sometimes you will find that the old olive has been tightened so much in the past that it has squeezed the tube and deformed it. Even if you can cut it off, the tubing is no longer a smooth cylinder. Or you cut too deep with the hacksaw and damaged it! Or it's just too funky to trust. Or the new valve is a different length than the new one and the pipes don't reach properly. When any of these happen, just cut your losses and cut the tubing back a few inches and connect a new piece of pipe with sharkbite fittings. They even make an extra long sharkbite "slip connector" for connecting a damaged pipe that you can't pull apart enough. Or you just replace the whole thing with a sharkbite valve.
5. For polishing that copper pipe end, they sell sandpaper in one inch wide rolls. Just tear off a piece about a foot long, loop it around the pipe, and pull it back and forth until the pipe is nice and shiny.
Bonus plumbing tips:
1. When replacing shower/tub handles, you don't have to get identical almost round handles that are hard to turn with wet soapy arthritic fingers. You can replace them with some with long cross thingies(technical term) or just one looooong thingie that you can even operate with a wet soapy arthritic foot. Just take the old one in to the hardware store and match the spline.
2. When replacing baseboard or wallboard over a plumbing repair, DO NOT POUND A NAIL IN WHERE IT WILL GO THROUGH THE PIPE IN THE WALL!
https://www.sharkbiteplumbing.co.uk/product/quarter-turn-brass-ball-valves-nickel-plated/
https://www.sharkbite.com/products/brass-push-slip-coupling
https://www.sharkbite.com/products/brass-push-coupling
https://www.walmart.com/ip/Chrome-Tub-Shower-Faucet-Handle-Crane-Cold-Cross-Handle-Crane-CRAFB8375/530983923
Lynda
Hard lesson learned, if you are replacing the washers in your outside tap, check the pipe inside the house. My pipe was not screwed on to anything, it was just hanging loose between the joists. When I was twisting the tap off outside, it torqued the pipe inside and the pipe snapped off. On the wrong side of the next shut off valve.
Jack Barr
Karen: ditto with Leo as a first check. Also, when running water from inside to outside anywhere (like most of Canada) there's danger of frost: use a frost free sillcock. Connect it downstream to your shutoff valve (one nut on your shutoff valve was cracked. Replace it!) It's a tap that comes in various lengths, to accommodate various foundation thicknesses: it seals on the inside of the foundation. This way you close the inside valve, open the outside valve to drain the water that would normally freeze and burst any exposed pipe/valve. After draining, you can close the outside valve and not worry about anything bursting.
Keep up the great posts, the gardening, the DIY energy.
Karen
Hi Jack! Yes, I knew it was probably just a washer, but I decided to replace the whole thing for two reasons. 1, because I'd rather replace an entire old part than just a tiny piece of it if it's around the same amount of work. :) This outdoor shut off is just a few inches from the outside wall it goes out. So I'm not sure a frost free sillcock would do anything more than what this system does. :/ I would just have two shut off valves side by side inside, no? ~ karen!
Quatorze
So, what’s that round white ceramic thingy above the shutoff? It’s in each photo, so I’m wondering what it is?
Carla
I'm pretty sure it’s a leftover “knob” from knob-and-tube wiring. (In the first picture thought she was using a lifesaver candy for size!)
Karen
Yep, it's a leftover piece from knob and tube wiring. ~ karen!
Tammy Smith
There were SO many lost opportunities to make "nut" jokes here.... are you feeling ok?
Kat - the other 1
I know!
After passing the mild claustrophobia and panic attack from the house filling with water, I was snickering all the way through! ;D
Lol!
leo muzzin
Karen: why did you not take the shutoff valve apart (while still attached to the pipe) to see what was causing it to leak, before removing and replacing it? Some of these shutoff valves have a rubber gasket as a stopper that wears out and would have been very easy to just replace the gasket. Knob and tube holdover? Nice.
Billy Sharpstick
Yes they can! Those old valves also have packing under the threaded collar that can be replaced. You can tell those have worn out when the handle wobbles loosely when the valve is opened and water seeps out at the handle shaft. It would have been difficult on Karen's valve though because it is in a hard to reach location. I only rebuild those old dinosaurs when I can't safely pull them out of the wall to replace them with modern quarter turn ones.
Karen
Hi Leo! Yes, I knew it was probably the rubber washer/gasket that was causing the problem. I just made a decision to replace the whole thing. ~ karen!
LOIS M BARON
OK! that was exciting enough just to read about doing. I'll have to go to bed now to get my pulse rate down. (Or because it's nearly 1 a.m.)
BUT: I can't believe you don't own a blowtorch. How does one make creme brulee without one?
Jan Goodman
I LOVE everything about your posts! You have a terrific sense of humor and a fabulous way with words! I admire your knowledge and the way you tackle any problem that confronts you. You are one helluva woman!!