Need to change an outdoor faucet but you don't know how to solder? Don't worry. Times have changed and so have plumbing supplies. Allow me to introduce you to the compression fitting and all the glory it brings. No soldering, blow torches or flux required.

I still need to run some pipe tape to secure the pipe to the wall. I'll get to that in a decade or so.
Fix my leaky outdoor faucet, teach myself to speak French, and perform a dance mashup of All the Single Ladies and Thriller at a royal wedding. For the longest time these were my 3 attainable goals in life and on Saturday, May 19th - the day of Prince Harry and Meghan Markle's wedding - I checked the most difficult one off of the list.
On that day, I fixed my outdoor faucet. It leaked, it was about 4 inches off of the ground, and it was hidden behind my compost bin. Seriously. It couldn't have been in a less convenient place if it were in the intestines of a royal Corgi.
It's a job I kept putting off because a) I was busy perfecting my dance moves and b) I'm not a confident solderer. I can do it, I'm just not particularly good at it. I put this job off for about 10 years. When the leak got so bad this spring that I couldn't turn my outdoor water on I decided I was going to have to suck it up. So I went up to my local fix-it centre and found my favourite long haired helper guy. He's the one who actually knows stuff and is happy to help.
He walked me over to the wall of compression fittings and told me that's what I should use. They're easy to work, don't need soldering and you can configure anything you want with them. Sold.
Welcome to the magical world of compression fittings.

Compression fittings work by compressing together when you tighten them. If you tighten them properly they'll be leak free forever. At least for the foreseeable future. Or until the next royal wedding.
Have a leaky outdoor faucet you want to change? Or maybe you want to make it higher? Here's what you have to do and what you need.
How to Replace a Leaky Outdoor Faucet
- Check to see if your faucet is screwed on or soldered on. If it's screwed on, just use a wrench to unscrew it. Run a single piece of teflon (plumbers) tape around the ½" threads coming off of the adapter then screw your new faucet on. That's all there is to it.
- If your faucet is soldered on, you have to cut the copper pipe it's soldered to using a pipe cutter.
Click here to jump to how to use a pipe cutter. - Once the pipe is cut screw a ½" to ⅝" compression adapter to your copper pipe.* This takes the place of soldering. Tighten it.
Click here to jump to how to install a compression fitting. Once the fitting is on your pipe, just run some teflon tape around the threads of the ½" portion of your adapter then screw your new faucet into place.
* ½" is a typical size for a faucet. ⅝" is a typical size for outdoor plumbing pipes. But it isn't ALWAYS the case so be sure to check your sizes.
How to Reposition an Outdoor Faucet

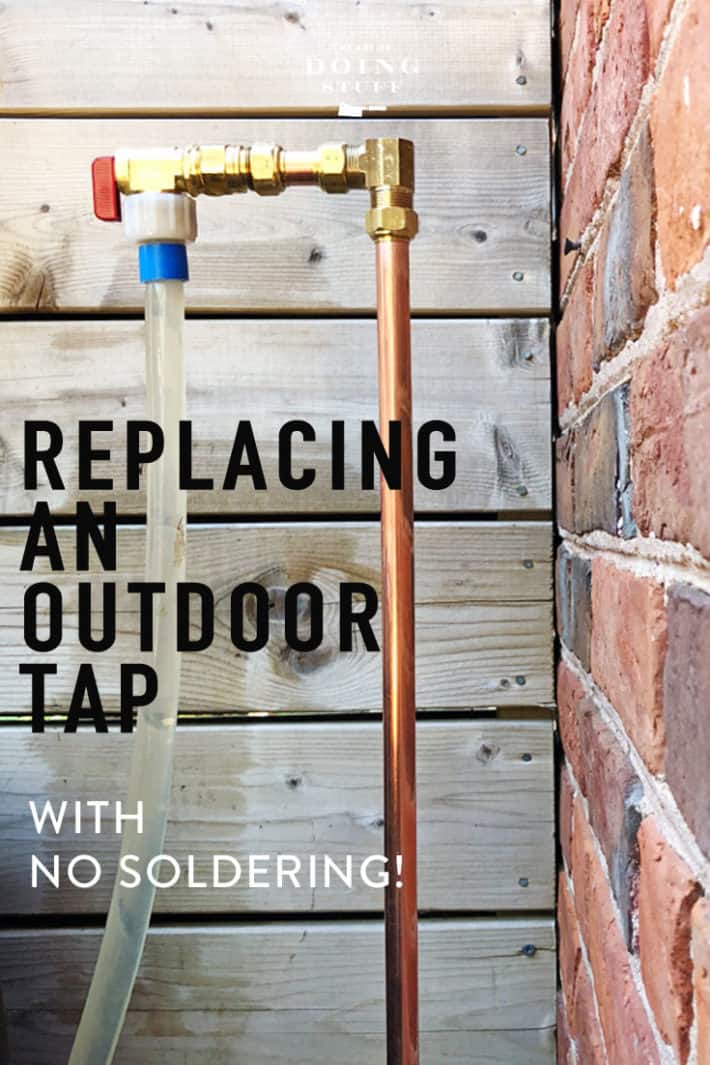
This setup will give me a new faucet and raise the height of my tap by over 2' without doing ANY soldering.
1.Cut the copper pipe either where it comes out of the house or where it rises to your faucet. make sure you leave enough pipe to fit a compression fitting on. You'll need a few inches.

How to Use a Pipe Cutter: To cut off a piece of copper pipe, put the pipe cutter around it and then twist the knob on the end to tighten it. Turn the entire pipe cutter around the pipe a few times until it moves freely. Then tighten the knob again and repeat. Keep doing this until the pipe is cut.

TIP:
Pipe cutters are cheap and easy to use. Just make sure you get the right size pipe cutter for the size of pipe you have.

Would you like to save this stuff?
2. Sand both of your pipe ends.

The old one to clean it up and the new one because your compression fitting won't fit over it unless you sand it down a bit.

3. Remove the compression fitting from its package and unscrew the nut. Slide the nut over your pipe.

4. Slip the compression fitting over the pipe.

5. Tighten the nut to the fitting, using one wrench to hold the fitting still and the other wrench to turn the nut.

TIP:
Tighten a compression fitting nut until you hear it groan. Once it does that, turn it another ½ a turn. Then STOP. If you over tighten your junction will leak.
6. Continue in this manner until all your compression fittings are on. You configure the run however you want but remember the more adapters you put on, the more likely you are to have a leak somewhere at some point.

7. Run one layer of teflon tape around the threads on the ½" adapter, then screw your new faucet on tightly.
*** Do not use teflon tape anywhere else. Compression fittings don't require teflon tape.***
That's it. You're done. You just reconfigured and replaced your outdoor faucet. Good job.
I took it all a few steps further to make my life of watering even easier. I put on a 4 tap diverter. To it I've attached 2 watering timers (one for my window boxes and one for my sprinkler system), one hose for my backyard and one hose for my front yard.

It isn't particularly pretty but thanks to raising my outdoor water pipe it's a lot neater than it has been in past years and WAY easier to get to. What with it not being hidden behind the compost bin and all. Or in a Corgi's gut.

If you're confused about anything, find whoever it is at your local fix-it store that actually knows something. They'll be happy to check and make sure you're getting the right materials in the right sizes.
This isn't a difficult job at all. I never should have put it off as long as I did. You can easily do this! Every one of you. And most importantly, for all the single ladies ... you can do it too.
→Follow me on Instagram where I show even more of the stuff I do←


Samantha Wark
I actually had this problem before but thankfully I had hired an expert to do it for me.