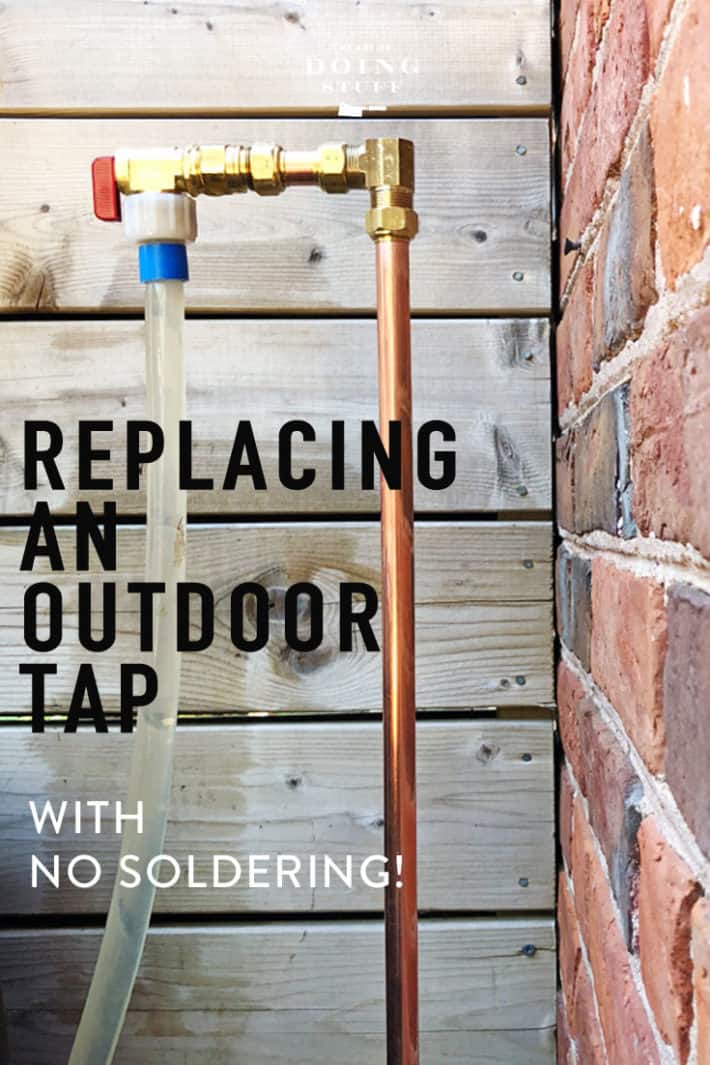
Need to change an outdoor faucet but you don't know how to solder? Don't worry. Times have changed and so have plumbing supplies. Allow me to introduce you to the compression fitting and all the glory it brings. No soldering, blow torches or flux required.

I still need to run some pipe tape to secure the pipe to the wall. I'll get to that in a decade or so.
Fix my leaky outdoor faucet, teach myself to speak French, and perform a dance mashup of All the Single Ladies and Thriller at a royal wedding. For the longest time these were my 3 attainable goals in life and on Saturday, May 19th - the day of Prince Harry and Meghan Markle's wedding - I checked the most difficult one off of the list.
On that day, I fixed my outdoor faucet. It leaked, it was about 4 inches off of the ground, and it was hidden behind my compost bin. Seriously. It couldn't have been in a less convenient place if it were in the intestines of a royal Corgi.
It's a job I kept putting off because a) I was busy perfecting my dance moves and b) I'm not a confident solderer. I can do it, I'm just not particularly good at it. I put this job off for about 10 years. When the leak got so bad this spring that I couldn't turn my outdoor water on I decided I was going to have to suck it up. So I went up to my local fix-it centre and found my favourite long haired helper guy. He's the one who actually knows stuff and is happy to help.
He walked me over to the wall of compression fittings and told me that's what I should use. They're easy to work, don't need soldering and you can configure anything you want with them. Sold.
Welcome to the magical world of compression fittings.

Compression fittings work by compressing together when you tighten them. If you tighten them properly they'll be leak free forever. At least for the foreseeable future. Or until the next royal wedding.
Have a leaky outdoor faucet you want to change? Or maybe you want to make it higher? Here's what you have to do and what you need.
How to Replace a Leaky Outdoor Faucet
- Check to see if your faucet is screwed on or soldered on. If it's screwed on, just use a wrench to unscrew it. Run a single piece of teflon (plumbers) tape around the ½" threads coming off of the adapter then screw your new faucet on. That's all there is to it.
- If your faucet is soldered on, you have to cut the copper pipe it's soldered to using a pipe cutter.
Click here to jump to how to use a pipe cutter. - Once the pipe is cut screw a ½" to ⅝" compression adapter to your copper pipe.* This takes the place of soldering. Tighten it.
Click here to jump to how to install a compression fitting. Once the fitting is on your pipe, just run some teflon tape around the threads of the ½" portion of your adapter then screw your new faucet into place.
* ½" is a typical size for a faucet. ⅝" is a typical size for outdoor plumbing pipes. But it isn't ALWAYS the case so be sure to check your sizes.
How to Reposition an Outdoor Faucet

This setup will give me a new faucet and raise the height of my tap by over 2' without doing ANY soldering.
1.Cut the copper pipe either where it comes out of the house or where it rises to your faucet. make sure you leave enough pipe to fit a compression fitting on. You'll need a few inches.

How to Use a Pipe Cutter: To cut off a piece of copper pipe, put the pipe cutter around it and then twist the knob on the end to tighten it. Turn the entire pipe cutter around the pipe a few times until it moves freely. Then tighten the knob again and repeat. Keep doing this until the pipe is cut.

TIP:
Pipe cutters are cheap and easy to use. Just make sure you get the right size pipe cutter for the size of pipe you have.

2. Sand both of your pipe ends.

The old one to clean it up and the new one because your compression fitting won't fit over it unless you sand it down a bit.

3. Remove the compression fitting from its package and unscrew the nut. Slide the nut over your pipe.

4. Slip the compression fitting over the pipe.

5. Tighten the nut to the fitting, using one wrench to hold the fitting still and the other wrench to turn the nut.

TIP:
Tighten a compression fitting nut until you hear it groan. Once it does that, turn it another ½ a turn. Then STOP. If you over tighten your junction will leak.
6. Continue in this manner until all your compression fittings are on. You configure the run however you want but remember the more adapters you put on, the more likely you are to have a leak somewhere at some point.

7. Run one layer of teflon tape around the threads on the ½" adapter, then screw your new faucet on tightly.
*** Do not use teflon tape anywhere else. Compression fittings don't require teflon tape.***
That's it. You're done. You just reconfigured and replaced your outdoor faucet. Good job.
I took it all a few steps further to make my life of watering even easier. I put on a 4 tap diverter. To it I've attached 2 watering timers (one for my window boxes and one for my sprinkler system), one hose for my backyard and one hose for my front yard.

It isn't particularly pretty but thanks to raising my outdoor water pipe it's a lot neater than it has been in past years and WAY easier to get to. What with it not being hidden behind the compost bin and all. Or in a Corgi's gut.

If you're confused about anything, find whoever it is at your local fix-it store that actually knows something. They'll be happy to check and make sure you're getting the right materials in the right sizes.
This isn't a difficult job at all. I never should have put it off as long as I did. You can easily do this! Every one of you. And most importantly, for all the single ladies ... you can do it too.
→Follow me on Instagram where I show even more of the stuff I do←


My outside faucet is in the mist of our flower bed. The problem is the length of visual pipe connected to the faucet which is in the bricks. Do I need to break some of the bricks to complete the task?
If you get around to attaching the pipe to the wall use a copper band around the pipe. Reason is that copper and galvanized strapping don’t always play well together. You could end up with a leak after a few years.
FYI, love your posts!
Hello Karen,
Can you tell me how I determine what size compression fitting I need to attach to the cut pipe coming from the house?
Thank you!
J
Hi!
I did basically what you did for the 4 tap diverter but... ;) I put a "Y" on the faucet then the timer then the 4 tap diverter. So I only need one timer and it waters everything at the same time. Then I also have a "free hose" that comes off the top "Y" that's shared with the timer, in case I need to just use a hose for something like filling a bucket And yes it isn't pretty but it's way convenient! :) Love your newsletter!!
Thanks Robin! ~ karen!
Hi Karen,
As a useful tip, those pipe cutters are industry standard in bicycle shops too. Perfect way to cleanly cut down handlebars to the correct width for a specific customer.
That makes sense. Good to know! ~ karen
My husband calls that long haired dude The Plumbing Savant. He is ALWAYS helpful and knows his stuff.
I think his name is Mario or something like that. Mauricio? Something you wouldn't expect. ~ karen!
Karen,
There are fittings called "Sharkbite" that are a little more expensive than compression fitting but work very well also.
So Karen, when are you going solar? I power my coop light/motion sensor light with a small solar panel, battery, and regulator. Some tips on making better use of the sun (even in Northern climes) would be welcomed by your readers (me).
I've thought about it just in terms of heating costs, but first I think I'll do as much as possible to insulate my house to see how that does. Solar is getting cheaper but it's still cost prohibitive on a large scale for most people. :/ I'll do some experimenting with it tho. ~ karen!
Well holy shit. That's easy peasy. Our new house has a crappy outdoor faucet that needs attention, I've tried a Rube Goldberg arrangement with acres of teflon tape and it still cries when I turn it on. So I just added "compression fittings" to our shopping list. It's right under "anything that fits me at Nordstrom Rack." NOW I'll have to hide the list from my husband, he freaks out when I spend money on unecessary girly stuff.
I hope you'll tackle gutter leakage some day, we have "that," too. Back of the house looks like Niagara Falls when it rains and no, the downspouts are not blocked. I'm stumped and hubby won't let me climb up on the roof.
Yessssss. Gutters.
You are a fount of knowledge, and I so enjoy your blog. Thanks! Funny, smart, enthusiastic, daring and practical. My kind of friend - even if we are just internet friends. :)
Generally it is better if you clean the copper with sand paper before cutting the pipe. Use a long strip and wrap it around and pull it back and forth.
Why would it make any difference if you cleaned it before or after cutting? ~ karen!
Easier to do and you can do a better job. Do it like polishing shoes. Don’t have to worry about keeping it on the end.
If you're looking for a real fix-it person, you are most likely to find one (before you grow old) at your local hardware store, not at a big-bix store. It might possibly cost a tiny bit more, but this is not a washer-dryer combo, just a few pipe fittings. If we automatically go to the big box stores for everything, we will do the fix-it people out of a job becaseu their store will have to close, and we will lose that precious resource and only have the internet. Wait... Karen is part of the internet... wll ok. Get inspired by the internet but go to the small store for your fix it parts!
Looks great. We just used compression fittings at my mother-in-law's home to fix her outside tap!
I definitely would get a support for your pipe, especially with that much weight in attachments!
Oh yes. I promise. In the very next decade. ~ karen!
You didn’t say, but does it make sense to pre-assemble the new bits together *first* (faucet head, adapter, short pipe, compression elbow, long pipe, compression elbow) and *then* attach the whole shebang to the exiting house water pipe?
That way you can do the pre-assembly in your air conditioned kitchen and only the last connection in the hot sweaty outdoors.
Personally I wouldn't do that because I measure as I go. I place a piece and then that tells me how long or short the next piece has to be. Just less chance for mistakes and less need for accurate measuring. But without giving it too much thought, I'd think it would be possible to preassemble it. ~ karen!
Ok! I'm going to do this! The boyfriend is away and I've been turning on and off the outdoor water by awkwardly reaching behind the washing machine every time I've had to shower or water the plants on the deck for the past few weeks. Shower, tub and garden hose all on same line, long story... Thanks!!
Hey Karen,
I hope you don’t mind, I have a tomato question and I’d really appreciate it if you could help.
So, my DIL has been getting some fancy-shmancy heirloom seeds and planted 2 plants for me this year. She said there was something wrong with the plants and she had to kill them and replant, except mine.
So I have mine in the garden and all the lower leaves look burnt and crinkled and yellow. But the top branches look fine. So I thought I should cut off the lower, crinkled branches because (in my mind) I think they’re putting too much effort into trying to heal the bad part.
Then a neighbor came screaming at me that you can’t cut branches because it’ll leave the cut open and bugs from my les around will come and climb in the open cuts. So do I bandage them or anything?
And now that we’re talking about pruning, you said to prune the suckers but from my farm life, suckers grow out of the root part. What are suckers on tomatoes? And in stringing my tomatoes up, do I need to also string each branch?
Thanks for all your help!
O.K. I can answer a few of those, lol. Search my blog for string training tomatoes. Also search for pruning suckers. As for the lower yellowing branches, it sounds like the plant just wasn't hardened off properly. (it was brought outside from being started inside and got burnt from the sun and wind because it wasn't used to it. You can break the entire lower branches off, nothing bad will happen. But don't take more than 1/3rd of the branches away or the plant will go into shock and you'll get "leaf curl". ~ karen!
Thanks Karen! And the raspberries I planted last summer (thanks to your column) are CRAZY! My 2 tiny plants are now a plot about 4 feet x 4 feet and certainly 6 feet high! And LOADED with baby berries!
It's amazing what fantasies people can dream up to frighten you with. So "bugs" get in through the stem cuts and not through the sucker or leaf cuts? On a tomato, "suckers" are the side stems that emerge between the leaf and the main stem. See this link for nice, clear images and instructions:
https://bonnieplants.com/library/how-to-prune-tomatoes/
And to assuage fears about harming the plant by pruning, here's another article on managing tomato plants:
http://homeguides.sfgate.com/grow-tomato-plants-trimming-lower-leaves-56469.html
Hope you have plenty of tomatoes to enjoy this summer!
Margaret, thanks for the thorough info! That really explained everything.
This looks extremely doable! I am having knee issues (they don’t like to get back up, from being down!) and one day I’ll have to do this to at least one of the outdoor faucets! Thanks for the tips!
Also install a shut-off valve, with a drain, on the inside of the house. In the fall, shut off the valve and drain all of the water from your pipe. You'll avoid nasty burst pipes during freezing weather.
Note - some shut-off valves also come with compression fittings, or handier push-fit connections.
Yes! But that's normally already done. :) This was just on how to replace your outdoor tap. ~ karen!
Oh silly me - of course you've done it! ;-)
Oh. My. God. You have saved me so many was in just the few weeks since I've found you! Of course I can do this -- now!
So far, I've put your Rhubarb Cobbler to good use. (I thought my rhubarb would all go to seed this year with my boredom.) Organized my favorite vintage plates to display. And this week, I will hit the hardware store for plumbing supplies to fix my TWO leaky old faucets! I'll be re-screening my patio door thanks to my cats who like to Velcro themselves to it.
I really enjoy reading every post!
Thanks Trish! Glad to help. ~ karen!
Thank you! You just solved my watering woes. I had no idea such a thing as a 4-Tap diverted existed, that fixing a faucet could be done without soldering, or adding timers would be so simple. I’m going to Lowe’s tomorrow!
Your Lowe's must be better than mine. Nobody at mine knows anything. Our local plumbing parts store guys know everything. If you have a plumbing store, I would start there. I can't solder well enough to plumb with copper so I re plumbed my whole house in PEX, all by myself!!!! All thanks to the guys at my local plumbing parts store and a tool they rented me for $15. Great guys who helped me have a house with plumbing that actually works!
Wow! Good job Lynn.
What's the tool?
It was/is the crimping tool to lock the compression fittings onto whatever length of pex tubing you need. Having a continuous 25-30 ft run of pipe means no leaking along the line. If the ends are crimped correctly, and it's rather obvious if it's been screwed up, there is no leaking!
The other clever part for me was the manifold. Each manifold has one incoming line of cold or hot water and many outgoing lines each with their own shutoff valve. So the toilet has its own shutoff valve on the manifold as does every faucet inside or out all in one place. It came in very handy when the cold water valve in the shower decided it didn't want to shut the water off anymore...