Are you hungry? I'm hungry. Specifically for a hamburger for some reason. A big one. My wish for a hamburger has nothing to do with VCT tiles by the way. I just thought I'd mention it since you're here and we're talking and all.
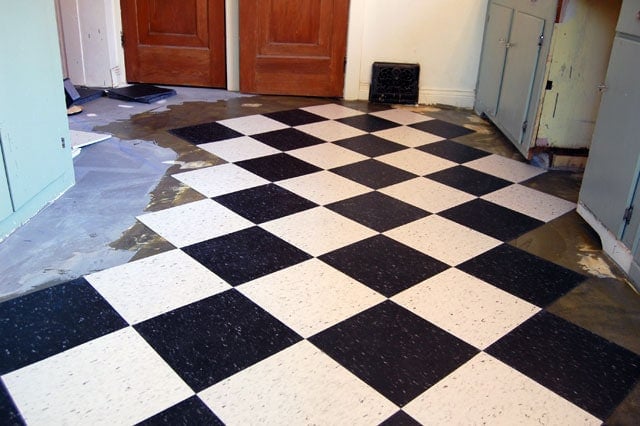
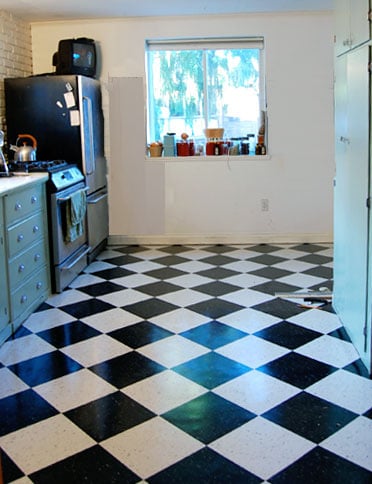
My floor is finished. Done. Complete. I love my VCT (vinyl composition tile). Here's why ...

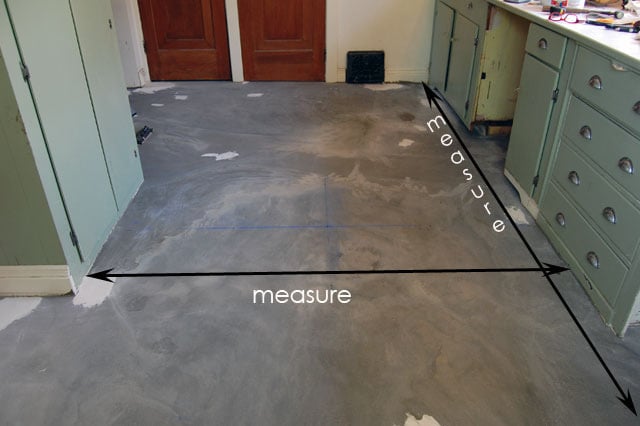
The biggest pain about laying the tiled floor is figuring out the line you're going to lay the tile on.
This is going to get a bit confusing so pay attention.
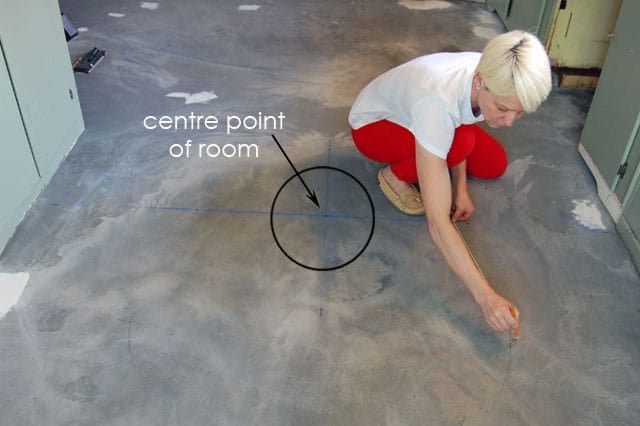
You need to figure out the centre width of your room, and the centre length of your room. Where these two lines dissect is the centre point of your floor. The centre point in the photo below is where the two blue chalk lines cross.
So that's pretty easy actually. And that's all you need to do if you're laying a "checkerboard" floor. Just snap your chalk lines and start working.
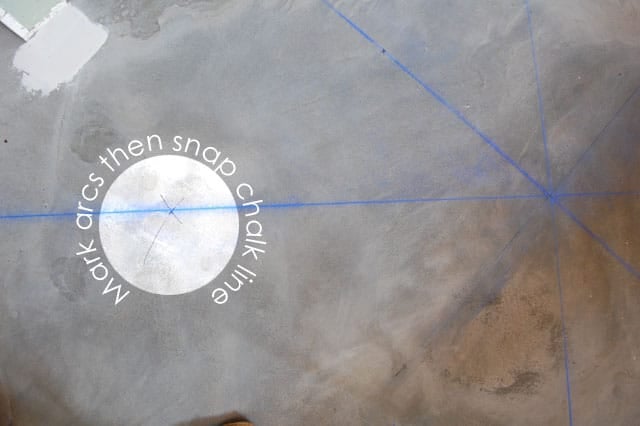
If you’re laying the floor in a diagonal pattern like I did, you need to do a little more measuring. You have to get your two diagonal lines. To do that, measure from your centre point to the nearest wall. In my case that measurement is 3 feet. Then make a mark that's ⅓rd the length of that measurement. In my case, that's 1 foot.
Cut a piece of string that measures longer than 1' and less than the remaining 2'.
Your measurements will be different, but the principal will be the same. 10' from centre point means a mark point of 3'3" and a string length of around 4'-5'.

You're going to tie a pencil on the end of this string and use it to mark your arcs by holding the end of the string on your "x" mark and running the pencil into an arc. Do this on all of the "x" points and where the arcs intersect will be where your diagonal lines are.
I fear I'm not explaining myself well.
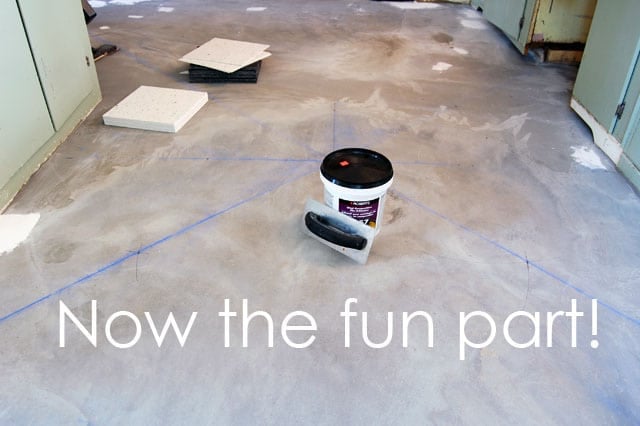
Once you've figured out your lines, the hard part is done. Now you have the fun part of laying the tile to look forward to.
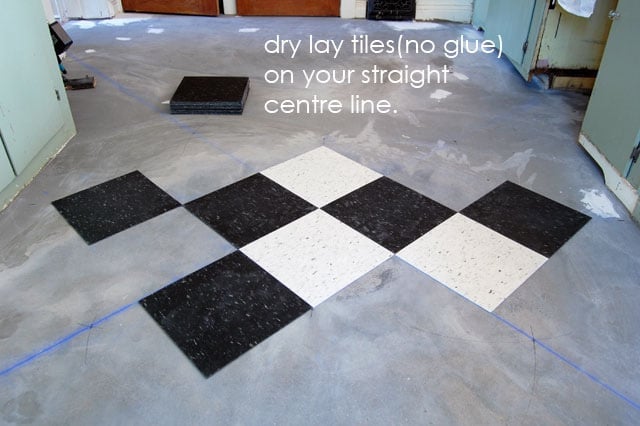
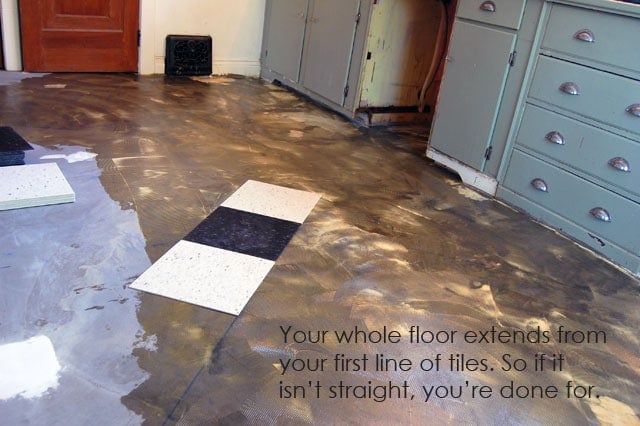
The first thing you should do is dry lay some tiles along your straight line. I'm referring to the row of black tiles in the centre of the room. You'll have two choices. Lay your first tile so it is centred over the centre point, or lay your first tile so the tip touches the centre point (like I did). If you've got your centre points right then you'll have the exact same distance between the walls and the ends of your final full tiles.
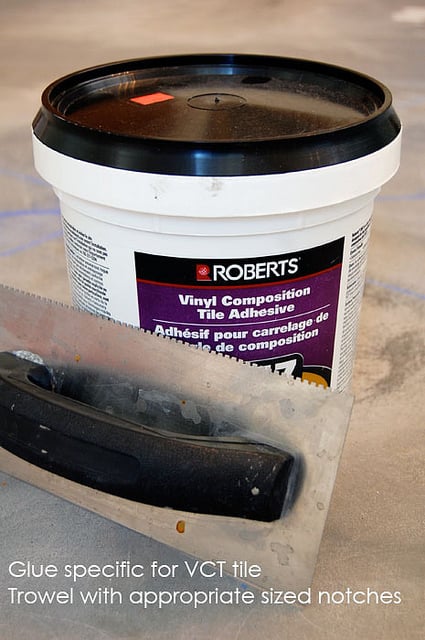
Once you've determined your straight lines are good, it's time to grab your glue and start laying tiles! Buy the glue when you buy your tile and ask for help to make sure you're getting the right glue for the tile you're using. Also read the bucket of glue to see what type of trowel you need. All trowels are not created equal. The distance between and depth of the notches make a difference. Only use the trowel size that's specified on the back of the bucket of glue.
Would you like to save this stuff?
Open up your glue and pour a big glug on the floor.
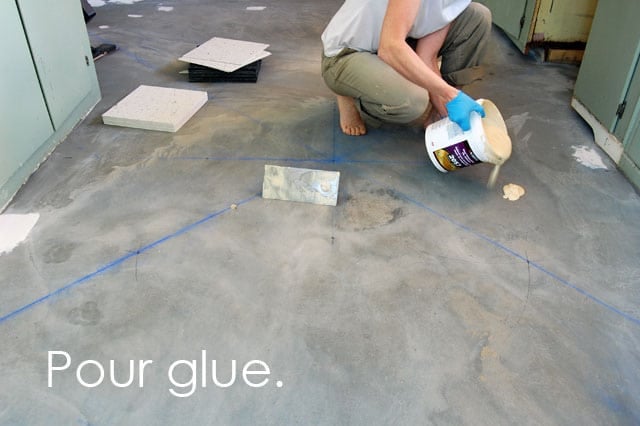
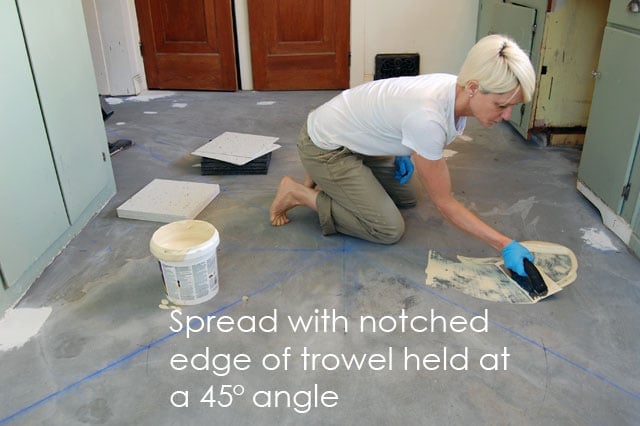
Trowel it out.
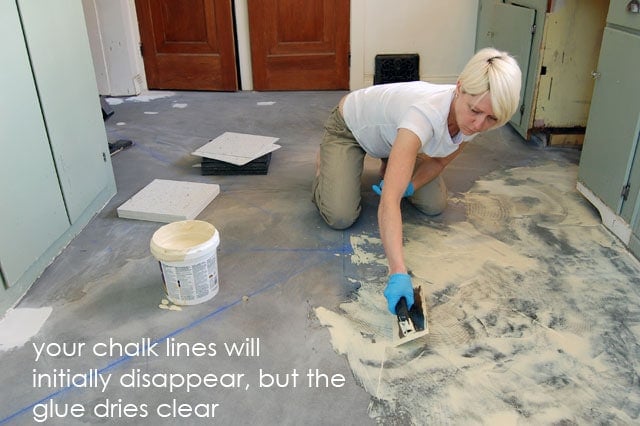

It'll take an hour or two for your glue to get tacky enough to lay your tiles so go take a walk. Or taunt your cats. Or learn a new language.
Once your glue is tacky, it'll stay that way for dayssss. So you literally have a work time with this glue of 2-3 days.
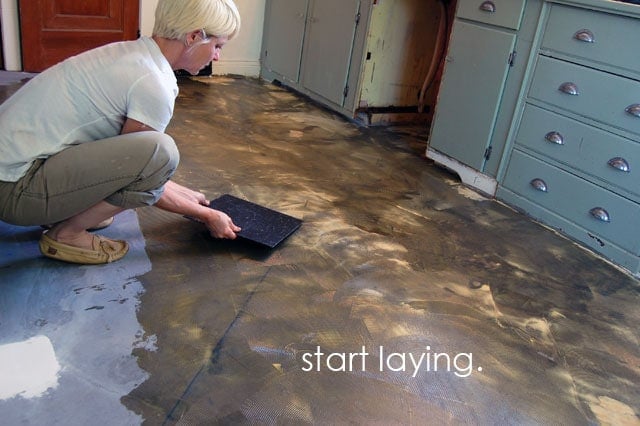
Carefully, carefully lay your first tile. Make sure it is *perfect*.
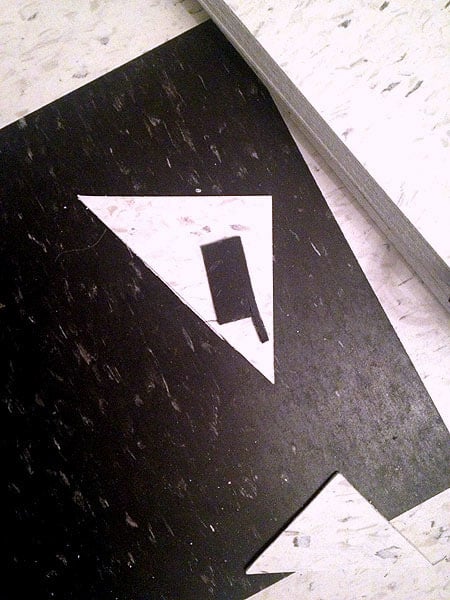
Midway through laying my floor I looked down and saw this, exactly as you see it now. A black cleaver on a white tile. I saw it as a sign. I'm not at all sure what it was a sign of, but it was definitely a sign. It either has something to do with cooking or killing. I haven't decided yet.
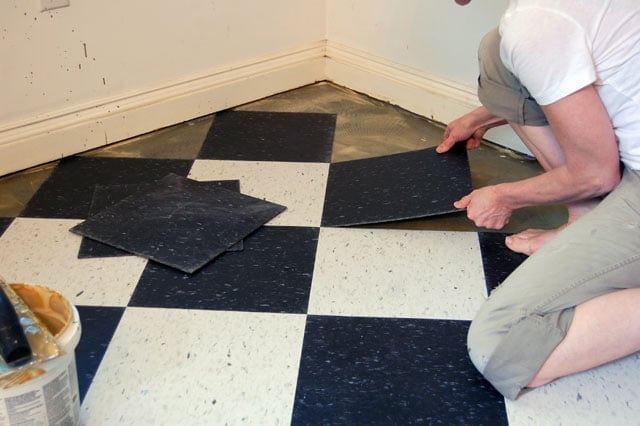
The laying of all the centre (full) tiles will go fairly quickly.
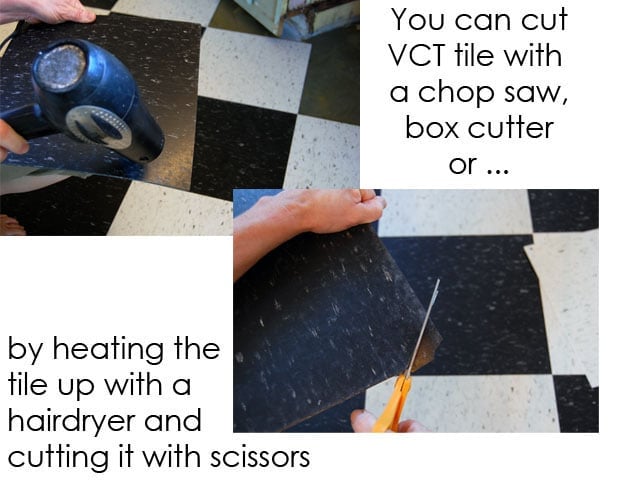
You will eventually get to the point where all of your full tiles are laid and you now need to lay the edge tiles which need to be cut. Some cuts are as easy as cutting a straight line, others that have to go around corners or curved baseboards will be more elaborate cuts.
There are at least 3 ways to cut the tile, but I found the easiest way was to heat it up a bit with a hairdryer and then just cut it with scissors. Next week I'll be doing a short video post on how to cut the edge tiles of a diagonally laid floor. There's a little trick that makes it really easy.
You may find the odd time you've laid a tile that doesn't butt right up to the tile beside it. Sometimes the tiles move while you're kneeling on them, or maybe you just made a mistake.
No problem. It's easy to fix.

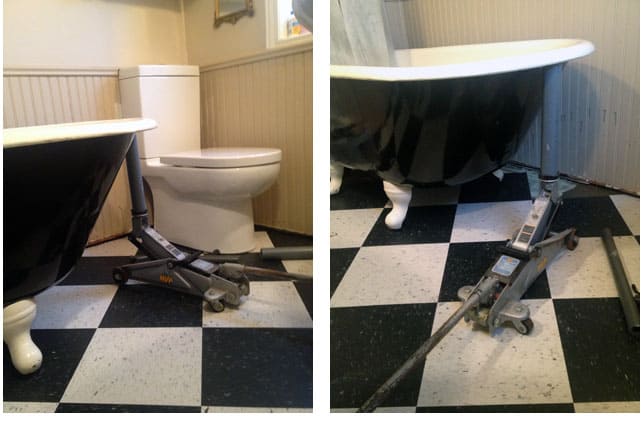
Wondering how one would deal with tiling under a cast iron bathtub?
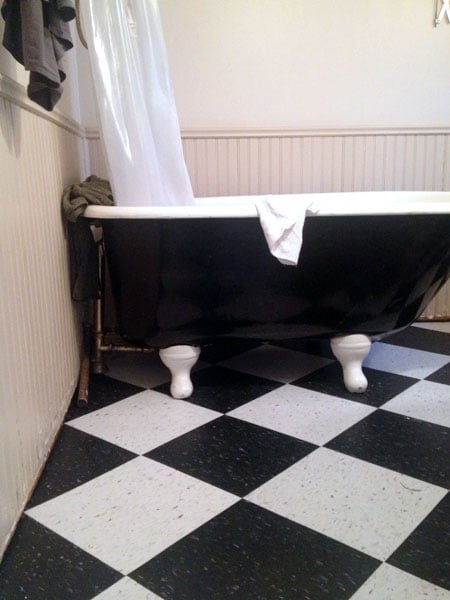
A car jack. After you've trowelled glue underneath and let it set, lift the tub *just* enough to slip your tile underneath the feet.
Done! This is not the final reveal picture of the kitchen, it's just a quick look at the completed floor
This completes my Big Spring Project 2013. I had planned to finish redecorating the mudroom and get new fixtures for the bathroom ... but I've run out of time. It is now summer and I don't want to be doing indoor construction projects. I want to be doing OUTDOOR construction projects. The first of which, will be constructing a rather large hamburger.


Wendy
It looks great, Karen!
Theresa
Love it!!!
Audrey
I absolutely love your floor, Karen. Maybe because ours is exactly the same. On the diagonal is really the 'correct' way to lay the tile. What kind of wax do you use? Would love to know. Adore your blog and the fact that you do so much yourself.
Karen
Thanks Audrey! - I use the wax that's meant for this particular Armstrong flooring. ~ karen!
Lin
As always...an awesome job Karen. It looks very professionally done. Yer the Mike Holmes of doing stuff...making it right! You earned a great big juicy hamburger on this one.
Nancy Blue Moon
Love It!!!..But you lost me at the math part..Checkerboard flooring is my favorite and what we are going to do in our kitchen this year..Or rather HE is going to do only because I can't get down on the floor due to medical issues..well..I can get down..I just can't get back up..lol..Enjoy that burger but I really think you deserve a T-Bone steak!
Elen Grey | Deep in B-ville Writing Over the Garage
We had ceramic tile installed in the kitchen/front hall/powder room. Biggest mistake of my life.
I would love to put something like this in my office. Would it stand up to the rolling around on the office chair exercise?
How would I prep a plywood floor for that product?
It's gorgeous, gorgeous, gorgeous. Well done.
Karen
Hi Elen - It would definitely stand up. This flooring is meant for commercial use. Like restaurants or schools. Just make sure the plywood is in good condition. Very smooth. If it isn't you need to lay new plywood, or pour self levelling concrete over top. ~ karen!
Jeannie B
Your new floor really looks wonderful Karen. Do people still wax floors? I have an old floor polisher in my basement if you want it. Complete with lambswool buffing pads. It hasn't been used for many years. Did spreading that glue, give you a headache? Sure hope you had lots of ventilation. A lot of work but the completed project looks charming.Well done!
Call Me Patty
Eeeps! You forgot to mention to lay the white tiles with the pattern all going the same way, and then the black tiles all going the opposite direction. We did pink and white tile YEARS ago in our kitchen. Got SO sick of the pink. If I had known that I could have maybe removed the pink with black, by just heating it up. I would have tried that instead of remove it all. Love the durability of the vinyl tile.
Karen
That's true. I did forget to mention that. However, now that you mention it, some people prefer to have a completely random laying of them. ~ karen!
Leslie
Congratulations! It looks great.
joanna
Bravo, Bravo, Bravo!!!!!!!
ruth
It is amazing! But I almost go into the fetal position at the thought of such a project. You are courage personified!
toekneetoni
very impressive! :D
gogothrift@etsy.com
LOVE it.
and whoda thunk....a car jack
DavidW.
WOW! That looks really lovely. I bet that tile is more forgiving than ceramic tile if glassware should happen to roll off the counter (don't ask). I wish I had the courage to take up the builder's generic beige ceramic tile (which is in perfect condition and does not need to be replaced.. just that I hate it) that came with the house and replace it with more colourful VCT. When I mention it to my wife she just looks at me like I am crazy. Thanks for the inspiration and tutorial :).
karol
"pour a big glug on the floor"
I love onomatopoeic words. Even though I had never heard that before, GLUG was the perfect word for pouring glue.
and I love how you work bare footed. Great job.
Kat
Yup, it's a thing of beauty! Have you stood there and stared at it for hours on end and made excuses just to go to the rooms to stare at it some more LOL? I would have!
Susan
It looks amazing! Thank you for telling us about VCT tiles, as well as showing the entire process of prepping and laying this floor. You make it look so simple, and it really is if you don't let the thought of doing it overwhelm you. It's all manageable, actually, isn't it!
Mary Werner
Diagonal sure makes it look larger. Love it!
Deb J.
Very nice! Have always loved a black and white checkerboard floor and am a diagonal fan myself - even if it does complicate pretty much everything. However, when you started with wanting a hamburger, I expected a comment (rant) on smeat:)
One question - would these tiles work on an unheated plywood floor that flexes a lot? I have a cottage floor that needs a solution. It's currently carpet. Ick. Carpets and cottages DO NOT go together!
Karen
Deb J - These tiles work perfectly just about anywhere. But you do have to have a perfectly flat surface. That means no bumps or bubbles and no cracks. Even a small speck of dirt will end up looking like a mountain under the tile after it's laid. So long as your plywood is in good shape and not splintering or anything you'll be good. ~ karen!
Alice
Karen, looks great! And you make it seem so easy...my husband and I laid sheet linoleum in our kitchen many, many years ago, and it was a real test of our marriage!
(Just a couple of typos, though...I think it must cost 0.85 dollars, or 85 cents a square foot, not 0.85 cents. Also, your piece of string should be longer than 1', not 1". Well, it should be longer than 1", of course, but you know what I mean...)