Are you hungry? I'm hungry. Specifically for a hamburger for some reason. A big one. My wish for a hamburger has nothing to do with VCT tiles by the way. I just thought I'd mention it since you're here and we're talking and all.
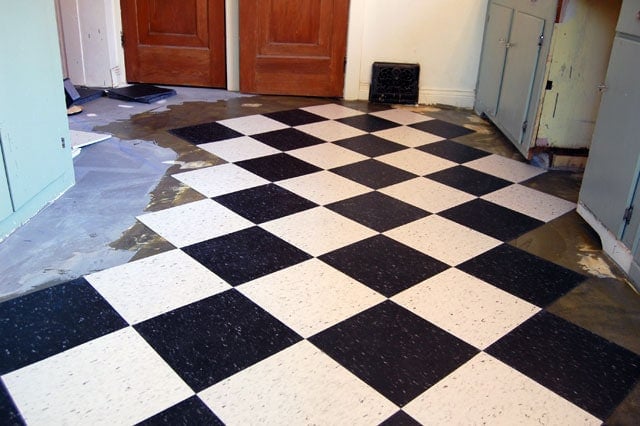
My floor is finished. Done. Complete. I love my VCT (vinyl composition tile). Here's why ...

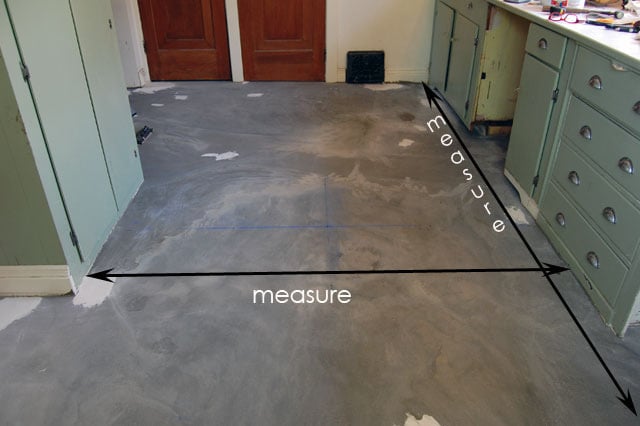
The biggest pain about laying the tiled floor is figuring out the line you're going to lay the tile on.
This is going to get a bit confusing so pay attention.
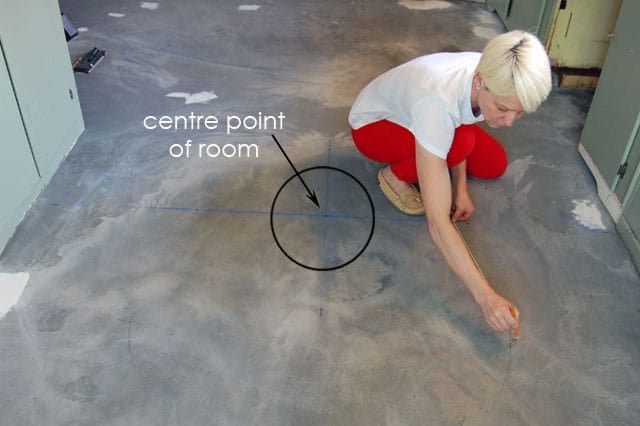
You need to figure out the centre width of your room, and the centre length of your room. Where these two lines dissect is the centre point of your floor. The centre point in the photo below is where the two blue chalk lines cross.
So that's pretty easy actually. And that's all you need to do if you're laying a "checkerboard" floor. Just snap your chalk lines and start working.
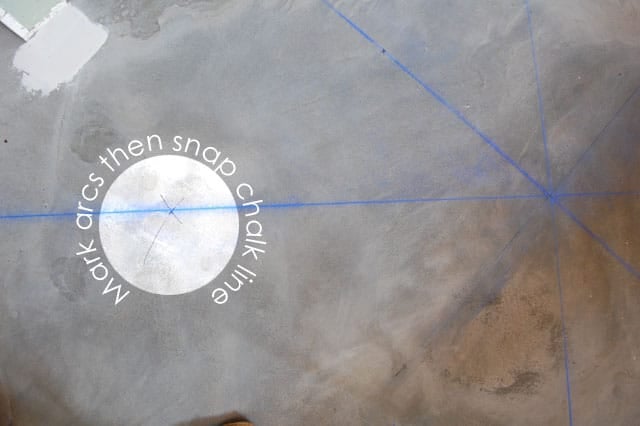
If you’re laying the floor in a diagonal pattern like I did, you need to do a little more measuring. You have to get your two diagonal lines. To do that, measure from your centre point to the nearest wall. In my case that measurement is 3 feet. Then make a mark that's ⅓rd the length of that measurement. In my case, that's 1 foot.
Cut a piece of string that measures longer than 1' and less than the remaining 2'.
Your measurements will be different, but the principal will be the same. 10' from centre point means a mark point of 3'3" and a string length of around 4'-5'.

You're going to tie a pencil on the end of this string and use it to mark your arcs by holding the end of the string on your "x" mark and running the pencil into an arc. Do this on all of the "x" points and where the arcs intersect will be where your diagonal lines are.
I fear I'm not explaining myself well.
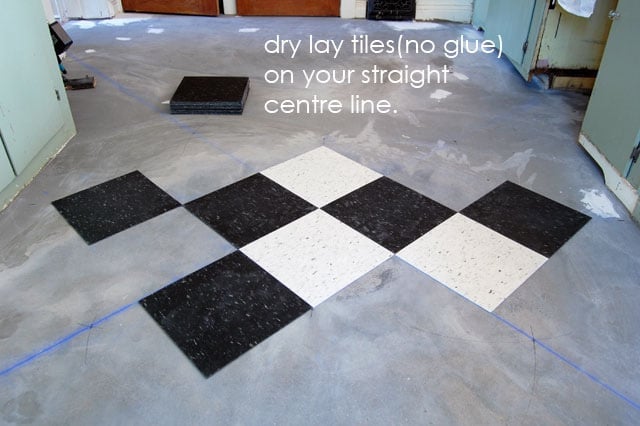
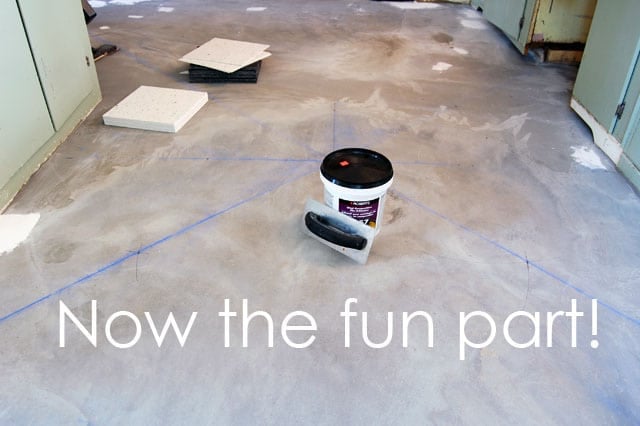
Once you've figured out your lines, the hard part is done. Now you have the fun part of laying the tile to look forward to.
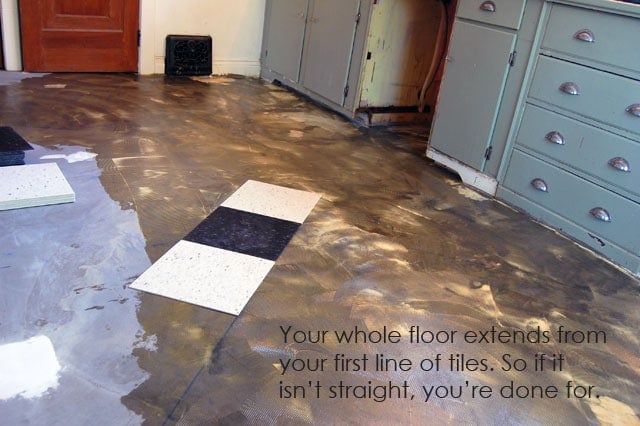
The first thing you should do is dry lay some tiles along your straight line. I'm referring to the row of black tiles in the centre of the room. You'll have two choices. Lay your first tile so it is centred over the centre point, or lay your first tile so the tip touches the centre point (like I did). If you've got your centre points right then you'll have the exact same distance between the walls and the ends of your final full tiles.
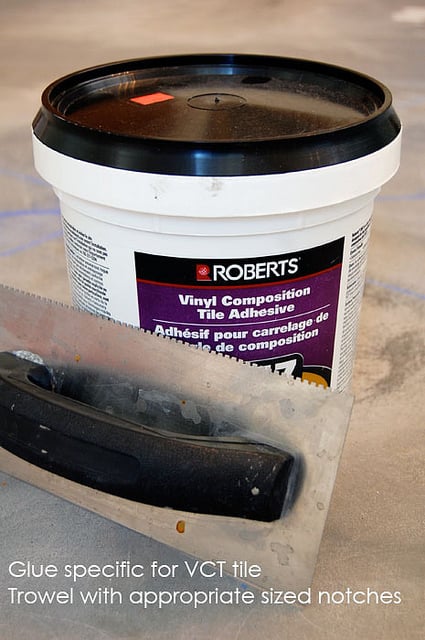
Once you've determined your straight lines are good, it's time to grab your glue and start laying tiles! Buy the glue when you buy your tile and ask for help to make sure you're getting the right glue for the tile you're using. Also read the bucket of glue to see what type of trowel you need. All trowels are not created equal. The distance between and depth of the notches make a difference. Only use the trowel size that's specified on the back of the bucket of glue.
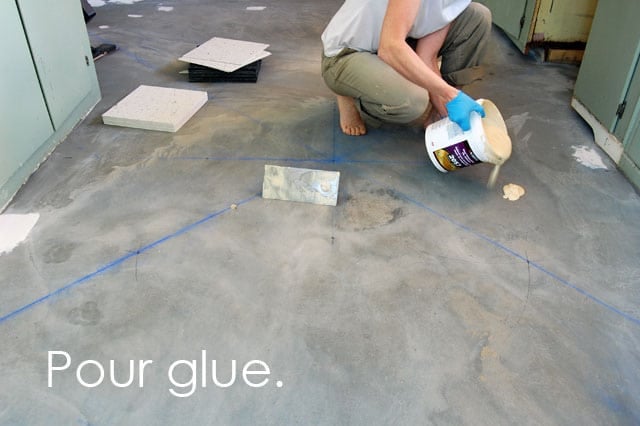
Open up your glue and pour a big glug on the floor.
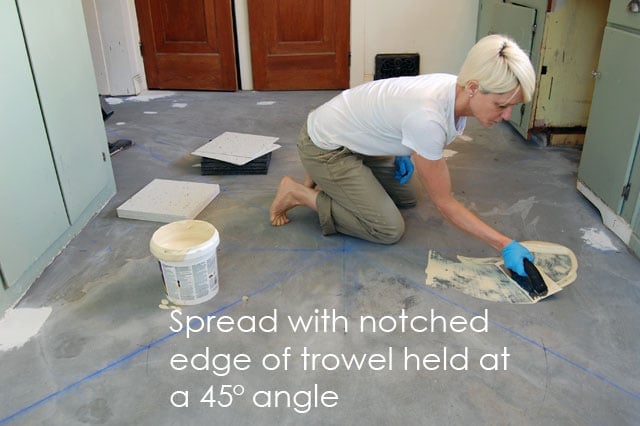
Trowel it out.
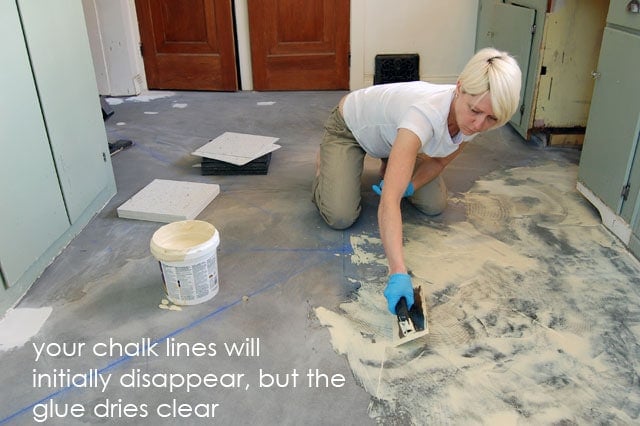

It'll take an hour or two for your glue to get tacky enough to lay your tiles so go take a walk. Or taunt your cats. Or learn a new language.
Once your glue is tacky, it'll stay that way for dayssss. So you literally have a work time with this glue of 2-3 days.
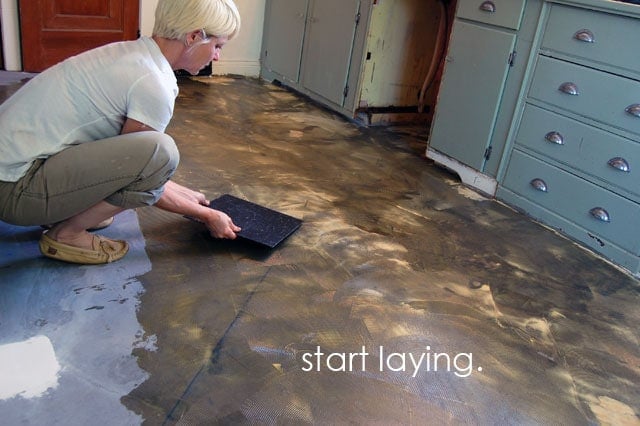
Carefully, carefully lay your first tile. Make sure it is *perfect*.
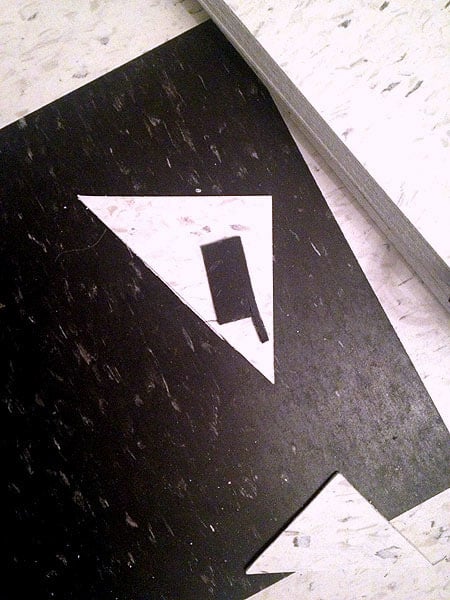
Midway through laying my floor I looked down and saw this, exactly as you see it now. A black cleaver on a white tile. I saw it as a sign. I'm not at all sure what it was a sign of, but it was definitely a sign. It either has something to do with cooking or killing. I haven't decided yet.
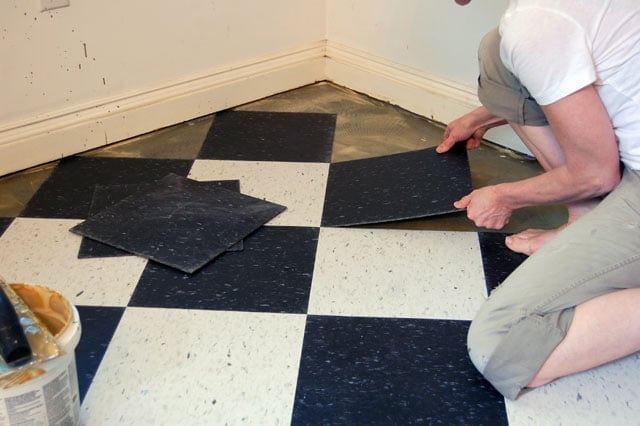
The laying of all the centre (full) tiles will go fairly quickly.
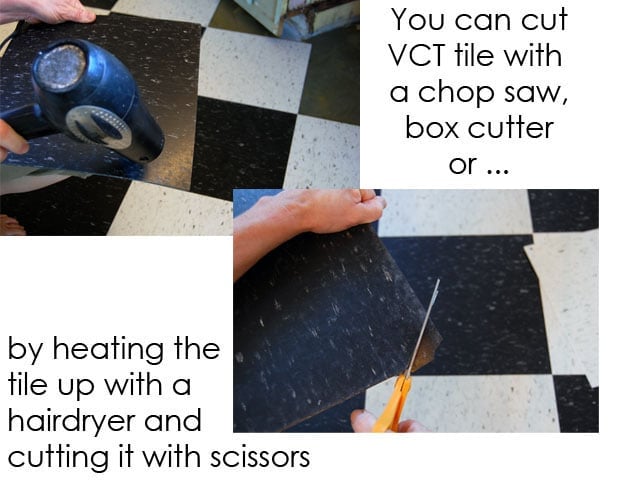
You will eventually get to the point where all of your full tiles are laid and you now need to lay the edge tiles which need to be cut. Some cuts are as easy as cutting a straight line, others that have to go around corners or curved baseboards will be more elaborate cuts.
There are at least 3 ways to cut the tile, but I found the easiest way was to heat it up a bit with a hairdryer and then just cut it with scissors. Next week I'll be doing a short video post on how to cut the edge tiles of a diagonally laid floor. There's a little trick that makes it really easy.
You may find the odd time you've laid a tile that doesn't butt right up to the tile beside it. Sometimes the tiles move while you're kneeling on them, or maybe you just made a mistake.
No problem. It's easy to fix.

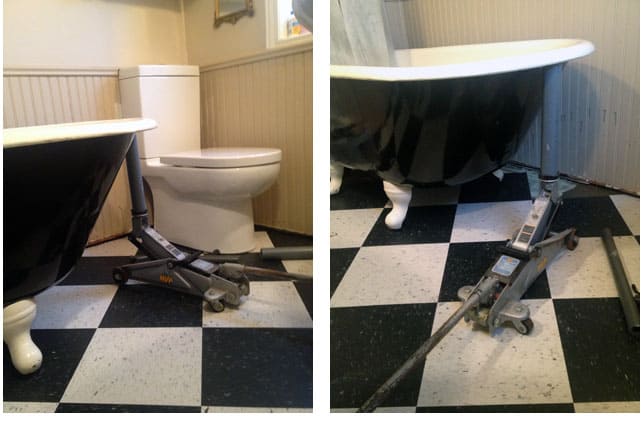
Wondering how one would deal with tiling under a cast iron bathtub?
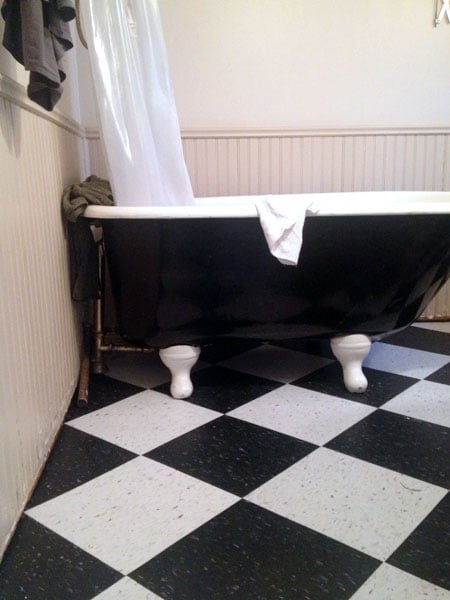
A car jack. After you've trowelled glue underneath and let it set, lift the tub *just* enough to slip your tile underneath the feet.
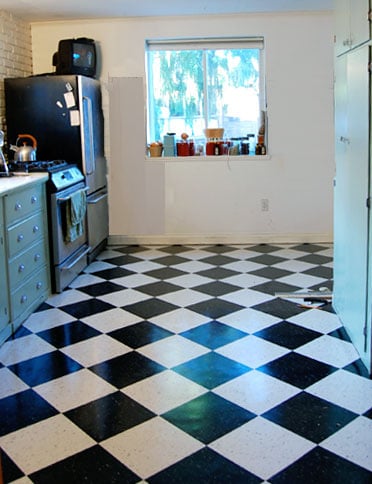
Done! This is not the final reveal picture of the kitchen, it's just a quick look at the completed floor
This completes my Big Spring Project 2013. I had planned to finish redecorating the mudroom and get new fixtures for the bathroom ... but I've run out of time. It is now summer and I don't want to be doing indoor construction projects. I want to be doing OUTDOOR construction projects. The first of which, will be constructing a rather large hamburger.


love it! great job karen..as usual
Looks charmingly nostalgic! I put the exact same stuff down, in the same pattern, in my former family room and it wore like iron. It will 'settle' around any surface imperfections, revealing lumps and bumps, so it's definitely worth all that extra prep work to create a perfectly smooth subfloor.
Congratulations on a beautiful job. The floor looks great.
I have a question as I am trying to figure out the cost of retiling my bathroom after the contractor failed to level my floor before the current tile went in. (Grrrrrrrrrrr.)
I know you used self-leveling concrete to level your floor, but what are the white patches I see? Are they something to do with the radiant heat you put in?
Thanks
Hi Tigersmom - The white patches are just bits of Durabond 90, a compound filler. A few areas of the self leveller needed a bit of help after it was dried, so I just sanded and/or filled them. ~ karen!
Thanks. I would never have thought to check and see if the leveler did it 's job correctly and then I would have a wonky floor again. : /
It looks fabulous. Great job. Now off to the great outdoors. Can't wait to see what's next.
I love it!! What a lot of work you have done Karen. I am excited for you this winter when your feet will be toasty and your head will be cool.
I'm so glad to see you went against the 'norm" by not choosing ceramic/stone flooring! I honestly don't see the attraction. It's always cold (unless you pay more to heat it) if you drop anything~it's done for, and it kills your back after standing on it for any length of time!
Your floor looks perfect...and comfortable!
Like I said to my Sista Marilyn, "That Karen amazes me". Good job girl!
Beautiful, as usual, Karen ! Is there NOTHING you can't do ?????? Or is that isn't there ANYTHING you can't do ??? How's about, can you do EVERYTHING ??? ;o)
Is there anything you can't do, Karen? (don't answer that question). Just when I think you can't surprise me more, you do. Beautiful job!! Great explanation (but not enough for me to ever tackle such a project). Can I just hire you?
LOL. No. NO I'm not for hire. :) I'm open to free compliments though.Thanks! ~ karen!
I love this flooring and want to use it when we redo our kitchen next year - do you need to seal it with anything?
Hi Shana - You don't seal it per say, but you do wax it. The first time you wax it you have to put on 4-6 coats of wax. Then you just wax every 6 months - year or so. I'll probably wax once every month or two because I like the shine. ~ karen!
What product do you wax with?
you are my HERO!
hero
Boy, I envy you for being so able, gifted, crafty, ingenious.
Wish I knew how to renovate my house by myself - I would probably do a better job than the guys who worked here when we bought it... (it looks like you sure did!)
What a fine job!! You made it look quite easy right from levelling to laying the tile - pictures made it easy to follow along. Enjoy that we'll deserved burger!
Oh, and the cleaver thing? Really, it just appeared? That is one fine sign my friend. I thought you were going to incorporate it into your design as it IS your kitchen logo and all.
You are A-mazing! Hope that burger tastes as great as your floor looks.
WOW!!!!! That floor looks amazing! Totally goes with the character of your house.
Thanks Robbin - It *must* look like it's always been there because people have come over and not even NOTICED the floor, LOL. When I tell them I just laid it they say Really? I thought this was always here. ~ karen!
Hi Karen,
I've been reading your wonderful blog for a few months now, but have never posted. Thank you for all you do!
I have the same claw foot tub as you with a shower attachment. I really need to replace our ugly, yellow linoleum that has been in the bathroom since 1950. How did you deal with the issue of the pipes that are attached to the tub when you jacked it up?
Thanks for any help.
Hi Audrey. Well we did have to remove the tub from the room entirely in order for me to be able get the ceramic tile out. That was the hard part. I hooked it back up again then when the time came to tile under the tub (and the pipes were all hooked up again) I just lifted with the jack a TINY little bit. Just enough to slip the thin tile under the foot. There was enough play in the pipes to allow for the slight movement. - karen!
Wow! That looks great! Makes me want to go to my kitchen and get another big bowl of Szechuan Carrot Soup! Mmmmm!
Beautiful, beautiful!
I love it!