So you're wondering about building your own wood fired pizza oven? Good for you. So was I! So I did the research, built my oven and love it. This is part 3 in my step-by-step guide to building your own pizza oven.

Welcome to the final tutorial on how to build your very own cob pizza oven so you can be the envy of every single person you know. Unless they too happen to have built a cob pizza oven. But yours will probably be nicer soooo you're still going to be the envy of every single person you know.
So far I've shown you how to build your pizza oven base, create your sand form and mix and apply your cob.
The first cob layer of your oven is the thermal mass layer. It's what heats up. And does it ever heat up. A pizza oven like this will generally heat up to anywhere from 800 - 900 degrees Fahrenheit.
It's those temperatures that create the perfect pizza. A crisp crust and bubbling top that cooks in around 2 minutes.
Some people say 90 seconds but that hasn't really been my experience. 2 minutes really is closer to the truth.
That really high temperature is important so you want to do everything you can to hold in as much heat as possible. That's where the insulation layer of your oven comes in.
The insulation layer is made up of a mixture of lay and straw which is has great insulating properties because of the air in the centre of each stick of straw.
The insulation layer is really just straw with enough clay mixture to make it bind together. There's WAY more straw than clay.
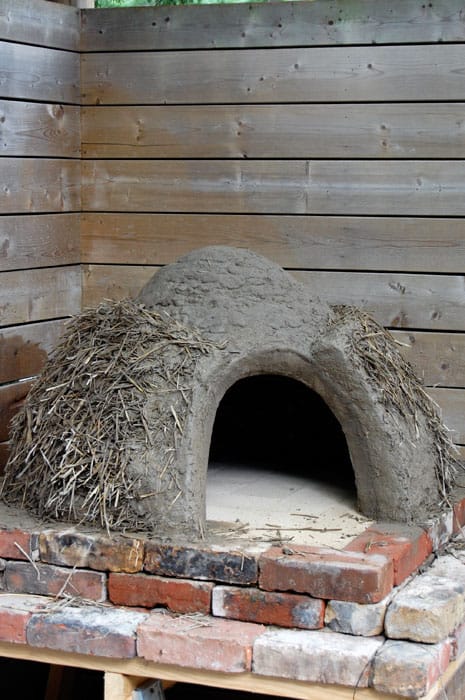
When all of your insulation layer is mixed up you can start applying it over your cob oven. It needs to be a minimum of 4 inches thick. The thicker the better. If you have it in you to do 6 or 8 inches you'll lock in even more heat.
It's quite obvious from the male pattern baldness that mine is a male pizza oven.
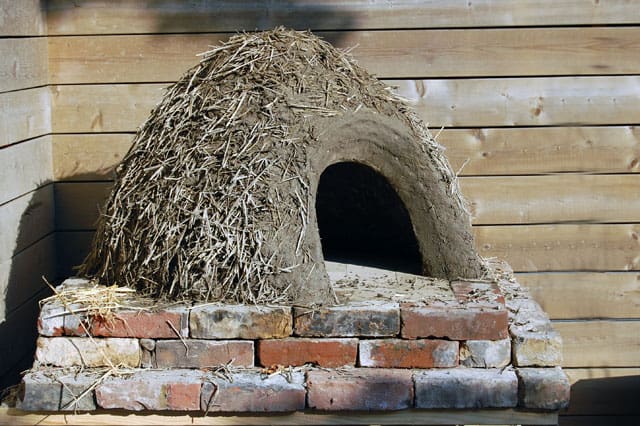
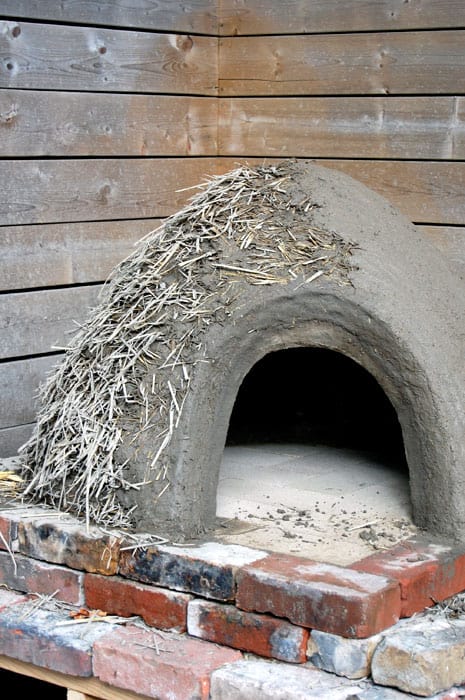
So after the insulation layer you're left with something of a muppet. Now I don't necessarily mind having a pizza oven that looks like Animal, but I knew I wanted something neater for my backyard. I also knew I wanted to do a layer of lime plaster over my oven. Applying the lime plaster would be a lot easier over a smoother surface.
So I did a very thin layer of the original cob material (made of clay and sand) thinned out a tiny bit.
Would you like to save this stuff?
Here's a tiny instructional video. Very tiny. Slightly instructional.
Insulation layer of cob oven
Mixing up the insulation layer for a cob pizza oven.
Now if you want, this can be the end of the pizza oven building, but most people like to weatherproof it. The cob will eventually just wash away if you don't protect it from the rain. It'd take a while, but it would happen.
So if you want this oven to last you have to do a layer of lime plaster over it. Lime plaster (made with powdered hydrated lime) is the best thing to use to weatherproof your oven because a) it's waterproof and b) it breathes. Like a porpoise.
A pizza porpoise.
I finished the insulation layer of my oven late last August or so. I didn't get around to the weatherproofing lime layer until a few weeks ago so I had to keep my oven covered with a tarp all winter and whenever it was raining.
The hydrated lime needs to sit for a few weeks at least to make it useable. You mix the powdered lime (you can get powdered lime at construction supply stores and stores that sell landscaping stones) with water and let it sit to "slake". The longer it sits, the more water it absorbs the better consistency it will be. The lime plaster then needs to be mixed with sand and applied to the pizza oven with a trowel.
This step has to be done in moderate temperatures with no chance of frost for a while. So because of the timeline I couldn't do my lime plaster step until the beginning of this summer.
The oven gets a minimum of two (3 is better) coats of lime plaster. One part hydrated lime with 3 parts sand. Each coat needs a week in between to cure. You don't want the lime to "dry", you want it to cure by reacting with carbon dioxide in the air. So you need to throw a tarp over the oven for a week to let it properly cure as opposed to air dry.
I meant to get to how I finished the base of my pizza oven today too but there just wasn't time. Besides. You can only absorb so much in any given post before you stop caring. So I'll show you the base and explain a little bit of how I did it later.
I'm finally done every step of my pizza oven and tomorrow I'll have a video showing you the whole pizza making process from the lighting of the fire to the eating of the pizza.
If THAT doesn't convince you to build your own pizza oven nothing will. If that's the case, that's O.K. You don't HAVE to build a pizza oven. I mean you're your own person. You don't have to do what all the cool kids are doing. It's perfectly fine to be like everyone else.
But it's better to be like me.
LOLOLOLOL! Oh my lordddd. I REALLY made myself laugh with that one.
→Follow me on Instagram where I often make a fool of myself←


Shannon
I noticed you have a new pizza oven what happened to the one you built
Karen
Hi Shannon. The forgot to cover the pizza oven with a tarp in time a couple of autumns ago. It got wet and froze. The entire exterior cracked and broke apart. I either had to rebuild from scratch or buy one so I thought I'd try what a store bought one is like. I got the Gozney Dome. I prefer my homemade pizza oven, but the Dome has the added advantage of being able to be hooked up to a propane tank for when I don't feel like paying attention to a wood fire. ~ karen!
Kat
Looks like your post is still going strong. I am on my last last insulation layer and boy, it’s been hard work! I wanted to see someone just do the straw layer, so thank you. I had help with the foundation from friends and then it’s been me alone! Thanks for the video. You’re funny and it’s much appreciated!
Karen
Hi Kat! Good luck! Go big on the insulation layer! The more you insulate the better and longer the oven will hold heat. ~ karen!
Rita
Thanks for that. I haven't laughed so hard in a long time. :0)
Rita
Juanjo Antoñanzas
En un horno de pizza, puedo asar un cordero se 6 Kilos?
Karen
Creo que sí, sí.
Paula Ciaravino
Hi Karen,
I just wanted to write you a note of thanks for documenting your pizza oven build. Your directions are very easy to understand.
Well, two years ago I convinced my family that we too could build a pizza oven like yours. So during the summer of 2018 we built it and we’ve used it so many times from spring through fall! We love it! Our winters are cold here in New Jersey so it just gets covered up with a tarp. Although we never completed the waterproofing with lime plaster so when it rains we cover it. It’s held up very well, except for a little bit of crumbling around the door.
Now we finally are getting ready to waterproof it. I’ve decided to build a new door frame out of clay bricks using an arched plywood mold. Then we’re going to put a ceramic fiber mat and chicken wire over the oven. Finally we’ll put refractory cement and then the lime plaster. I’ll send you a pic and let you know how it all worked out. Thanks again, Paula
tom
I want a woman like Karen!
Di
Love your tutorial. Just wondering how hot the outside gets. You have built yours near a wooden fence. Is there not a risk of fire.
Karen
If you build it properly the outside doesn't get hot at all. You need to build a good insulation layer to hold the heat IN the pizza oven so you can cook in it. Therefore, that heat also doesn't escape out. You can literally hold your hands on the outside of it and feel nothing. ~ karen!
Cassie
HI Karen
Did you have to wear any special respirator, goggles etc when working with the lime? I was reading it was really dangerous to use.
Rasmus Hansen
Hello, first thanks for sharing your work. It is lovely and after much internet research among the absolute best instructions. I live in rainy Denmark, and want to avoid cement for construction - so I have some questions regarding the lime protection you have made (I would have loved to see that in photos and vids as well). Can you tell me exactly what were the ingredients for this (aprox. amounts etc.) and also how well does it sustain the elements? Thanks again! Rasmus
Maria Berg Roholt Mortensen
Can I ask for the ratio of the cob insulation layer? :)
Thanks for sharing such a nice and hilarious tutorial of a great project!
Marilyn Majalca
Just wanted to say that we have referred to your posts many times during our recent oven making project (along with the Kiko Denzer book. Your info has been very helpful and we hoe to fire it up this next week. Thanks for your great blog! Marilyn
mike
can you still use the oven when the lime is curing?
Laura Ingalls Gunn
Lightbulb moment. The horno stops at the adobe phase. As I mentioned in my post the Red Willow people just add another layer of adobe to the horno oven once a year because as you said, it does wash away during the course of the year. Perhaps the addition of the lime plaster is what makes a cob oven a cob oven. Now I am going to have to go rogue and google "how to construct a beehive oven" to fully satisfy my thirst for mindless knowledge.
As usual I have been left thinking "Is there anything Karen can't do?" Bravo.
Karen
There's lots of things I can't do. Many, many, MANY things. From the looks of the picture the homes have lime plaster on them. But I could be wrong. The beehive oven is just shaped more like a beehive. I think it's more traditionally a North American shape but I could be totally wrong. ~ karen!
Jamie
Hello again,
Firstly, I have a great pic of my daughter now hung on the wall, transferred onto a bit of old pallet wood... admittedly, I went Mod Podge for this as my printer destroys wax paper!!! Never the less, I shall be persevering with your much quicker option and as I am possibly the most impatient person alive, I need speed. (errm not the white snowy stuff)
So the pickles are currently sat in a bowl of ice and I am scratching my head at what to do next!
I love this cob oven thing, always liked the idea but never really thought it was something I could do but this has proven otherwise. Sadly for me, we rent our home and there is no way on earth that the landlord would agree to this in the yard so basically I am going to move just so I can build one!!!
They seem great for other cooking, not just Pizza. I wonder, can you (aside from bread) cook other things in them too? ie a whopping great joint of pork or beef, spuds (potatoes), Landlords?
Have you cooked anything aside from Pizza and loaves?
Thanks again Karen
J
Barbie
Love it, now I have to keep catching up on your posts to see if you actually make a pizza with it...................................
Stephbo
It never in a million years would have occurred to me to build a pizza oven in my back yard. But now I think I have to have one. Now I just need my own backyard to build one in....
Rita
Thanks for that. I haven't laughed so hard in a long time. :0)
Rita
Lianne Raymond
OK, you've pushed me over the edge. I'm getting the mud girls over here this summer and having an oven building party. I want one, but don't want to do it myself.
http://mudgirls.wordpress.com/about/
DD
I love the mudpie aspect of this project...