So you're wondering about building your own wood fired pizza oven? Good for you. So was I! So I did the research, built my oven and love it. This is part 3 in my step-by-step guide to building your own pizza oven.

Welcome to the final tutorial on how to build your very own cob pizza oven so you can be the envy of every single person you know. Unless they too happen to have built a cob pizza oven. But yours will probably be nicer soooo you're still going to be the envy of every single person you know.
So far I've shown you how to build your pizza oven base, create your sand form and mix and apply your cob.
The first cob layer of your oven is the thermal mass layer. It's what heats up. And does it ever heat up. A pizza oven like this will generally heat up to anywhere from 800 - 900 degrees Fahrenheit.
It's those temperatures that create the perfect pizza. A crisp crust and bubbling top that cooks in around 2 minutes.
Some people say 90 seconds but that hasn't really been my experience. 2 minutes really is closer to the truth.
That really high temperature is important so you want to do everything you can to hold in as much heat as possible. That's where the insulation layer of your oven comes in.
The insulation layer is made up of a mixture of lay and straw which is has great insulating properties because of the air in the centre of each stick of straw.
The insulation layer is really just straw with enough clay mixture to make it bind together. There's WAY more straw than clay.
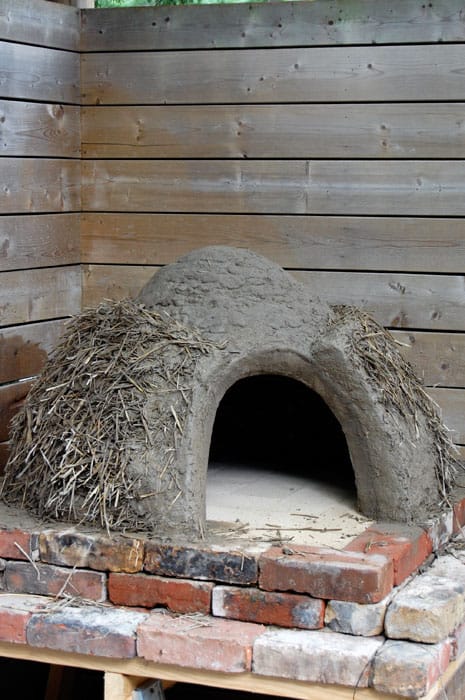
When all of your insulation layer is mixed up you can start applying it over your cob oven. It needs to be a minimum of 4 inches thick. The thicker the better. If you have it in you to do 6 or 8 inches you'll lock in even more heat.
It's quite obvious from the male pattern baldness that mine is a male pizza oven.
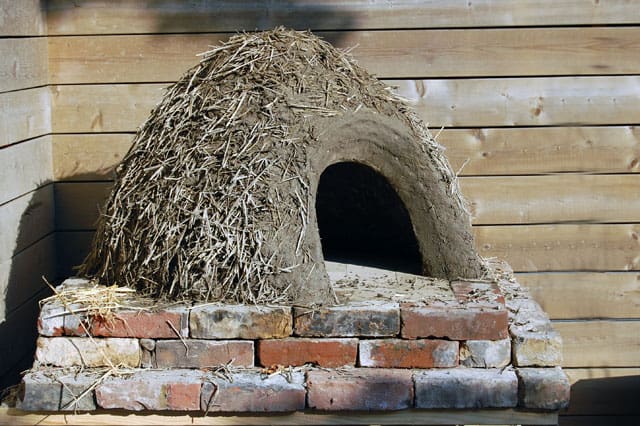
So after the insulation layer you're left with something of a muppet. Now I don't necessarily mind having a pizza oven that looks like Animal, but I knew I wanted something neater for my backyard. I also knew I wanted to do a layer of lime plaster over my oven. Applying the lime plaster would be a lot easier over a smoother surface.
So I did a very thin layer of the original cob material (made of clay and sand) thinned out a tiny bit.
Would you like to save this stuff?
Here's a tiny instructional video. Very tiny. Slightly instructional.
Insulation layer of cob oven
Mixing up the insulation layer for a cob pizza oven.
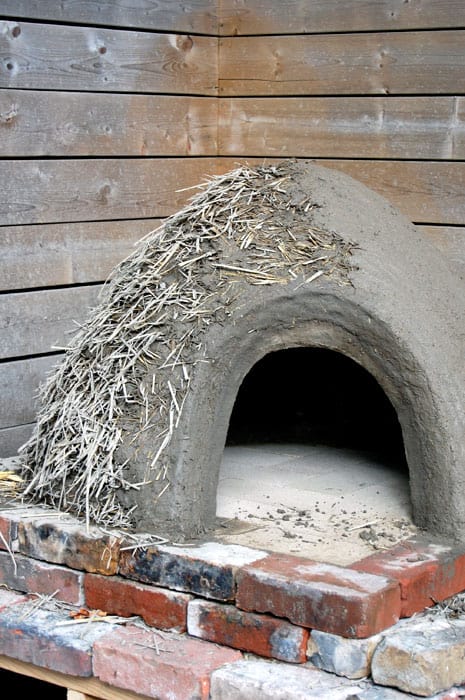
Now if you want, this can be the end of the pizza oven building, but most people like to weatherproof it. The cob will eventually just wash away if you don't protect it from the rain. It'd take a while, but it would happen.
So if you want this oven to last you have to do a layer of lime plaster over it. Lime plaster (made with powdered hydrated lime) is the best thing to use to weatherproof your oven because a) it's waterproof and b) it breathes. Like a porpoise.
A pizza porpoise.
I finished the insulation layer of my oven late last August or so. I didn't get around to the weatherproofing lime layer until a few weeks ago so I had to keep my oven covered with a tarp all winter and whenever it was raining.
The hydrated lime needs to sit for a few weeks at least to make it useable. You mix the powdered lime (you can get powdered lime at construction supply stores and stores that sell landscaping stones) with water and let it sit to "slake". The longer it sits, the more water it absorbs the better consistency it will be. The lime plaster then needs to be mixed with sand and applied to the pizza oven with a trowel.
This step has to be done in moderate temperatures with no chance of frost for a while. So because of the timeline I couldn't do my lime plaster step until the beginning of this summer.
The oven gets a minimum of two (3 is better) coats of lime plaster. One part hydrated lime with 3 parts sand. Each coat needs a week in between to cure. You don't want the lime to "dry", you want it to cure by reacting with carbon dioxide in the air. So you need to throw a tarp over the oven for a week to let it properly cure as opposed to air dry.
I meant to get to how I finished the base of my pizza oven today too but there just wasn't time. Besides. You can only absorb so much in any given post before you stop caring. So I'll show you the base and explain a little bit of how I did it later.
I'm finally done every step of my pizza oven and tomorrow I'll have a video showing you the whole pizza making process from the lighting of the fire to the eating of the pizza.
If THAT doesn't convince you to build your own pizza oven nothing will. If that's the case, that's O.K. You don't HAVE to build a pizza oven. I mean you're your own person. You don't have to do what all the cool kids are doing. It's perfectly fine to be like everyone else.
But it's better to be like me.
LOLOLOLOL! Oh my lordddd. I REALLY made myself laugh with that one.
→Follow me on Instagram where I often make a fool of myself←


Tracy G
Is lime dangerous to get on bare skin? I ask because our neighbor was pouring concrete for an outdoor bar and got it on his legs. He didn't wash it off immediately and he ended up in the hospital. He still has the scars. I wasn't sure if the lime in concrete and the lime you're talking about are the same. Just thought I'd check.
Karen
Yup. It's the same thing Tracy G. Lime is caustic. When it's in concrete form it's much more diluted, but straight line is dangerous. You're fine if you wash it off immediately. Nothing will happen. But you have to be careful you don't get it on you and don't know. You don't feel any burning until it's too late. I wore eye goggles, rubber construction gloves, long pants and a ventilator mask to mix it and work with it. ~ karen!
Olga
Karen, what would something like this cost to built? Considering that all the supplies must be bought. I'm not sure if I can find anyone to give me free clay.
Karen
Hi Olga - If you live in an area that has clay you can just go and dig it up. Around ponds is a good place to start. I actually don't know how much powdered clay is to buy but I wouldn't imagine it costs very much. I scrounged and begged for most of the materials. My oven ended up costing around $100. I had to buy the brackets for the sawhorses, the sand, spray construction adhesive for the bricks, and some lumber (but most of the lumber I already had in my lumber stash), and the lime plaster. I also had to buy some metal and doo dads for the "prettifying" the oven which you'll see later but those things didn't amount to much. All the materials it's made out of can be scrounged or bought for cheap. To purchase an italian pizza oven like this costs around $3,000 for the absolute cheapest, ugliest one you can buy with no base other than a metal stand. Generally a nice, good pizza oven runs about $10,000. So even if you have to buy more materials than I had to, it'll still be the deal of the century for you! ~ karen!
Kristin Ferguson
I like the Muppet look, but I agree it doesn't really go with your patio. Just an FYI for anyone who wants to make an oven, you can use wood shavings or sawdust instead of straw. It is waaaaay easier to mix. But it will not look much like a muppet. Or, I should say, it might look like Grover, but not Animal. I weatherproofed mine with a layer of surface bonding cement, fortified with acrylic. It went on in one layer and dried without cracks, and has protected my oven for more than three years now. Plus you can add color if you like! I helped build an oven in a community garden and we dyed the dome a brilliant blue. I don't know if it "breathes" (probably not), which initially concerned me, but the oven works perfectly. I didn't even think of lime, which would have appealed to me as a more old school and authentic solution. Again, good job Karen!
leslie
Thank you, thank you, thank you!! I can't wait for the next installment!! This is SO much more interesting and inspiring than a soap opera or TV sitcom, or even cupcakes! Do you by aaannnyyy chance have a video of the lime application? I know I could buy the book (even though my husband has 6 or 7 books on the subject) but it's SO much more fun watching YOU do it!! Now please take this in the complimentary way in which it is fully intended- watching and reading your posts reminds me that "I Love Lucy" was one of my favorite shows, ever! Is the blue eyes? The impish grin? The I-can-do-this-myself, trial and error approach to engineering? Just please know you have a big fan here in New Mexico!!
Kari
I would love the do this. I bet it's the best pizza crust. Yum
Heather Eggert
You are my favorite. Just my absolute favorite.
Susan
Karen,
Been a naggin" my man for over a year...I want a pizza oven...I want a pizza oven...you get the drift. So, when I saw this, I said to my man.."Look what Canadian Karen did". His response? Well...if Karen can build her own, so can you. Yikes, he's right! Ordered the build your own oven book, have the perfect spot for it in a side garden, 10 feet from the deck, easy access to the kitchen, and I WILL build one! (Once I start, wonder how long it will be before I get "help") Question, though, can I put mosiac tiles on somehow?
Love the post,
Susan
Karen
:) Yes, Susan, your husband is right. Of course you can do it. As I say, "It ain't that hard. Any of it". And yes, you can absolutely put mosaic tiles on it. Google pizza ovens and it'll show you how. Basically on your final layer you just push them into the material. (whether it's the cob or the final lime plaster) Have fun! ~ karen
Nancy Blue Moon
Pizza in 2 minutes..awesome..looking forward to the video!
Amy in StL
My neighbor has an oven in his yard. His dad was a mason and in his free time he built all kinds of things. Our neighborhood has several benches with angels built into them that he built. He has a table that has all kinds of figures molded into the surface and he has this huge fantastic oven in his yard. It looks like it has two areas to cook, one has a door but the other is open. His mom made bread in them in the summer months (my neighborhood is italian) I'm trying to figure out a way to move it to my yard since he's just let it get overgrown with ivy. So please do your next post on stealing the oven from your neighbor's yard because they aren't good oven parents.
Ocean State Home
This could be the distraction that is going to get me in trouble with my better half for not getting the things done that I should be on our new house. I'm also thinking that I could build the platform on wheels to move it around as needed. Maybe put next to the dog house that I'll have to build too so I'll have some place to sleep if I even start to think about building it this year.
Thank you for sharing. Now I'm going to go click on a bunch of ads…
Karen
Good thinking. On all accounts. ~ karen!
Maria
So if it's male pattern baldness in the first picture, is it wearing a toupee in the second? Been craving pizza all week thanks to you
Joanne
so ... wait... you want the lime to air-dry, but not air-dry? why would a tarp help it "cure" as opposed to "air dry"? does the tarp meed to be airtight, and if so, how do you keep t from sticking in the lime? confused..... maybe its just too early for me.
Biggest question hanging in the back of my mind is how you heat the oven? wood? start the fire, and push it to the back or a side?
I told myself that I really wasn't interested... but as I read more and more, I'm getting intrigued.
Karen
Joanne - Tarping (just throwing a tarp over it) allows the lime to "cure". In other words it is reacting to the carbon dioxide in the air. If you don't tarp it, the wind and sun will simply dry the lime, especially the outermost layer of it, which then makes it impossible for the lime underneath to cure properly because the outside layer has become crusty. It's like a mound of bread dough and letting it rise or proof with a tea towel over it. You want it to proof and rise, but you don't want that skin to form on the outside). ~ karen!
Mary Werner
OK now I know why the men that poured our drive-way were so glad we had a nice summer "shower" immediately after and again the next day. It is wonderful and amazing that you can blog about something most of us are not going to do but remain very interested in how to do it and love to watch you get yours. You do have a knack!!!!
Lynne
Yep, just like when you're making concrete paving stones. You want them to dry slowly so that a skin on the surface doesn't prevent the interior from curing and drying properly.
Ev Wilcox
Since this oven gets up to 900 degrees, it seems rather close to the fence! Is this "an optical delusion"? I hope you will do a photo tour of your patio area again to show how the cob looks with everything! Happy Pizza!
Karen
Hi Ev - The base (widest part of the oven) is about a foot from the fence. But it could literally be touching the fence and it wouldn't matter. Because the insulation layer is so thick and works so well the outside of the oven doesn't get hot. At all. That's another bonus to insulating so well underneath and on the outside of the oven. It poses no fire hazard. The only hazard you have to watch for are sparks coming out the front of the oven. And even then, since I have a stone paved backyard I don't have to worry. ~ karen!
Karen
And yes ... a photo tour coming up soon. ~ karen!
Danni
I don't care that my kids are ready to commit me, I will get this done before next summer. I'll just explain that it will increase the property value once they lock me up and sell!
You have a very nice fenced yard, doesn't seem that the neighbors watched you stomping mud, in my case my neighbors will see, and add another 10 feet to the 30 feet they already stand back from me, the crazy lady at #13.... hehehehehe
Su
Living vicariously thru you on this one.... :)
Ramona
You really HAVEN'T lost your funny bone!!! =D
Kathy
I agree with Tom Sawyer...lime washing or whitewash is fun. I was looking forward to today's post on lime plaster because I have been using real lime wash to brighten my 130 year old basement and want to patch some with lime plaster. Have you tried real lime wash Karen, any advice? Do you lime wash inside your coop?
Karen
Hi Kathy - Yes the lime I'm talking about here is the same thing. The difference between a wash and a plaster is the consistency of the lime once mixed. Lime plaster is thicker like sour cream and a lime wash is mixed up thinner. I don't lime wash the inside of my coop. I painted it with porch paint and just wash it with a bleach and water mixture once a year. ~ karen!
Niki Dee
Never been a cool kid but I can't wait to make a pizza oven! I'll have to start next year (having the same type of lovely seasons you enjoy..Spring, Summer, Fall, Winter Winter Winter). Now if you could just show me how to build the rocket mass heater that I've been threatening to build...I'll be forever in your debt.
TucsonPatty
"It’s quite obvious from the male pattern baldness that mine is a male pizza oven."
My favorite line ever...until you cracked yourself up telling us it would be better if we would be more like you...
I agree completely with that statement! I really, really wish I was more like you.
I could really get things done. Faster. Before old age sets in.
I love this oven and it makes me want to build one, but I know it won't happen. Mostly because my neighbor up the street has one in his back yard and I can go up there periodically to have a 3 minute pizza. They have a build it yourself pizza party once in a while.
You are an awesome chick!
With awesome chicks!
Go Karen!
Can't wait until the complete reveal!
kate-v
The oven with the plaster's in the cob with the cure; the pizza from the porpoise feeds the crew that is true. Right?
Jennifer
Oh, I see what you did there! Court Jester reference, oh yeah.
kate-v
yeah, it is. I find this this whole outdoor oven thing very amusing - especially all the time Karen says she's not being funny, that she's very Serious - I find that funny - kinds like the vessel with the pessel and all that. Oh, I forgot we're actually being very serious. Right? This website cracks me up!!
stefani
How can you not love somebody that remembers Court Jester.