
Let me answer the first question you have. Customization. THAT's why you should build shelves as opposed to buying them from Ikea, Home Depot or any other store.
By building shelves yourself you can make sure to use every inch of space that you have and even build your shelves around the boxes you know you're going to be storing on them. No wasted space, no fits when you find out your massive stock pot is ½ " taller than your biggest shelf.
Now that we have that out of the way, I'll give you an idea of the sort of thing I was dealing with when I built my basement shelves. My basement is a nightmare. A place where demons dance. It's creepy and old and built out of rubble.
My basement is 175 years old and is home to an equally aged band of centipedes.
What is has going for it, is it's dry, fairly large and seems to be ghost free.
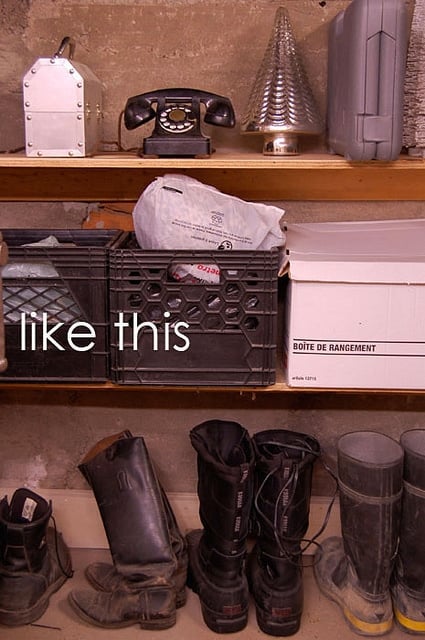
My basement is a bit of an odd shape with a weird cement ledge all the way around it. This made installing store bought shelves kind of useless. It's hard to describe, but by putting up high shelves, I'd be losing space behind them. Many, many square feet of space.
So. I never put up shelves.
Instead I dumped stuff upon stuff upon stuff. I'd find old shelves at garage sales or on the street and throw them down in the basement hoping they'd help solve my storage problems. They did not. They did not help at all.
When I had my basement sprayed with foam insulation this summer, I had to move every single thing down there into the middle of the basement so they guys could have room to work spraying around the outside walls of the basement. It was such a huge job I figured while I had everything moved I might as well think about building actual shelves.
It took $100 and 1 day.
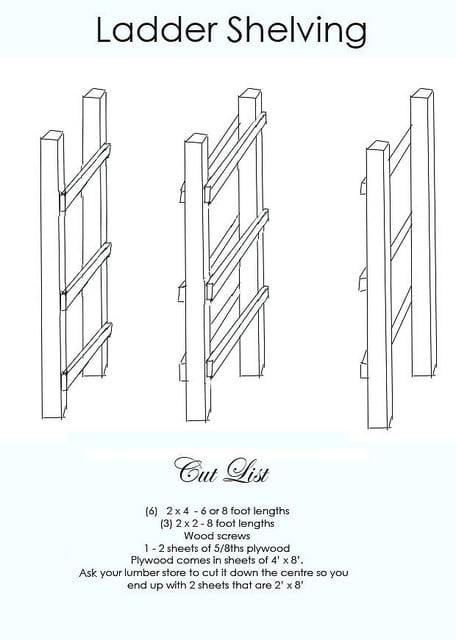
That's right. All you need to do is basically build a series of rudimentary ladders. I've drawn the plans up so it involves the minimum amount of cutting on your part as possible.
This project is simple enough that someone with a basic knowledge of tools and building can make them in a day.
To do this you will need a few tools though.

The wood you use to build your shelves will depend on the height of your ceilings and the size of your wall. But if you follow the general plan I've given you in the picture above you can adapt them to build shelves to your heart's content.
The only thing you have to remember is to install one "ladder" for every 3-4 feet. This will give your shelves the proper support they'll need and prevent them from sagging. Also make sure to buy ⅝ths plywood and nothing thinner. Thinner will sag over time.
The 2x4 s will be the tall supports of your ladder shelves.
The 2x2 s will be what the plywood shelves rest on. (You can use almost any wood for this. I used a bunch of 1x4 s I had hanging around for instance)
The plywood will be your actual shelves. The more shelves you plan to have, the more sheets of plywood you'll need.
These plans will make a shelving unit that's 6' long, 6-8' high and 2' deep.
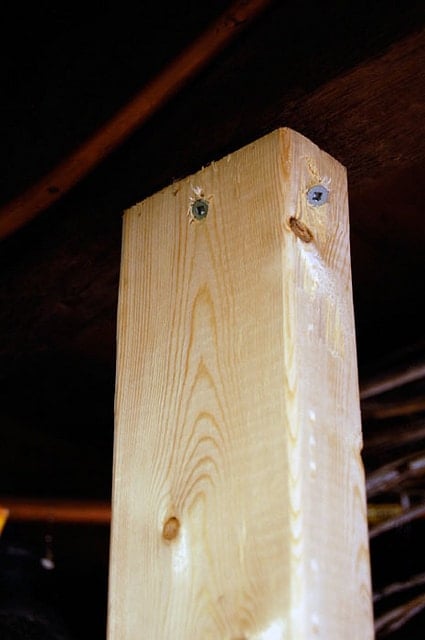
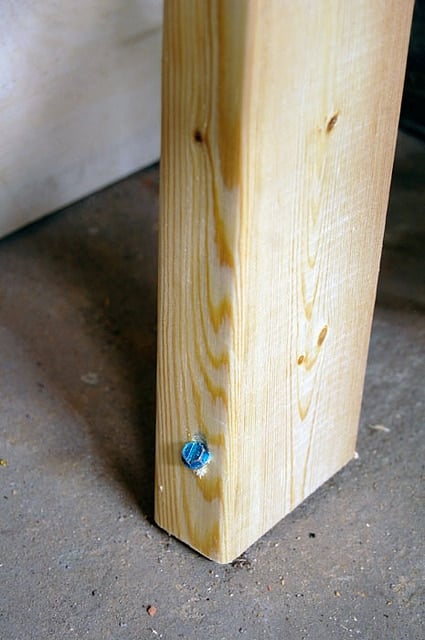
Your tall supports will be attached to the floor joists at the top (floor joists are actually in the ceiling) and into the concrete floor at the bottom.
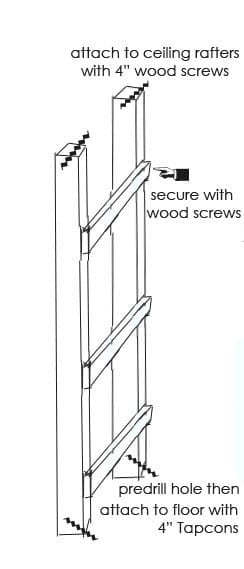
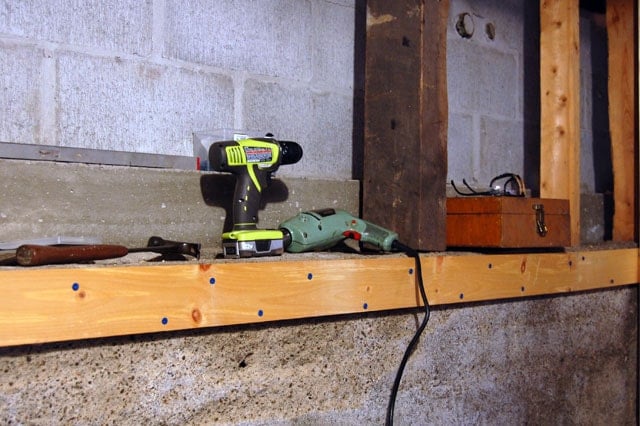
To attach into concrete you need to use special screws called Tapcons. Tapcon is actually a brand name like Kleenex. When you buy a box of Tapcons they usually come with the drill bit you need for pre-drilling the concrete so you don't need to guess at what size of bit to use. It's all ready to go.
That by the way is part of the reason I say it's best to have 2 drills if you can. Even if you have to borrow one.
One drill for the pre-drilling of holes ... and one drill for setting the screws.
Otherwise you're constantly wasting time having to change back and forth between bits.
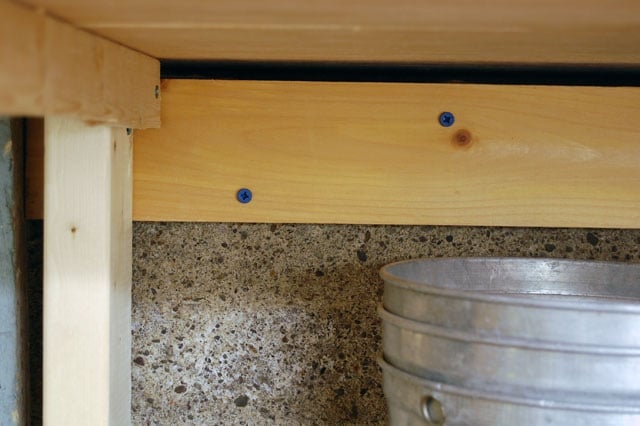
To attach the wood to other wood, you just need to use 4" wood screws. I had leftover decking screws, so that's what I used. I used up a lot of crap doing this project actually.
For extra, added security you can run a length of wood across your wall. If it's cement, attach the wood with Tapcons.
This will give you something extra, along with the ceiling and floor to attach the tall supports to.
Again, for this I used an extra length of 1 x 4 I had laying around.
So you'll be securing your supports in 3 places.
#1 ... the floor joists in the ceiling
#2 ... the floor
#3 ... the wall
You can either build your entire ladders first, including the shelf supports and attach them to the ceiling, floor and wall,
or
You can build your ladders with one shelf support a few inches up from the bottom, and one at the very top, attach them to the ceiling, floor and wall and then attach the rest of the shelf supports once the ladders are up and secured. Doing it this way is useful if you want your shelves to be at custom heights for big boxes and such.
Just measure you biggest box, then measure up from your lowest shelf support. Cut your plywood shelf to fit, and then do the same with the next box and shelf support.
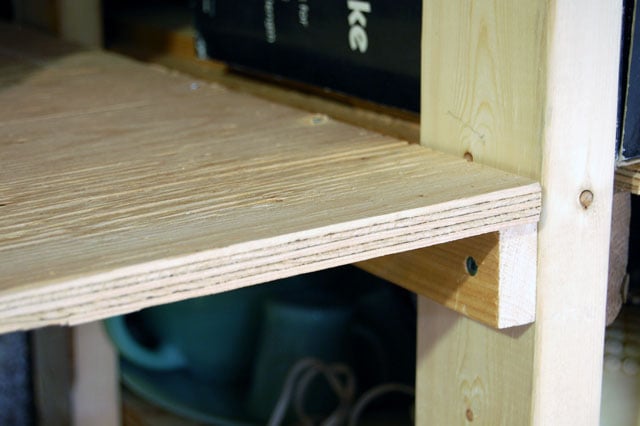
As you can see, I did a variety of shelf heights to accommodate the variety of boxes and things I had to store. This way I wasn't wasting any space at ALL.

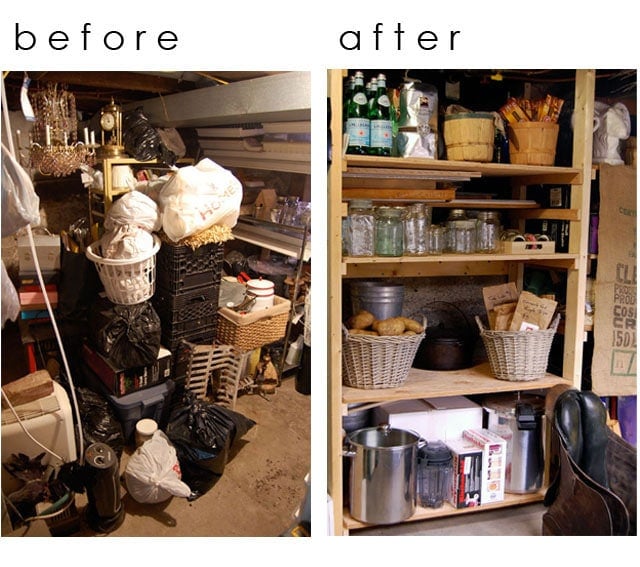
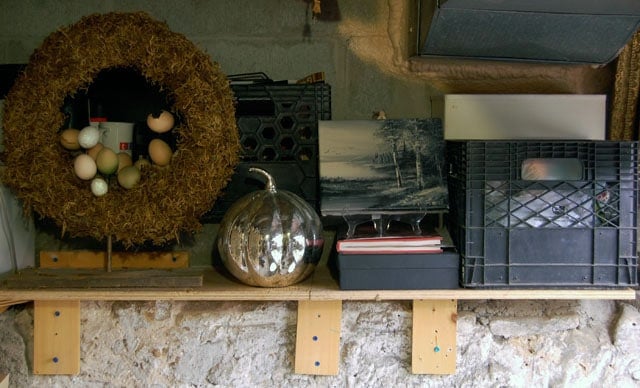
When I first started to take the after pictures of my basement for you it wasn't looking so hot. So, I styled my shelves and got them looking pretty by putting stuff in baskets and boxes.
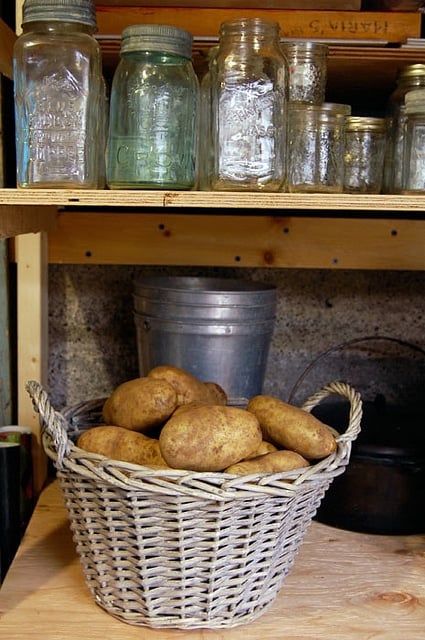
I recommend you do the same. I love going into this basement now, not only because of how organized it is, but because it looks half decent. Take your garbage bags out of their ugly cardboard box and put them in a nice basket. Ditto for storing potatoes or anything else.
I never would have done this if I wasn't taking pictures and I'm so glad I did.
So that's my word of advice for the day. If you redo your basement, do it like someone's going to come in and take pictures of it. It'll make you happy every single time you go down into that hell hole.
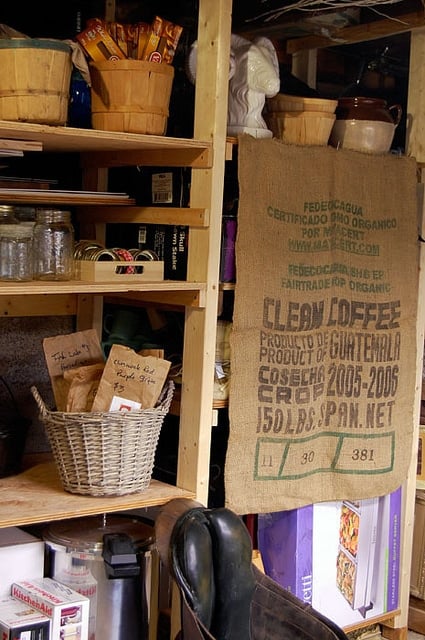
One section of my shelving unit is devoted to Halloween and random house accessories that aren't in rotation at the moment. Those 2 shelves look really messy and ugly so I covered them up by tacking up a burlap coffee bag I scored from my local health food store. You could do any kind of drape or a length of plain cotton fabric. Just tack it in place and lift it when you need to get into that area. It just helps to get rid of some visual clutter.
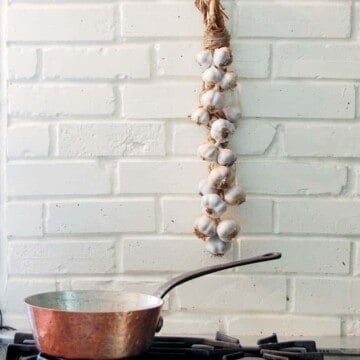
Bags and bags of heirloom garlic courtesy of my super-fantstic neighbour Jane who picked it up for me when she was on vacation this summer.
Just waiting to be planted in late October.
Getting organized allowed me to make use of a few things that were just thrown into the original messy basement.
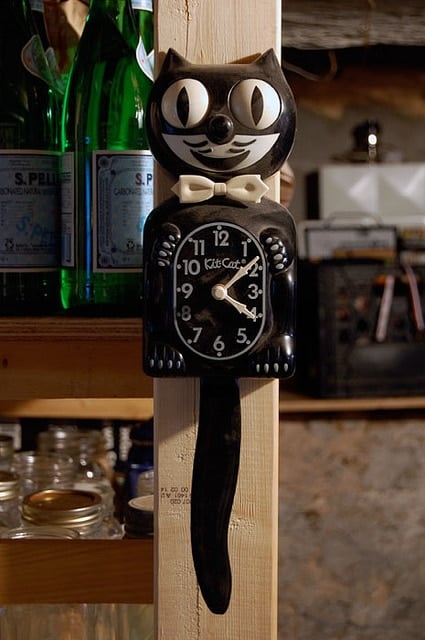
Things like my kitty cat clock were pulled out and hung up.
By the way. You haven't lived until you've gone to Costco and bought the jumbo packages of paper towels and toilet paper because you actually have somewhere to PUT them.
I feel like a princess.
Once I got the hang of it I was putting shelves everywhere I could fit them.
This one isn't exactly pretty, but drilling into boulders is a LOT harder than you would think.
This area is a work in progress ... I'll be showing you how to build a handy little basement table in this very spot in the near future.
And now onto the other side of the basement.
The workshop area.

The one shelving unit I saved from all the pieces of crap I'd collected from the side of the road over the years was this one metal shelf.
It's very narrow and has a lot of shelf space.
Perfect for my canned goods, extra paint cans and craft supplies.
I actually have an entire shelf dedicated to my moss collection.
Yes. Seriously.

It's only been a week or so since I finished the basement and I've already used it for projects I could never use it for before because I just didn't have the room.
Plus everything was all over the place and disorganized and I was always knocking something over ... bleh.
Now? It'll make reupholstering this little footstool a breeze.
You can't see it but I have a small television hooked up in the corner and also installed a phone line.

Tools? Got em. Whadda need? 'Cause I know exactly where it is.
It's right there. On the wall.
Unless it's a drill or something larger, in which case it's in the cupboards below.
Yup.


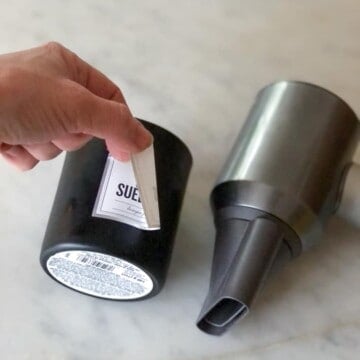
I searched all over for jars to put my assorted deck screws in but decided I liked them in their paper bags, so I just rolled down the edges and hung the bags.

Nowhere to put the antique fishing creel? No problem.
Hang it on the wall and fill it with ribbon and bows.
Definitely one of my favourite things.
The ribbons are all on a dowel so they spin. I can just pull out the length I need and cut it.

I realize this may not look like the makeover of the century but I've already gained back the time it took me to rebuild this basement. I've saved 17 hours in the past week just by knowing where my duct tape is.

The best part of all of this is I found my old saddle. I love that saddle.
Now that I have so much time on my hands, maybe one day I'll go for a ride if I can manage to strap it on one of the centipedes.

Karen,
Just now seeing your basement shelving, organization & workshop thanks to the link you shared in a recent post. Fantastic & the pics provide further motivation. Your suggestion of using nice baskets, etc to organize & store is spot on!
I've collected & purchased decorative storage pieces in preparation for the huge task of reorganizing my garden shed - yet again. Great post; thanks for the motivation & always love your sense of humor!
I live in a studio apartment which is being overcome by books. My dresser drawer broke at the same time as one of my large bookshelves-I have two. This looks like a great idea, except for having to buy everything, especially power tools. Any ideas to make this cheaper> I am 61 and admttedly foreign to tools
Hi Jone! The best thing for you to do is to buy prebuilt bookcases. Or easy to assemble ones like those from Ikea. But even then you'll need a drill so that you can secure them to the wall so they don't topple over. Ikea's "Billy" bookcases are the cheapest and best out there because they're only 10" or so deep and don't take up much room. ~ karen!
Hi there everyone, it's my first pay a visit at this website, and piece of writing is actually fruitful for me, keep up posting
these articles.
My garage had enough room for my car until I sold my other house. Now I need to build shelves in the basement, because all the boxes are multiplying at night! What used to be my music room, is now a repository for assorted goods in cardboard boxes. Your neat shelving will allow me to properly store my hoard, and regain my music room again. I also need shelves for my extensive record collection, and the store bought metal ones with fiberboard shelves are flimsy at best, not to be trusted with irreplaceable discs and cylinders from as far back as the turn of the previous century. That means as far back as 1900 or so.
By the by, where did they put the spray foam insulation? I don't see any evidence of it in your "after" pics. I live in SE Wisconsin, and my basement stays at 60 F year round. It's a monolithic foundation of solid poured concrete and dry as a bone, with 8 foot high open ceiling. My previous house was only 4 feet in the ground, and cold as a well diggers ankles in the winter, and hotter than Hades in the summer! Enjoy your blogging style.
Hi Dale. You can't really see the insulation in the photos. It's up high around the top of the ceiling (the top of the foundation really). My basement is back to being a mess, lol. Time to clean it this weekend to get it ready for seed starting season. ~ karen!
I was very happy to discover this web site. I need to to thank you for your time just for this fantastic
read!! I definitely loved every part of it and I have you
saved to fav to look at new information on your web site.