An Amaryllis that grows without any water, a vase or general care. Just stick it on a table and walk away. What is this sorcery? Waxed Amaryllis bulbs. Here's how to make them.

Now is the time to start thinking about getting some Amaryllis bulbs if you'd like to wax some so they're ready to bloom at Christmas.
Table of Contents
What's a waxed amaryllis?
Years ago I saw Amaryllis bulbs that had been dipped in wax at my local garden centre. I didn't know what they were and figured they were just Amaryllis bulbs that had been dipped in wax to look pretty. At around $34 for a bulb I wasn't intrigued enough to read anymore about them on the box.
Fast forward to this year when I saw them again and realized the magic of them is the fact that you can just place them anywhere and they'll grow. Along a mantle, down the centre of a dining room table tucked into greenery. They're less expensive this year, around $20, but they're still a lot more than a plain Amaryllis bulb - which is between $8-$15 per bulb depending on the rarity and quality of it.
omgomgomgomgomg. THIS is what my DIY dreams are made of. I got to work immediately figuring this out.
Did I mention this would make a GREAT hostess gift this season?
After some online research and reading on Amaryllis bulbs I got a handle on it. The wax part was fairly obvious. Wax would hold the moisture in the bulb. But according to the makers of these wax bulbs there was some super secret process the bulbs went through to make sure they'd bloom without additional water.
Since it was pretty easy to figure out how they got the Caramilk into the Caramilk bar I was pretty confident I'd crack the secret to the waxed bulbs.
I gave it some thought, did some more research and decided the two things you'd need to do to ensure success was twofold.
1. Soak the Amaryllis bulbs in water so they're fully hydrated before you wax them.
and ...
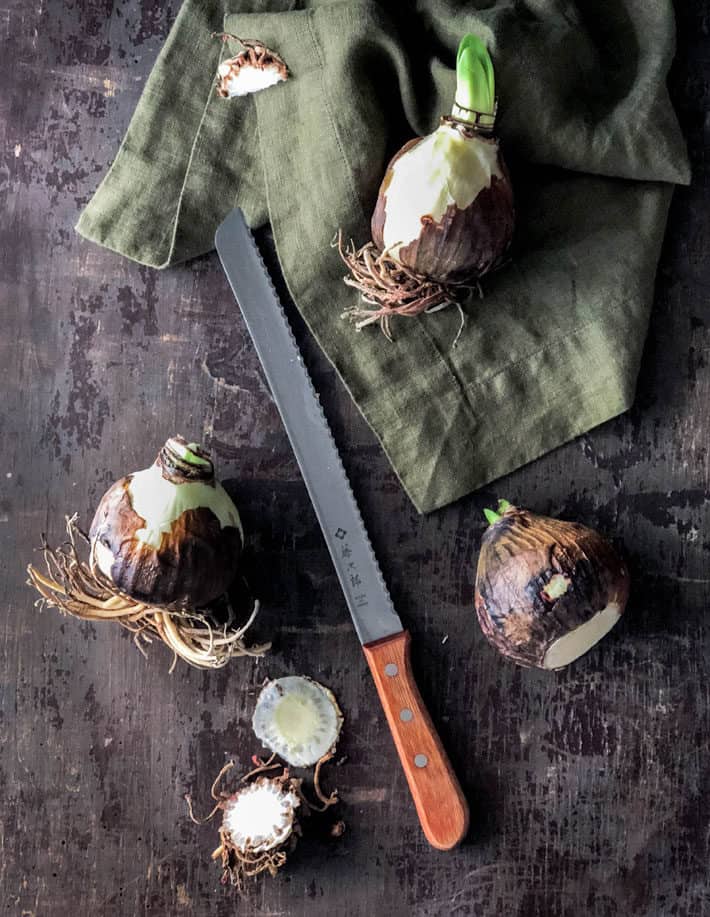
2. Cut off the bulb's basal plate (the flat part the roots grow out of) to shock it into thinking it's dying which forces it into trying desperately to reproduce itself - by flowering.
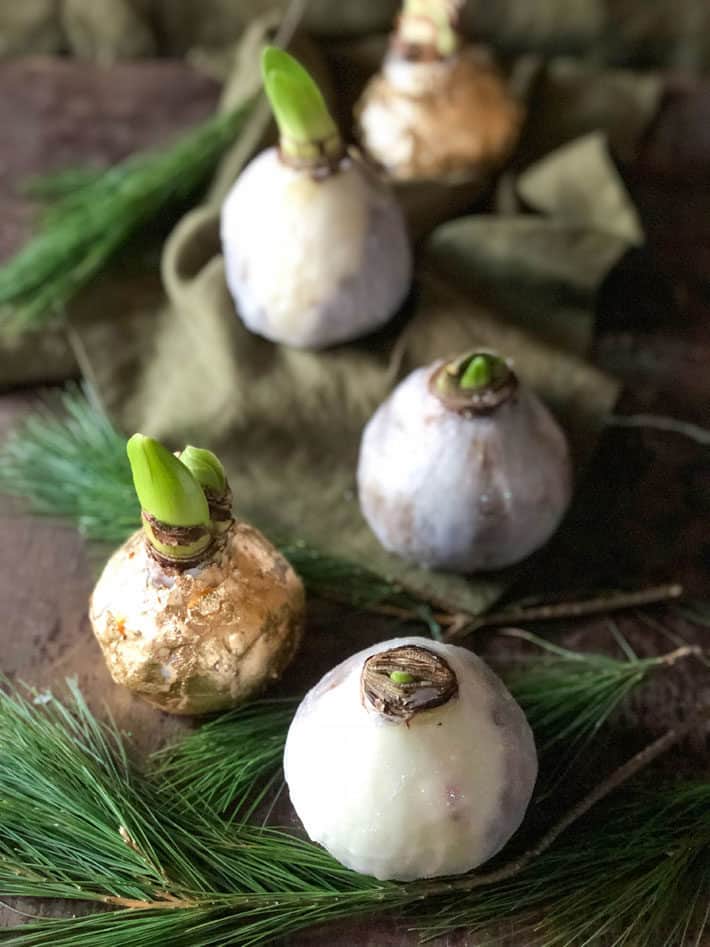
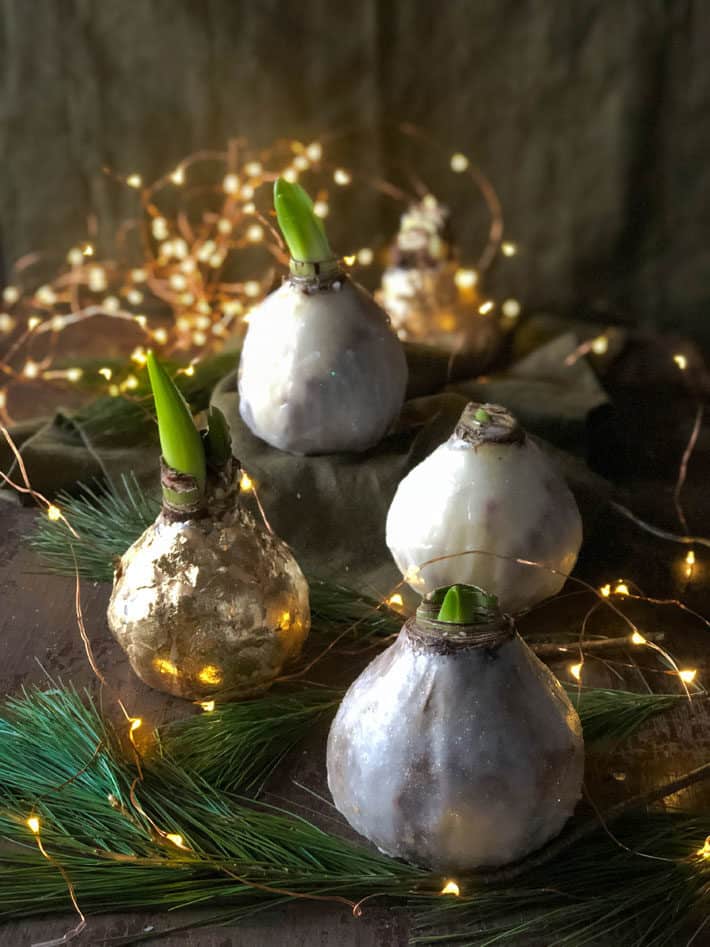
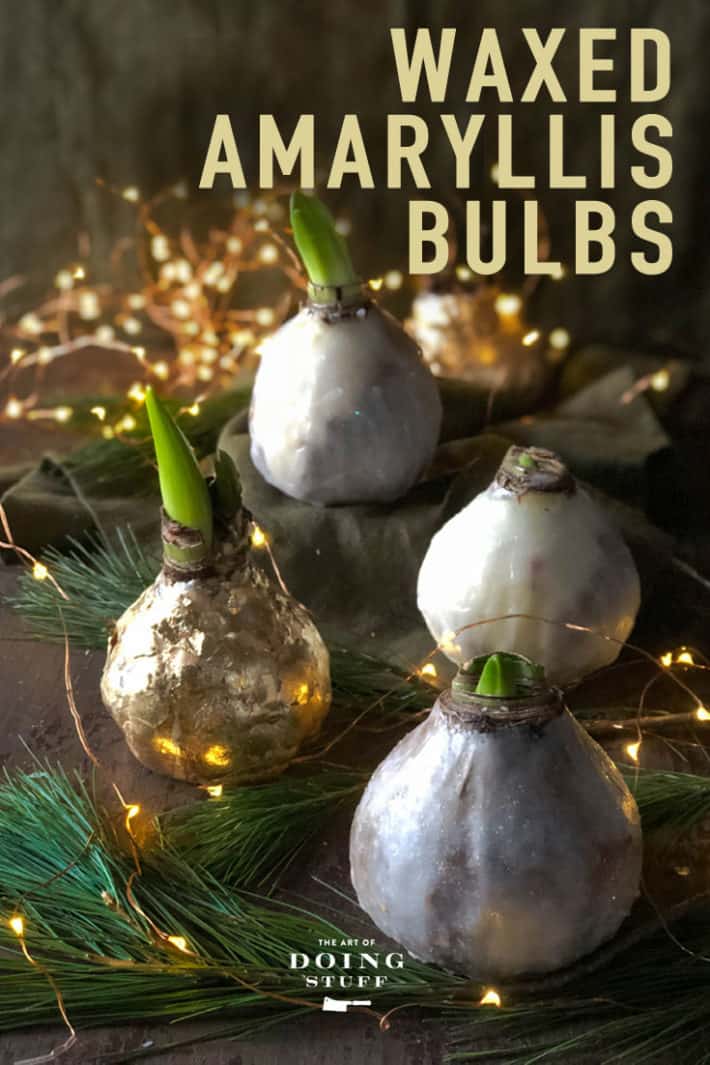
My experiment seems to have worked. And I have to say I like the way these homemade wax Amaryllis bulbs look better than the store bought ones. For one thing, you can customize them.
At first glance I thought the store bought waxed bulbs were made with metallic wax, but it's just regular paraffin wax that's been spray painted.
If you have all the stuff you can also make coloured wax by mixing regular wax with wax dye, but I didn't do that. I just wanted a quick DIY not a whole "thing" that would end up costing more money than just buying one pre-made.
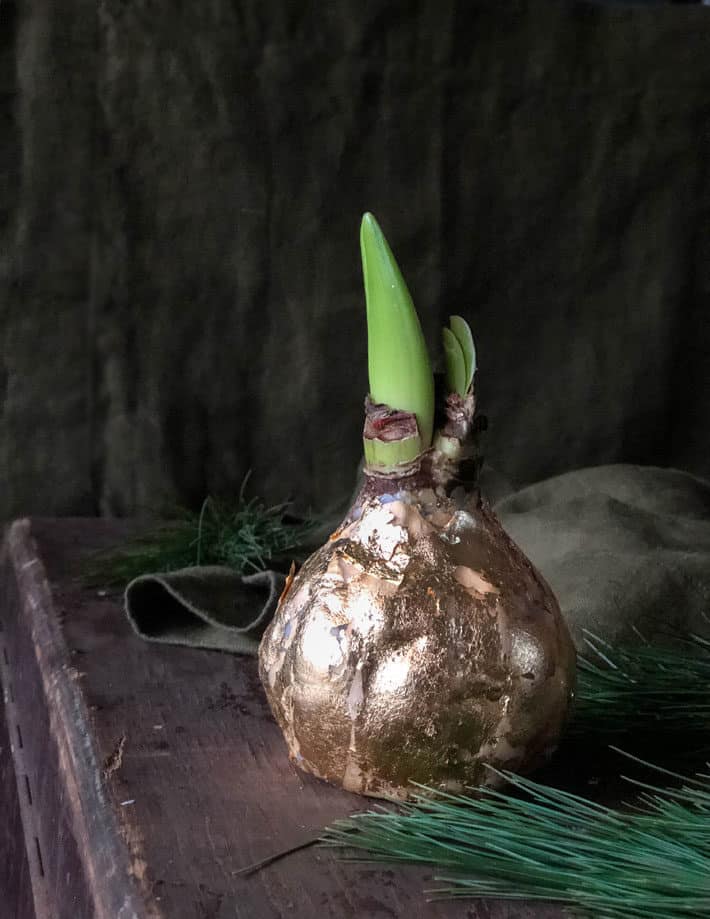
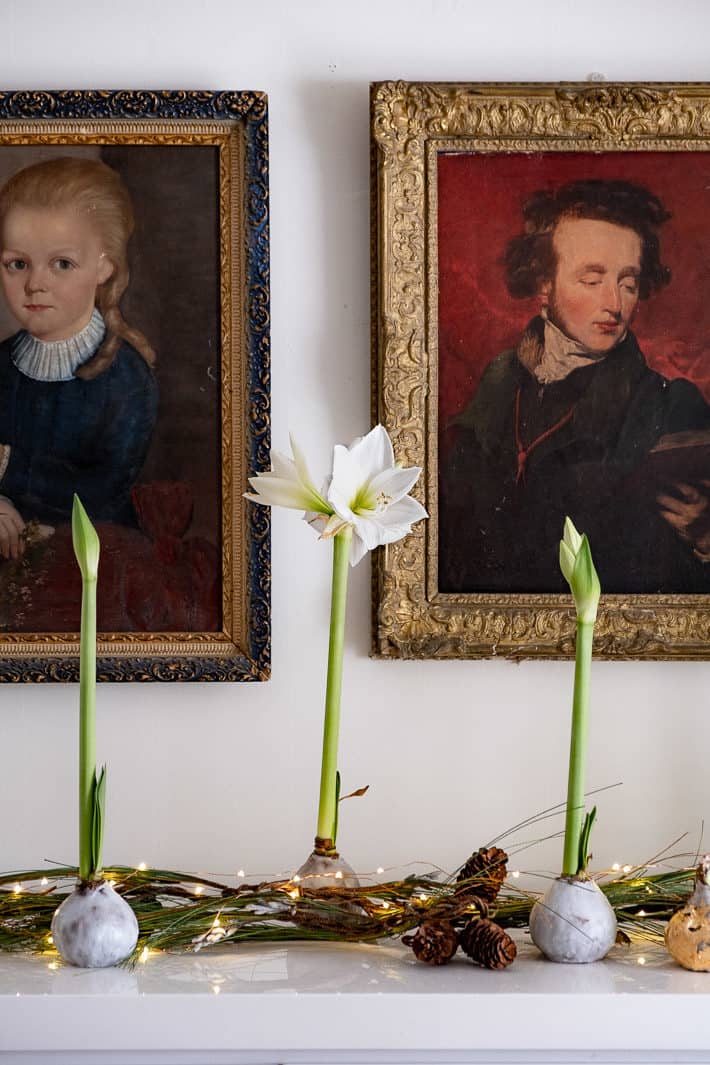
So instead of trying to make metallic wax for instance, I gold leafed the bulb afterwards with gold leaf I found at the Dollar Store. Other bulbs I left natural, with just white wax covering them, part of the darker bulb skin showing through and and most of the bulbs I sprinkled the white wax generously with white dollar store sparkles to make them glitter.
All in all this "I'm cheaping out" experiment has been a complete success and these waxed Amaryllis bulbs are going to be beautiful around the house throughout the holidays.
Here's how to do it:
How to Make Waxed Amaryllis Bulbs
- Soak Amaryllis bulb in lukewarm water for 4-8 hours.
- Cut off the roots, including the basal plate.
- Let the bulb dry for a few hours.
update: Wrap the bulb in plastic wrap before waxing it. - Melt wax (I used old candle stubs but if you don't have those use some paraffin wax) over low heat.
- Paint the wax on the Amaryllis bulbs from the neck down covering the sides and base.
- Gold leaf or cover in sparkles if glitzy is your thing.
- Place the bulbs in a warm area of the house to encourage growth.
The length of time it takes to flower usually around 6 weeks with store bought Amaryllis bulbs. I can't give you a timeline on this because mine haven't flowered yet, but the flower bud has popped up out of the bulb so I know it's only a matter of time.
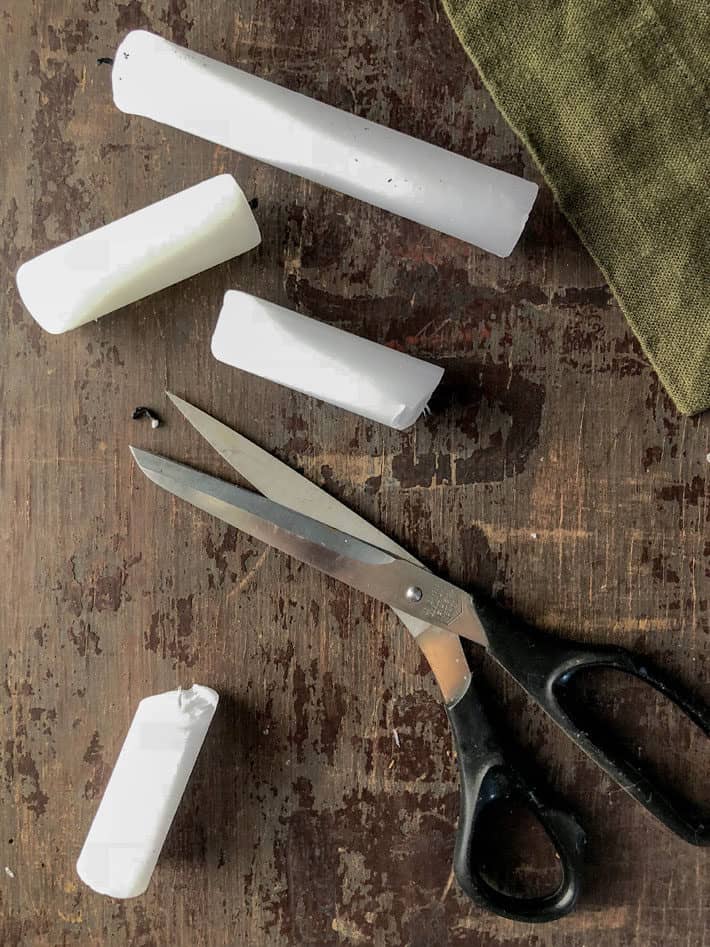
I save my short, burned candles all the time. Half the time I look at them in the cupboard and think WHAT am I saving this crap for. The other half I pull them out and think WELL thank the lord I saved this crap. (I also use spent candles for making homemade fire starters.)
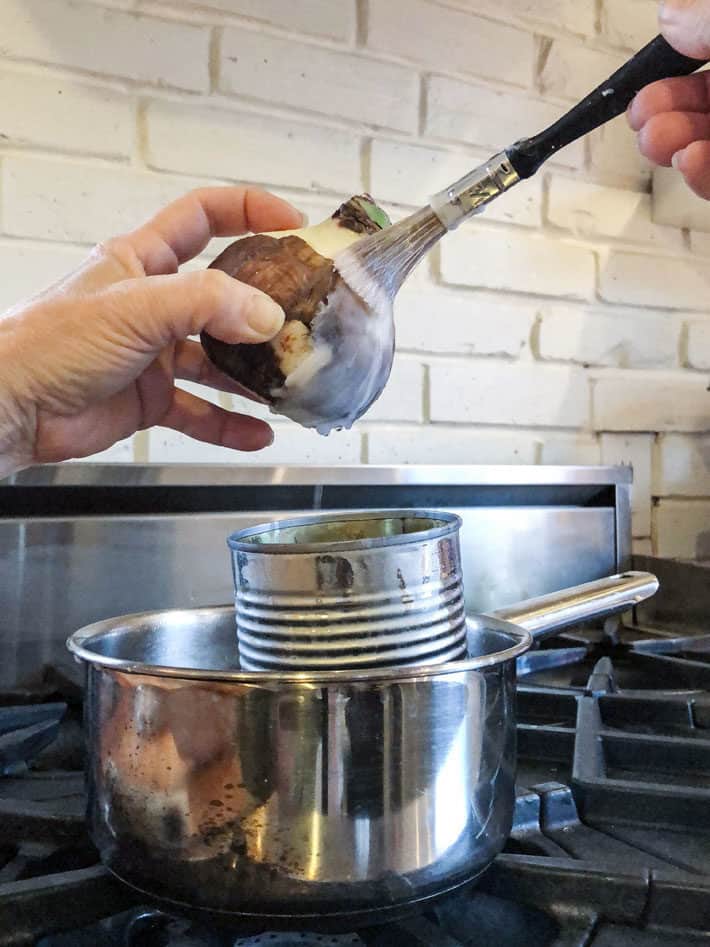
I didn't dip the entire bulb into the hot wax because I felt like it would be too much of a shock to the bulb. Painting it on felt more gentle.
Paint the wax on until there's a good thick coating of wax all over the bulb. It'll take several layers.
The gold foil is VERY fiddly to get on the wax. Make sure your wax is still hot when you apply the gold foil and press it into the wax with your fingers or the palm of your hand until you think it's really stuck. And repeat. Like a million times.
It's a huge pain but the result is kindda breathtaking.
The easier way to fancy up the waxed bulb is to sprinkle it with sparkles as soon as you're done waxing it.
I used white sparkles on white wax but you could do whatever you wanted. Green sparkles on green wax, green sparkles on white wax, gold sparkles on white wax ... how many more examples do you need?
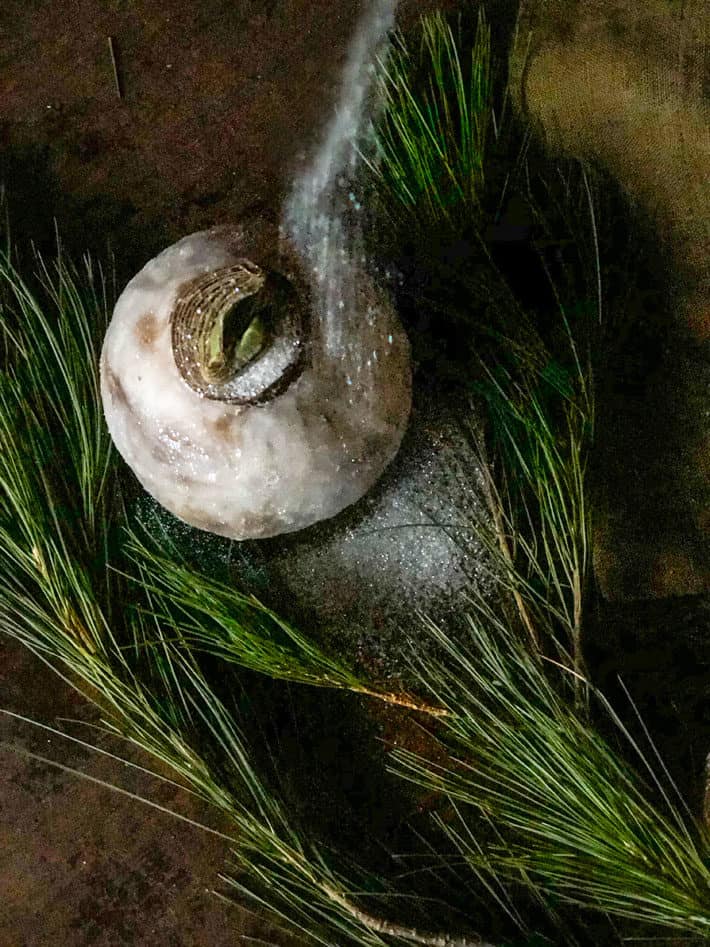
I've also left my wax drippy looking. I did that on purpose. If you want things perfectly smooth just smooth the wax out with your finger or the brush while the wax is warm.
Would you like to save this stuff?
How long do waxed amaryllis bulbs last?
It takes an Amaryllis bulb around 3 weeks to show signs of growth after planting it.
It takes 6-12 weeks for the Amaryllis to *bloom* from the day it is planted.
You can speed this process up by keeping the bulb in a very warm room of 27 C (80F). Conversely you can slow the blooming time down by putting it in a cool room of around 10 C (50 F).
Each amaryllis blooms will last about 5 days.
When to start them for Christmas blooms
Mid November.
This is a bit of a crapshoot because different varieties of amaryllis take different lengths of time to grow and bloom. But generally speaking, for Christmas blooms, you should plant your bulbs in early to mid November.
Bulbs you buy in a box kit from the grocery store or garden centre may have already sprouted in the box! If they have, you'll get blooms a few weeks earlier - so plant them accordingly.
If a bulb shows NO signs of green growth, it will take a few weeks longer to produce a bloom.
Can you regrow the waxed bulbs
If the entire growth plate at the bottom of the bulb isn't completely cut off, there *is* a possibility that the amaryllis can live another day.
So when your amaryllis is done blooming you can either throw it in the garbage, scrape the wax off and compost the bulb, or scrape the wax off and replant the bulb in soil.
For replanting follow these steps.
- After your waxed amaryllis has bloomed and the blooms have finished, cut the bloom stalks off, but leave the leaves on the plant.
- Scrape the wax off of the bulb.
- Plant it in soil and continue to care for it like any other house plant.
- Once spring weather arrives and frost is no longer a threat you can put the potted amaryllis outside for the summer, taking care of it as necessary. Amaryllis plants need little water so don't overwater them. You can plant them straight in the garden as well.
- Dig it up September 1st, cut off the leaves and a lot of the roots (leave 3-4" of roots)
- Place bulb in a paper bag and store in a cool room to dry out and go dormant.
- On November 1st, replant them in a small pot.
- They'll rebloom in 6-8 weeks.
*you don't have to immediately pot it up after 8 weeks. You can wait another month before potting it up if you like.
Waxed bulb tips
- Don't soak your bulb in water for longer than 8 hours. It can turn to mush.
- When you cut off the basal plate make sure you do it straight so your bulb isn't tippy. Your flat cut is what will keep the bulb stable.
- If you're using spent candles for your wax, like I did, cut the burnt part of the wick off otherwise it'll get your wax dirty looking. Don't worry about getting rid of the wick, the wax will just melt away from it.
- For heating your wax I HIGHLY recommend putting the wax in a tin can and setting that can in a pot with some water in the bottom. It keeps your pots clean. Plus if you have leftover wax you can just put the whole can, wax and all in the cupboard and pull it out when you need to wax something else.
- Don't forget to wax the bottom of the bulb. The whole point of waxing is to help the bulb retain moisture so as much of the bulb needs to be waxed as possible.
- I used Dollar Store gold leaf which was basically a mess of small gold leaf pieces. To make things easier you can buy whole sheets of gold leaf.
Amaryllis Bulb Buying Guide
When you buy your bulbs for waxing pay special attention to the size of the amaryllis. Amaryllis with HUGE flowers are going to be very top heavy and have a tendency to tip over.
Also pay attention to the bloom time. Different bulbs take different lengths of time to bloom. To get your flower to be on full display at the time you want you need to know how long that particular variety takes to flower.
Most grocery stores carry box kits of Amaryllis bulbs and that's where I usually pick mine up. But if you want something other than the standard white or red flowers there are speciality bulbs you can order online.
"Charisma"
This red and white specialty Amaryllis looks paint spattered.

![]()

![]()
"Coral"
Not in love with the traditional red & white? This orangey coral coloured ones would look beautiful.
More subtle, but still a deviation from red or white.

![]()

![]()
Sure it's red ... but look at it! A double amaryllis with double the petals.
Those are just a few. If you go even further into Amaryllis world you can order from specialty places like Brecks but they're already starting to sell out of a lot of bulbs.
Making these waxed bulbs is fun to do. Like, 100%, I should totally have a bulb waxing party. Which of course would be much more fun than any other sort of waxing party. It's easy, the results are great and it's weirdly satisfying to paint wax on a bulb then cover it with gold foil or sparkles.
Happy waxing.
→Follow me on Instagram where I often make a fool of myself←


Mary W
WOW wow and another wow! The first time I visited your blog it was due to a DIY about glowing garden globes. I subscribed immediately and have always been happy with spending time with you. Now this! Gosh, a globe with a bulb next to it would make a pretty sight in my bedroom for a night light! You are wonder woman with a big, inquisitive, and imaginative brain!
Amy
Could one use melted crayons rather than paraffin?
Lora Hyatt
Awesome post! But there is no way I can cutoff the bottom ! My bulbs are coming out of the dark today so they will bloom. I think I’m going to wax them though. I grow mine with no soil suspended with their roots in water glass containers vases filled with clear glass pebbles. Put them outside in the warm weather then into the dark completely dry for a couple months. Bring them back out in winter and they bloom! More flowers shoots each year! But I love the wax idea mostly with the Gold! What exactly is that? Where do I get it?
Thanks for your inspiration!
Karen
Hi Lora, it's gold leaf - all the instructions and where to get materials are in the post. Good luck ! ~ karen
Katt Hunsaker
How are you handling the tippy once the flower starts? They are quite top heavy aren’t they?
Karen
They are but the bottom is now completely flat and quite wide which will stabilize it quite a bit. I have a plan up my sleeve if they start to tip which involves a flat board and a nail. Basically I'll just hammer a large nail through a board from the bottom up and then impale the bulb. ~ karen!
Zachary
How can people be so cruel to such beautiful creatures!!!?
Billy bob
Someone needs an IQ test......🌷
Billy bob
You need to be tested.....is there such a thing as a bulb head? Or are you just short a few marbles?
Jen Topp
You have the BEST dollar store!!!
Sue Schneider
Once again, Karen, you have proved your resourcefulness and its attendant brilliance! Thank you for this idea! I’ve done amaryllis only once or twice in the past, but your take on it really appeals to me. Who wouldn’t love flowers sans dirt??
Gabrielle
I would like to hear, after this experiment is complete, whether the flat bottom of the bulb really keeps it upright. I have never been able to keep them from tipping over, no matter what vase or etc. I have used.
Also, does cutting off the roots mean you won't be able to plant and grow the amarylis for next year?
Karen
Yes, you're definitely lessening your chances of regrowth by cutting off the basal plate. Occasionally they will regrow. But since I never save my Amaryllis bulbs and throw them out I wasn't worried about that. I only have so much room and time in my life and getting rid of Amaryllis bulbs is something allow myself to do without guilt, lol. ~ karen!
Zachary
Then you really shouldn’t be allowed to own amaryllis plants. It’s morally wrong but sadly legal. Somewhere in Switzerland a plants rights bill was passed. I wish that would happen here so your cruelty and arrogance would be shunned... how can you care so little about a creature that can live as long as you?
billy sharpstick
I'm going to frame this and put it on the wall: "Half the time I look at them in the cupboard and think WHAT am I saving this crap for. The other half I pull them out and think WELL thank the lord I saved this crap. "
Mainly for my wife to see when she accuses me of hording.
One thing that might help is to somehow add a wide base to it. The one I bought my mom kept falling over, more and more as it grew more top heavy.
Karen
If you keep the bulb close to a light source they have a tendency to grow a shorter flower. Some of the ones you buy in stores have heavy duty wire wrapped around the bottom to act as a bit of a stabilizer. I experimented with that but didn't like how it looked, lol. So I'll see how these do and amend next year if I have to. ~ karen!
Penney B
One out of 9 of mine was top heavy, I just set it in coffee cup and all was well.
Mary Michelle
I've had good luck reblooming my amaryllis bulbs, but waxing them with your DYI instructions would make great gifts for my "black thumb" friends, who always forget to water their plants or drown them instead. Thank you, Karen.
Linda Hambleton
i bought one of these already done from my local gardening centre last year as a gift for my mom. after it finished blooming, she peeled off the wax, and planted it in a pot - and it grew!
Karen
It may not flower. But if not enough of the basal plate was cut off then yep it could technically grow again! ~ karen
Ramona
“How many more examples do you need?” Hahahaha :)
Suzette
Is the paraffin part important? Or can I use beeswax?
Karen
Beeswax would be fine, I just chose paraffin because it's the least expensive and most readily available to most people. ~ karen!
Jenny W
Simply beautiful, this one I've got to try <3
Oh, and your photography for these is spot on!
Karen
Thanks Jenny! And yes, absolutely try this. It's so fun! I'll post an update photo on Instagram in a couple of days to show their growth. ~ karen
Cathy Reeves
Ok, now I get to be in your league, this I can do. No way am I gonna whip up my own patio furniture or rip up my floors let alone sand/finish them!!
You haven’t gained weight, that’s just me riding tour coat tails😬
Karen
LOL!! ~ karen
Jennifer
This DOES sound fun. I’m not sure I could intentionally murder a bulb, though. Neglect, rot, misplacing bulbs - that’s more my style. You’re a stronger woman than I.
Still, it really does sound fun...
Constance
What kind of paint did u use that would actually stick to the wax? Thank you
Karen
Hi Constance, I didn't try the paint. Mine are just sparkles and gold leaf. I suspect any spray paint meant for plastics would work like Krylon. Amazon sells this mini can of gold spray paint that works on plastic according to the Krylon website. Your local hardware store would have a ton of choices too. ~ karen!
Constance
Thank you most kindly
Shauna
Do you need to buy special amaryllis bulbs or chill them or anything? Or are the kind that come in bags from the garden center fine?
Karen
These are regular Amaryllis bulbs that you'd buy at Christmas. The ones that usually come in a box with a pot and about 3" of peat moss. They're sold as kits. ~ karen!
Jo
Hehe. Before I got to number 4 I was thinking "good lord - I'm Not going to melt wax in my pot!" Karen must have 'spare' pots for such tasks. uh-uh. Not for me...
And then, reliably, you provided an elegant, and in hindsight Obvious solution. So easy! So elegant!
Thanks for putting Your thinking cap on for those of us who manage to miss the easy solutions.
ecoteri
Jo, even more elegant is to use the tin can in a cheapo Sally Ann pot - don't do wax in your favourite cooking pots! My mom made candles for the "church bazaar" for years ( use a tall cream carton, fit in a candle, fill the outsides with ice cubes, pour in the wax. peel off the carton, cover the wax with glue and put on sprinkles. I know, awesome, right?. I thought so when I was 5). She had a pathetic old pot into which the wax can was placed. Never use your good pots.. Wax goes everywhere.....
Wendy W
These are fantastic! Do you think any other type of bulb would work?
amanda
I have the same question. Could you wax paper whites?
Karen
I'm not sure, but my guess is the reason an Amaryllis bulb works is because it's so big, it can retain a lot of moisture in it. A paperwhite is much smaller for instance. I was going to try the paperwhites later this year so I won't have a result until then I"m afraid. :) ~ karen!
Tina
Do you have a fabulous dinner roll recipe? Mine were kind of questionable last year.
But FABULOUS bulbs!
Karen
I make brioche buns. Nothing is more delicious than a brioche bun. I use the recipe from the New Artisan Bread in 5 minutes a Day cookbook. ~ karen!
Kristin Ferguson
My family insists on Katherine rolls. My eldest daughter is named Katherine and she loved these rolls as a kid. I would often make them for somewhat special dinners, but they have come to be expected at holiday meals.
12 oz warm milk
5 oz sourdough starter, if you keep a starter (if not, try it sometime!)
1.5 Tbs. yeast
1.5 or 2 oz sugar (depending on how sweet you like your rolls)
1 lbs 2 oz all purpose flour
1 egg
1 Tbs Crystal Diamond salt (or slightly less Morton's Kosher, or less again table salt. Taste the dough to check for saltiness.
4 oz soft butter
Egg mixed with a tiny bit of water and some salt, for the egg wash
1-2 Tbs sesame seeds, poppy seeds, or whatever garnish you like (optional)
Combine milk and yeast with sugar and starter. Let sit until yeast has dissolved/softened. Add flour and knead in Kitchen Aid low speed two minutes. Rest, covered with plastic, and put the salt on top of the plastic. After 20 minutes, dump the salt in and add the egg. Knead until the dough windowpanes (this means that when you pull a piece of dough up and stretch it out it gets thin and translucent before breaking, as if it were a window you could look through.) Exact measurements of flour and liquid are often impossible since climate can change the amount of moisture in your flour, so just try to make a very soft dough that has some body. Add butter and knead until incorporated. The dough should clean the sides of the mixing bowl, but only at the higher speeds. At lower speeds the dough is too soft to clean the bowl. Dump dough out onto floured counter and fold like a business letter, then fold across once in the other direction. Rest a few minutes and repeat. Let rise, covered, for 20 minutes, then punch down by folding again in the same manner. Weigh into 3 oz balls (in a professional kitchen, I weigh the balls, but at home I just eyeball it), place on a parchment-lined sheet pan, cover with sprayed plastic wrap (spray the side that will touch the rolls, obviously, and don’t wrap tightly or in any way that would restrict the dough from rising vertically--leave some room under the wrap because the rolls rise a lot) and proof until very soft and pillowy. Egg wash generously, and sprinkle with sesame or poppy seeds (if desired--I usually do some sesame, some poppy, and some plain.) Now take a pair of shears or scissors, hold them vertically, and snip a small X into the top of each roll. This part is also optional. For more perfectly round rolls, omit this step. Bake 375 or so for about 25 minutes, or until browned properly.
Note: my oven is hotter on the bottom, so I double-pan the rolls so they don't burn on the bottoms.
Note on sourdough starter: I bet you have a friend or neighbor who keeps one. If not, it is easy to make. Just mix 2 Tbs of flour and 2 Tbs of water in a bowl and cover it loosely. Somewhere around 8-12 hours later add another 2 Tbs flour and 2 Tbs water and stir. From then on, just add enough flour and water to roughly double the volume of your starter each time you feed it, which should ideally be twice a day. After maybe two or three days you should have something that looks bubbly and smells slightly sour (you will eventually have to either throw some away or use some to make bread, because you are doubling it each feeding and that is not sustainable.) When you are finished using it for your holiday baking, pop some in an empty yogurt cup (labeled!) in the freezer for another time, and also pop some into your fridge where it will keep for weeks. To activate it, just feed it again a couple of times and leave it out on the counter.
Tina
Thanks Kristin! I’ll save that for next time.
For Thanksgiving, I made Karen’s suggested soft brioche and they were SO good and so easy that I made another batch today to have for this week. I do love fresh baked bread!