Life is full of compromises. You want to get more sleep but don't have the time. So you allow yourself to nod off whenever possible; during a movie, standing in line at the grocery store, in the middle of anyone talking about their kids. See? You compromised.
In order to get one thing done, chances are, if your life is full, you have to deal with the fact that some other thing is NOT going to get done. You take the kids to hockey practice knowing that means the laundry won't get done. You do the laundry, knowing that means the homemade meal is not going to get done. You make the homemade meal knowing that means you won't get to sit down for 3 hours to binge watch The Mindy Project.
Life is compromise after compromise and that's why you can't get everything done. That and the thought of doing certain things sends you into such an upset you develop eye warts and spectacular stomach distress.
Such is the case with The Gallery Wall. I know you want one. So did I. I know you're putting it off. So did I.
I could say I haven't done the gallery wall I've wanted to do for the past 5 years because I haven't had time. I could say I had to take the kids to hockey practice. But those would be boldfaced lies. I watched 4 seasons of American Horror Story in a day and a half just last month. I had time. Plus my kids aren't enrolled in hockey. Plus I don't have kids.
So ….
A gallery wall is one of those things that you don't know where to start. You don't WANT to start.
Want to know the trick to starting a gallery wall?
Imagine someone has a gun to your head. Simple as that.
Then start by dragging all your art into one room and confront it. Look at it, take it all in, then boss it around. YOU are going to make a gallery wall.
GALLERY WALL RULES (to ignore)
#1. Use photos that all have the same coloured frame.
Yes, using frames that look the same either in shape, size or colour makes the job a bit easier but it also makes for a less interesting gallery wall.
GALLERY WALL RULES (to ignore)
#2. Use all black and white pictures.
Sure if black and white is your thing, go nuts, but this is definitely a rule that can be ignored. In fact I think an entirely black and white photo wall would be pretty boring.
GALLERY WALL RULES (to ignore)
#3 Trace your frames onto paper and then tape the paper to the wall so you can arrange your art without having to hang it. Once you find a configuration you like, you can hang your actual art therefore eliminating the dreaded "Wall of a thousand holes".
This tip is worth looking at for some people. It just didn't work for me. I tried to use this tip but gave up on it. The paper kept falling off the wall, I didn't have the patience to cut out patterns of all of my art (I just wanted to get going on hanging real art) and this method doesn't take the actual images or even the look/colour of the frame into account. Just the size of the frame.
So if I ignored the rules, how did I do it? How did I finally make a gallery wall?
Like so.
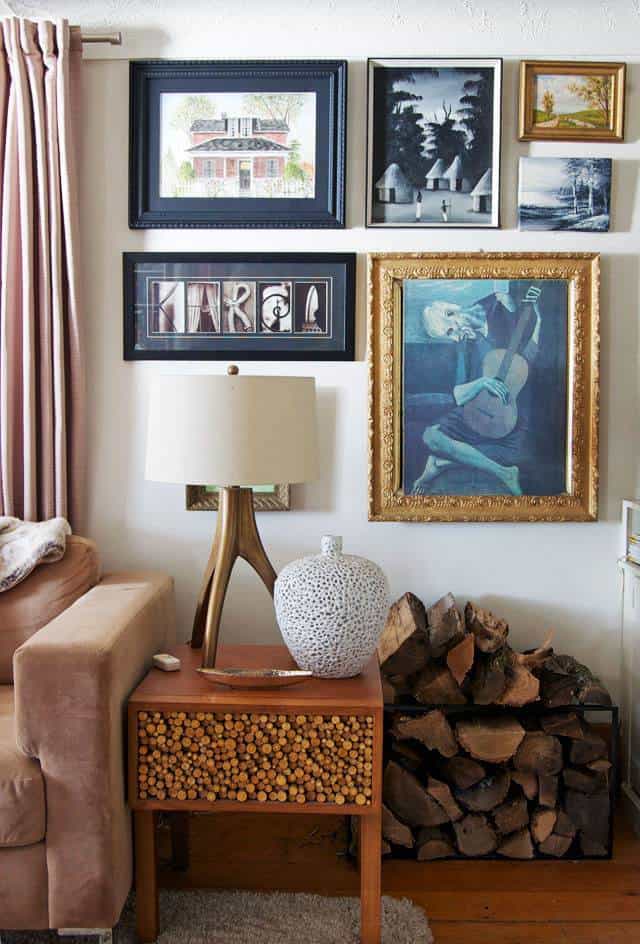
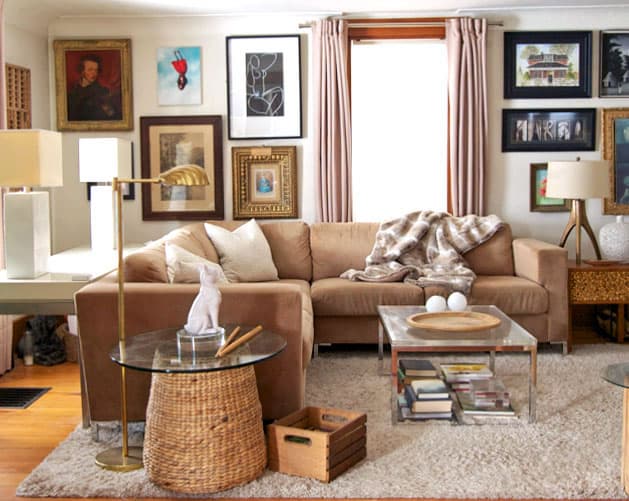
I dragged up every single picture that's been sitting in my basement and around my house. Stuff that wasn't remarkable enough to look good all on its own, or didn't fit the space or whatever.
If I had a recent photo of my walls before doing the gallery wall here is where I would put it. But I do not. Don't ask me how I don't but I don't. I do have a photo of the left corner of the room. Here it is.
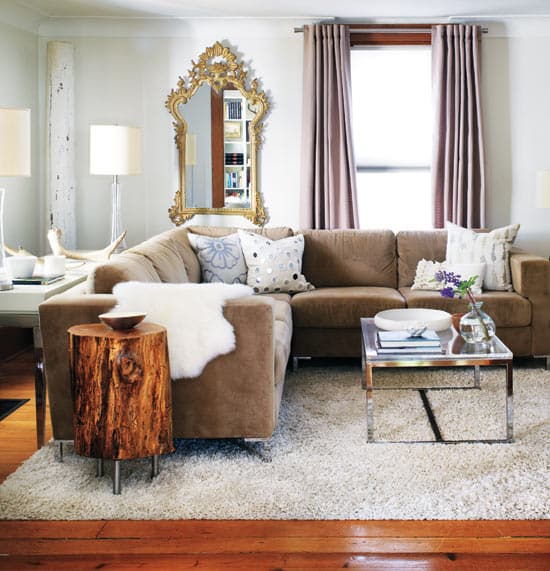
photo by Donna Griffith for Style at Home Magazine
That picture, even though it's many years old, gives you a sense of what the room was like before I made the gallery wall. Mainly because it was exactly the same for many years. In addition to adding the gallery wall I changed up a few tables, accessories and lights.
The rattan table at the end of the couch is actually a basket from Target that I was using as a log holder. Since it was replaced by my Ikea laundry hamper hack, I put a piece of glass on it and it now acts as a table. The reading light over it is a vintage piece I found at my local Bible/thrift store for $9.
O.K., back to picking out your art.
Would you like to save this stuff?
It's entirely possible you don't have this much hidden art in your basement or on walls around your house. That's fine. You'll build your gallery wall over time.
KAREN'S GALLERY WALL RULE (feel free to ignore)
Pick your statement piece (usually the largest frame) and work out from it.
I had a lot of big pieces so this was hard for me and it might be for you too.
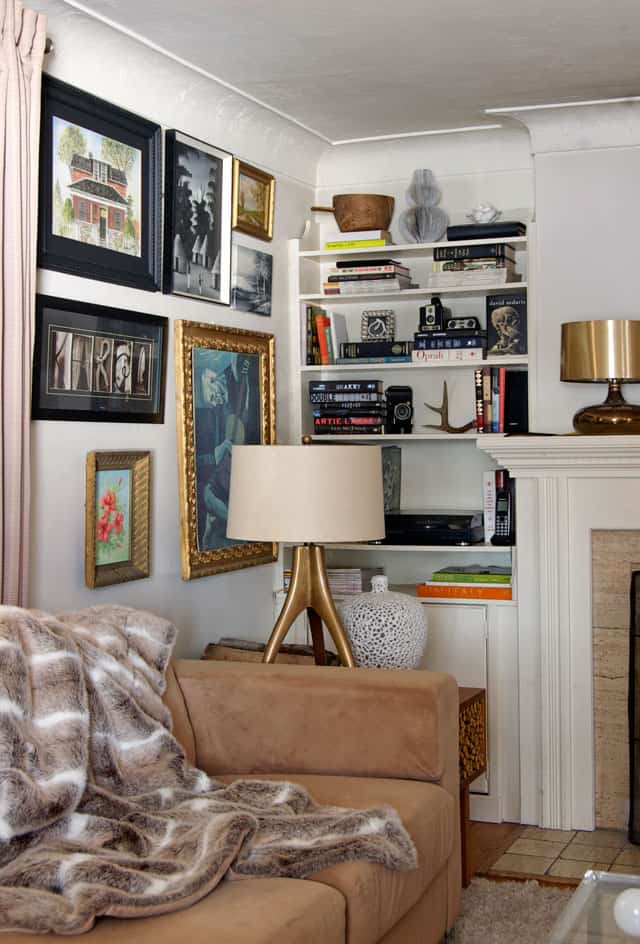
I knew I wanted my Ikea purchased, Matisse line drawing print (black and white with boobs) adjacent to my antique gold frame because of the dichotomy and how well they complimented each other. So those were the two pieces I hung first.
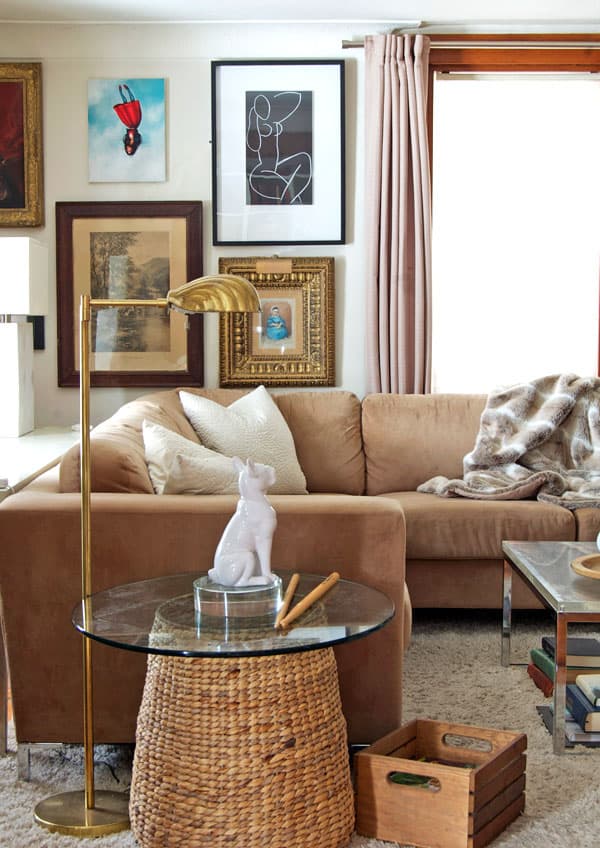
Then I hopped over to the righthand side of the window and hung the anchoring piece for that side. The blue period Picasso print in the gold frame ( It's kind of just propped in the gold frame right now but I hope to have it actually framed in the next decade or so. Give or take a hockey practice or two.)
Technically (and if I were to follow the rules) this piece should either be centred on the wall or immediately to the right of the curtain panel. But if I did that then my favourite piece of art in the whole room would be partially blocked most of the time. So I broke the rule and hung it where you'd see it the best. See? The rules don't always work for everyone and if you can think of a good reason to break one, I highly recommend you do so. You'll thank me for it later. Unless you're Jewish and you're eyeing a bacon double cheeseburger. In that case, you're on your own.
At this point I had my 3 major pieces hung and it was time to get the rest of them up. I laid the remaining art on the floor of the living room according to size and/or colour.
Then I matched up frames to fit the spaces available. By just laying everything on the floor side by side I could basically see how they'd fit together on the wall. What you're doing is making an art jigsaw puzzle really.
It may seem all willy nilly when you look at this sort of gallery wall, but if you really look at it you'll notice something holding everything together. If you look at my wall below you'll notice that the top of all the frames line up straight. O.K. the gold frame is a little slanty but that's just where a wombat landed on it before I took the picture. I was also able to make them line up on the bottom of their frames, but this isn't necessary. It was just luck.
You can also see that all the pictures have a similar sized space in between them. This helps calm the riot of art down a bit. It makes it easier to look at.
KAREN'S GALLERY WALL RULE (try not to ignore)
#2. If you want this sort of classic, collected over time, gallery wall feel, use a mix of paintings, prints, drawings and photos.
The point is you just have to sit down and do it. Making a gallery wall is one of those things that's way more intimidating to think about than to actually do. Once I got rolling it was way easier than I imagined it was going to be. Like, way easier. For one thing I kind of imagined it was going to be like drowning puppies or showing your boobs to your neighbours. An absolute nightmare.
But it wasn't.
To recap:
1. Pull out all the art in your house and put it on the floor in one room.
2. Hang the biggest, most dynamic piece first then just start working out from there.
3. Working with similar shaped or coloured frames is easier but won't have quite as much impact.
4. Lay pieces out on the floor and move them around seeing which ones will fit best together.
4. Mix prints, photos, drawings and paintings.
5. Tame the wall a bit by making sure some of the edges line up or there's a relatively equal space between the hangings.
But really my most important piece of advice is just start the stupid project. Just start it. If you can bring yourself to do that you'll have done the hardest part. And understand you'll have to make a compromise. So the day the gallery wall gets done, shovelling up the dog crap from the yard might not get done.
Gallery wall's not lookin' so bad anymore is it?


Deb J.
I designed a gallery wall for my daughter. She wanted one to fill the space over her couch in her bachelor apartment. She only had a couple of items and virtually no money so I was working with a blank slate. Very liberating! And a bit of a challenge. In the end, I created a rectangle above her couch and defined the four outside corners. Then I filled in the space with pleasing shapes. She took my drawing and raided my supplies, haunted thrift stores, etc and filled in the space. It contains art she made, thrifted mirrors, antlers, feathers, etc. Even an old wrapper from some seam binding. It looks great. I want one in my house but cannot make it happen. I keep getting stuck on two groups if three that I own. I know I should just break them up but .... It is a lot easier to do things when you don't have to live with them:)
Jennie Lee
I, too, miss your log table. I want one myself. I noticed recently that Ellen has one on her show, where she sits down to interview guests. Please tell us you found an even nicer place for it.
Melanie
The girl in the clouds (tiny on my screen, but looks almost Edward Gorey-ish -- her legs and hair, I think) has Talking Heads' And She Was stuck in my head. Think I'll go listen to that right now!
Diane Amick
OkieGirl I can help!!
I have the same situation, plus (!) I have a very open floorplan which means I have virtually NO walls in my LR (a 11' opening into the DR, a wall of frenchdoor/fireplace/frenchdoor/ a 10' opening into the kitchen). The ONLY wall is where the 47" flatscreen TV lives. It looked like a large black hole into which the world got sucked. I started at the vaulted ceiling top directly above and centered on the TV with my largest piece and worked my way out to both corners from there. I guess what helped was that this wall has chair molding and grasscloth wallpaper below it, so really I was working with about half the wall space. It has very eclectic artwork - everything from a framed oriental fan, not one but two feather wreaths (different sizes and colors), crossstitch, glass mosaics and line drawing nudes, three oil paintings of fruit, a bird print, roosters (three - one in oil, one crossstitch and one mosiac), and two family crests framed alike but hung at a distance from one another. I don't think it causes any problems with watching the TV - the TV actually gives your eye a place to rest on the wall. It did take awhile, but I LOVE IT.
kathleen
loved this so much i felt compelled to comment!
Karen
Thanks Kathleen. I appreciate it. I'm really, really happy with how it turned out and I wish I'd done it sooner! ~ karen
marilyn
sweet!
Traci
We are filling up the 2 story wall in our stairwell like this and did a gallery wall in the living room as well. For the living room, it was easy to lay things out on the floor to arrange and just hang. For the stairs we did find the paper trick to be essential for the first round, but now we just add to it piece by piece. I found arranging items by color tones helped calm things down and each color family blends to the next. It doesn't scream color coordinated (no rainbow effect), but it does allow for some visual flow.
OkieGirl
HELP KAREN!!
I love this and have been putting it off for three years. Karen, I love that you chuck the rules and come out on the creative end. But!! What about the large wall a large a## TV is hung on? I've seen stuff hung around the TV in Pottery Barn catalogs...but the rules followed and it looks a bit on the boring side. But how do you, or do you, introduce the variety of photos and art that you have so done so well without interfering with watching the boob tube? My fear, or really, my husband's fear, is that the things hung around the TV will distract from watching Scandal. Any tips?
Karen
Hi OkieGirl - The things hanging around the television won't interfere with watching it unless you're watching something really boring. I also strugle with my television. I hate it! At the moment it is on the wall opposite the corner of the couch with the brass, 3 legged lamp. It's on an articulating arm and sits across the corner, not flat on the wall. To the right of it I have another print on canvas hung. It's my least favourite corner of the room but my most necessary. :( I think that in the case of the flatscreen television, either placing it on a *black* wall, or surrounded by black framed photos/art helps to integrate it. ~ karen!
Allison
My recommendation is to treat the TV as your anchoring piece that Karen mentions above. If you use a variety of frames and art, it won't be boring. It shouldn't distract when the TV is on, but will make the TV less noticeable when it's off. :)
We are planning on doing this soon once we do some rearranging of the furniture in our living room.
Linda Weber
I think your gallery wall makes the room seem larger (or as designers would say - it expands the space lol)
Karen
LOL. And it really makes the couch "pop", ;). Thanks Linda. It just makes the room feel more complete and more like it's been there forever. Less decorated, more lived in. Which it is. I've barely left the room since redoing it. ~ karen!
Tigersmom
Oh, and my trick for keeping frames from tilting is to use museum putty underneath the two bottom corners. It doesn't harm the walls or the frames and keeps the pictures level and aligned until my son pulls it out to make creatures out of it.
magali
I had a gallery wall in the apartment we just moved out of and now will have to start over. My problem wasn't getting the art on the wall, my problem is with getting prints framed! Every time I buy a new print it just gets taped to the wall in it's protective plastic and I picture the frame I want. And every time a Michaels frame sale comes along I put the coupon/ad on the fridge and my husband and I promise each other we will go together. And every single time that coupon ends up going in the recycling weeks later. Our compromise is binge watching Suits. The vicious cycle needs to stop!!
Tigersmom
Your wall looks awesome! The room looked great before, but the artwork really warms it up. Now I want to know where the gold mirror is living and did you put a glass top on your log table and is that what I am glimpsing in the bottom right corner of the third picture?
My trick for settling on a layout without putting a zillion holes in the wall is to lay out a cheap roll of white (or if it's not white, just use the backside of it) wrapping paper on the floor and then arrange the pictures on top of it. Once you like the arrangement, trace around the frames and then you only have to get one piece of paper to stick to the wall and you have a pattern of your arrangement in case you get interrupted and can't complete the hanging job all at once. If you have multiple frames of the same size, you can just write the title of the work or a brief description inside your traced outline of the piece. I figured this out when I was hanging a wall of crosses years ago. It saved my sanity.
Also, I have been known to use duct tape (on the backside) to hold a picture into a frame instead of actually shelling out to have it affixed into the frame by a pro. I'm strangely fearless when it comes to opening up the backside of a picture and repurposing frames. I've done it countless times.
Karen
Gold mirror is now over a bookcase made of butter boxes in my office and the other log table you see is an unfinished one without legs. :) ~ karen!
Shirley
Love your "KAREN" picture! Took me a while. :)
Kat
Beautiful job Karen. I once did a gallery wall of all mirrors, I loved that wall. Did you order those black and whites to make your name? I would like to do one of my own so will be on the look out of for ones to do my own name with my own photos, such a unique piece!
Karen
The fella got me that for Christmas a few years ago. It was really popular around here at the craft markets for about one summer. I'm actually going to replace my name with black and white photos of my chickens when I get around to it, lol. ~ karen!
Su
Black and white photos of the chickens will look great!
Jody
Very eclectic mix of art. I love it. What the story of the upside down guy?
judy
I love everything you do and the humor is icing on the Cake but I have to say the guitarist gives me the Willies. I would have to invite him to put down his guitar and come have a couple of double bacon cheeseburgers and maybe a nice new outfit........... and shoes? and try playing a tune that brings a nice smile to that face.
Karen
Ha! That's The Old Guitarist by Picasso. It used to hang in my grandparents attic and it scared the CRAP out of me! It just creeped me out. But it was their house I also secretly went through medical textbooks of malformed babies etc., so it was the lesser of two frightening things. It always terrified me but I grew to love the scary guitar player. :) ~ karen!
Jenny W
I recently added a gallery wall to a narrow staircase leading up to my two teenager's bedrooms,
Like you, I just winged it :) Had a "kind-a-sort-a plan", and just made it pleasing to my eye.
May I just add, for all those worrying about nail holes, to use command hooks, and command sticky spots for the corners. Soooo worth it!
Grammy
Nice job on the gallery wall. It's nice to get your artwork up where you (and we) can enjoy it.
But where did your log table go?
Karen
It's just over in the foyer under a painting on a very, very narrow wall between a window and door. It's moved over about 8 feet, lol. ~ karen!
Nur Costa
This looks awesome, Karen!
Nice job! I know it must have been hard to pull this one. But the writing of this post and the pictures are GOLDEN.
Congrats, and enjoy your new wall! :D
Karen
Thanks Nur. :) Once I decided I was doing the wall actually, it wasn't that bad. ~ karen!
Tracy
Thanks for this! Ironically, I pulled all of our art out on Friday night and organized what I thought I wanted (on three different walls), then also cut out paper to hang up where I thought the grouping should then go. I have also been putting this off - and it took some time, but now all I have to do is actually put the nails in the walls. The hubs is opposed to nail holes, so it may take a few hockey practices before I gain his commitment! :) Feels good having a plan though! ;) Your walls look GREAT!!