If you've ever thought about making a tree stump table, fall is a good time to actually do it. That's right. It's tree stump season! Fall sees a lot of firewood deliveries and trees coming down in storms which gives you, the intrepid reclaimer, easy access to tree trunks. Let's get started.
10 years ago I made a tree stump table. It got shared, copied and posted about so much it's one of 3 posts that I consider to have kickstarted my blogging career (thanks in part to Design*Sponge loving it too.) That table still sits in my living room looking as good as the day I made it.
Stump tables, made out of tree trunks, are one part architectural piece, one part table, one part bugs. Don't worry. We'll get rid of the bugs.
The point is they aren't just a place to put your coffee, a stump table brings the outside in giving your room a cozy organic feel.
They can feel modern or completely hygge and organic. It depends on how you finish them.

FYI! You can also use these as bases for a stump table with a glass top.
These two tree stump ideas are for using them indoors and no chain saws are involved.
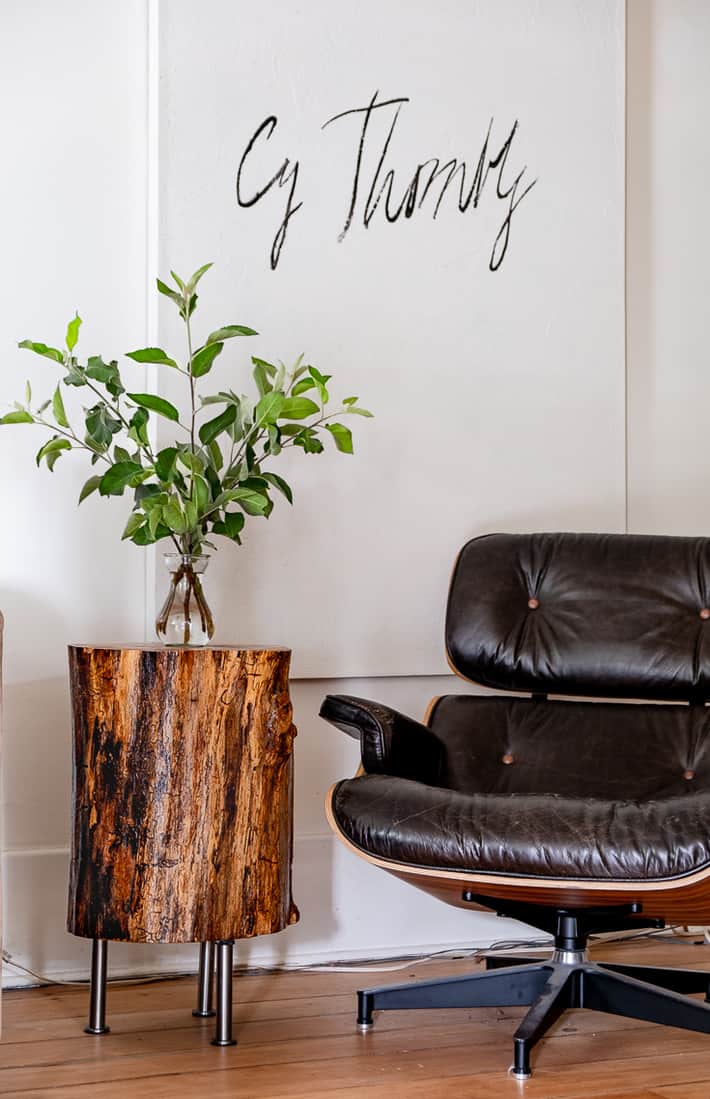
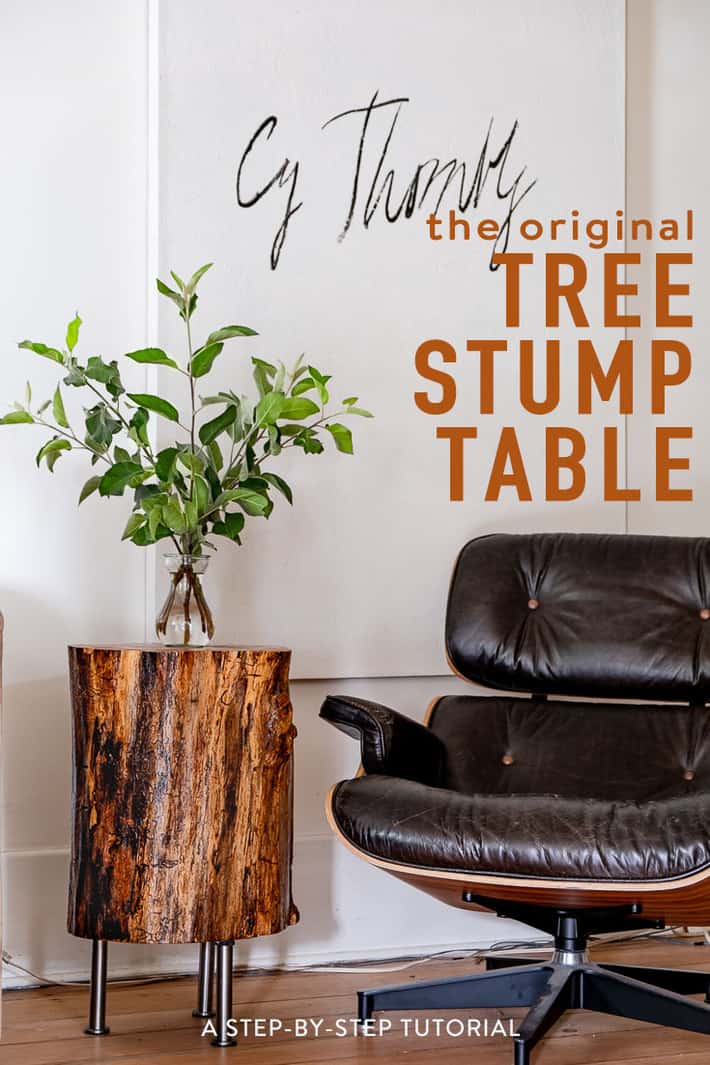
I'll show you how to make an unfinished table that's similar to the famous Crate and Barrel tree stump table and a finished one that sits on tall legs.
First the finished stump table that's on legs.
Table of Contents
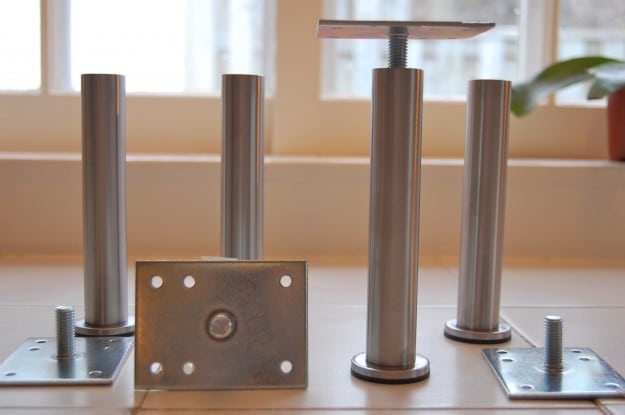
Materials
- Tree stump
- Sandpaper (medium and fine grit)
- Polyurethane (high gloss, semi-gloss, satin … whichever you want) I used satin which has just a nice sheen
- Paint brush
- 1 package of 4, 6" Capita legs from Ikea (these legs aren't available at Ikea anymore but they ARE available on Amazon.)
- Drill and appropriate bits
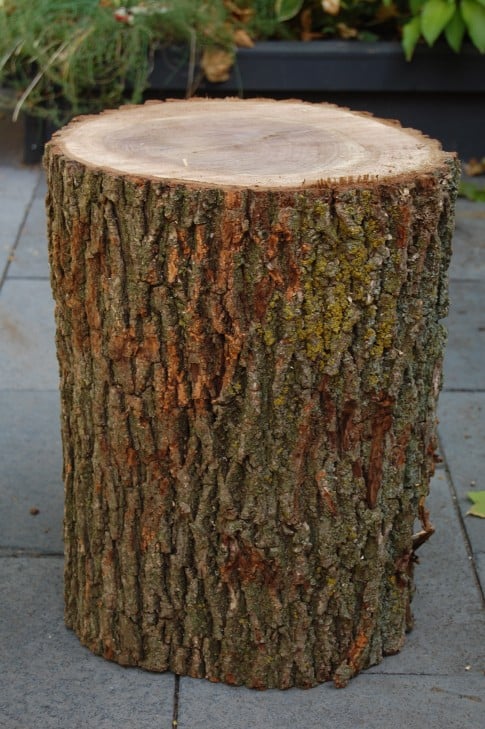
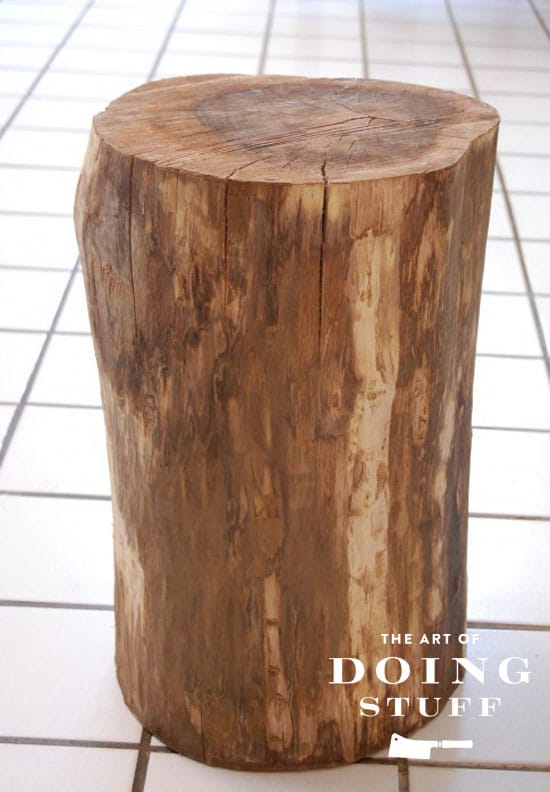
First things first. You have to get yourself a tree stump.
Where to find a tree stump?
Keep your eye out for city workers or private tree companies taking down trees. Pull over, ask them if you an have a section of a branch if they're big or the stump. Simple as that.
Call up places near you that sell firewood. They advertise a lot during this time of year so they'll be easy to find. That's what makes fall tree stump season!
I got my stump delivered with my yearly wood order.
How big should it be?
It depends if you want your table to be on legs or sit directly on the floor. I like the look of legs.
Your legs will be 6 inches high, so figure out how tall your stump needs to be for where you want to put it.
Generally you're going to want a tall tree stump for this.
If your sofa has arms at 25" and you want it to be around level with the arms, then you need a stump that's 18" tall.
My stump is 15" across by 18" high, with the 6" legs it's a total of 24" high. This brings it to just below the arm of my sofa.
Steps
Step 1 DRY IT
Allow your stump to dry out for at least a month. It’ll lose several pounds and the bark will loosen, making step 2 easier.
Coincidentally if you allow yourself to dry out for a month you’ll lose several pounds too.
You can dry the stump outside for a couple of months, then bring it inside for a couple of weeks.
If your stump was already cut and dried from wherever you got it, you can just bring it inside for a couple of weeks.
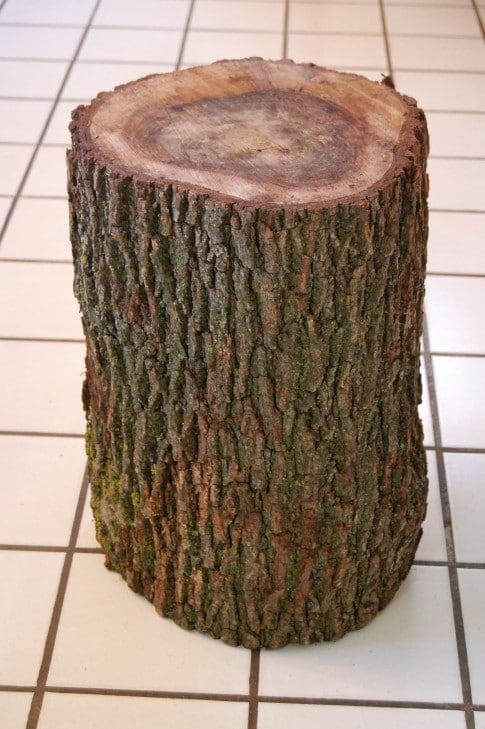
Step 2 REMOVE THE BARK
Now the work begins. You have to remove the bark. Sometimes this is easy, sometimes it isn't.
The first stump table I made was from Oak. The bark just pulled off with my hands.
The second stump table I made was from Walnut. The bark was a nightmare to remove. I needed an array of tools and a 14' length of prayer beads.
To remove the stump's bark, you'll need these tools to do it:
A Hammer
A Prybar
After your stump has dried inside for a couple of weeks insert the prybar between the bark and the stump. Hammer it enough to loosen the wood then either keep hammering or pull the bark loose with your fingers. Keep doing this all the way around the stump until all the bark is off.
And yes, you do need to remove the bark. If you don't, over time it'll loosen and fall off on its own leaving you with a cruddy looking piece of crud as a table.
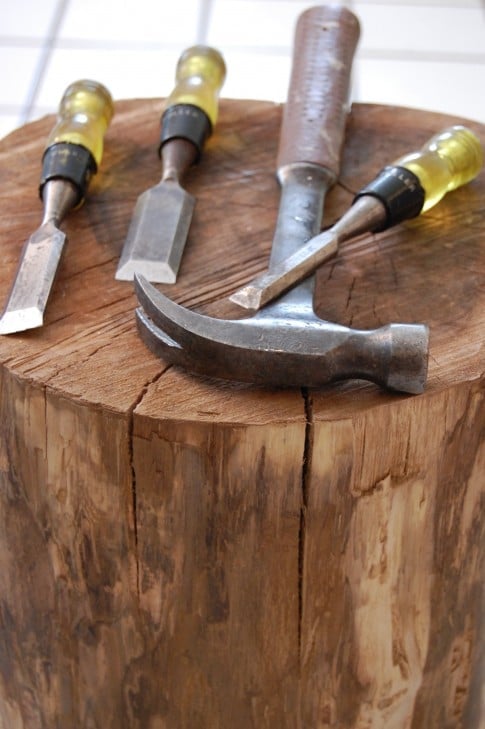

If the bark is particularly stubborn, like this stupid thing was ... do the same thing but with wood chisels. They're sharper and will cut through the fibres between the bark and the stump better than a prybar. Be careful not to hack into the wood with the chisel though.
Do not hack into yourself either. Wood chisels are sharp on all sides, not just the tips, so be careful.
Now your stump is cleaned of its bark.
When it's dried out the stump might split a bit like this. That's O.K. It adds character.
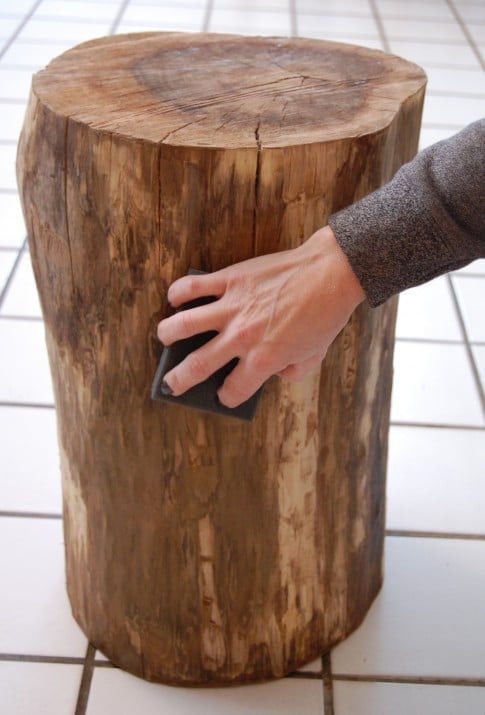
Step 3 - SAND IT
The stump now needs to be sanded to get all the little hairs and slivers off it.
You need a smooth stump. Use a variety of sandpaper grits to sand it smooth.

Start with the coarsest grit, gradually working your way to sanding the stump with the smoothest grit.
Get rid of all the hairs.
Sand until you can run your hand over the stump and it feels smooth.
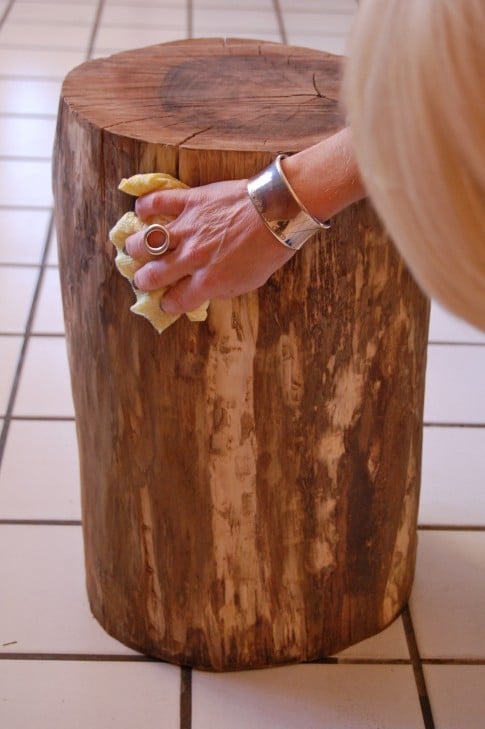
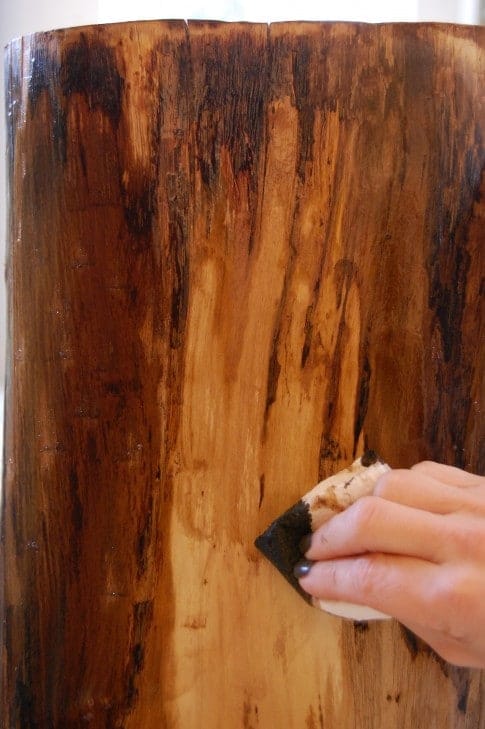
Once your stump is smooth wipe over it with a damp, lint free cloth or a tack cloth.
A lot of wood dust will come off. Keep wiping until your cloth comes away clean.
Now flip your stump over and get ready for the fun part.
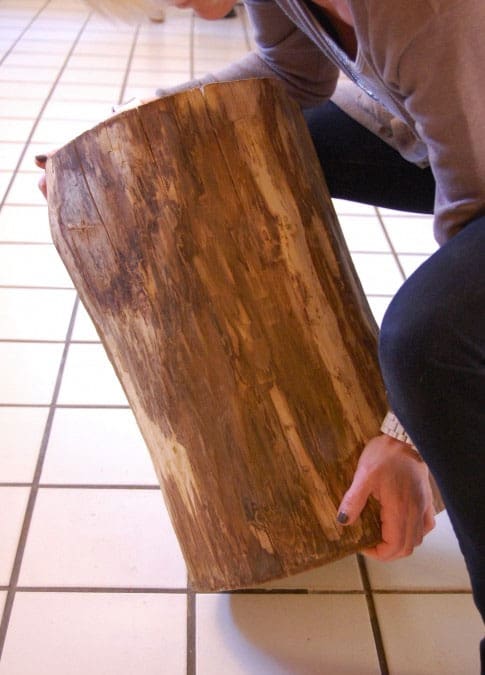
Step 4 - ATTACH THE LEGS
Get your pre-purchased legs. Like I said, mine are the Capita legs from Ikea which are soon to be discontinued. You can buy the exact Ikea Capita legs on Amazon though.
To make the end table more like the $900 Crate and Barrel one, ditch the long legs and use little bun feet like these instead. You'll also need a wider, more squat stump.
Each leg comes with a bracket that you screw into the base of your table.
Whatever kind of legs you get make sure the height is adjustable like these are. Adjustable legs on the table means you can make sure it's level without having to squish up a folded up piece of paper. Or if you're a certain age and type - a book of matches.
Don't forget. Adjustable legs are the way to make sure your stump table is level.
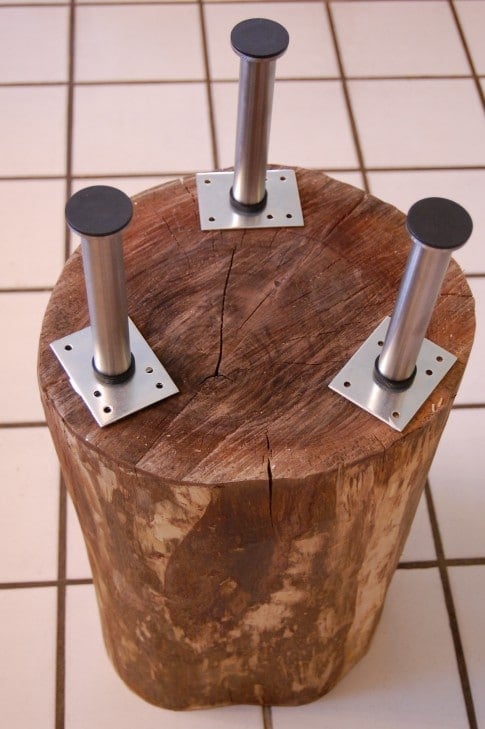
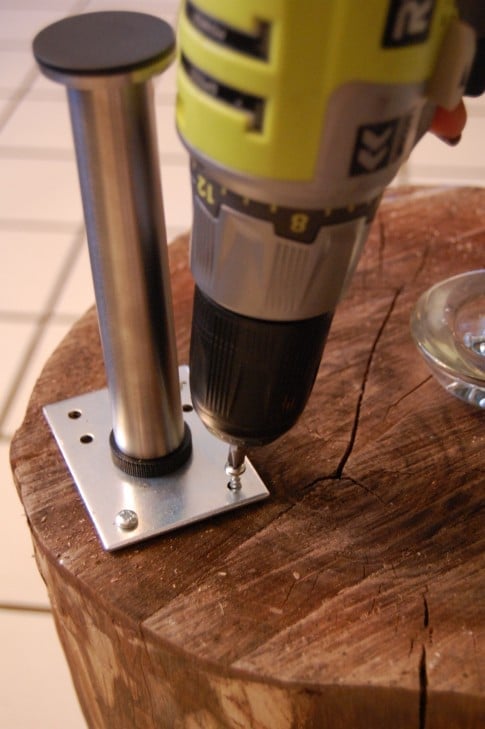
Place your legs on the underside of your stump. You can use all 4 legs or just 3. I'm partial to 3, but 4 is definitely more stable.
Use a measuring tape to make sure they're an equal distance apart.
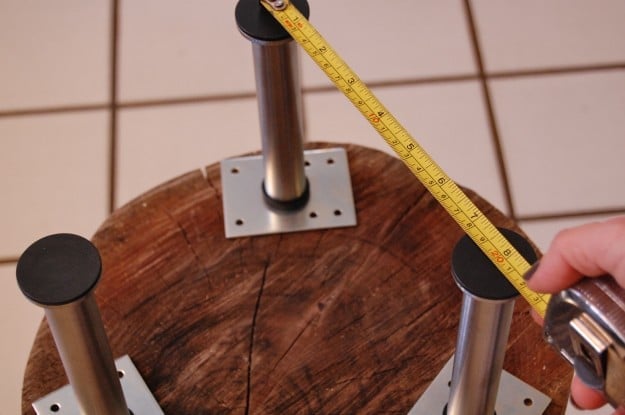
Once you have the legs positioned, mark the holes in the plates with either a pencil or a marker.
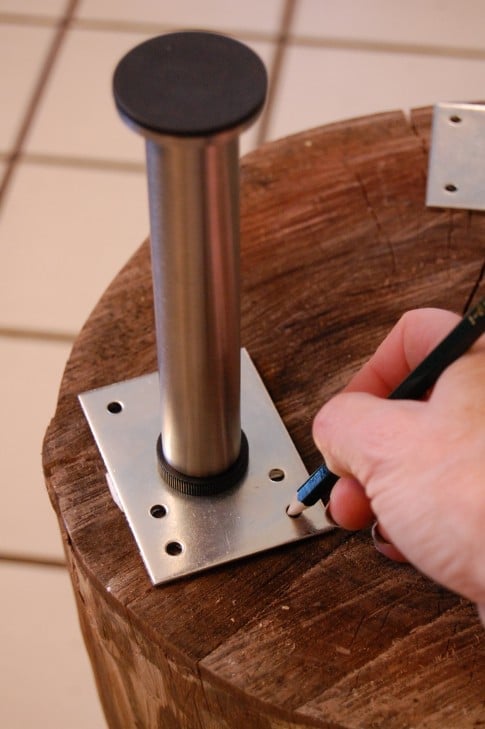
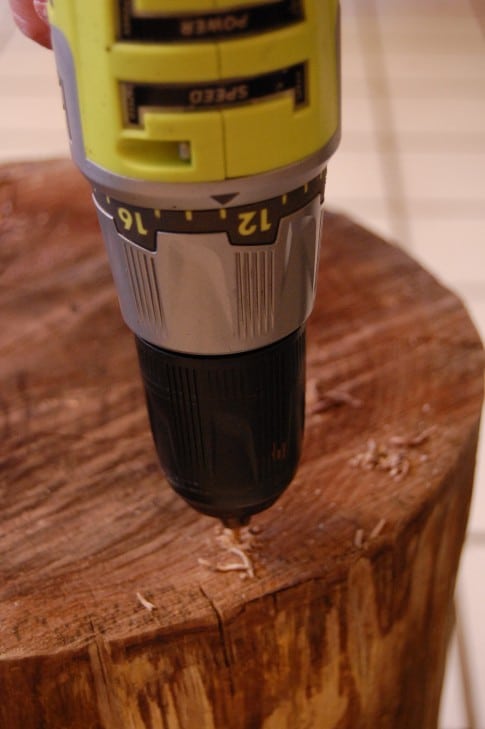
Remove the legs and fit your drill with the appropriate sized drill bit.
Pre-drill holes at the spots you marked for the screws.
Once all your holes are predrilled, place your legs and brackets back on and screw them into place.
To make my life easier, I put all my screws into a little dish. Don't question it. Just do it.
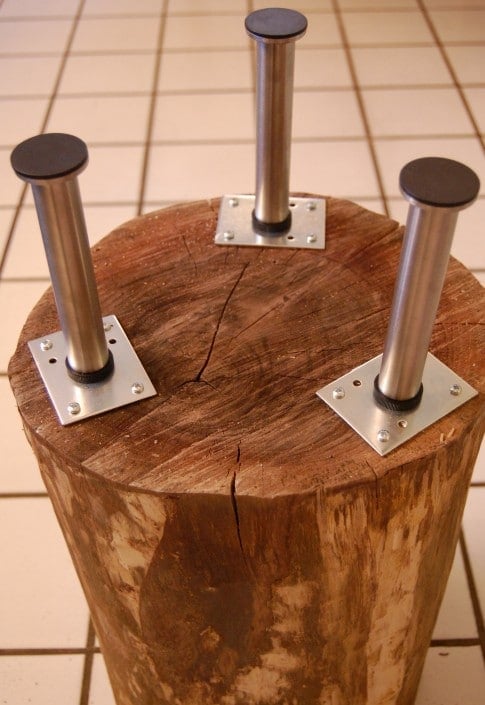
Now all your legs are on!
Step 5 - STAIN & SEAL IT (OPTIONAL)
If there are any sections where you accidentally took too much of the wood off (it's lighter underneath) you can skim over it with some stain. I have a whack of different cans of stain so I picked the one I thought would match the best.
Appropriately, it was "Walnut" stain for this walnut stump.
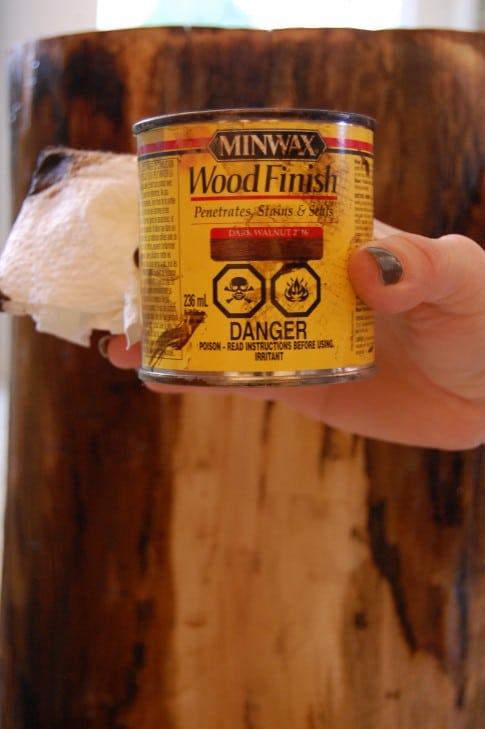
Just wipe it onto the light portion of your wood with some paper towel. It just darkens it up enough to make it blend in a little better. There will still be a colour variation, just not quite as distinct. Again, the look and colour and grain will be different depending on what type of wood stump you're working with.
The staining is a matter of choice. On my first stump table I didn't do it ... on this one I did.
Let your stain soak in and dry.
SEAL IT
Now you have to seal all that hard work in.
To stop your stump from drying out even more and to keep it from getting marked on top when you put things down on it you should seal your tree stump.
You can use any wood sealer. If you want a completely natural look I'd recommend sealing it with Thompsons Water Seal which will give the look of having no finish on it at all. Just remember that Thompsons Water Seal is water based which means it can only go on natural wood or wood that has been stained with a water based stain.
I used an oil based Polyurethane to make my stump top as durable as possible. I tend to be a bit spilly and bangy.
If you're using an oil based finish use a natural bristle brush.
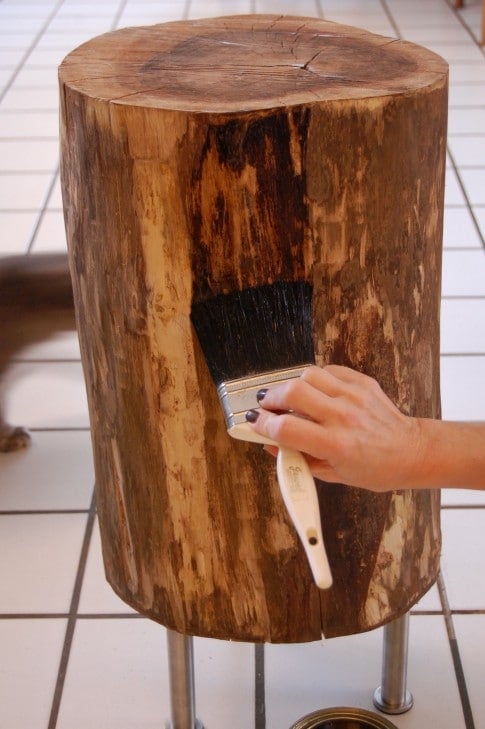
Seal the whole stump.
Seal the top, sides and bottom of the stump with 2-3 coats.
The top of the stump will get really dark, but it'll lighten up once the finish sinks in and dries.
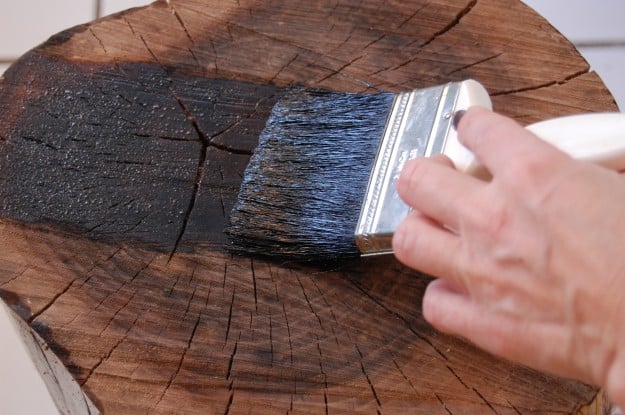
After your first coat dries, gently sand off any burrs and bumps.
The sanding will leave the finish with a white haze. Don't worry about it. It'll go away once you apply another coat of finish. Seal the sides and underside again 1-2 more times according to the manufacturer's directions.
Your stump may need up to 6 coats on the top. Because of the open grain, the finish soaks into the top a lot more and requires more coats. Always let your finish dry the recommended amount of time in between coats.
Once you've completed all coats of finish you're done.
Want to paint it?
If you're rather have a painted stump table, after sanding and wiping it apply a coat of primer. Once the primer has dried you can paint it with either water based or oil based paint.


Tree Trunk Table
How to make a tree stump table.
Materials
- Tree stump (your choice for size)
- Sandpaper (medium and fine grit)
- Polyurethane (high gloss, semi-gloss, satin … whichever you want) I used satin which has just a nice sheen
- Paint brush
- 1 package of 4, 6" Capita legs from Ikea (or similar)
Tools
- Drill
Instructions
Get your stump and allow it to dry out for at least a month. It will lose weight over this period and the bark will shrink away from the wood.
If you let your stump dry outside, as opposed to inside you'll still need to let it dry out inside for another couple of weeks to acclimatize it.
Once the stump has dried out remove the bark from it using a prybar and a hammer to chisel it away. Be careful not to gouge the wood stump.
If the bark is difficult to get off let it dry longer or carefully use a chisel with a hammer to remove it.
Sand your stump to get it smooth and then run over it with a tack cloth or damp cloth to remove any sawdust.
Flip the stump over so you're working on the underside of it and screw in the legs. Pre-drill your screw holes and make sure to measure so your legs are equal distances apart.
Stain and seal the table if desired.
Notes
If you want a very natural look to your stump, use a water based stain followed by Thompson's Water seal.
For optimal protection and a bit of a sheen on your stump use an oil based stain and a Polyurethane finish in satin.
Recommended Products
I'm an Amazon affiliate some I get a few cents when you buy something I've linked to.

Unfinished stump table
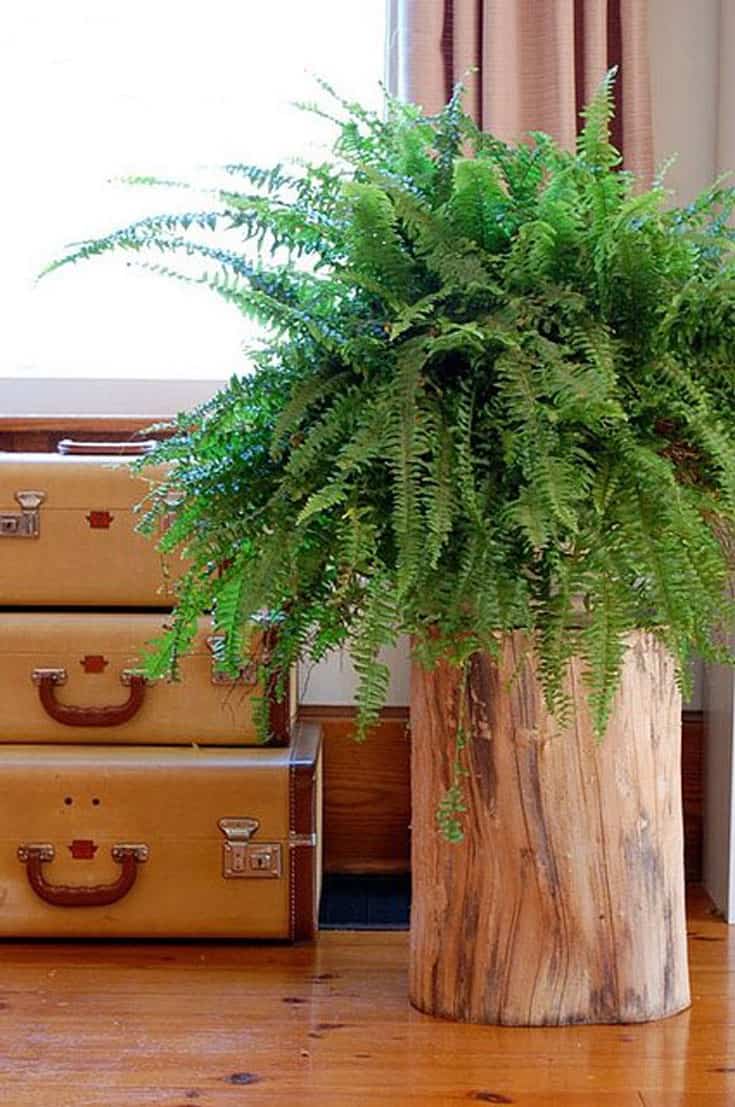
This is pretty obvious, but if you'd rather make a more natural looking log side table, just skip adding stain and any finish to it.
For an even more organic look, leave the legs off of it.
To make one just find a log, let it dry out, then sand it smooth.
Wood from deciduous trees: Ash, black walnut, birch, cypress, cherry, elm, maple and oak are all good choices.
You should AVOID conifers. Those trees that have resin that are a sticky mess. Trees like cedar, fir, juniper, pine, redwood, spruce, yew, larch should not be used. (think of how sticky the bottom of a Christmas tree is after cutting it)
The only drawback to these tables? Everyone is going to want you to make them one. So you can either start a blog, get a following, contemplate quitting, keep at it, and then one day write a post about how to build a stump table that you can tell them about.
Or you can just skip all that and direct them to this post instead.
→Follow me on Instagram where I often make a fool of myself←


Karen - I MUST have one of these. Like, Now.
But I'm stumped (ha!) about where to find the wood. I live in the Hamilton area too, so I'm wondering if you can share where you bought yours and the approximate price.
Thanks!
Hi Emma. I got my stump from Kastrau nursery. I got it for free but that's because I buy $700 worth of wood for burning in my fireplace every year! I imagine it'd be around $20 to buy it all on it's own. You can check and see. Otherwise just Google firewood places in Hamilton and see what comes up. ~ karen!
I'm so glad I came and read through this whole thread to this point, because I've been looking and looking and just could not find a place in the area. I'm in Kitchener, and Hamilton isn't too far away. Road trip! :)
Hi Karen! I love how you don't just SAY, 'Hmm, I could do that,' but you go out and actually DO IT. You're so inspirational! Your tree stump side table was one of my favourite things in the Style At Home article that featured your house. I started following your blog because of that article! Sadly, my home doesn't look anything like yours (but I continue to read home decor magazines in vain).
Thanks Cheryl! My house didn't look like *my* house until about 2 years ago either, so don't sweat it. :) ~ karen
Hey Karen,
Thanks for the advice on the chainsaw. It is safely tucked away in the basement far from my itchy hands. When I told my daughter your advice she said, "I could have told you that!" So now I just need a lumberjack. But the stumps are drying so it's work in progress.
Karen, your table is just gorgeous. And my hat is off to your wood wrestling skill and tenacity with those chisels-- You're practically supernatural!
But I have one suggestion: DON'T use a freshly cut stump. The longer you let it dry out, the lighter and easier it'll be to wrestle. Best of all, the bark'll come off a lot easier. [Gees, Karen. That had to be tough on your nails!]
My husband (the wood torturer) has stumps and chunks of wood aging all over the place. He'd tell you to get the oldest stump you can. 'Hope that helps!
Hey Pam'a! Thanks! But I'm confused. Why do you think I was using a freshly cut stump, LOL? ~ karen
Hmm. I guess I just inferred it from the combo of 1) the bark being hard to chip off, and 2) wanting to get it done in time for Christmas. I could have *sworn* there was a better reason than those...
:) Nope. I let the stump dry for months. It was difficult to remove because it was Walnut. And it was probably just being mean. ~ karen
Thank you! I have been eyeing these since they made there way into the design mags. I wanted to make one myself so thank you for the tutorial. Forget Wonder Woman, you are my hero.
I have been wanting to do this for awhile! Thanks for the tutorial. Now I need to find a stump.
Happy new year Karen. Thanks so much for this! Can't wait to find me a stump and a boyfriend and get to work!
This is VERY cool, Karen. Superbly cool.
Why thank you Alexandra! ~ karen
LOVE IT...so timely, my husband wants one...but I'm not DIY gal...you think I could do first time round? Okay...gotta get me a stump first.
Sundeep! ABSOLUTELY you can do t his as a first time DIYer! This is an especially great project for a first timer because it's so easy but has such HUGE impact. As long as you follow all the steps I've laid out exactly (let the stump dry out! Be patient with taking your bark off etc. ) You'll do great. When you get your stump, if you buy it from someone make sure to ask them if the stump has been cut and dried for a few months. Also ask them if they can recommend a wood that the bark will come off easily. Walnut is NOT one of those woods. LOL. Oak, probably is. It's also nice to try to get a stump with a knot, or some bumps where branches were coming out of it. Makes it interesting! Good luck and lemme know if you go though with it. ~ karen
I look forward to reading your daily posts Karen...seriously entertaining and informative to boot. What more could I ask for?
Love the table!
And I have a "chucker" in the family...my daughter. Christ, I left an EXpensive down robe to be worn during the wet cold months in the Pacific NW, where the only heat in the house was by one measly fireplace. The little ingrate chucked it!
Heck, I should have known...I've seen her closet with so few pieces of clothing in it one wonders how she finds a full outfit to don :)
I am in love with the rustic-modern look of this table. I think I am going to go right out to the nearest plot of trees and find a fallen one just to make a table like yours!
Love this! Thank you so much. Would love to try to make my own, just have to figure out where to get a stump.
Also, wondering if you have to put on legs or if it's more of a decorative/height thing?
Wishing you all good things in 2011!
Hi Connie! Heck no, you don't have to put legs on it. I just like the look of it, plus it brought the stump up to the height of my couch arm. If I had just used a stump it would have had to have been 24 or 25 inches high, which wouldn't have looked right. If you have a chair with a lower arm, or even just a corner, the stump with no legs will look great. They can also be painted! Or whitewashed! The possibilities are endless. :) ~ karen
that's bad ass!
Karen,
I click and read all your ads every day because I know that’s how you bloggers get paid. One of your ads isn’t working properly. Just thought you should know. Love your blog and support it by supporting your advertisers!
LOL, Thanks Craig! The ads rotate so I'm not sure which one you mean. But thanks! I'll look into it. And thanks for your support! ~ karen
This is brilliant! Your niece is a lucky gal. Am guessing there aren't too many felled walnut trees in the Phoenix area, but 'Stump Quest 2011' is on. (LOVE your cuff and ring in the tack cloth demo photo -- the sign of a true professional. If I wore jewelry while doing something like this, it would fall off into the varnish no doubt.)
Jennifer! You can use any wood. Some are prettier than others, that's all. My original stump table is red Oak and it looks really nice. ~ karen!
Jennifer, try Don at the Gold King Mine in Jerome. Not to far from Phoenix and a nice drive. They do vertical cuts there.
Fabulous work!
And I love how you have nail varnish on in the photos, makes you a glamorous workwoman in my book!
Mimi! *I* love that you call it nail varnish as opposed to nail polish! :) ~ karen
I knew this could be made! Now I just need a stump.
I have lots of big tree stumps but none of them are cut straight. I guess I just need to learn how to use my chain saw. It kinda scares me. Any good suggestions?
Oh dear God, Nancy. LOL. Don't use a chainsaw! They're for experienced lumberjacks only. *I* don't even like to use a chainsaw. If it hits a knot it can kick back and take your face out! If you *are* experienced with a chainsaw, just mark a straight line on the log with roller paint and cut away (and cut under the paint so it doesn't end up on the stump). ~ karen
Karen:
Where can I buy a vertical section of a tree to make a long 6 person dinner table? Do you know what I mean?
Hi Chrodis. I think you probably just mean a board, LOL. If that's the case you can get "barnboard" at a lot of lumber stores. Rona here in Canada has barn board. It's wood that's around 12 - 16 inches wide and it can be however long you want. You'd need a few to make a table though. It's almost impossible to get board that's much wider than that anymore. You'd have to look for vintage barnboard that's around 100 years old to come across something like that. Good luck! ~ karen
Hy: March 16,2012 Columbus,Ohio USA
Regarding the wide board for a table top...Almost
35 years ago while skiing in Vermont,Killington,...I stopped at at mill WEIRD WOOD something....and I picked a board,that they shipped to my house....lots ow work later..I had a
beautiful Harvest Table...the top was 34" wide,92"long,2 1/2" Thick....White pine I believe..still being used daily....a great piece of furniture..teach me how to send you a picture
I have some beauties GUIDO...Gepelbaum @AOL.COM
Hey Guido. Do you know how to attach a picture to an email? If you do ... send the pics. to karen@theartofdoingstuff.com If you don't know how, let me know and I'll walk you through it. ~ karen
Chrodis... I believe what you are asking for is a piece of "live edge" or a "slab" generally a 2-4" thick slice of a tree cut length wise. the edges are not cut and squared, they are left intact leaving you with a flat hardy table which has the natural contours of the tree as the edges. You can check my website for pics of a live edge floating shelf i made for a customer. They are commonly used as tables shelves bar-tops and mantles. I make sure mine are dried for 2 years before starting work on it, since wood moves as it dries. the fibers shrink and twist which will ruin your finish, and leave you with a twisted un usable table top.
http://www.hvhimprovement.com
Nancy-
Just reading this... I would use a power-sander. May take you a while, but definitely a safer idea!
Daina
Nancy, A power sander is good idea for levelling out small imperfections but it probably wouldn't be very good if the stump is off by an inch or so. (which I think is what Nancy is referring to). An electric planer, perhaps would work though! karen!
& may I add to my fb post? The $199. stump in the mail order catalog does not have legs! It is just a STUMP!! (creativity is SUCH a blessing!)
Handily my backyard happens to be full of stumps. Gotta go drag one in now. Thanks Karen!
Awesome!! I might have to make one now that I know how. Happy New Year!
I just came across your blog. I have been dreaming of the stump table at West Elm. But like you, I am too cheap to let loose with the cash. I have thought about making one, but thought it would take much longer for the stump to dry out. This is a definate project. Will give my husband the specs when he cuts wood this summer. Thanks for the great instructions.
No problem Tami! Glad you found my site. ~ karen
hi great work....just wondering...how do you know if the stump has termites?
Hi Ryan - Termites aren't a huge problem around here, but to check for them I'd just see if the stump is much lighter than it should be. Also, chances are you'll be able to see the termite damage. They have to enter at some point of the stump and if there are termites, you should be able to notice the entry point. If you're worried about termites or bugs put the stump in a plastic garbage bag, spray it with bug spray that contains pyrethrins. ~ karen!
thank you
Hey I have the same problem, great suggestion. however I found that the stump has some random spots that are really moist almost like a sponge. Would this be a sign that is is decomposing or termites?
Well Daniel - It could be aliens. But probably not. Most likely it's just rotted wood. You can dig around (dig the rotted wood out) to see how far it goes. It this is going to ruin the look of your stump, then you'd best look for another stump I'm afraid. One that hasn't been infested with aliens. ~ karen!
I've seen some lovely stumps and branches where spaces of dug-out wood are filled with bits of agate, or glass marbles, or other such interesting items... and the hole is then filled with resin. Place the wood it on its side (gravity is your friend) and let it dry (solidify) for a long while, and once done, it will look like smooth glass filled with sparklies.
Daniel, Karen!
Another little thought to add to the stump idea is, if there is a significant spot of rot... but you REALLY like your stump... dig out the rot till you cant take any more out.... then, if its on the side, clean out the "bottom" of the hole and smooth it down till its flat... and finish it the same way you did the outside of your stump. NOW ... you have a stump table or seat... with a CUBBY in it.... sometimes, that can be useful for magazines or little things like a book you read while in your chair or some little items you want handy but not constantly cluttering your table top.
If the rot is on the TOP of your table... scoop out all the soft stuff, then fill it with clear resin. You can get the resin you need from most hardware or paint stores. OR you can scoop it free of mushyness and get a piece of glass for your table top.... a creative way to use the space would be to get a piece of glass and have it cut with a hole right where the hole in your stump is... place it on the stump table with the hole lined up with your stumps hole.... and find a flower pot or small vase that will fit inside the hole... fill it with water or soil... and... insta- pretty !!! add your flowers and now, if you have pets... like I do... that like to knock over anything with water in it... they CAN'T make a mess of your flower vase any longer!!!
Happy Crafting!!!
Ann
Thanks Ann! ~ karen
Why do people think that only something that will kill you is needed to get rid of tiny bugs? If termites are in your tree stump, get some alcohol (70% or 91%) and spray away. Any bug that burrows or is in the ground will die, immediately, and not return. Always try green first!
You will see termites.
I have some large logs from tree that I would like to use for decorative purposes. Do I need to remove the bark before I seal it? I'd like to keep the bark since I'm keeping them outdoors.
Hi Enedelia - Depending on what type of tree you're talking about, chances are over time the bark will fall of by itself. That's why it's recommended that you remove it first. You can try to seal it with the bark on, but it's probable that your bark will start to fall off on its own eventually and you'll have to reseal it without the bark. ~ karen!
Also, the bark holds moisture that will lead to rot slowly and attracts bugs - or at least gives them a foothold to hide away from predators while they attack your stump from relative safety.
Karen.May 18,2013
We had a tree down from the Sandy storm. there was a piece of truck that was so different i wanted to keep it but not for the house. for the garden. I am assuming i can follow the same steps u did to paint and stain. i have alot of experince in that area. But the drying out part it is big. can i cover it out side it is always raining and bigand heavy to drag in the house. any suggestions? and when i rolled it over there was little bugs on it I don't know what they were I threw water on them and they went away. I really don't want to throw the tree out. do u have any suggestions? thank you so much
Chris - You can dry it inside and seal it and everything, but if you're leaving the tree outside, personally, I wold probably just remove the bark and leave it natural. It will rot eventually but it will be a long, longgggg time before that happens. ~ karen!