Pine floors are notorious for turning orange once you finish them. Their natural desire is to transform into pumpkin orange right before your eyes, but you can temper that tone by updating the way you finish them.
When I first bought my house and had the floors done, the only finishing option was drenching them with a plastic-like orangey goo that smelled very much like premature death. That toxic finishing option was called Polyurethane.
The only thing this stuff has going for it is the fact that it's bullet proof. Seriously. You could have an O.K. Corral type shootout in your living room and bullets would just bounce off the floor.
I suppose there were other options for finishing my floors 20 years ago but I didn't know what they were and neither did the flooring companies. So I had them "Polyurethaned" and have hated my floors for the past 20 years.
Polyurethane, still the most popular finishing option for wood floors, is slippery, unnatural looking, and brings out the orange or yellow tone in any floor. The product itself also turns more orange as it ages so the floors just get more and more orange as time goes on. Which is fine if you like orange floors. I do not.
When I accidentally ripped up all my floors this past fall (as one does) I decided I was going to research everything there was to know about refinishing pine floors until my fingers were numb and my floors weren't orange.
I ripped up my kitchen floor on a whim as well in 2013 and installed heated floors, VCT tile and levelled it all with self levelling cement myself.
I am now the most knowledgeable person in the galaxy with regard to pine flooring. I know more than anyone. I am the foremost expert.
Actually, I'm not, but I do know more than I did 20 years ago.
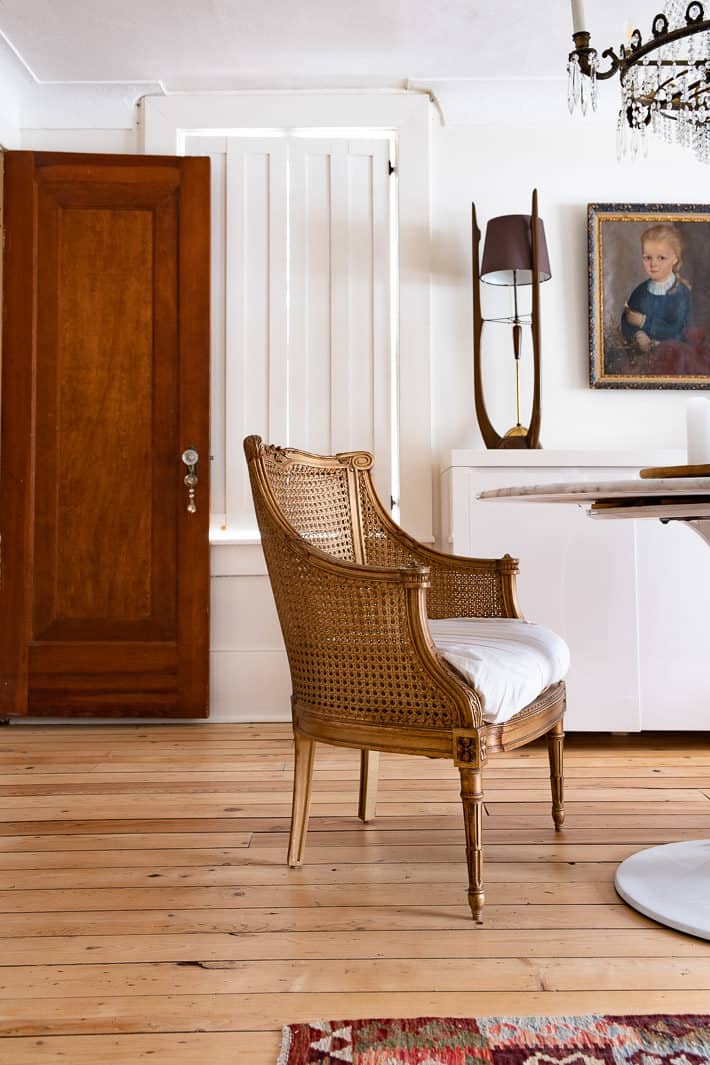
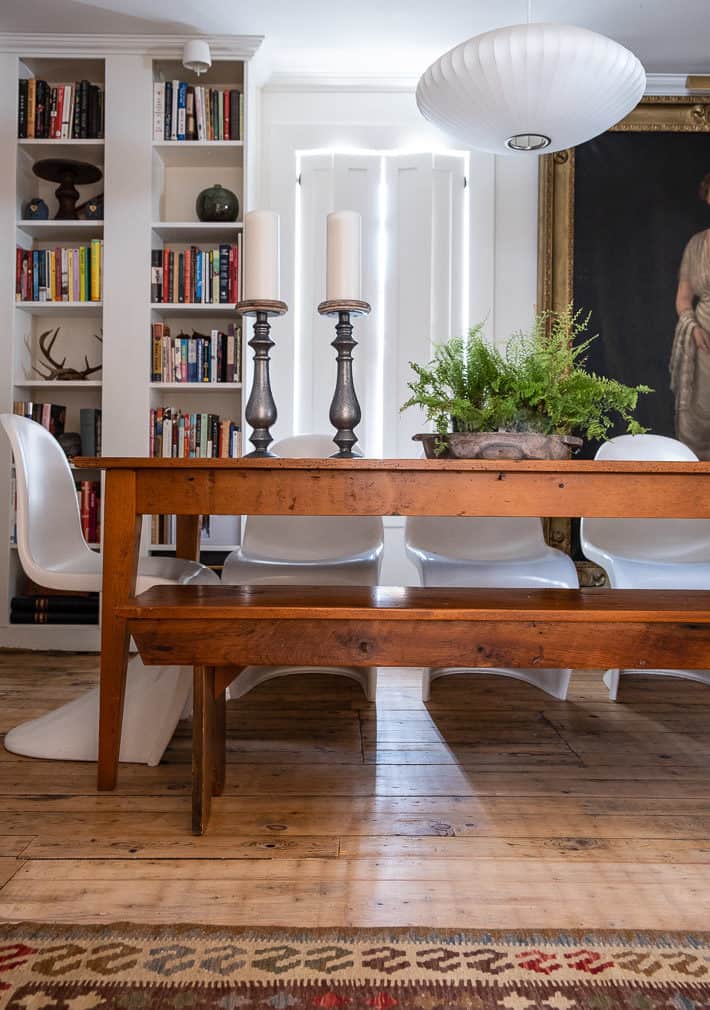
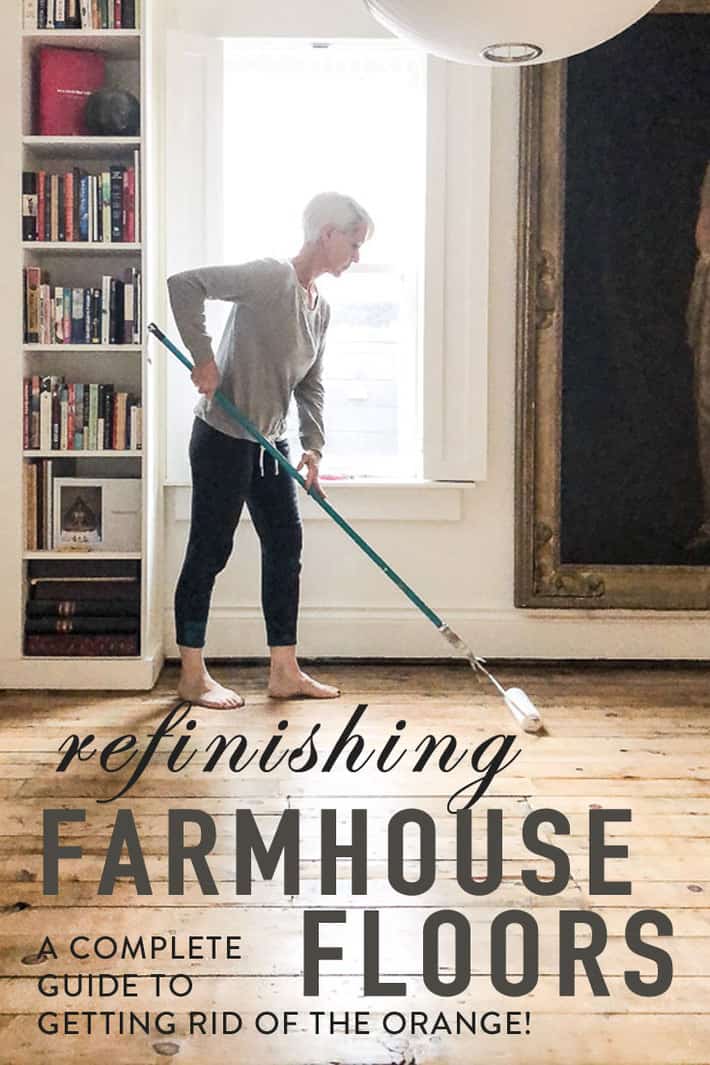
And I NOW have pine floors without any hint of pumpkin orange. Here's how I did it.
How to Finish Pine Floors (Without the Orange)
Just before delving into my pine floor research I was simply going to leave my pine floors raw after sanding them. I wanted raw wood (unfinished) floors for two reasons.
- Raw wood floors feel beautiful beneath your feet unlike finished floors which feel like plastic.
- Raw wood floors would retain their natural colour and not end up looking like a Cheeto.
I decided against the raw floors because I was a bit worried about cleaning them and a bit more worried about not being able to drag my furniture across them like I normally do. (raw wood has NO protection and the pine would gouge easily)
After a couple of weeks of hard core research I decided there were two keys to a natural looking pine floor.
Keys to Natural Looking Pine Floors
A MATTE FINISH & A WATER BASED FORMULA
I don't think either of these things were readily available 10 years ago let alone 20. There are other ways to achieve that neutral pine finish like waxing or soaping the floors but both of those things require maintenance I wasn't convinced I would keep up.
After talking to my flooring guy about my concerns we came up with a 3 step plan for my floor finish. I was going to use a water based, low VOC, non toxic, green product from Bona's professional line.
A lot of people online are using Benjamin Moore's Stays Clear for their floors, and I'm sure it's a great product, in fact it's what I was going to use UNTIL I spoke with a professional floor refinisher. He very gently steered me in the direction of a professional product. Literally. Like, he gave me directions to the nearest distributer.
These Bona products aren't the same ones that can be bought at Home Depot. They're only available through distributors, or as I recently found out ... Amazon (which I've linked to above in the product list).
If you'd like to see if you have a distributor in your area you can click Bona's Distribution Map to find a store near you in the US or Canada.
Would you like to save this stuff?
How to Refinish a Pine Floor
MATERIALS
- Bona NaturalSeal
- Bona Novia - Satin
- Bona Traffic HD - Matte
- (3) 10 mm microfiber rollers
- Paint brush for edging
- Paint Tray
- Paint Tray liners (optional)
- Broom handle for paint roller
- Paint roller frame
- Sandpaper for between finish coats (220 grit)
STEPS
- Sand the old finish or staining off - Two of my rooms needed to be professionally sanded to remove the polyurethane. One room I sanded myself with a palm sander because the wood had no finish on it so I didn't need the power of a professional sander. Also I wanted to retain the character and staining on the floor and to do that you have to sand by hand. Once your floor is sanded vacuum, vacuum, vacuum. You only have one shot at making sure you've got rid of all the dust around. After vacuuming, wipe the floor with a damp cloth.
TIP: If you want your floors to still feel like worn old floors, don't sand them with too fine of a final grit. This will make the floors feel unnatural and like glass. End with around a 100 grit. This post has good information on sanding pine.
TIP: A lot of people recommend a tack cloth for this type of job but my sister, a painter, said both she's found tack cloths can ruin a finish by causing it to fish-eye. She uses a damp cloth for picking up dust so I did the same. It worked great.
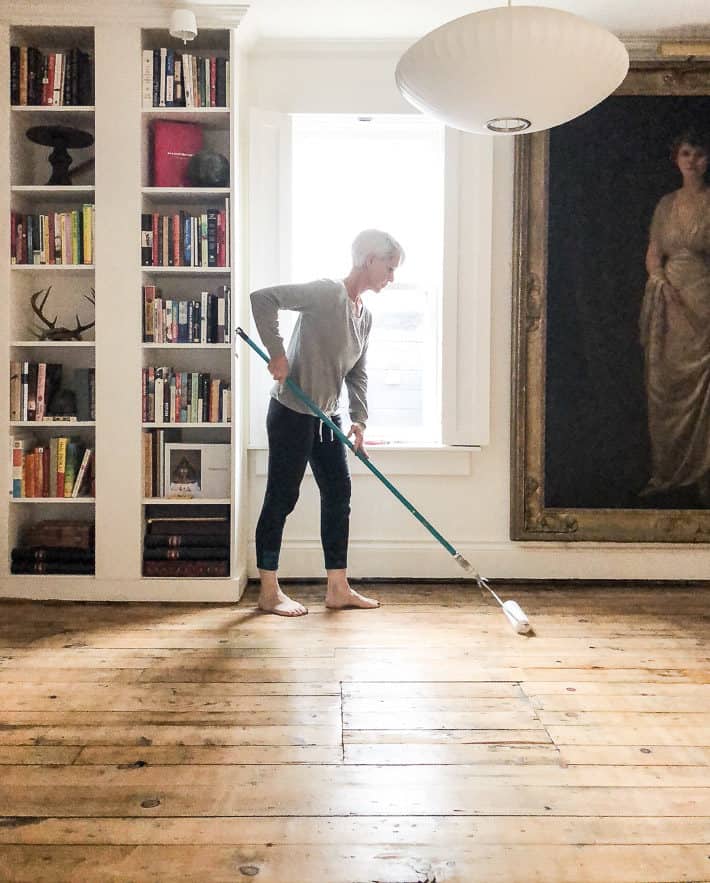
2. Apply 1 coat of Bona NaturalSeal. Using a paintbrush cut in around the edges of the room. Don't do the whole room, only do about 4' at a time. You don't want the edging to dry before you get a chance to roll that section of the floor, or else the edging will show. You need to always be painting "wet on wet".
Using a 10 mm roller and a paint roller pan, roll the sealer onto the floor being careful to keep everything smooth the same way you would if you were rolling paint onto a wall. Repeat the edging and rolling across the room until it's all done. Allow to dry 3 hours (I left it overnight) Sanding between the sealer and the finish coats is NOT necessary according to Bona. But for the smoothest finish, sand the floor VERY lightly with 180-240 grit sandpaper after it has dried. You barely have to even go over the floor. Vacuum, then wipe with a damp cloth.
3. Apply 1 coat of Bona Novia (Satin). Apply a coat of the Bona Novia Satin the same way you did the sealer by edging and rolling (using a NEW roller). Allow to dry 3 hours. (again I left it overnight). Sand very lightly with 180-240 grit sandpaper. Vacuum, then wipe with a damp cloth.
4. Apply 2 coats of Bona Traffic HD*. Apply a coat of Bona Traffic HD the same way you did the others, edging and rolling (with a new 10 mm roller), making sure you don't leave any pooling or striping. Allow to dry 3 hours. Sand again, if that's what you're doing and vacuum and wipe with a damp cloth. Repeat for a second coat. NOTE: Bona Traffic HD requires mixing a hardener into the product before use. Once it's mixed you have a limited time to work with it (4 hours). That's just enough time to do 2 coats. If you cannot get both coats done in 4 hours, only mix up as much of the product as you'll need. You'll have to do your own math on this.
QUESTIONS & ANSWERS about Refinishing Pine Floors
How much will I need? 1 gallon (each bottle is 1 gallon) will do 500 square feet of flooring) Buy extra if you think you might need it. As long as you don't open it and you'll be able to return it. (check with who you buy it from first though)
How much will it cost? For my 3 gallons (the sealer, the Novio and the Traffic HD) plus a few rollers, it was $274 Canadian to do around 500 square feet of flooring.
Why not use Bona Traffic HD for all of your finish coats? *The Bona Traffic HD is more expensive than the Bona Novia so using the Novia as your second coat keeps the price down a bit. Bona Traffic HD is your only option for a matte finish, plus it has the best durability so if for some reason you only want to use one product, go with the Bona Traffic HD for all of your finish coats, NOT the Bona Novia.
I looked online and they say applying the finish is really hard and you have to be able to swirl it around corners and you should use a pad to put it on and I'm really scared to do it because I might ruin my floors. You won't. I thought the same thing when I looked up how to properly apply the finish. Just ignore what you've read and think of it like painting a wall. You want to feather out your edges and you don't want noticeable lines or splotches. If you see a splotch, just run over it again lightly with the roller.
I like whitewashed floors. How do I get that look? There's the somewhat difficult way of using wood lye (bleach) and castile soap but you can get a similar look by just using the Bona NordicSeal as your sealer instead of the Bona NaturalSeal.
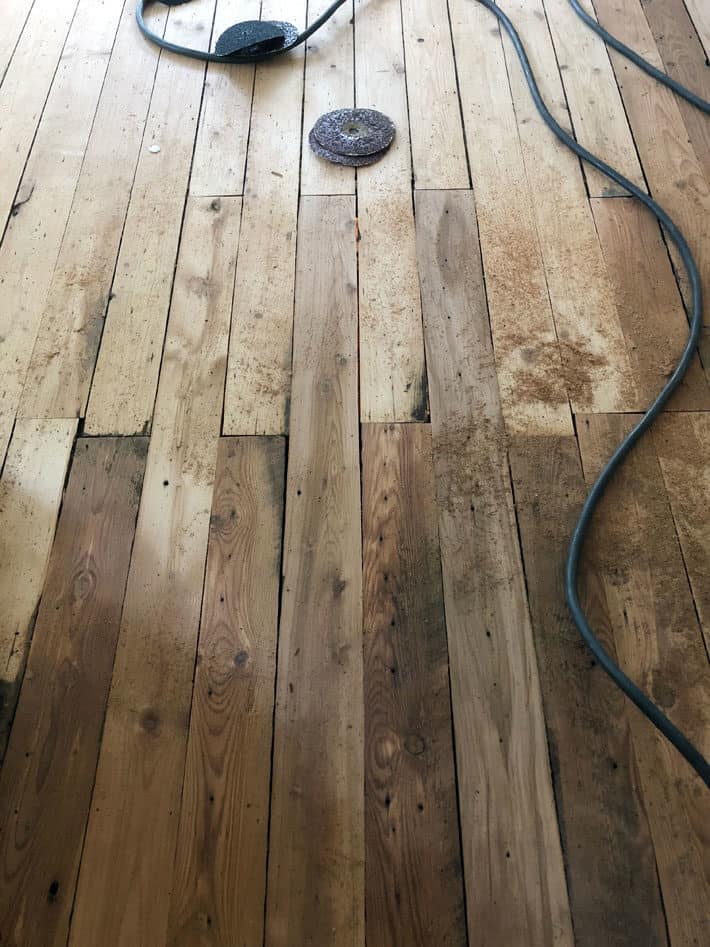
Doesn't sanding old floors remove all the patina and beauty of them?? It depends on the age of the wood. The older the wood, the deeper the colour in them goes. 20 year old floors with have colour just on the surface. 100 year old floors will have colour almost all the way through the board. So you can sand them and still retain that nice old wood look. Keep in mind, the board will be lighter the deeper you sand no matter what, but there will be colour and it will still look like a mottled, old piece of wood.
Can you bleach wood floors? I did. Some of the replacement boards I used for patching were made of fir which was darker than my pine floors. I just poured straight bleach onto the board and wiped it with cloth. By the next day the boards had lightened. In some cases I had to do this twice.
I hope, hope, HOPE this helps any of you who have faced the same orange floor crisis as I did. There's is a green alternative that will eliminate your orange floors.
You can do it! Exhume the fume from your Oompa Loompa room.
→Follow me on Instagram where I do lots of other stuff←


Susan
Some if my floor is much older than others. The older part has stains deep and I want to do a whitewash finish. Any suggestions on how to match up the darker color of wood? It’s been professionally sanded but still has much dark areas where perhaps a rug was there years ago.
Karen
Hi Susan. The only thing that can make the floor lighter is either bleaching the darker part or sanding it more to get deeper below the patina. The older the floor, the deeper the patina so sometimes no matter how deep you sand you can't get it as light as you want it. I'm afraid those are my only suggestions at this point. Good luck. ~ karen!
Kris
We really wanted "blonde fir" floors in our new Scandi-modern home and looked at the ones imported from Sweden https://nordicdesign.ca/inside-a-swedish-home-with-a-scandi-meets-boho-chic-vibe/ - the cost was way out of our budget.
So we used locally-cut wide fir boards and Osmo (in a white stain) - this is an environmentally-friendly product imported from Germany, so tough and durable. https://osmo.ca/information/compare-osmo/
Our floors are beautiful and really the focal point of our new home.
Of course, nothing can match the patina of old floors - love yours, Karen (and suspect the products you used are the same as Osmo, just a different brand).
Kim Fortier
What did you do, if anything, about the cracks between your pine boards? Last year we stripped off the old carpet in my parents' house. We knew the pine floor was under there, but boy, what a mess it was with that old carpet backing seemingly grown into it. And the staples! We also used Bona, and I am very happy with the results. But dust and dirt collects in the cracks between the floorboards like crazy and it's hard to vacuum out. Do you have any tricks on maintenance?
Karen
Hi Kim. I just vacuum with my central vac which gets most of the stuff out if I'm patient with it. Which I'm not always, lol. Your options are really just filling the cracks with strips of wood, filling the cracks prior to sealing with a mixture of sawdust and glue, or filling the cracks with rope (that's the classic old fashioned way to do it) ~ karen!
Susan Schneider
Hi Karen- Would your technique work on a pine mantel? It's a manufactured mantel that has several 2x6s glued together (cheesy, I know). The house was built in 1987, so it is about 30 years old. The mantel is ORANGE, your favorite color and mine, for pine. Not. Anyway, before I spend $300 on a new rustic whole piece of wood mantel, I thought I'd try to make this one a little better looking and re-cycle it. I figure I don't have anything to lose except some hours of time. I don't guess I would need near the quantities you used, but I can call them to find out if 1) they ship to the States and 2) if I can get the stuff in small amounts. Thanks much for any ideas. I love your blog and your sense of humor. So inspirational and informative, to say nothing of hilarious.
Kathy Hartzell
Hey Idaho Girl,
You'd best check the finish on those 60's oak floors. Popular then were prefinished oak, so it's got a factory finish that's like a polyurethane. We had this (tested with scraps removed from a closet redo) and actually lived with those prefinished floors thru two kids and 20+ years. THEN we sanded them down and did a Bona finish. Probably not today's Bona, as it was 15 years ago.
But I'd not recommend waxing until you know that there's wax atop raw wood, and what you're peeking at isn't wax but a prefinish.
Laura
I didn't know I hated my own orange floors until I saw your more natural looking ones! Which means my husband is going to kill me. Ha! Does this same technique work on oak? My oak is about 70 years old, and I'm sure would be a darker tone than pine if I sand down the finish. Hmm. I love love love how yours look!
Mae
You said you wanted to leave some staining on the floors, so this is not the natural pine color? I have pine floors with poly on and the poly chips off, seemingly taking any stain with it, revealing the natural color. So the stain stays in the floor? Just a little confused. Love your floors.
Karen
Hi Mae. By staining I mean the patina and literal staining. :) So not stain that comes in a can ... stain as in areas where the floor has become discoloured. Hope that clears things up. :) ~ karen!
Idaho Girl
The 1st time I saw the color of your stripped floors, it really made me pause and think about it (with a puzzled look on my face, I'm sure). It's just so different that what we've all been conditioned to accept as the color/tone of wood floors. Now, every time I see it, I just like it more and more. I have a 1960 home with oak floors that were never polyurethaned - just waxed and immediately covered up with carpets when it was built. When I pulled the carpet up several years ago and discovered this pristine floor, I always intended to have it sealed some day, but never seemed to find the money, time and ambition to move everything out to get it done. There's an unfinished basement underneath, so I am easily able to see the unfinished 2x8 subfloor that sure looks good from the bottom side, so now I'm vacillating between leaving the oak and rewaxing again, and pulling it up to get a similar look to what you have. Hmmm.....
Karen
I also have a 1960's era house with original oak hardwood floors that we finally had refinished last year. They were sanded and stained a medium/light brown which allowed their character to come through....then sealed with a matte finish. I love the look of them and plan to let them wear naturally and most likely will never refinish them again. (I'm old!)
Kipper
We have hickory floors that were refinished about 15 years ago. At that time whole house had to be emptied and items placed in kitchen and bathroom...including the piano. All inside doors taken down. I think they were put in the bathroom. Thank goodness we labeled their location first! Evacuated for a week. The poly finish looked nice but within a year the dog feet and basic human foot traffic started to show, despite cleaning the floor appropriately. It still is easier to maintain than wall to wall carpeting, just wish the finish had been more protective.
Jennie
Anytime you have a catalyst to add to a base coating, it is a great thing. It's easy to be intimated by it but I think now that you've used it, more people are going to be surprised just how much money they've thrown away over the years, using what I call "civilian" coatings.
Can't wait to try Bona!
Thanks.
SF
How long until you were able to use your floors again (foot traffic, animals, put furniture back, etc.)?
Your floors look great! I have never considered refinishing mine because I can't tolerate the toxic fumes of poly.
Karen
It's just a few hours before you can walk on it in socks and 3 days for it to cure before you can put heavy furniture back on it. ~ karen!
Hydee Yinkers
Hi Karen,
Thanks for this down to earth, this is how it’s done post. I do enjoy how much research you do, then “dive in” and share the good, the bad and the ugly so that we all have the clearest picture possible. I do have a question. I know I have wide pine boards coated in brown paint with plywood screwed on top all over the place so that carpet could be laid. How would you suggest stripping the painted floor? With normal paint stripper? Is this a job for a professional or would it be worth doing it myself?
Any thoughts appreciated!
Karen
Hi Hydee. Chances are the paint would have to be sanded off professionally by floor refinishers. It's totally doable, but paint, especially old paint is very "gummy" and gums up the sanding pads so it's a bit of a pain for the sanding guys because they have to change the sanding pads more often than in a regular sanding. That can also make sanding off paint a bit more expensive because of the added cost of new pads for the machine. I wouldn't personally attempt to sand an entire painted floor. ~ karen!
Alena
I wish I had known this some 10 years ago or whenever it was I decided to redo my hardwood floor. My house has oak hwd floors throughout (except the kitchen and the bathroom - it's a bungalow so 1 floor only). Even though the bedrooms were in pristine condition they had to be redone as well you cannot stop at the door (no thresholds). I really loved the pale colour of the floors when they were stripped but then came the polyurethane. Now the floors have that honey colour that I don't particularly adore but since the floors can be refinished only 1 more time, I don't think I will undertake it. BTW, redoing the floors in the entire house is WORSE than moving - because you need to evacuate the entire house (including closets) and everything gets covered in a thick layer of fine dust.
Like I said, I wish I had known this then but as Karen said, maybe those products were not available yet.
Waxing is terrible - I did wax my floors in an apartment in Prague and I hated it. The dirt gets embedded in the wax and it's just such a PITA.
By the way, I don't entirely agree with the assessment of polyurethane - the new finish got quite scratched by my dogs' nails (not right way - over the years) so I don't think it's as bullet-proof as you think.
Michael Goran
Hi Karen. I’d recommend to NEVER use chlorine bleach on wood. Regular household bleach on wood (floors or anything else) is a recipe for ruining the wood. Fast. It breaks down the ‘mushy’ part of the wood (lignin) that holds the fibres (cellulose) together VERY quickly, weakening it and then makes it splinter. The best option is ‘Wood Bleach’ (I know it sounds wrong) but it’s not chlorine, it’s actually a very nice harmless chemical called Oxalic Acid. It lightens the wood beautifully and does no harm to the wood (or your lungs). You can get it from Amazon.
Karen
Yes, I understand that's how some people feel but with the small amount of bleach needed to lighten just the surface I did my research, talked to flooring guys and decided it was fine. I was actually going to put a footnote in the post because I knew this would give wood guys a heart attack, lol. Wood bleach isn't easy to come by, plus it's expensive. It's a good thing to use if you're doing a whole room and want to put in that added expense, but I only had a few boards. ~ karen!
Jen
Most importantly, how the heck did you keep your cat from walking on those nice wet floors??
Ei Con
What exactly does the sanding between coats steps involve? Manually on hands and knees with a sanding block? Electric-ly on hands and knees with a palm sander? Big ol’ rented machine?
Karen
Just lightly, like I said. On your hands with a piece of sandpaper. You just need to skim off the top of the surface where any of the wood grain may have raised and to knock off any bumps. ~ karen!
MajesticMoose
I used a sanding pole for drywall and fine sandpaper for this step - no bending down or being on your knees. It is also pretty neat for controlling how much (or how little) pressure you use.
Karen
I forget why I didn't do that, but there was some reason. :/ ~ karen!
judy
I have to replace the floor in my kitchen due to the second (brand name) dishwasher that was happily leaking under the 5 layers of flooring. I am really tempted to use the pine flooring offered by LL. The lower quality is really cheap and I envisage it with a white wash and looking cute and cottage-y. I know it will not-my Karma - it will look awful,have to be replaced thus costing as much as the sheet vinyl at an estimate of $3600.00 installed. The exorbitant cost includes five hundred dollars for each old layer removed. I thought the pine wood could go right over the whole mess which is presently whatever layer my son was able to remove and the deep gouges in plywood made when he was doing this. Sob'''''' Any thoughts,suggestions,loan of your pistol or a stout rope.
Karen
You're really always best to go down to the original subfloor. If you keep piling floors on, it makes everything higher, which usually doesn't work with thresholds and butting up to cupboards etc. If you take everything down, you can also install heated floors. ;) ~ karen!
Mim
What did you do with the cat? I have wanted to refinish my floor for years, but with three dogs — and the hair that comes with them — it seems an impossible task to accomplish over three days (or even one very long day) without ending up with dog hair embedded in the finish, or even a dog paw print if one manages to overcome the barricade I would have to erect. Seems just wrong to send them to a kennel simply so I can do my floors. So I continue to have a floor with very worn areas surrounded by orange... Did you banish the cat? Put her in a crate? Send her for a stayover at Betty’s or Pink Tool Belt’s?
Karen
I didn't do anything with her. I just finished my floors before I went to bed (other than the final coat) and the cat stays upstairs with me all night. So no problem. :) ~ karen!
Nicole
I'm confused about what each of the layers does.
The first one seals the wood?
The second one...?
And then the third is finish?
Karen
The second one is also a finish. You need at least 2 coats of finish, 3 is better. But because the 3rd is much more expensive, for the first coat of finish which ends up getting covered up, I used the cheaper stuff. ~ karen!
Catherine Vosper
That is a beautiful floor, congratulations!!
Suel
Wow Karen! That photograph of the cane back chair on the pine floor is beautiful. I hope one day to have the time and the presence of mind to pull up 4 rooms worth of carpet and restore the hardwood floors beneath. I'd never heard of the Bona products, so thank you for that and all the Q&A, tips and details of your project.
Karen
Hi Suel. If you wait for the right time and mindset you'll never do it. The next time you look at your carpet with disgust just start ripping! :) ~ karen!
Suel
Thank you, a word from the wise. The carpet is ugliest stuff I have ever seen. I'm hesitant to start because it's glued to the original hardwood. Do you have any ideas or sources for glued/carpet removal.
Thanks again!