Can you operate a pair of scissors? Yes? PERFECT. That means you have the skills to install a switch on a lamp cord. Today we're installing a wheel switch.
There's really no good reason you wouldn't want to install a wheel switch. It's like having a tiny wizard in your cord.
Anyone can do this. ANYONE.
Because with a handy little wheel switch there's no wiring.
THE FIRST REASON (other than the wizard thing) you'll want to try this is because you can get almost immediate satisfaction from it. It takes like, 5 minutes, but you'll feel ... smug. Smart. Handy.
THE SECOND REASON is if you have a lamp that has no switch (as is the case with the picture light I'm working on here). There are archaic lights out there that you need to plug in to turn on and unplug to turn off.
THE THIRD REASON is if the lamp's switch is inconvenient to reach, like under a lampshade or in a bucket of spiders.
So everybody just calm down. You've got this. It's a piece of cake
EXCEPT WARNING
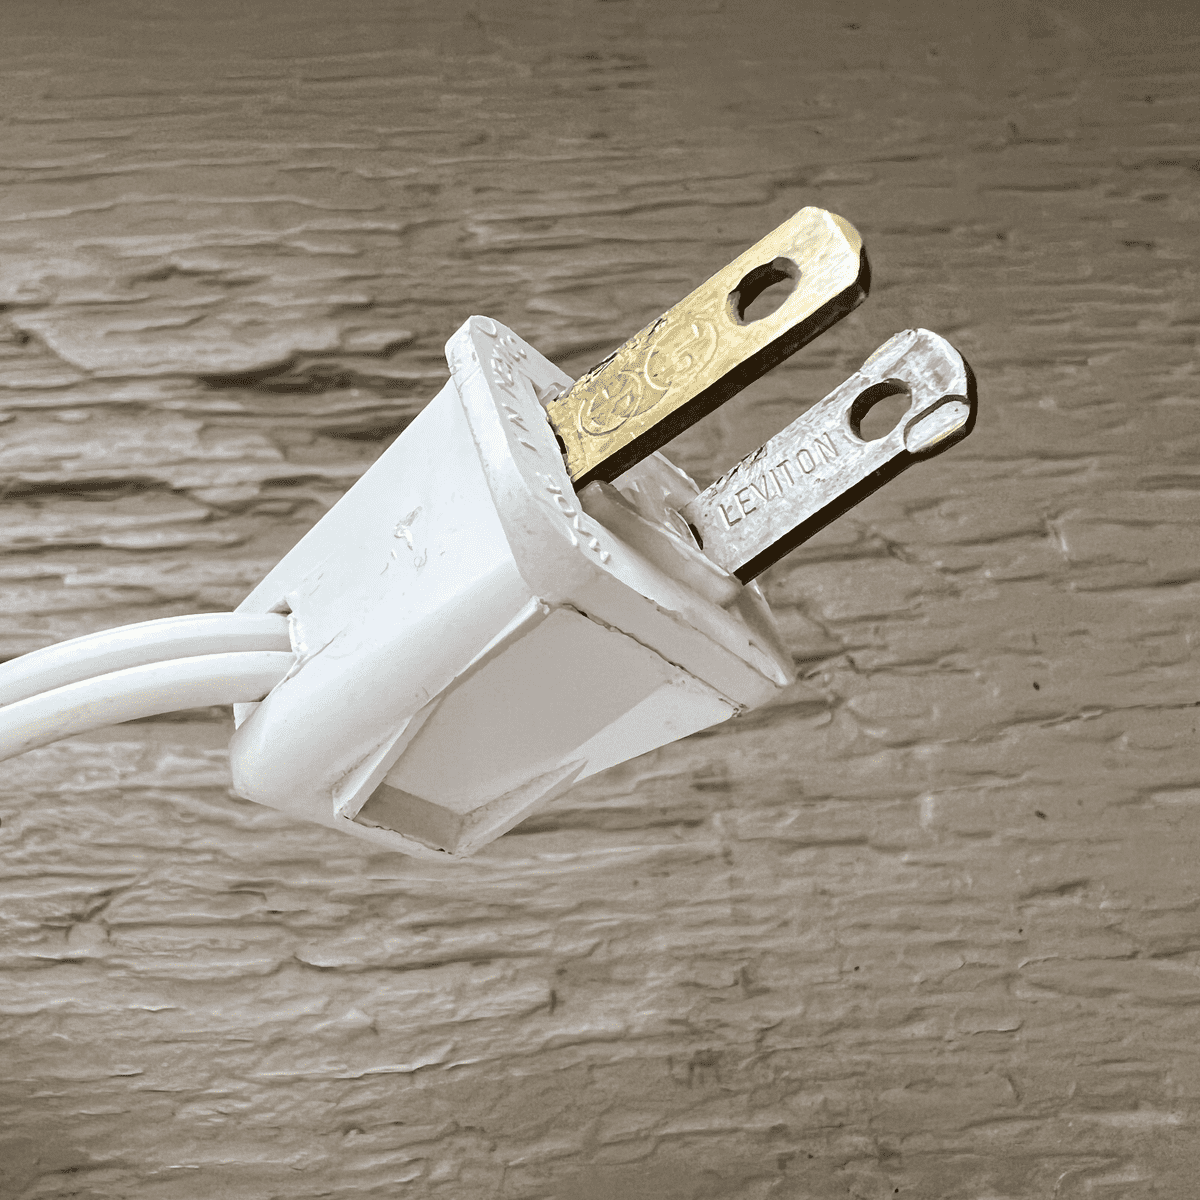
THERE'S ONLY ONE IMPORTANT THING TO KNOW: which is the hot and which is the neutral wire.
The narrow (brass) prong is the HOT conductor which connects to the hot wire.
The wide (silver) prong is the NEUTRAL conductor which connects to the neutral wire.
All polarized plugs (with a wide & a narrow prong) are the same.
ONLY add an inline wheel switch to a cord with a polarized plug.
The side with the smooth sheathing is the HOT wire.
The side with the ridged sheathing is the NEUTRAL wire.

That means:
Narrow terminal side - Smooth insulation = HOT conductor
Wide terminal side - Ridged insulation = NEUTRAL conductor
You'll probably have to look back to reference those things, and that's fine. Just make sure that you're always paying attention to which wire it is you're cutting and/or dealing with.
Would you like to save this stuff?
YOU'RE CONFUSED. I understand.
All you need to remember is that you are cutting the smooth wire. (the one that goes to the narrow terminal)
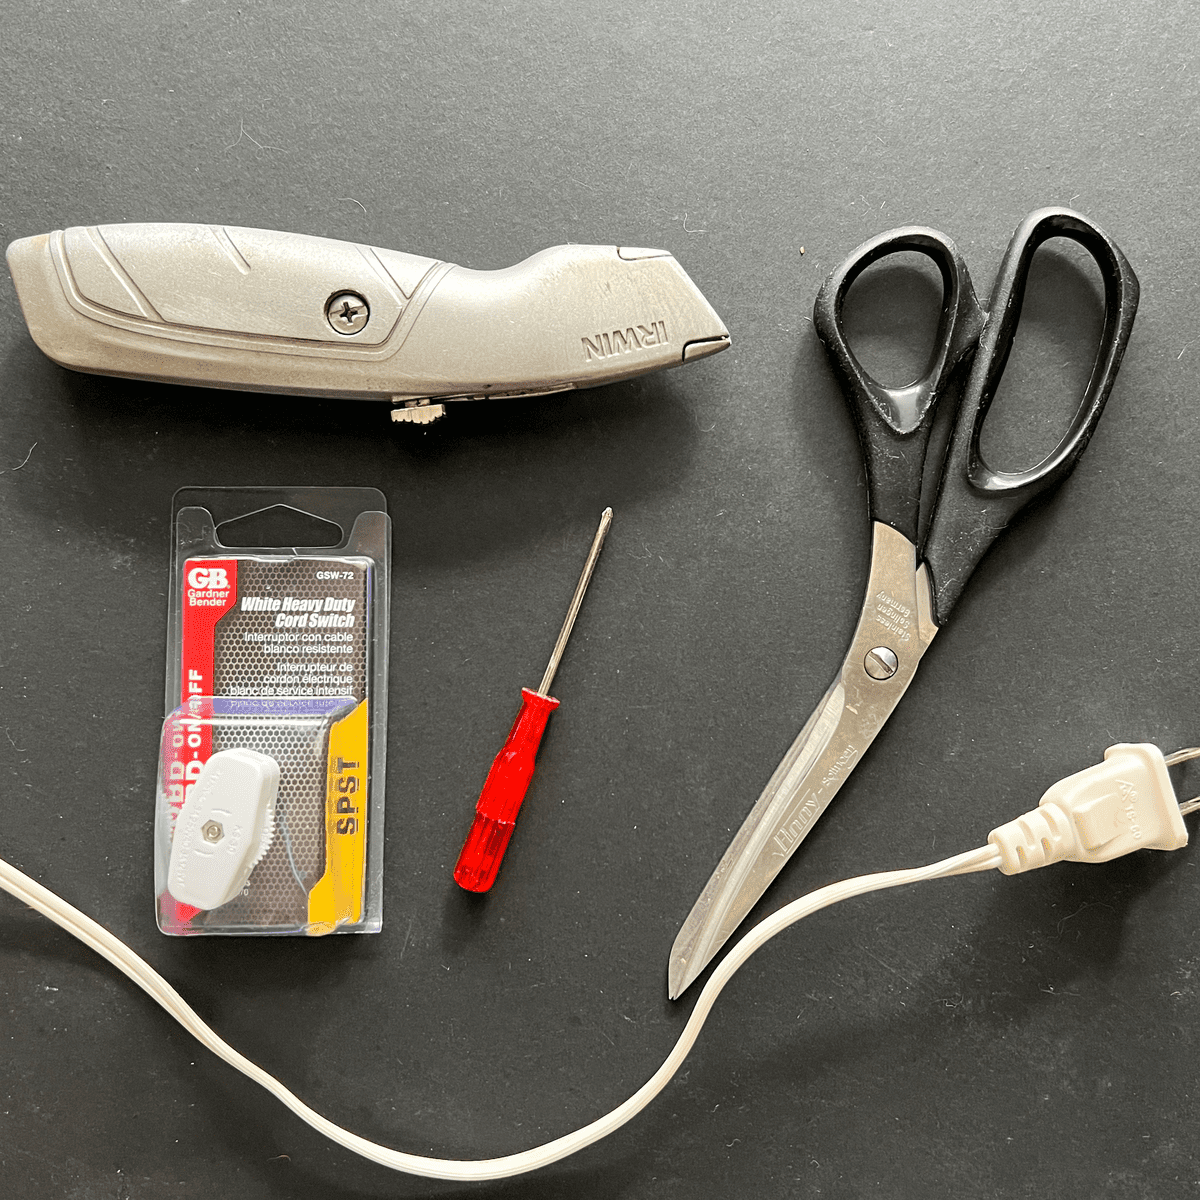
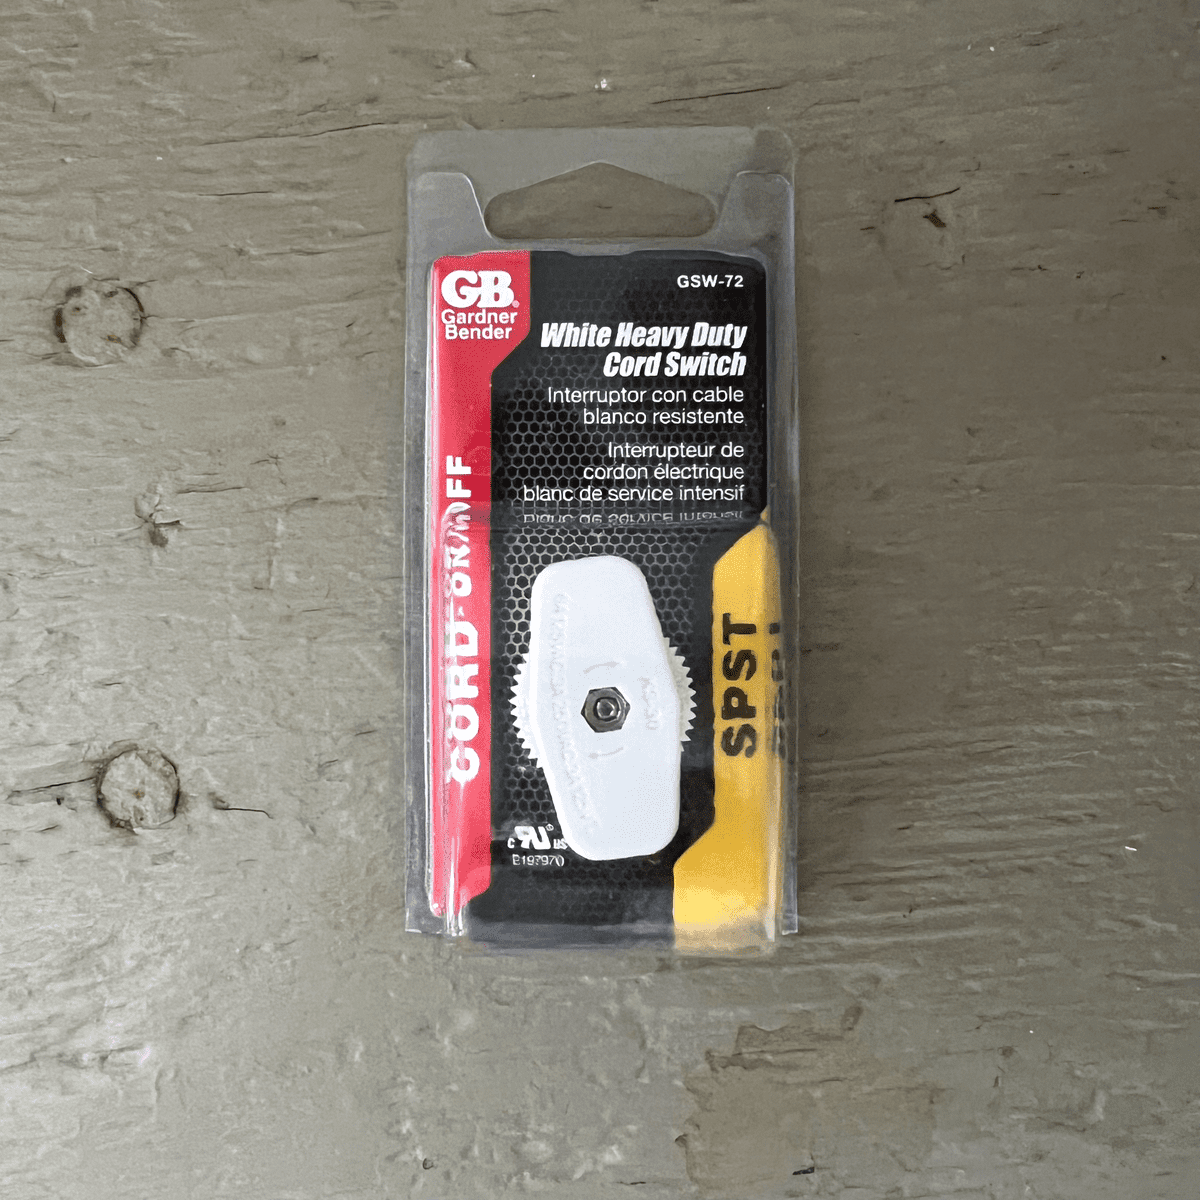
What You Need
- SMALL SCREWDRIVER
- BOX CUTTER or sharp blade
- SCISSORS
- CORD WHEEL SWITCH - (inline switch, interrupter switch)
Instructions
Step by step this is how to install your light switch.
1. Get your stuff together.
2. Decide where you want the switch to go. You get to decide where it's most convenient for you.
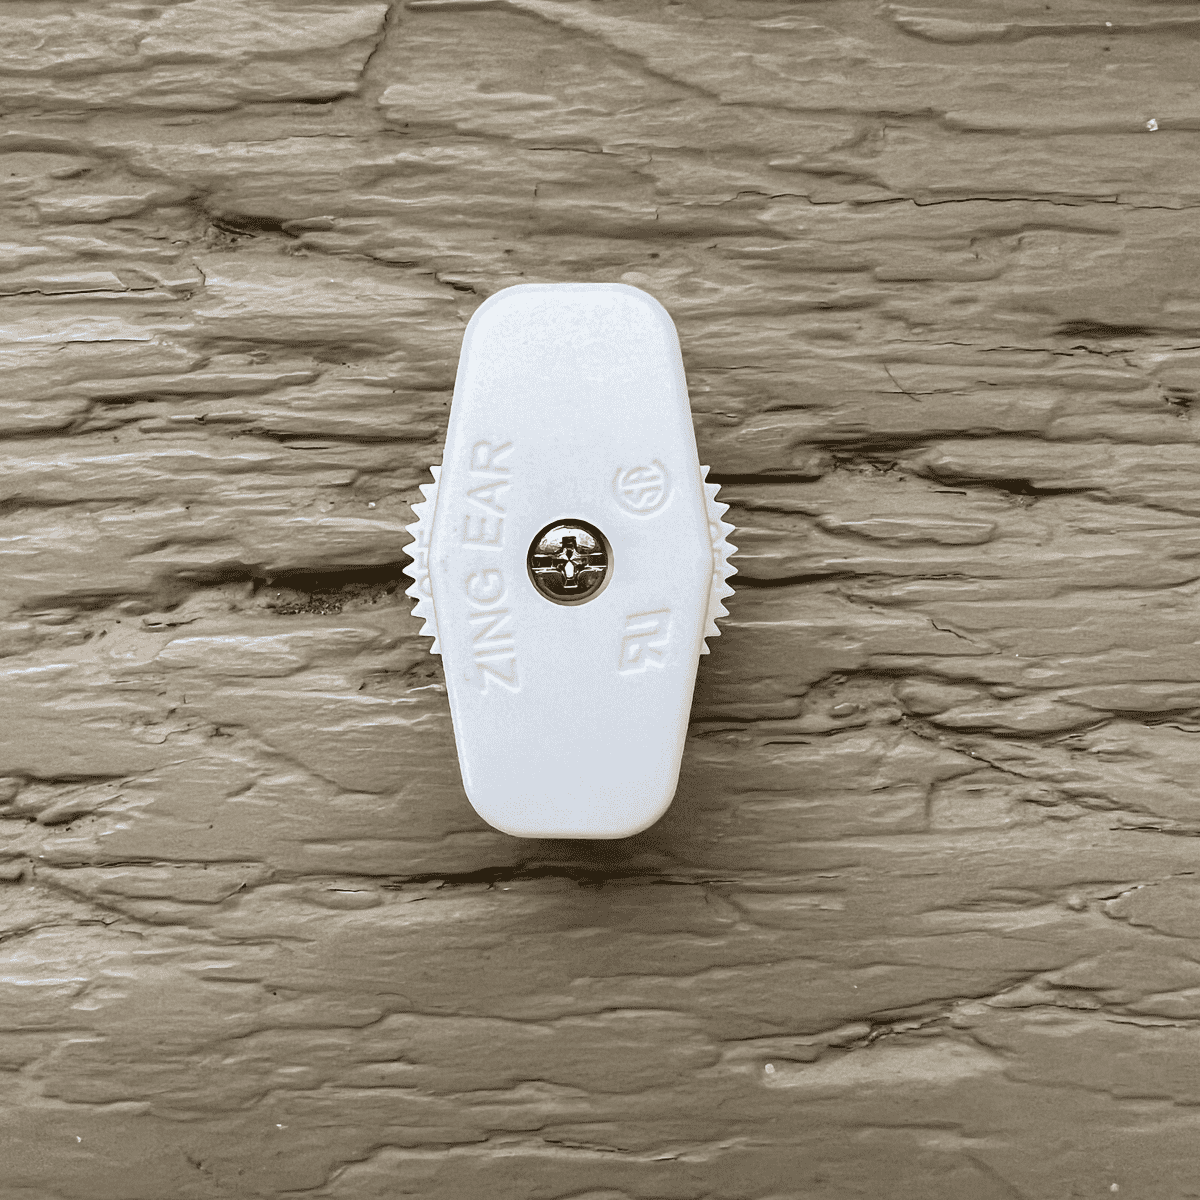
3. Admire your switch. You're about to become an electricianish.
4. Your switch might look slightly different. That's O.K.


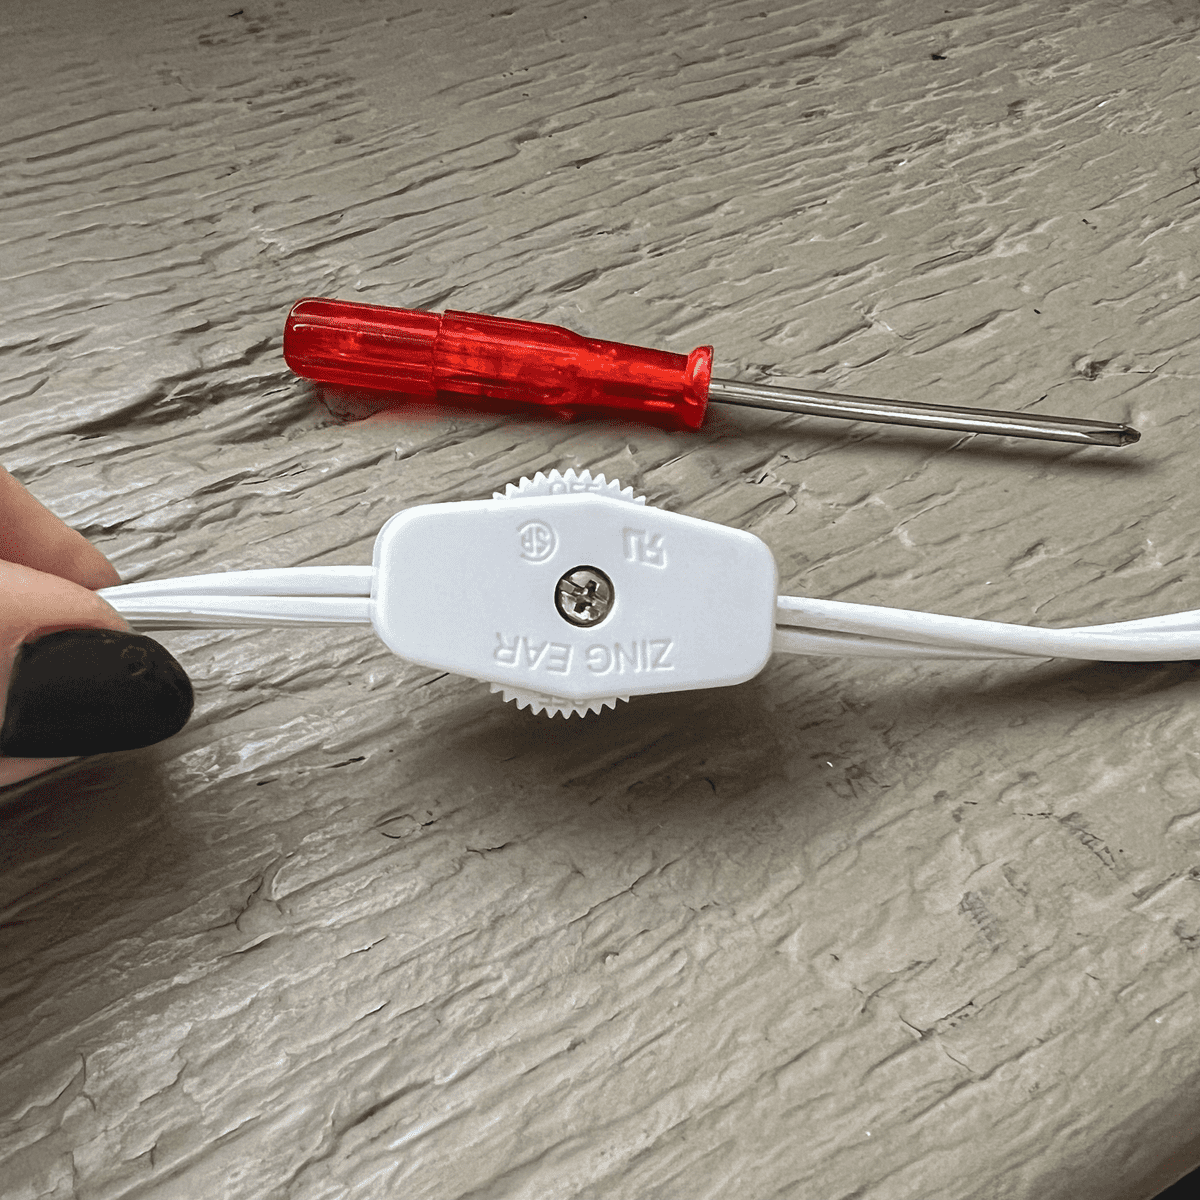
5. Remove the screw to open the switch up. Don't lose the tiny nut from the other side of the screw head.
6. Using a sharp blade split the electrical cord to separate it.
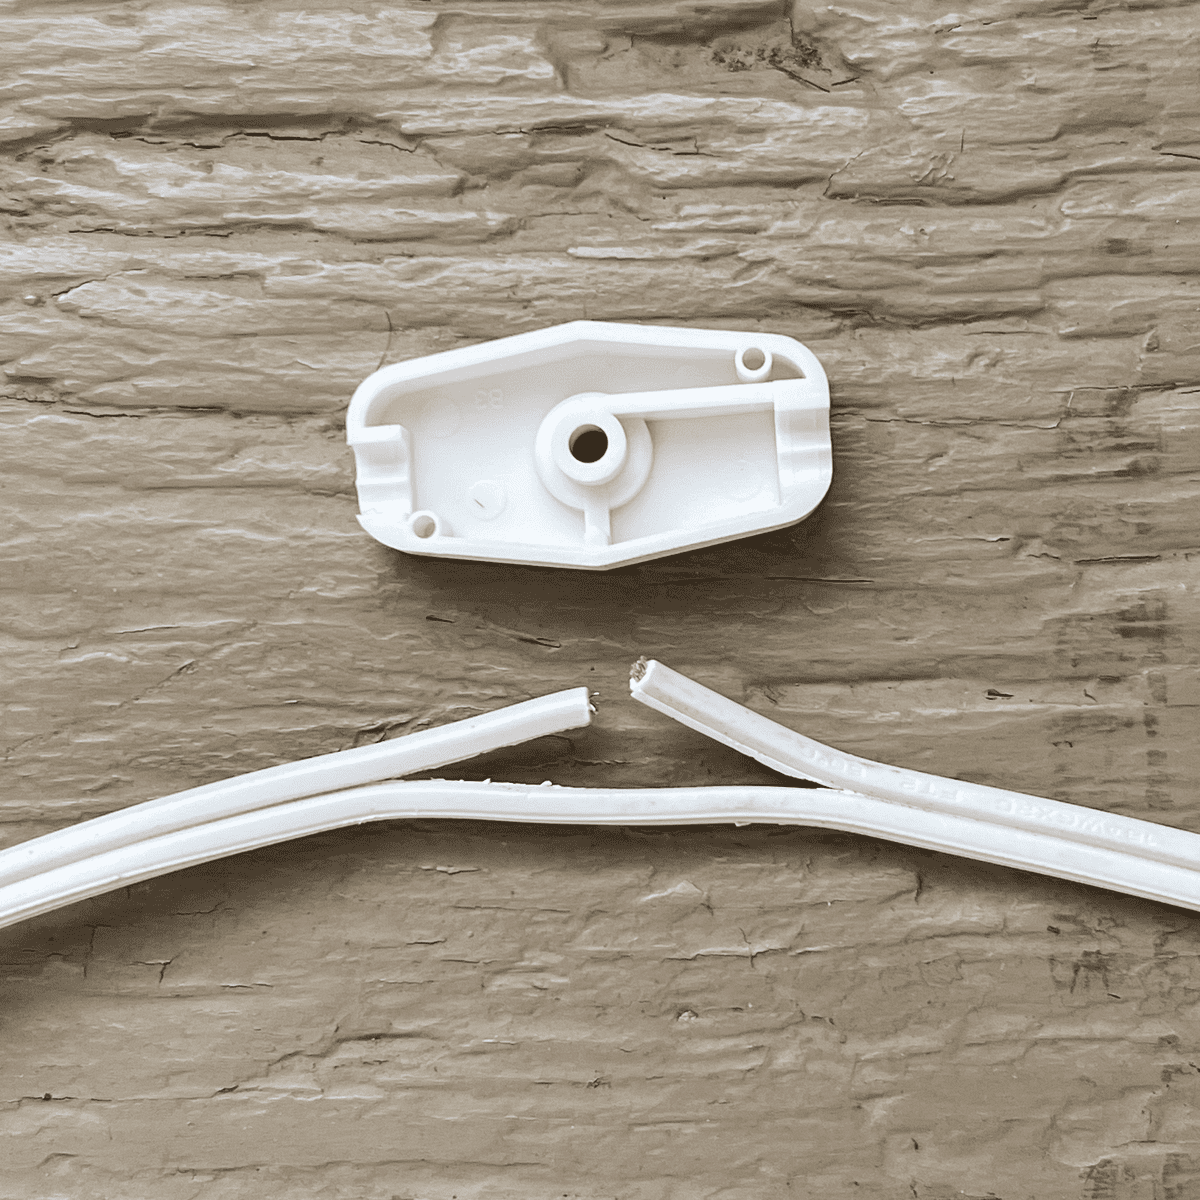
7. Cut the HOT, smooth insulated wire in the middle. (this is where you get to show off your scissor skills)
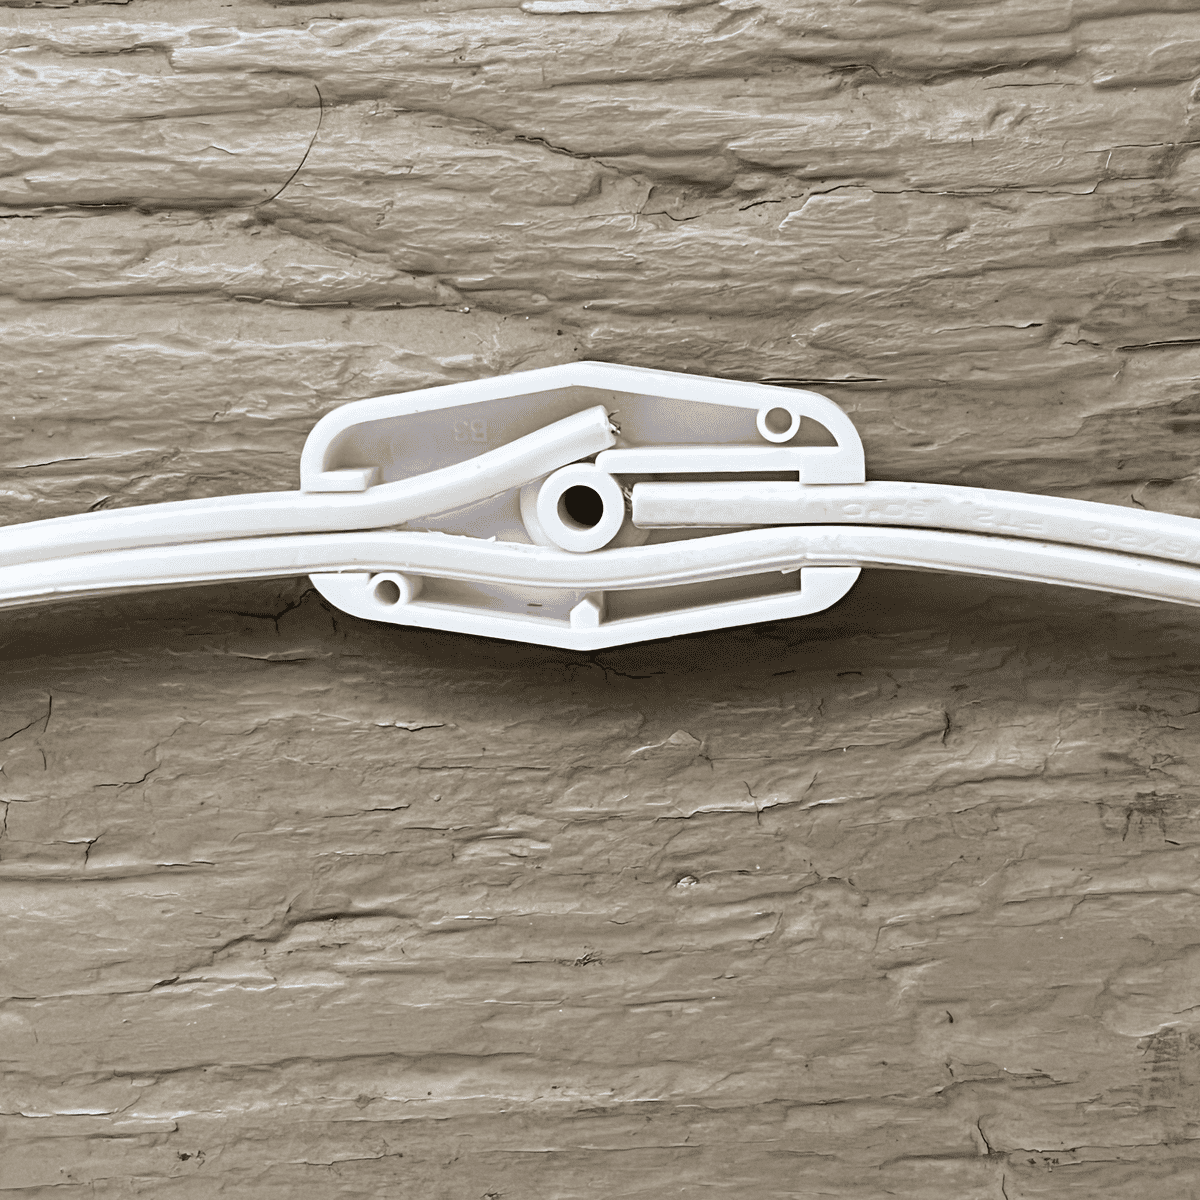
8. Press the NEUTRAL, ridged, wire into the bottom channel then press the cut HOT, smooth wires above it.
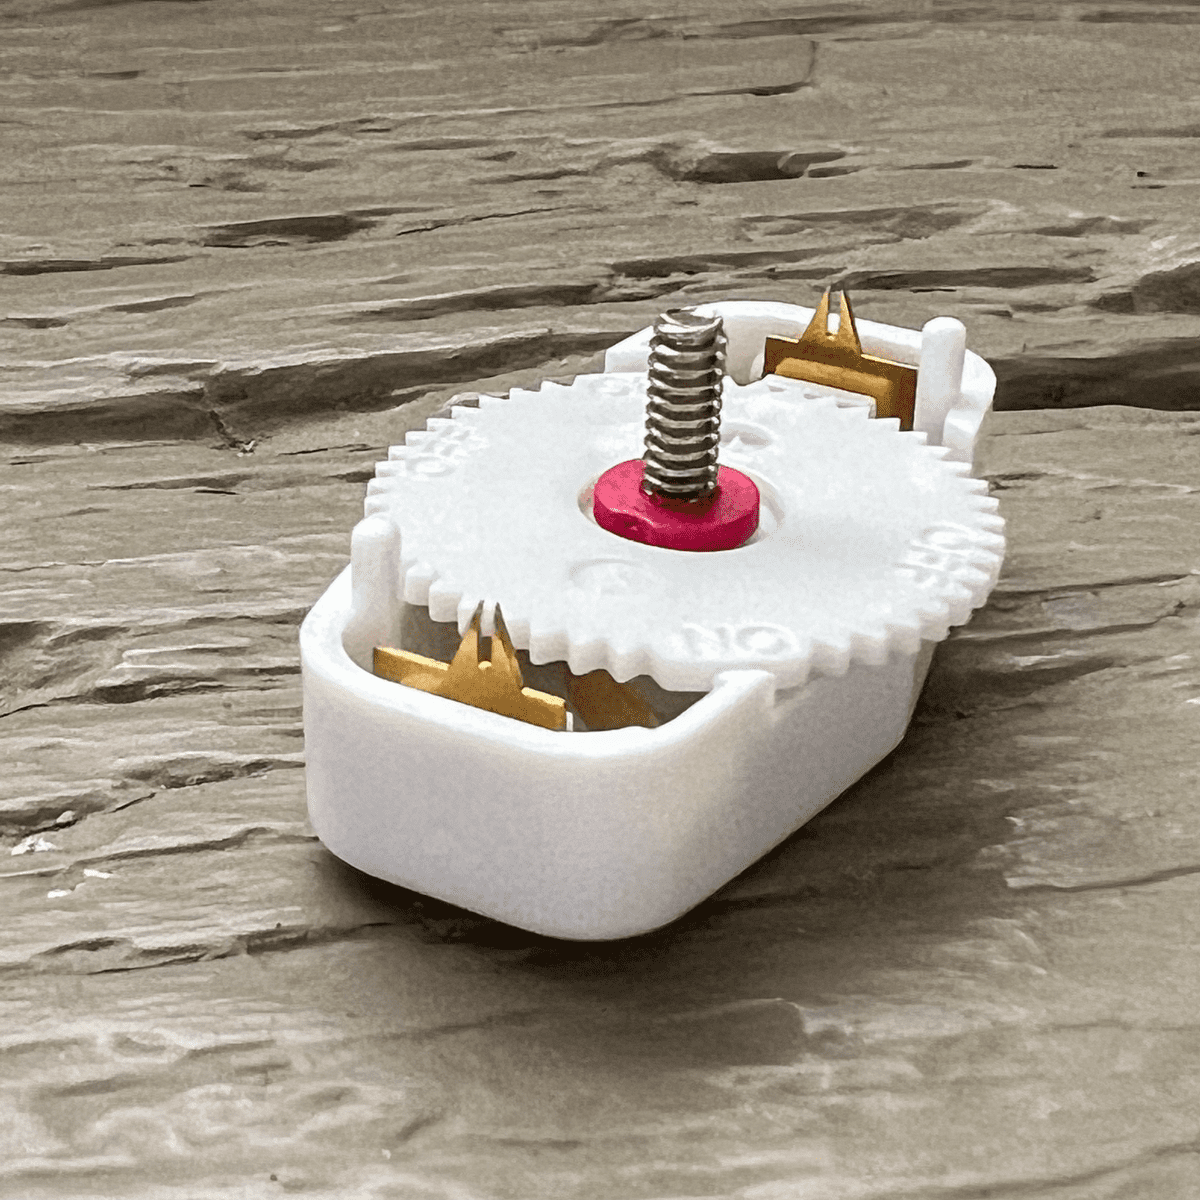
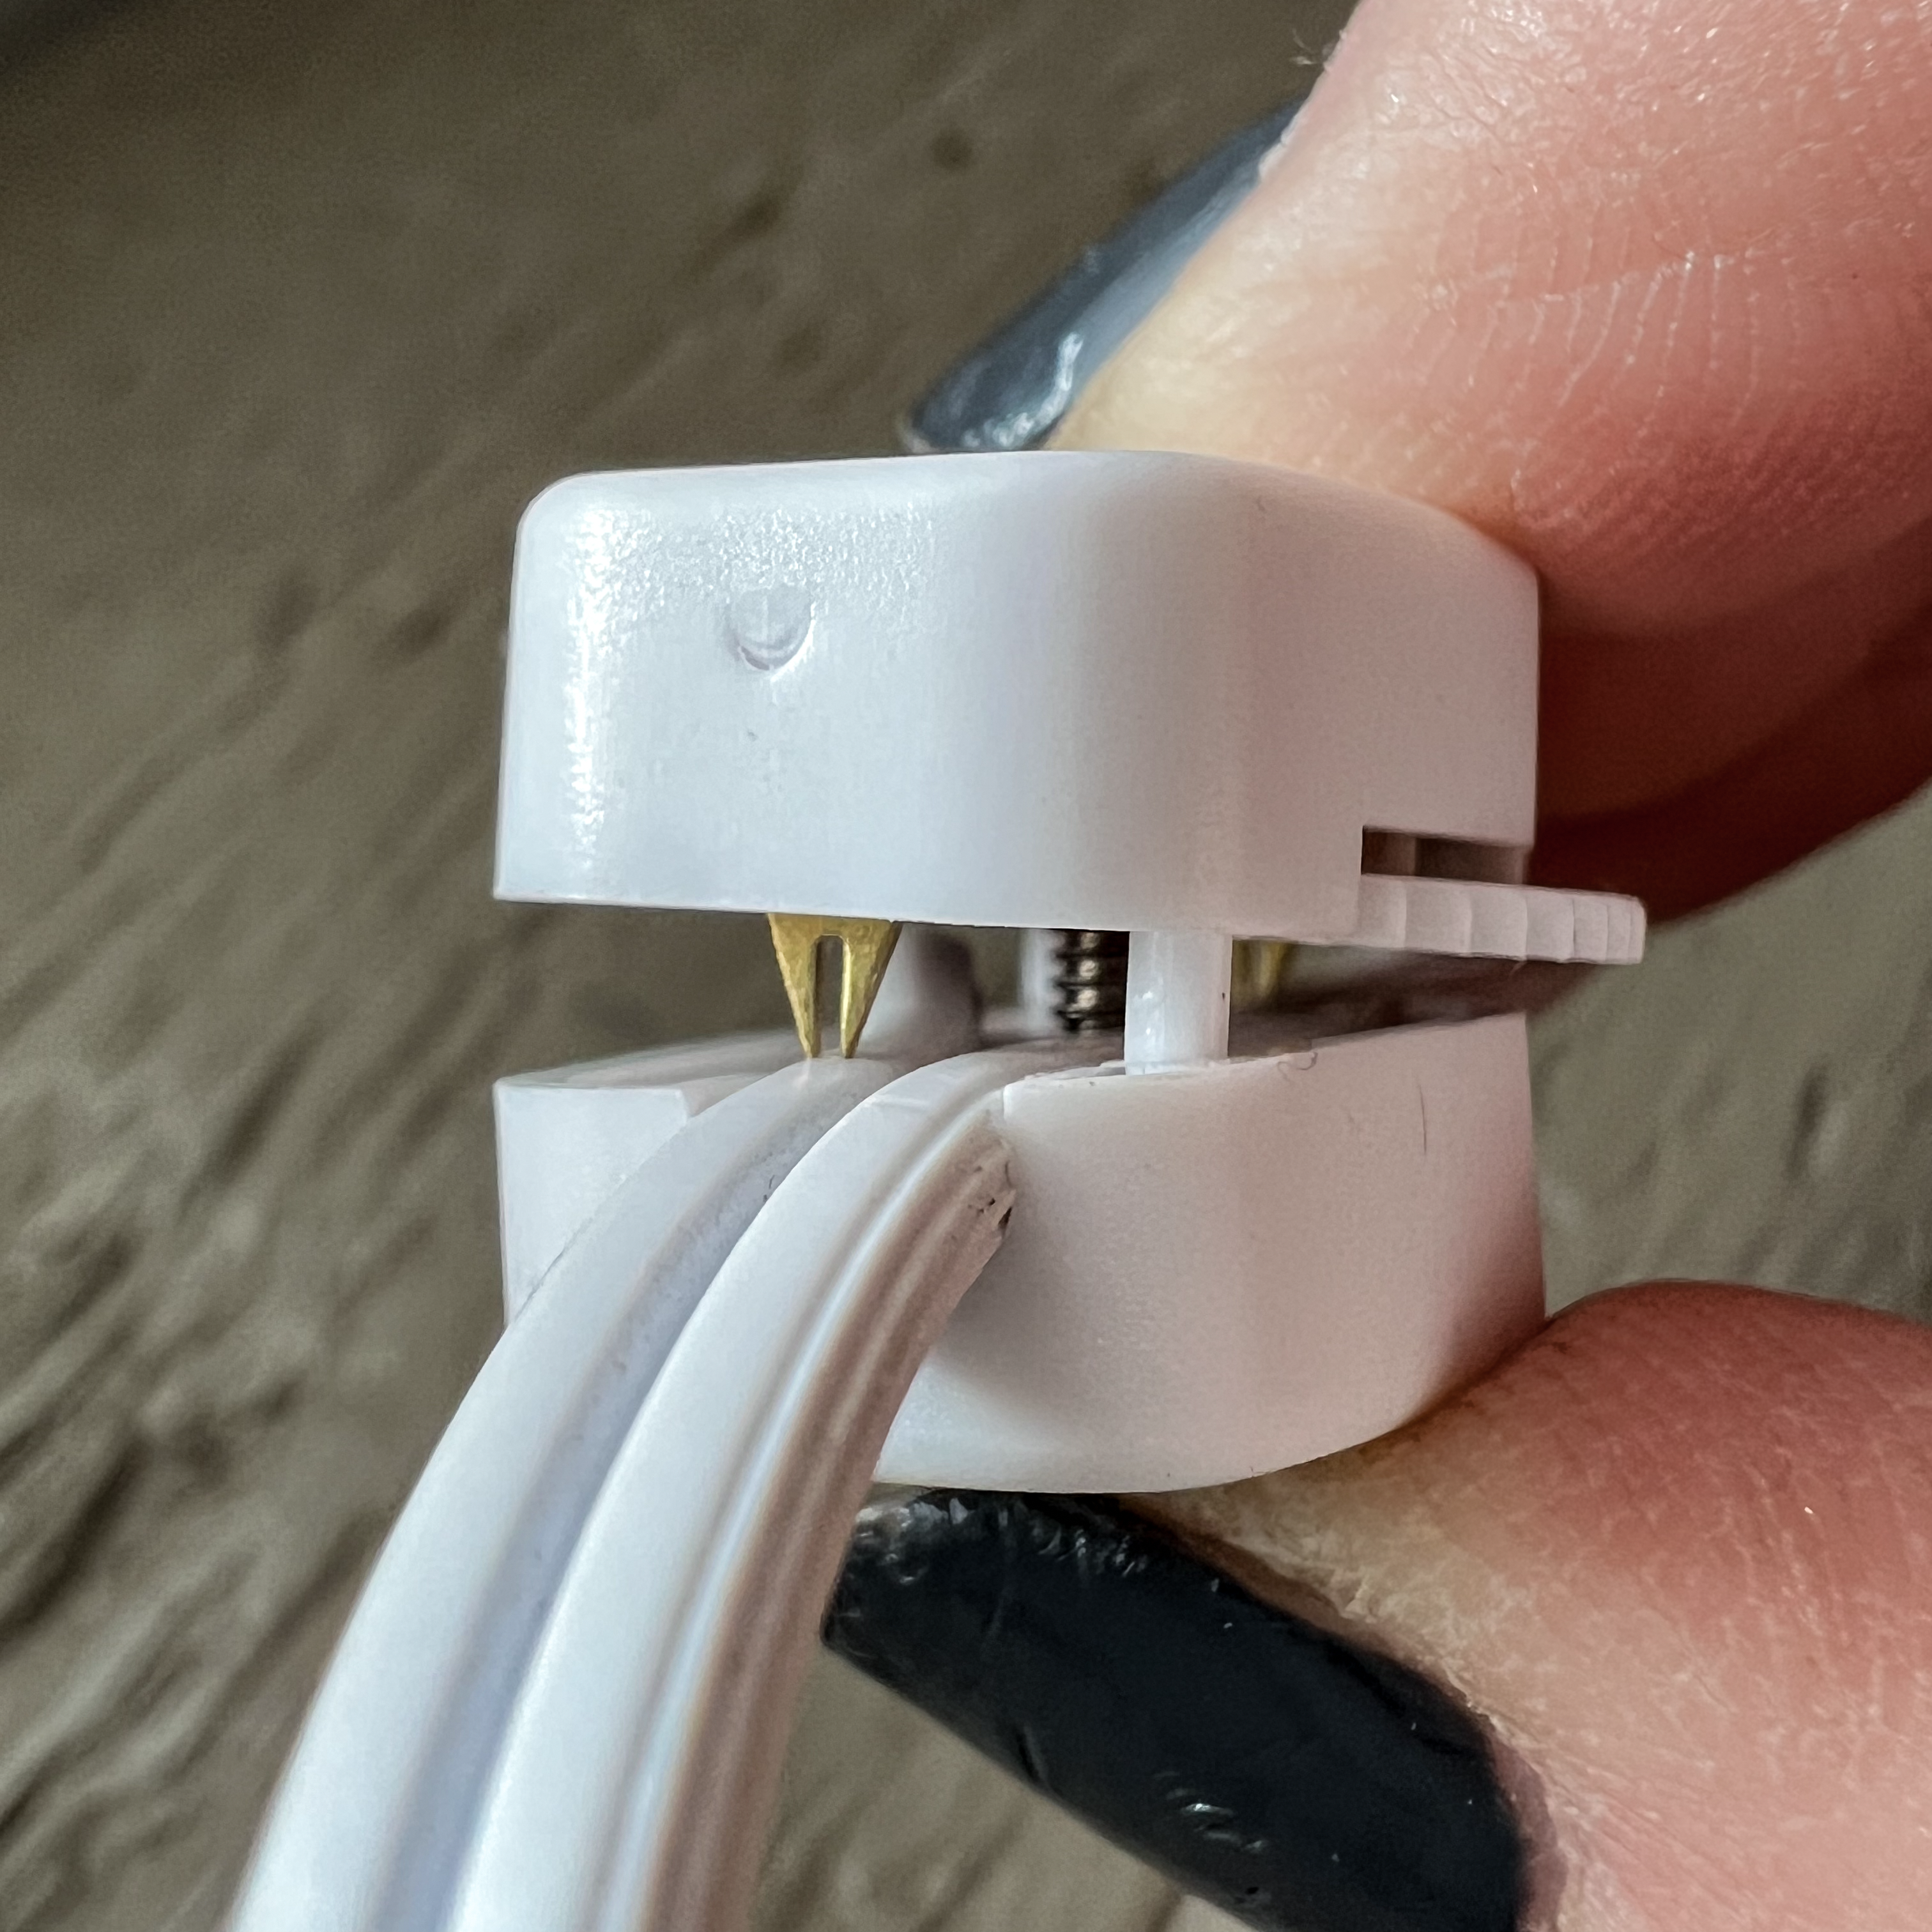
9. Note the points on the other half of the switch. They will pierce the HOT smooth wires to finish the broken circuit.
10. Line the top part of the switch over the bottom, and press together firmly.
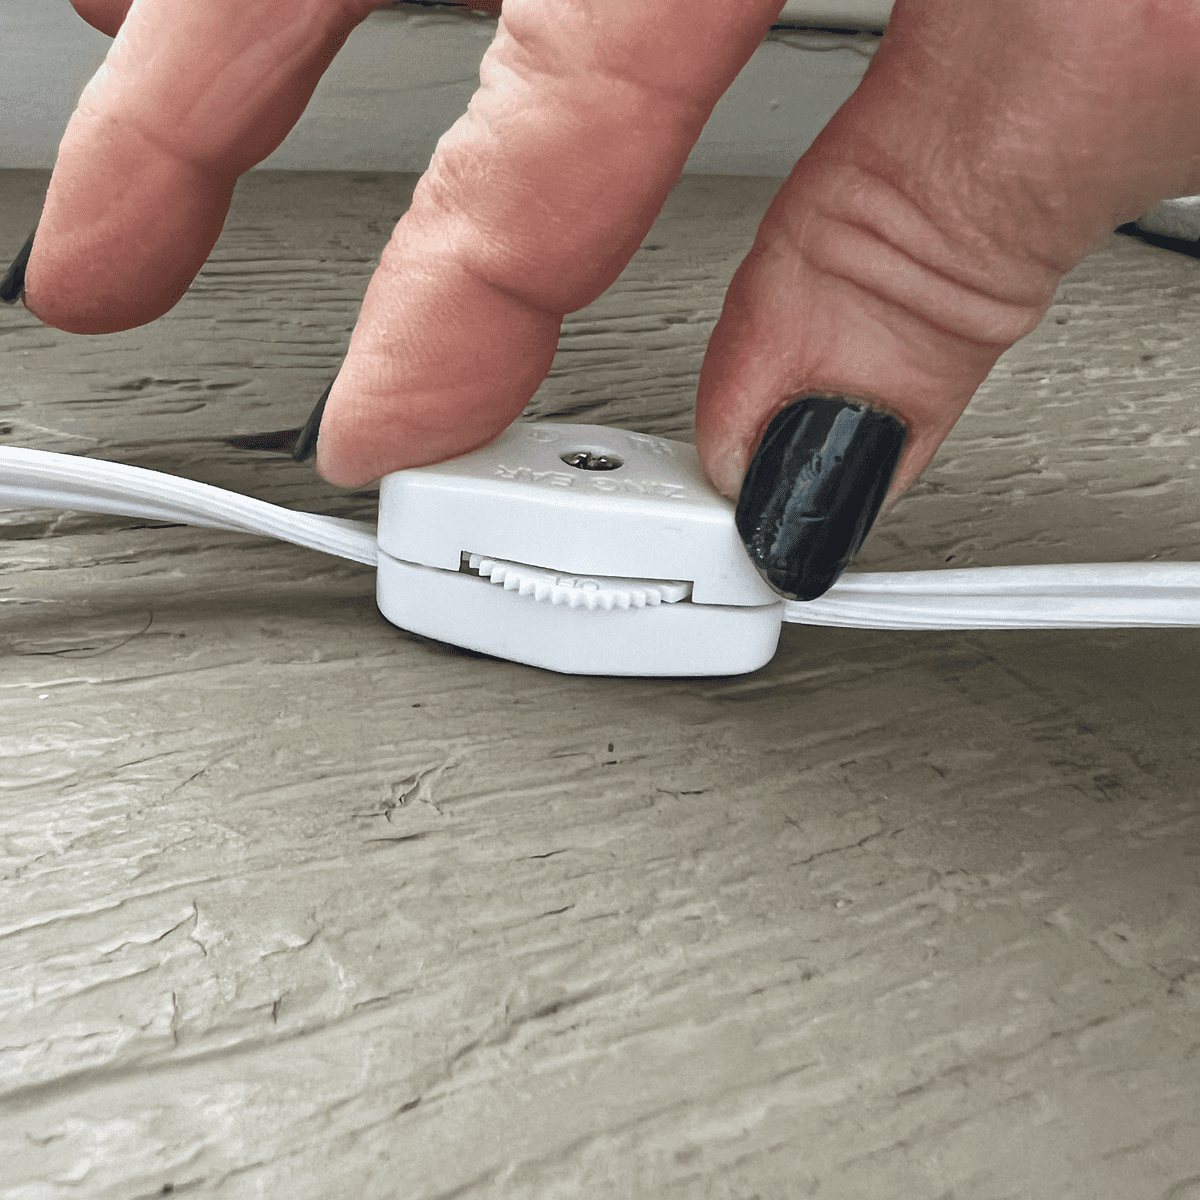
11. Make sure the tiny nut is in place and screw together to tighten.
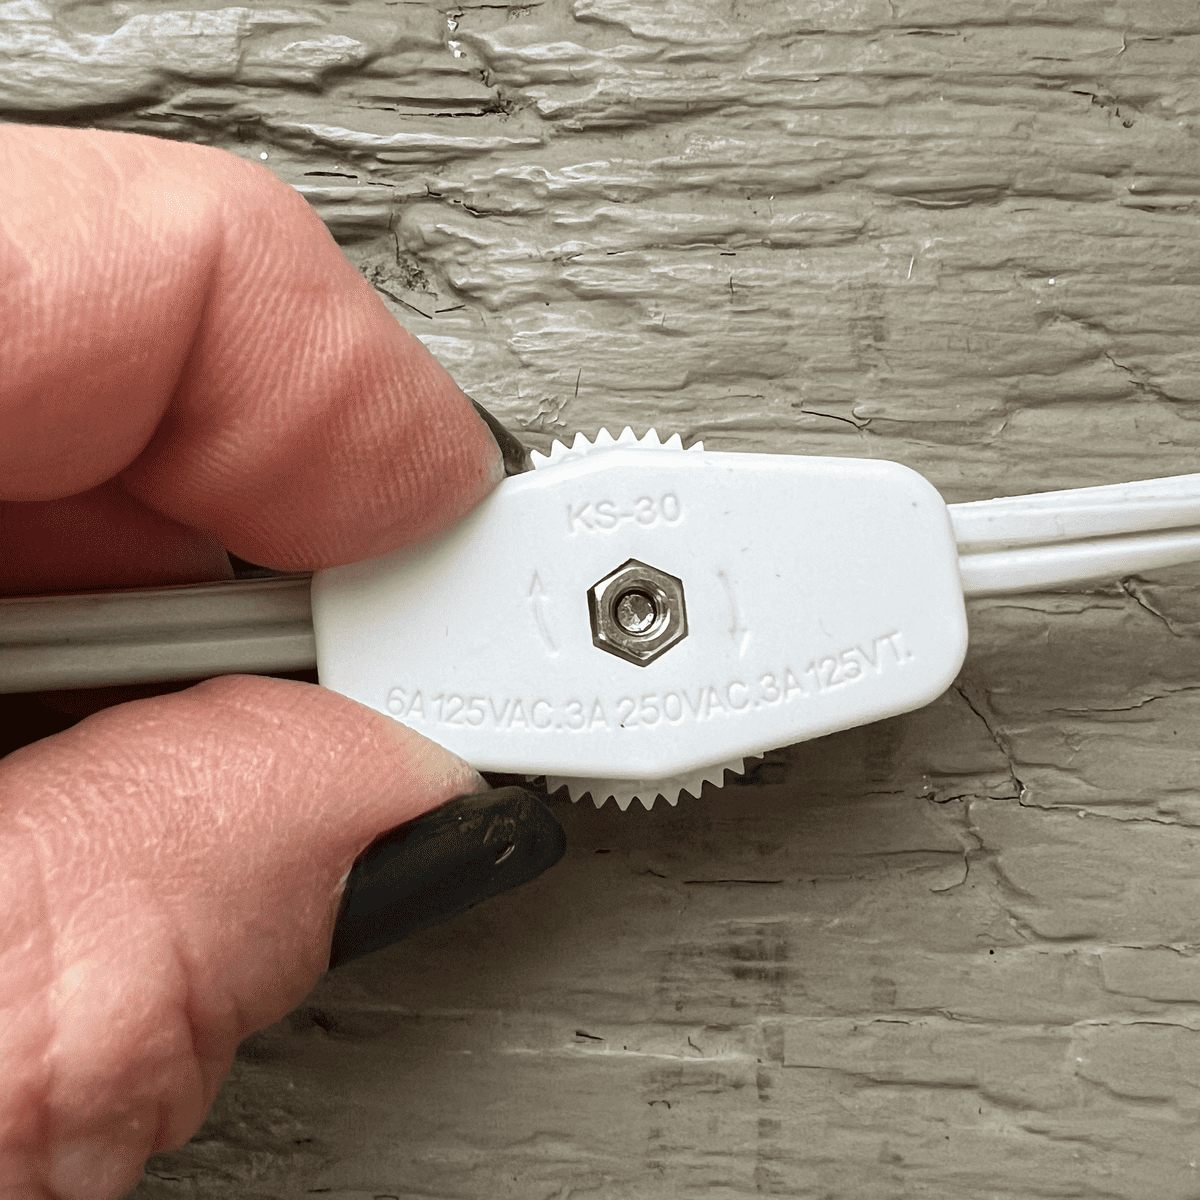
12. You're done Bob Vila. You just have to test it out.

Look at you, you switched it up.
If you have bigger lamp problems, I can also show you how to rewire an entire lamp.
And then of course there's the option of using smart plugs and smart bulbs. I use Philips Hue bulbs in my living room and Kasa smart plugs around the house, plus I added some to my mom's house.
Betty claimed she didn't need them, but now that I've set them up for her she loves walking into the living room and saying "Hey Google" turn the lights on." Then the neighbourhood takes a drink.


Chris Toole
Would this work on a 3 way lamp? ie. 50, 100 and 150 amp.
Karen
Hi Chris. If you mean: can you leave the lamp set to the 50W setting and use the cord switch to turn it on/off without cycling through the others — then yes, that should work. The inline switch just cuts power; it doesn’t change the settings.
If that’s not what you meant, let me know and I’ll give it another go.
—Karen
Chris Toole
Thanks for your reply Karen. I read somewhere that this would only work on the lowest setting of the lamp ie. 50 watts. I was hoping to leave the lamp set on the 100 watt setting. I think this should work fine but would like your opinion. Thanks again
Karen
Hi Chris. I'm not an electrician, but I can't see any reason why it wouldn't work with the 100 watts. The only thing I could think was that inline switches could only be used on very low power, but they can take over 300 watts so I believe it should work for you. ~ karen!
Carol Wiederrecht
I want to install a plug-in pendant light over the counter in a room with low ceilings. But all the lights I am looking at have an on/off switch a foot away from the plug. Can I install a wheel switch at a convenient height without compromising safety?
Rhonda Coleman
Will this work on a coffee cup warmer as well? I have a cup warmer that I love, but the “button” that controls on, low, medium, high heat, & off is flush with the front of the unit. That positioning makes it all too easy to turn the unit on, even by a cat's paw! I have resorted to turning the unit upside down, relocating it, and putting it on a power surge strip that has an on/off switch. Having an inline switch would be a game changer for me!! Thanks for the excellent tutorial!
Karen
Hi Rhonda. Yes, it should work. You would have to keep your coffee cup warmer set to whichever heat you want and then you would turn it on and off with the switch on the cord. ~ karen!
Dave
I agree with using this on most things but before you do, check the "AMPERAGE" of the unit and make sure the switch can handle that amperage.
This will be listed on the packaging or on the switch itself AND on the item you want to add the switch to.
BTW, LOVE your sight.
Karen
Good point Dave! These little switches wouldn't fit on anything larger than a standard 15 amp lamp cord though. It physically wouldn't be able to closer around a larger (ampier, lol) wire. ~ karen!
Nikki
Ma'am, you are the epitome of awesome!!!!! I have 2 lamps w/o switches...idk y, got them at a yard sale...i thought i was gonna have to become a human pretzel to use them coz the outlet nearest them is behind couch in a corner....i also have several of these switches...from same yard sale...included in box i bought for .25 coz i wanted the "ugly" cover plates...it was legit a box of "worthless crap i found when i cleaned out dads workshop" directly quoted from lady having the sale!! I never knew what to do w the switches, but being raised by grandparents, i never throw anything away...so I JUST STUMBLED ONTO YOUR SITE TODAY AND OMG NOW I HAVE A MATCHING PAIR OF UGLY LAMPS THAT ACTUALLY WORK!!!!! And no more pretzeling my 48 yr old self into positions that would frighten the emt's that would b needed to get me out of!!!! THANK YOU!!!
Karen
LOL. You're welcome! There's nothing more satisfying than a garage sale find! I'm glad you're able to see the light now. ;) ~ karen
Pam'a
In a weird coincidence, I set out to do this exact task last weekend. Luckily, I don't have a blog, because I managed to totally FAIL.
It turns out that my lamp's cord was just a tich too big around to fit into the openings on each end of the switch, no matter what swear words I tried. It wasn't a fat cord, either. So be sure to check that!
Jenny W
Thank You once again for teaching me something I did not know that I needed to Know!
Karen
You're welcome! That's what I'm here for. That and to supply my neighbours with dehydrated sourdough starter. ~ karen!
Meg
wait did I miss this in a post, you can dehydrate sourdough starter instead of keeping it like a weird pet?! *goes to search box*
Kristin S.
Thanks for this tutorial, but when I ran around the house looking for lights to add this to (obviously), I only found one light. It doesn't have the two cords, and instead has one of those fabric wrapped all in one cords.
Theoretically there are those smooth and ridged wires in there, but cutting through seems a 50/50 chance I kill the lamp. I am now disappointed. Guess I'll just throw it on a timer.
LS
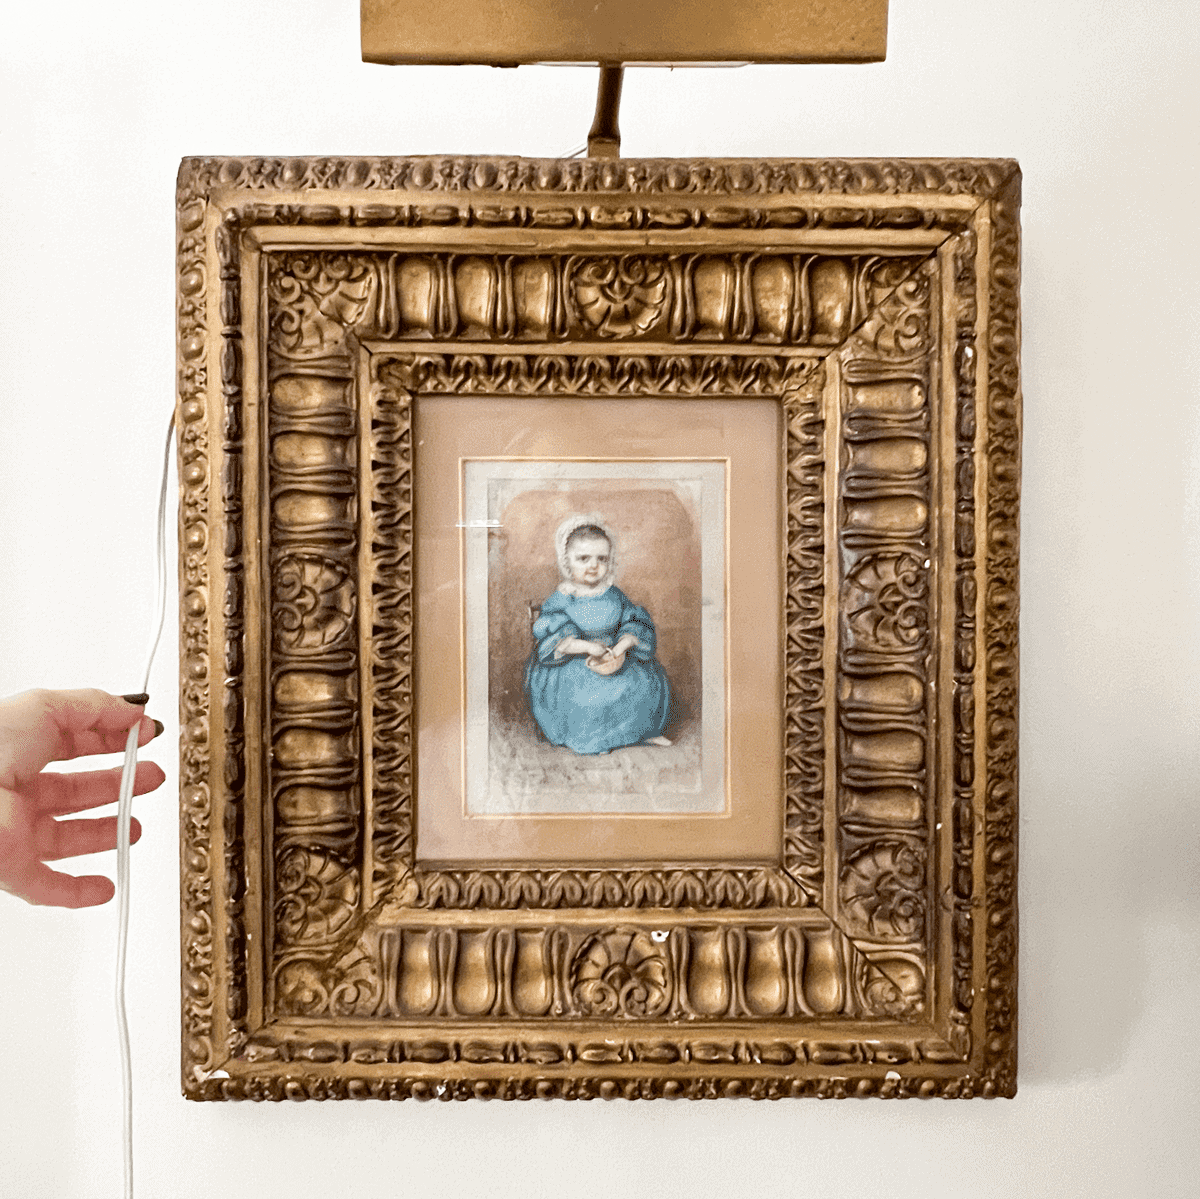
That's kind of a homely baby in the picture you're illuminating. Would make me want to look directly at Lip to get a better image in my minds eye.
Karen
I LOVE my blue dressed baby. That frame and print is one of the first things I bought for this house. And I'm still not sick of it. I have a thing for creepyish portraits. ~ karen!
Jody Farrand
Now I'm looking around the house looking for lights to add wheel switches onto. Great tutorial!
Karen
Thanks Jody! Let me know if you're successful in finding something.😆 ~ karen!
LP
Oh my god, you can ADD these to lamps?! This is going to be a game changer at my house, thanks, Karen!
Karen
You can! These are the most basic, easiest version. Others like toggle switches can be added, you just have to do some wiring instead of just cutting one wire. ~ karen!
Deb from Maryland
Your tutes always seem to be timely for something I'm debating what to do about! I have to bend over the arm of my couch to plug in (and unplug) a hanging lamp in my living room. Perfect solution - and quite easily accomplished even! Thank you.
Karen
You're welcome! There are other switches, like toggle switches you can install as well, but those involve removing the sheathing from the wire and wrapping the wire around a screw terminal. They aren't difficult, they just aren't cut and paste easy like the wheel switch. ~ karen!
Edie Marie
You just changed my life Karen! Need I say more?
Karen
You do not need to say more. I'm good with that. ;) ~ karen!
Mary W
What is sheathing? I understand narrow and wide but how do I know what wire goes to which side? Seems I'd have to cut the original cord where the wheel is going to be inserted into the cord. That means I don't know which wire went to narrow plugger and which wire went to fatter plugger. What does the ridging look like? I can't sleep so got up 3 hours early and now I'm as smart as a box of rocks. Obviously I should just go work a puzzle. But hey, you got me hooked up to that also. Thanks.
Debbie D
Loved the tutorial. Putting it in a safe spot should I need it in the future. I too love my smart plugs. I can climb into bed, or go into a dark room, etc., and have (she who shall not be named otherwise she will awake) turn them on and off for me. I also have them set to go on and off at certain times, so my house is lit up at night as I get home from work, looks like someone is there when I am out of town, etc.
Carolyn
Nice tutorial. Yup, add to the instructions that the cord must not be plugged in while completing this procedure!
Randy P
I have used these in the past and they are quite simple to install - one caveat is to use them on low amp draw things, like a single bulb light ( I've converted to all LEDs wherever possible) for the lower electical consumption and long life. I would not use those wheel switches in things like small electric heaters, fans, tools or anything with higher amp use. The switch mechanism is not very 'stout' and could cause problems.
Randy P
I should of course mention that most people are shocked when they discover what a bad electrician I am.
Randy P
A quick Googling says these type switches are rated for just 2-3 amps. Amps = Watts/Volts
Kat - the other 1
⚡😵⚡
Are shocked?
Or GET shocked?
😁
Barbara H.
Well, the first most important thing is that the lamp or whatever is to UNPLUG it before cutting any wires. Thanks for the instructions.
Algonquin Man
I’m not sure I understand the neighborhood having a drink reference. Nonetheless I’ve never been more entertained while being educated. Congrats and thanks.