Every summer I look forward to fall when I can harvest the potatoes of my labour. And beets. And squash and tomatoes and carrots.
I also look forward to cleaning the garden up and putting it to bed. Let's face it. We all have good intentions in the spring. We're going to water every day and it will be fun and we'll wear a sun bonnet and everything will look fresh and lively all summer long. We'll deadhead all the flowers and it'll only take a few seconds every day and we'll keep things trimmed and THIS is the year the lawn will always be edged!
And then 2 weeks pass and we're sick of watering, can't be bothered to dead head, lose our sun bonnet and buy our second set of hanging baskets because the first ones withered and died already. Also the lawn looks kind of rustic with it's long, hair edges so we'll probably leave those as is.
With fall and winter come long days and nights indoors that aren't spent scrubbing dirt out of our fingerprints. It's a rest from the outdoor work of gardening.
In keeping with my year of tragedy I'm going to keep the pain going.
I'm going to continue gardening alllll w i n t e r l o n g! Actually there's no tragedy in that. Just a bit of work. But I'm excited for it.
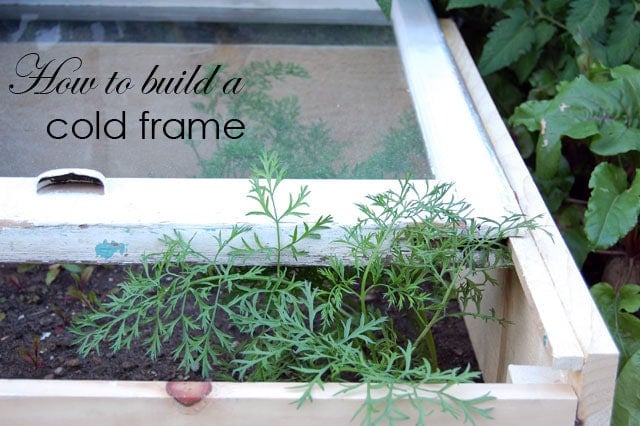
Cold frames allow people in cooler climates to extend their growing season beyond the summer into fall, winter and even spring. Some crops actually grow throughout the winter, and others are just harvested then. The cold frame allows the plants to grow throughout the fall when they'd normally stop growing due to lack of heat and available sun making them ready for harvest in November and December.
There's really no weeding involved and not much watering. All you do is plant a few things this time of year (or a bit earlier) and then go out and pick what you need throughout the cold winter months.
I'M SO EXCITED.
I'm not gonna lie to you. I've never used cold frames before.
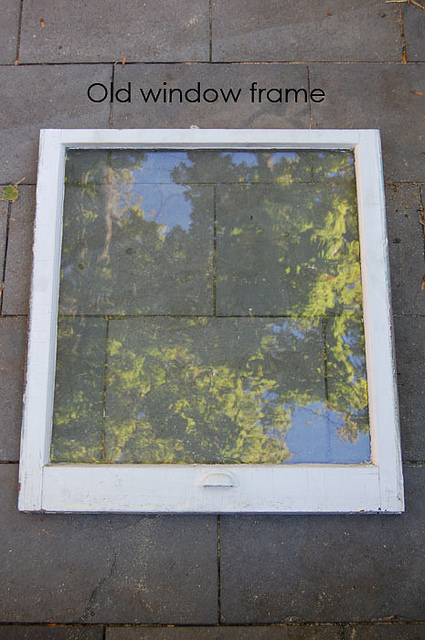
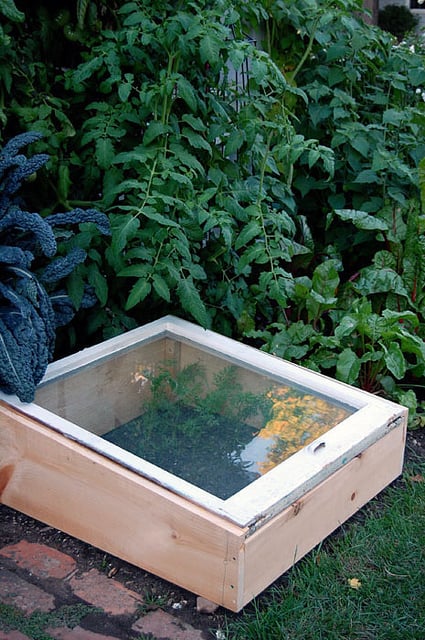
I felt inclined to work with cold frames some time early this summer so when I was driving down the road the other day and saw a huge selection of old windows and frames out by the curb I screeched to a halt, picked out 2 reasonable sized ones, threw them in the trunk, and continued on my way to my baton lessons.
If you can find yourself some old windows half your job is done. Building the rest of the cold frame is a breeze, even for someone with limited carpentry skills.
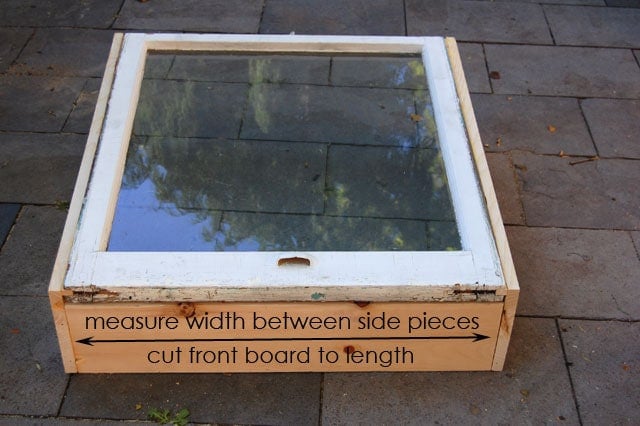
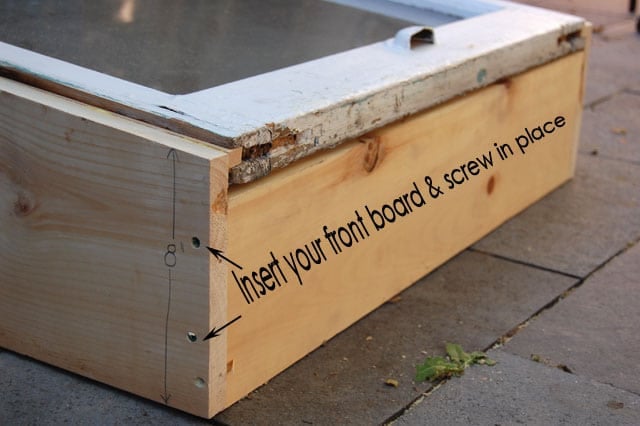
The easiest way to build a cold frame is to simply build a bottomless box, that the glass window sits on.
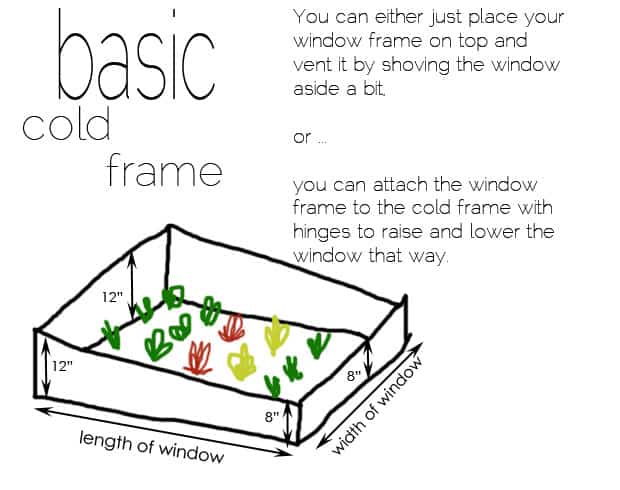
The box should measure 12" at the back and 8" at the front in order to maximize the suns rays it catches.

If you can't find an old glass window you can use plexiglass on top, or even thick clear plastic. Glass is best, followed by plexiglass, followed by plastic sheeting.
Some windows from this era slid up and down on pulleys. Because of this they have notches in the side of them. You can take advantage of those notches and build a slightly more advanced cold frame like this ...
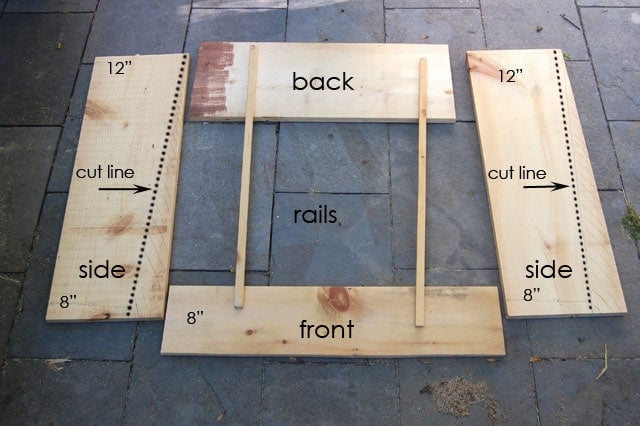
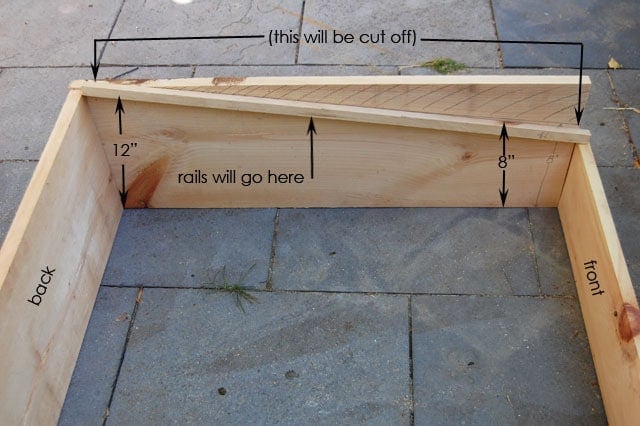
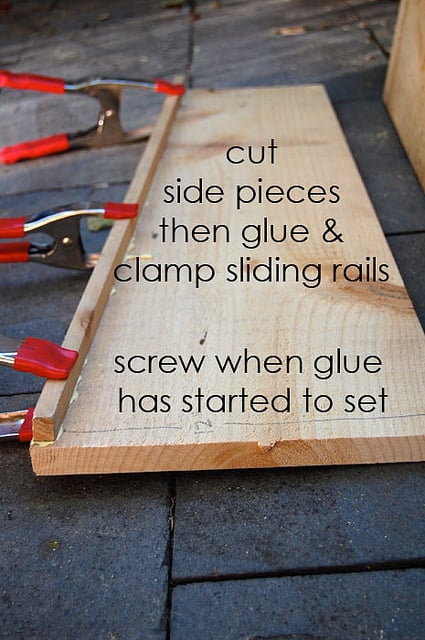
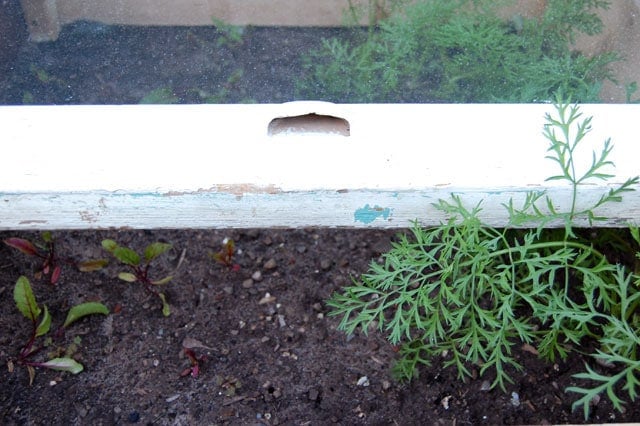
When you initially cut your rails (I cut mine out of a piece of 1 x 4 with a circular saw) cut them slightly smaller than the width of the notches in the side of the frames. If the notches are ½" then cut your side rails to ⅜" or slightly smaller.
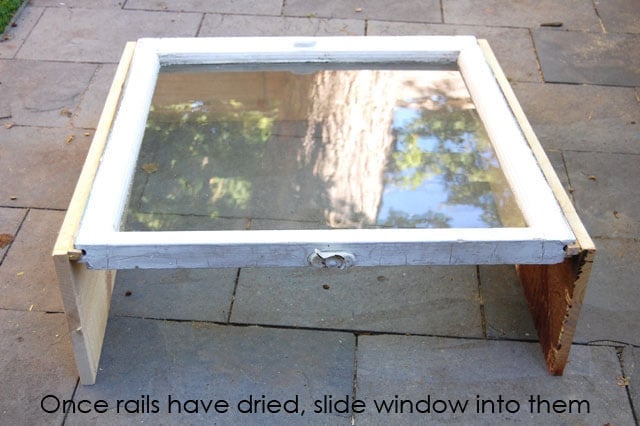
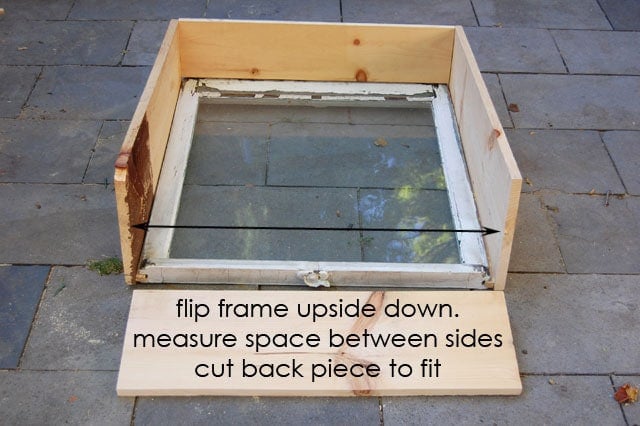
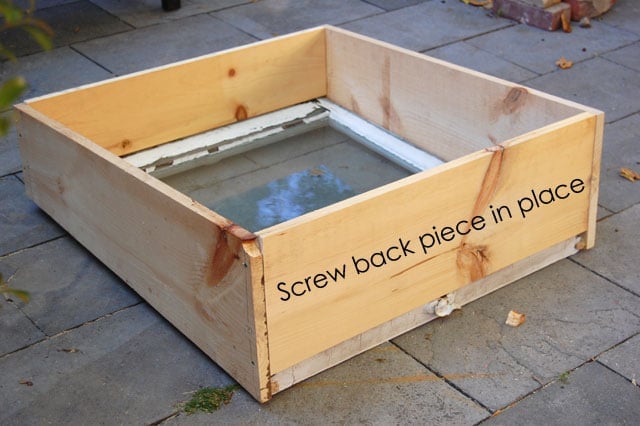
Allow a bit of space between the back piece and the window frame, so it can slide easily over the back of the frame. If it butts right up to the frame of the window it will hit the back piece when you slide the frame back. (see picture above)
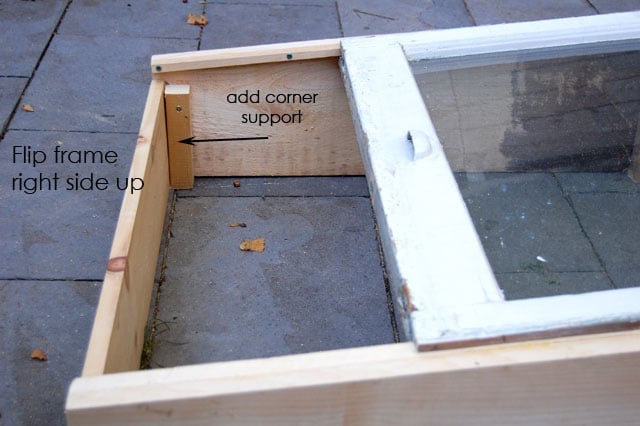
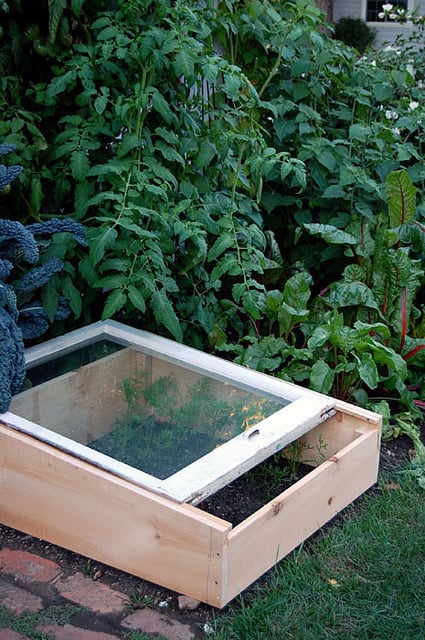
There's really nothing better about this cold frame than the more basic one. It's just fun to slide the window up and down on the rails. It's based on the concept of something called Dutch Lights. That's what the glass on top of cold frames is called by the way; lights.
If you're worried about the wood rotting over a period of many years where it touches the ground, you can set your cold frames on some 2x4s. That way it's the 2x4s that are sitting in the wet dirt, and they're the things that will rot, not the cold frame you spent many, many laborious seconds building.
In a few days I'll tell you what you can and can't plant in cold frames and show you what I will be planting in them myself. If only I could find my winter sun bonnet. Otherwise known here in Canada as ... a toque.


Hey Karen,
Is there any specific depth you have to go to. I am going to make one this year but it's on a roof top. Hence the soil is all going to be stuff I haul up a fire escape (or throw out [coffee grounds/eggshells]).
J
Joshhhhhhhhhhh!!!!!! It really depends on what you're planning on growing. More soil is always better but if you are only growing things like baby lettuces then it doesn't need to be as deep as if you're looking to row carrots or beets. I'd like you to have a minimum of 8" of soil. For one thing, the soil holds the nutrients so the more of it you have, the more nutrients you have. Is this for the summer or the winter, btw? ~ karen!
Two weeks is about as long as I kept my school notes neat. And my locker. Best intentions, eh?
And do you really have to water EVERY day? That would explain a lot. My poor garden never had a chance.
When using old windows that might have old lead paint, how concerned are you about the lead leaching into the soil?
You can buy lead tester kits at the home improvement store. A quick swipe will tell you if you even need to worry about this.
OK! Added to my list of things I need to do/make sooner than later. Thanks for this!
I'm seriously considering planting a little garden. I've wanted to for a long time but thanks to you I actually feel like I can do it!
Oh, you can absolutely do it Kari! It does take a bit of work because you have to stay on top of the weeds and make sure it has water etc., but I find that because I like to check on how the garden is doing so often (it can grow an incredible amount just overnight it seems!) weeding and watering aren't a big deal. ~ karen!
We had some gorgeous raised beds installed in the garden area on the side of our house this spring. They're about 2' tall, L-shaped, and about 4' wide on each leg with a sort of sill on each side for sitting or perching a pot or what-have-you...Anyway, I'm trying to think of how a cold frame might be sited on part of these beds where I don't have perennials planted. You're the inventive one, so blast me with your bright ideas! Thanks!
...I'll get my husband right on that! HA!
You have saved me. I have just started to go to garage sales after a long break. We down sized our home (nothing noble economy stuff). Now it's down to the nitty gritty, I am back at it. I found a remodeler who was getting rid of salvaged items. I get excited thinking about it again. Anyway, it was windows with panes in the frame with original hard ware still attached on it. It was from a sleeping porch. Eight large windows later they were in my truck. Hoping to somehow sneak them into the back yard till I knew what exactly I was going to use them for. He was home, and I didn't have a real plan just a sort of a I am working on that part of plan. Now I have a plan even if it evolves into something else. Thank you.
For some reason I really like the reflection of the tree above in your first picture of the old window frame!
Good. I did that on purpose. :) ~ karen!
Thats awesome. I wonder if it would work around here. Alberta isn't exactly known for winter veggies.
cool. I actually found two windows in the alley recently and carted them home not knowing what I would do with them. My Mom said something about making a greenhouse with them, but I scoffed. Now that I see them, I take back my scoff. I don't live in a cold climate, but surely it will still be useful to me.
That's awesome Karen. We built a greenhouse this year so we one upped you....sorry for that. But you have a warmer zone than we do here so we needed one. Good luck with your winter crop. Looking forward to seeing what you plant! BTW excellent design on your frame. I have a few old windows with the groove so I will make sure I recycle them when I get new ones!
FYI for EXTRA cold nights. By putting milk jugs full of water inside the cold frame and leaving them there to absorb the sun heat and radiate it off during the night works very well. I know someone that built a wall of them for his back porch and happily used it as a green house all winter long. It was so toasty, he used to sit out there and drink his morning coffee.
I forgot to say they are also spray painted black.
Thanks Mary! I know thermal heat mass with water can have a huge affect on temperatures. I was going to experiment with it for cooling in my chicken coop. ~ karen!
Last spring was my first run with a cold frame. We had four types of lettuce all spring and into summer, till it was too hot. I rubber-banded a little thermometer on to the top of a chopstick and stuck it in the soil so that I could regulate the temp by lifting the window. My window is on a hinge and I use a stick with little notches to lift to different heights. It has been a lot of fun. This falls crop already has a nice start.
GREAT just what I needed to know and now need minions (what girl doesn't) to knock out a few 'cause nothing is shorter than my planting season in Seattle!
Breathlessly await plant list in your next dispatch.
baton lessons! Too funny. However, I wouldn't put it past you. You probably have the big boots and shiny skirt already . . . or you'll grow some.
Did you know you could grow radicchio under the snow? No cold frame needed. My Italian parents Giorgio and Alda could tell you how to do it - they bring home beautiful red balls of radicchio all winter long from the cottage. And they figured out all this stuff without google, go figure.
Great..I can't wait to see what you grow during the winter!
Those are much nicer looking than my lazy cold frames. I put straw bales around the plants and place the old window on top. Farm-ghetto.