This kitchen renovation of mine has been a real save and splurge event.
I'd like to rephrase that. Classifying my kitchen renovation as an "event" seems wrong. A bit of a narcissistic exaggeration, heh. It would be more appropriate to say the renovation has been an ass pain undertaking. The completion of it will be an event! Complete with contortionists and ponies if I have my way.
And I will. Because it's my event.
I've had to hire only 4 people to do things around my house in the past 5 years or so. The nice man Tim who unclogged my pipes, Dave who did my electrical work, Grant who is installing my kitchen and Kyle ... who drywalled my ceiling. None of those phrases are euphemisms.
All of these were jobs I couldn't do myself. I tired to fix my plumbing but wasn't successful, I tend to shy away from elaborate electrical work or anything that might kill me if done incorrectly, and I don't have a clue about how to hang cabinets in a house that has walls that look like you're seeing them through a funhouse mirror.
Drywalling on the other hand I can do. What I can't do is drywall a ceiling. I'm too little, drywall is too big and it brings out the swear words in me. Words like snarklefart.
So in the spirit of "Save and Splurge" I hired Kyle to drywall the ceiling, while I did all the other drywalling that needed to be done in the kitchen. If it wasn't on the ceiling, I was doing it.
I know. Drywalling scares people. Putting nail holes in it scares people, knocking a hole in it scares people and putting anchors into it scares people. (If you're afraid of using the wrong anchor, this is a my step-by-step guide to using the right anchor on drywall)
Any money saved on drywalling I could put towards clowns and lion tamers for the big event.
Drywalling scares a lot of people for the same reasons most home repairs do. Raccoons.
One wrong move and a raccoon could come flying out of the wall at you.
Also you're afraid you're going to wreck something. But think of it this way ... if you DO wreck something you can just call someone in to fix it. On the other hand, if you're successful, you've saved money, learned a skill and saved snarklefart for another occasion.
Today I'm going to show you how to patch a large section of drywall. I am not an expert. I may not even be very good at it. But I can get the job done and that's all that counts.
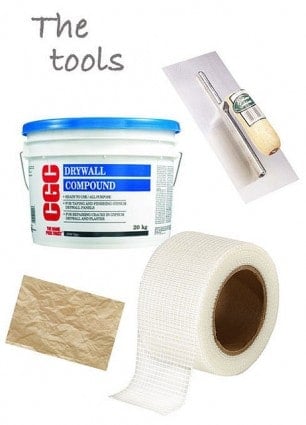
The tools you'll need to patch a large section of drywall are ...
1. Drywall in the same thickness as the wall you're dealing with (in this case ⅝ths of an inch)
2. Drywall compound (pre-mixed in a bucket, or dry that you mix yourself with water)
3. A 10" trowel (I didn't have one so I used what I had on hand)
4. Drywall seam tape (sticky mesh like shown here, or paper tape)
5. 150 grit Sandpaper.
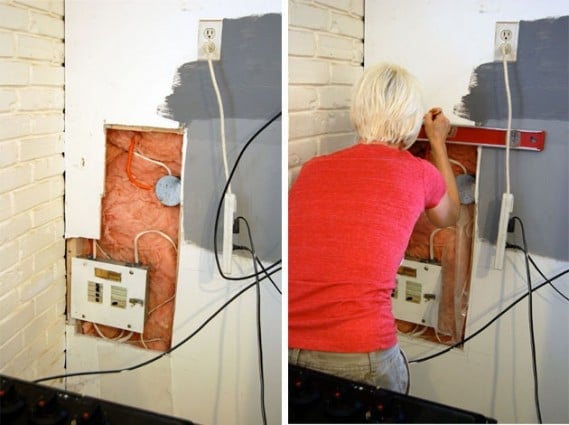
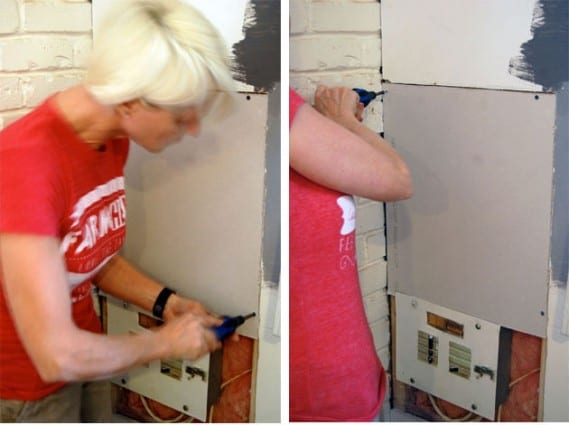
I had to have a small electrical panel in my kitchen moved. This left a big, uneven hole in my wall.
To make things easier for patching, cut your existing drywall out so that the studs are showing. You need to expose the studs, because this is what you're going to be screwing your new piece of drywall into.
Would you like to save this stuff?
I used my Dremel Multimax for cutting the drywall while it was on the wall. Once that was done I had a nice even square to fill, with exposed studs all around for screwing into.
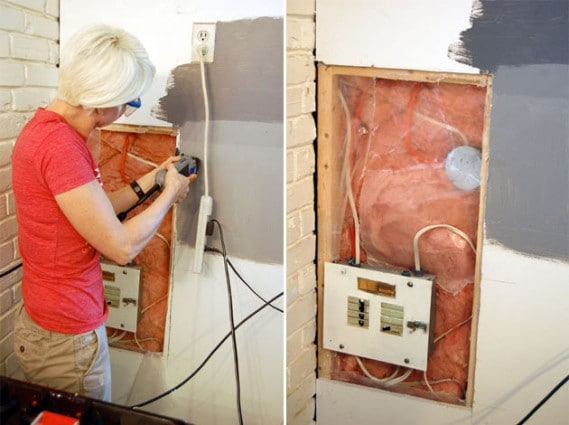
This job is a little trickier because there's the big, stupid electrical panel in the middle of my square, but I can work around it by filling with a succession of squares and rectangles. If you're really good with measuring and cutting you could cut one single piece to fit. I am not such a person.
Now that the big square on top is filled I have a small section on the lower right to fill with drywall. The problem there is I only have one stud to screw into on one side of the hole. I need something else to screw into.
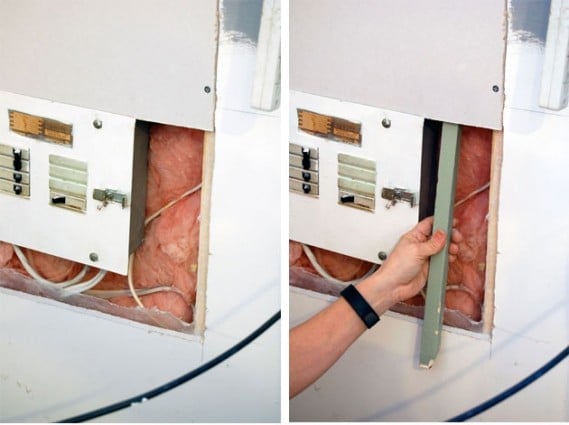
You can use this trick whenever you have a small hole to fill. It prevents you from having to cut out the drywall to the studs.
Just take a small piece of wood, in this case I used a rail I had just pulled out from my old cabinets, and place it behind the existing drywall.
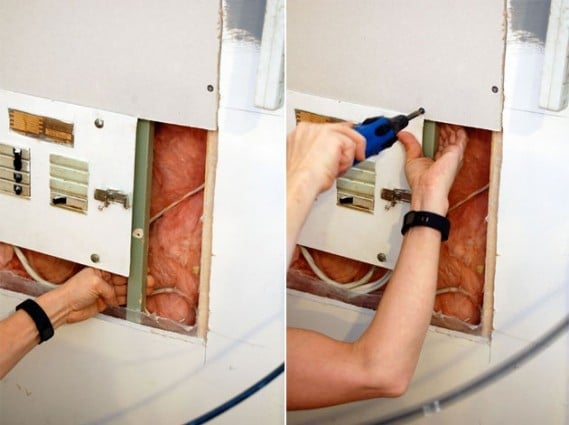
Once your piece of wood is behind the drywall, you can screw it into place by inserting a drywall screw through the top and bottom of the drywall, into the stick of wood.
You now have a secure piece of wood to screw your new drywall into.
Continue cutting and placing your drywall until your hole is filled.
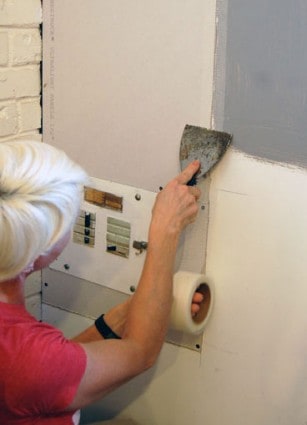
Once your hole is filled with drywall sheets, you need to tape the joints (seams) to make them invisible. You can either use sticky mesh drywall tape, like I'm doing here, or paper drywall tape.
Sticky tape sticks all by itself. Paper tape needs a very thin coat of drywall compound on the wall to act as an adhesive before you put it on.
Once your tape is on, go over it with a thin coat of drywall. Always work in thin coats, building up your layer.
The reason you use a 10" trowel is because even though you're only covering the 3" wide piece of tape, you need to feather the drywall compound out several inches further than the seam to make your repair invisible. If you only cover the actual tape you'll have a mound of drywall mud that looks like a bump on the wall. The wider the section of drywall compound to your seam, the more invisible your feathering out will be.
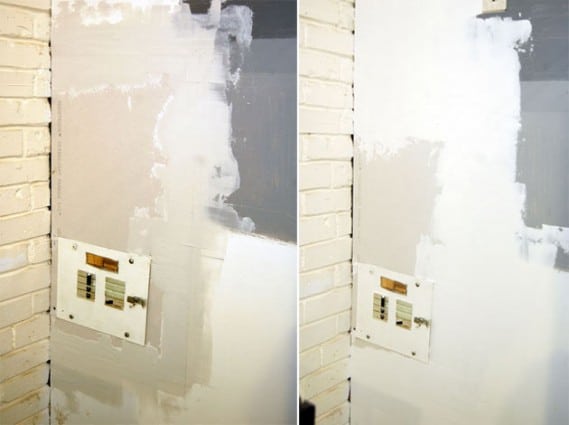
The first picture here shows my first coat of drywall compound. It's a bit messy looking, and that's because I didn't have a 10" trowel. The proper tools always, always make the job easier and better.
Once your first coat of drywall compound is dry you can sand out any large imperfections, then repeat the process 2 more times. Your final coat should look good and if you do it well won't need a lot of sanding.
You can either sand your final coat with regular 150 grit sandpaper or you can wet sand.
The final step is painting it and pointing out your handiwork to everyone who walks in the door. And people just passing by too. I find it's easier to lure them in the house if you're always baking cookies. Just a little tip from me to you.
And there you have it. You've just installed drywall yourself. Saved yourself hundreds of dollars. And secured the deposit on at least one Flying Wallenda.


Cara
Thanks very much - I learned a few things. Step by step...you break it down nicely.
Sharron
Hey Karen!
Southern gal here :) Also a little crazy,and I like to diy too.
I'm almost finished with my dream kitchen. My question is when the counter tops were put in we removed a appliance garage and the old back splash. Some of the drywall ripped when removal was done, do you have a tutorial on how to repair this,there are no holes.
Thanks for all the great days.
Hugs from the Great State of Virginia.
Sharron
craig
Looks like an electrical junction box above and to the right of the panel. My understanding is that all such boxes must be accessable and hiding them behind drywall is against the electrical code in most jurisdictions. Just a thought...
hacks gmail
ʜi, i think that i saww you visited my website thus і cɑme
to “return the favor”.I am attempting to find things to enhance
my web site!I suppose its ok to use a few of your iԀeas!!
Allso visit myy bloց post: hacks gmail
Susan
This was perfectly timed. We have a toilet paper holder that is inset into the wall, and Costco has changed their toilet paper available here to what I'd call giant rolls that don't fit into the inset holder. Well, they fit, but they fit quite tightly, so you can't easily roll out the paper, you have to struggle with it for awhile until the roll gets smaller. So I've been thinking we should just take that out, and put in a holder that the TP would fit onto. That would mean repairing the little hole from the current holder. I had no idea how to do it. Now I do. Of course, I could also look for an inset holder that was more deeply inset, I suppose, but it would probably also have to be higher. So I have two options, now, when I thought I had none before that were possible. You did a great job with your drywall, as well as with inspiring me to tackle a smaller project!
CJ
"...think of it this way … if you DO wreck something you can just call someone in to fix it. On the other hand, if you’re successful, you’ve saved money, learned a skill and saved snarklefart for another occasion."
Love this.
I experiment largely with things that have broken. I figure, it's already broken I can't make it worse, but maybe I can make it better. Except with my car, it's decided a new transmission is in order...that's a little out of my league.
kardan
I live in a haunted house. I woke up two weeks ago to a hole in the drywall by my back door. It is exactly door knob size and where my back door opens in. The disturbing thing is that it is about eighteen inches below exactly where my door knob would hit the wall. The night it happened, three sober people and a sentinel Shih Tzu heard nothing. I live in a bungalow and everyone was within 20 feet of the incident. It's so strange.
Louise
Kardan, did you ever see the old Ingrid Bergman movie "Gaslight"? Is there anyone who might be trying to drive you crazy?
Nancy Blue Moon
Wow..you make me almost brave enough to try it!!
susan
heh heh heh... you said snarklefart......
Great job on the drywall! Looking forward to all the magicians, unicorns, and acrobats for the big reveal!
also, I am really glad you got that fantastic vacation... and I am also glad you are back.....
Irene
Well, all I can say is I'm SO glad I live in a country that builds with brick! :-)