Sometimes you become immune to the ugly stuff in your house. Like old, gross electrical outlets. Fear not. There's nothing scary or hard about it. You CAN replace an electrical outlet. This tutorial walks you, a homeowner, through how to change an outlet in a real life situation.

Jump right to the Quick View Tutorial.
Isn't she a beaut? The elegant lines, the contrasting colour that makes her stand out and demand attention in the middle of the baseboard, the paint artfully slopped all over it. Outlet replacement was the only option. To make this look good I needed to replace the brown outlet cover and outlet with white.
At least it's near the ground. When I first moved into my house the majority of the outlets were 3 feet off of the ground, waist level on the walls for some reason. I suspect the previous owners had no knees.
I've wanted to move this plug closer to the corner of the room as opposed to being in the middle of it for ages but ... well I just haven't had time in the past 18 years. You know how it is.
I finally gave up on the bigger job of moving it and resolved to at least change out the receptacle to something less bossy.
I am a firm believer that you shouldn't do anything around your house that has the potential to kill you. Things like roofing work, installing an electrical panel or running on newly waxed floors while wearing socks.
But this? Replacing an electric outlet. That? THAT you can do without fear of death.
How to Replace an Electrical Outlet.
1. TURN THE POWER OFF to the area you're working on. Better yet. Just cut the breaker to the whole house if you aren't sure about which breaker or fuse powers the outlet you're working on.

2. Remove the face plate to the electrical outlet.

3. Remove the electrical outlet from the box by unscrewing the visible screws.

4. Pull the outlet away from the box.

Seems I got paint splattered on more than the receptacle. Heh. I'll deal with that later.
Don't even ASK me when this outlet was originally installed but there were some issues. For some reason the ground wire was broken. It either happened as I pulled the outlet out or happened when the outlet was originally pushed in. Either way it needs to be fixed. I'll get to that.
See? This is what happens in a real life situation as opposed to a sterile instructional video.
5. Remove the wires from the old outlet by unscrewing the screws they're wrapped around slightly. Just enough so that you can slip the wires off.

6. Throw that sucker out.

7. Now is the time to talk about the scary GROUNDING WIRE, which everyone seems confused by. Here are the two things you need to know.
a) The ground wire needs to be grounded to the box, AND
b) The ground wire needs to be grounded to the outlet.
First, how do you recognize the ground wire? It'll either be the green wire, or a bare copper wire. One of the two.
Before installing your new outlet you would wrap the ground wire around the grounding screw at the back of the metal box and then bring it forward to the receptacle.

Since my grounding wire is broken I've had to do something a bit different. I'll have to make the two independent wires work together as one.
8. I've created a loop in my stubby little grounding wire with pliers. Luckily it's just long enough to wrap around the grounding screw.

See that hole in the back of the box that the wire is coming through? There should really be a Romex connector there so the wire isn't rubbing the sharp metal edges. I didn't have one and wanted to continue with the post, so continued on without it for the time being.

9. Then I created the same loop on the longer, broken off part of the grounding wire.
** if my copper wire had been a tiny bit longer the better thing to do would be to use a 2 port Wago like this to attach the wires.**

10. I looped the shorter grounding wire around the grounding screw and then I looped the longer grounding wire around the screw so everything was touching. As long as the two grounding wires were touching behind the screw, I knew I'd have a completed circuit.
REMEMBER this was an anomaly because my grounding wire was broken off very short.
Most people will have a longer wire that will easily loop around the grounding screw in the box with enough left over to attach to the new outlet.
11. Get your new outlet and face plate ready.

I like the snap on face plates that don't have a visible screw to hold it on.
12. Attach your wires to the new outlet.
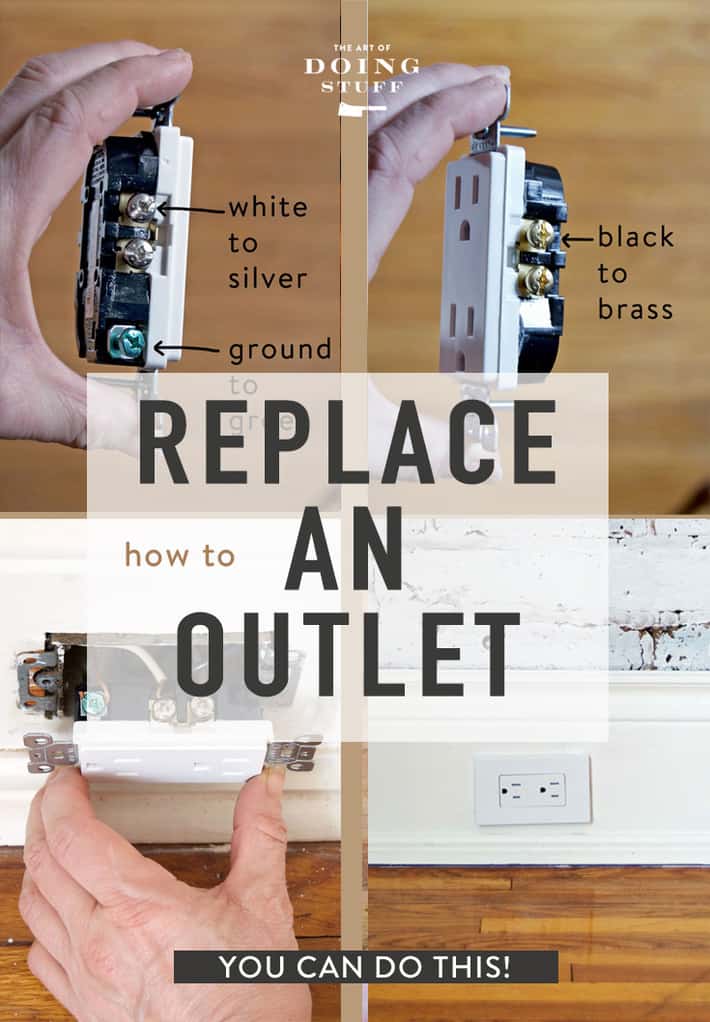
TIPS FOR WHAT WIRE GOES WHERE

- Your outlet will have one side with brass screws. The other side will have silver screws and a green screw for the ground wire.

Attach your wires like this:
BLACK GOES TO BRASS
WHITE GOES TO SILVER
GROUND GOES TO GREEN

See how there are two silver screws? It doesn't matter which one you use. So don't fret over it. Just pick one. Try to do a little better than I did with the exposed copper wire though. The least amount of it should be exposed as possible. More should be under the screw. (This doesn't matter on the grounding wire as it doesn't conduct any electricity)
Hook your wires so they are going in the same direction as the screw is when turned to tighten. This will help clamp the wire down as opposed to pushing it off.

See how there are two brass screws? Again, it doesn't matter which one you use. Just pick one.
Also notice I did a better job of having less of the bare copper wire exposed.
13. Carefully push the new outlet back into the box.

This shot here nearly BLEW the minds of some electricians who read this post when I first published it. Why? Because I haven't wrapped the outlet in electrical tape. Some electricians (this is kind of a polarizing issue) wrap any outlets that are going into metal boxes with electrical tape.
This covers the metal screws and therefore prevents them from ever accidentally coming into contact with the metal box. However, there are other electricians who are just as adamant about not using electrical tape.
14. Rescrew the outlet into the box.

15. Cover with the face plate and you're done. Just turn on the power again and watch the room light up.

And just like that you know how to install an electrical outlet.
Here's a quick rundown without pictures so you can quickly check it for when YOU replace your hideous electrical outlet.
How to Replace an Electrical Outlet.
Step by step instructions on how to replace an electrical outlet.
Materials
- new electrical outlet
Tools
- wire strippers or scissors
- Screwdriver
Instructions
- Turn power to the outlet OFF.
- Remove the face plate.
- Unscrew and pull out the old outlet.
- Remove wires from the old outlet.
- Attach new outlet. White wire to silver, black wire to brass, Ground wire to grounding screw at back of box and then to green screw on outlet.
- Gently push the outlet back into the box.
- Screw the new outlet in place.
- Attach new face plate.
- Turn power back on and bask in the glow.
Now that you're an electrical outlet expert, you might as well learn how rewire a lamp.
There's only one question left to answer. No. I am not likely to wash the paint off of my floors in the near future. Not in the next 18 years anyway.
→Like to Sweat, Swear and do Stuff? GET MY POSTS emailed to you 3 times a week←


I need this. Thank you Karen.😘
Please add to the instructions to check that BOTH plugs have no power before starting. We have outlets that are on 2 breakers, breakers that were mislabeled...
Great! Loved this! Exactly what I needed! Two questions...
1. Why are there two brass and silver screws if we only need one of each? What would we use them for?
2. I have outside electrical outlets that don’t work. Confirming your directions would be the same when I try to replace them this Spring. Can’t see why they wouldn’t be the same, but thought I would ask.
Did I say...THANK YOU! 💕💕💕
Now...on to the lamp instructions! ☺️
If the outside outlets are the only ones not working, you probably have a GFCI breaker tripped. It's happened to me in two different houses. The one that controls my outside sockets is actually located in the garage. All I had to do was push in the external breaker and BAM! Lights on.
I’ll check on the GFCI breaker!
Thanks, Jenna.
The two screws are so you can daisy chain on to the next outlet. You can also break off the tab on the hot side and have two circuits on that outlet. This is often used when one of the sockets is used for a floor lamp that is switched by the door of the room, leaving the other one always on.
Well here in Florida almost all plugs are in the wall about 3 foot up. I've never actually seen one in the baseboard before except once in a very old house. Maybe they didn't want to mess up nice wallpaper and thought it was easier just to go through the wood. I do think having them very low is a great idea since the cords won't show as much. I've even seen them a couple times in the hardwood floors which is really weird but maybe when they finally got electricity, that was the easiest way to get wired - crawl under the house and up through the floor - we rarely have basements in Florida, also. It would be filled with water and snakes and maybe an alligator but positively would be covered in black mold. Just like spiders, I always slam the magazine or book shut if one turns up in a picture - but for some reason, I didn't skip your post today - I'm terrified of electricity and spiders. I do so admire how you operate and can just see you as Scarlet ripping the drapes off the window and making a gown from it. You are certainly the deluxe emporium for blog readers - something for anyone. I did change the switch covers once to get white so I could paint them and was so scared the whole time I would slip with the screwdriver and it would touch something shocking - but was so happy that I did the job.
THIS is what I love about you Karen.
You are the one who puts their arm around my shoulders and says, "Sure you can: here's how."
Your tutorial on sheetrock anchors made possible the large heavy mirrors in my bathroom & closet, and the wire shelf systems above the washer/dryer, and in closet - all installed single-handedly by lil ol' moi.
This one will be utilized in the kitchen where the counter outlet faceplates coordinate with the rustic copper tile backsplash, but the outlets themselves are high contrast almond plastic.
Thanks, Girlfriend.
Thanks for another great electrical post! I have a room full of wallplugs that need switching out to white.
Two things you may want to add: check the outlet with a tester before and after you turn off the breaker or fuse. No tester? Use a lamp. If the outlet does power on,. Look for a wall switch or other obvious reason. If it has other issues (swapped wires, no ground, etc...) before you start, then maybe call an electrician. Then flip the breaker and recheck. Always always always recheck. The breaker may not be labeled correctly, or someone could have tied two circuits together (not code, but surprisingly common) and your outlet could still be live!
While you have the outlet out of the wall, carefully inspect the wire and wire insulation for corrosion and cracks, also make sure it is copper, not aluminum. If aluminum, you will need special outlets to prevent corrosion and eventually fire.
Finally, after turning the power on, check the outlet with the tester again. If GFCI, test the fault protection feature, too.
Great post though, just wanted to add some additional safety tips in there too.
Right on Tim...…you beat me to it......that testing at the outset is critical......
Speaking as someone who replaced all the switches and outlets in the house (they were ivory. I wanted white, plus all the outlets were installed with the ground on the top rather than the bottom as is standard these days) I'd like to suggest that as you find out which breaker works for each outlet/switch you mark it on the inside of the cover plate. Saves time if you need to mess with it again.
Naturally you still check to be sure there's no current before boldly grasping any wires. I use one of those little detectors that lights up if there's a current and then touch first with the back of my hand because I'm really paranoid about electrocuting myself. I also prefer to work when there's someone else at home to call 911. (Did I mention that I'm paranoid about electricity?)
Oh God, that's brilliant, Linda. Here's me running to get my screwdriver and a Sharpie.
If the plate is too slick to write on, just use a little piece of tape or something to write on.
What a great idea!
Bravo Karen!
We've been slowly changing out our outlet covers, too--it really makes a difference to go from old dingy almond-colored outlets to fresh white outlets/light switches! I'll be honest, I usually hold the flashlight/screwdriver/screws for my husband while he does the nitty-gritty, but I think next time I'll insist that I do the hands-on work.
Thanks Karen! I have waited actual YEARS for that kind of work when spouse would not get it done. Now that he can't do it, I can wait till he is busy elsewhere and do it myself and he won't even know. No need to to hurt his feelings, but no need to wait either! Thanks!
I don't mess with electricity. First step is turning off the power, and that would involve opening the fuse box-nope, not going to do that. I will gladly pay for the nice electrician man to come over and risk his life. More power to you Karen (hah!) for showing us how, but I think I'll sit this one out.
Handy trick if you don’t know which fuse is which (renter with an unmarked box), plug a lamp into the socket you are replacing and turn it on, when it turns off you have the right fuse!
This works but you need to check BOTH terminals with a voltmeter or stick in a reliable tool, before you touch anything.. an improperly wired circuit breaker could cut a neutral instead... of course even if neutral is cut that will make the lamp not work, but the source wire is the one that actually shocks because you act as a neutral, if you ever touch a live one.
Bravo! I’ve replaced all my switches and outlets over the years too but when it came to the GFCI I cried “uncle” and asked for help. Too many wires on that sucker for me!
PS - there’s been a recall on some Instant Pots for melting and starting on fire. I thought of you!
I need a light switch changed out (why would that break? Weird.) and have been nervous about trying to do it myself. I am one of those people that thinks there is left over electricity hiding inside that lamp or outlet or switc, even when the power is turned off. It will jump out and get me. I know - not possible, but I do lots of other scary stuff to make up for that fear. Thanks for making this look simple enough for me to take care of my problem.
What? You mean the electricity WON'T jump out and get me if the power is turned off? I don't know . . . Why does the light stay on my re-charger for my phone even after I unplug it? Anyway, twice (TWICE!) I've managed to shock myself because I THOUGHT I'd turned the power off to whatever it was I was working on.
Get a current detector! We have one to double-check that the power is off because our home's fuse box is horribly labeled and very weirdly organized (especially for a house built in 2005) and we've gotten shocked when we thought the whole room was on one fuse and painfully found out it wasn't. Search "current detectors" on Amazon--they're not even expensive!
Good advice, and I'll take it!
Thanks!
Another option to check it is to plug a lamp into it. Leave the light on when you go to turn off the power. If the lamp isn't lit when you return, you've turned off the power, or else the bulb decided to take exactly that moment before you arrived to burn out. These are the things I think of, when faced with doing something that has me slightly fearful. I can always come up with some situation in which all of my safety measures will be useless.
Haven't shocked myself yet, though! But I also use a device to measure if there's any power in the outlet.
Yea! You finally replaced that old ugly outlet that was ruining the look of your gorgeous wall! Thank you for posting this great tutorial. Electricity scares me to death. I have cut and pasted this fabulousness and now have it for a reference for the future should I need to do this soon. This is wonderful. Thank you so much for posting!
Thankfully, your supervisor arrived just in time (photo 3) for the important stuff!
I. Need. To. Do. This. Really, I do. Thanks so much for all you do to keep us fledglings safe and occupied caring for our "stuff". It truly is an art...
As a person who is a retired electrician, and who possess a penis, I saw this headline and immediately thought to myself, "Myself, As good as Karen is at doing stuff, she's bound to screw this one up and I will get a chance to mansplain how to do it right." Fortunately(for me, because I would be sure to receive threats to my life and gonads for being so insensitive and politically incorrect), she got it all right. The only thing I will add is to recommend splurging(30 cents or so?) on nylon unbreakable cover plates. The cheap plastic ones tend to crack easily.
(Next, please post how to replace a toilet and septic tank, real soon! Long story, don't ask!)
Well I don't have a septic tank so I can't help you with that one but I did do a post on replacing a toilet. https://www.theartofdoingstuff.com/how-to-install-a-toilet-in-1-2-hours/ Let me know if you need me to explain it to you. ;) ~ karen!
Why did you use wood screws to screw the plug to the baseboard rather than using the screws that came with the plug?
Because it's a very old electrical box and the new plug didn't line up with it properly. With wood screws I could drill straight into the wood baseboard to hold everything secure. ~ karen!
How are you able to anticipate everything I need to upgrade in my life so perfectly Karen!!!? Seriously, your last 3 posts have been things happening to me! Thanks for your skillful suggestions and pictures that say 1000 words :)
Ha! Ohhhh they're just things that mainly apply to all people I think. At least all people that read this website. :) ~ karen!