A cute little mirrored planter to hide all those ugly plastic pots. An easy DIY that'll take 15 minutes and about $5.
I am sitting here at my computer with a faint, goofy smile on my face thinking back to the first time I had a Dollarama revelation. The first time I looked at something in one of their aisles and thought hmm ... I could make something out of that.
I don't know if it was the buzzing of the fluorescent lights or the hypnotic drone of the soft rock, but something in me came alive that day. My body seemed like it was on fire. I had an electric sensation from my head to my toes as right there in the Dollar Store my innards gave birth to a something entirely new. In the blink of an eye I developed the Dollarama DNA. Which is wayyyyy cooler than a Y chromosome by the way.
So allow me to introduce you to my first born; my first project ever made out of Dollarama crap.
Oh and by the way, in case any Dollarama head honchos who have the ability to ban me from all Dollarama stores happen to be reading this blog ... "crap" is actually a term of endearment.
Here we go ......... !

with this ...

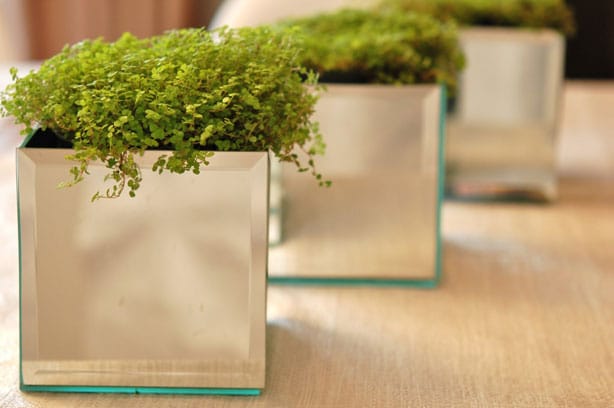
Gives you this!
Now, the observant among you may recognize these mirrored boxes from yesterday's post on the always classy garbage bag table runner. I probably made these boxes for the first time 5 or 6 years ago. Since that time both my sister and my niece have also made them. My niece uses hers in her kitchen for her car keys and pens and such. As you can see the mirrored box also makes quite a fetching planter. Total Cost? Five dollars. Plus whatever a squirt of Windex and a paper towel will cost every time you pick them up to marvel at their beauty.
And here's how you do it!
How to Make a Mirrored Planter
Update: I apologize for the weirdly small photos, but this is one of the VERY first posts I ever did and somewhere over the years the larger ones were lost.

scrape the stickers off with a razor squeegee. Trying to peel them off will only end in tears and pill popping.

lay your base, mirror side down and hold one of the mirrored pieces up to the edge of the base.

once you're sure everything is even and level run a bead of hot glue along the seam where the edges meet.

wait patiently for the glue to dry before moving onto the next piece of mirror. This is exactly when the bottom of your foot will feel like it needs to be scratched.

Continue lining up and gluing the bottom and side edges of the mirrored pieces. My glue gun broke mid-craft so mine is messy.

Done! If you think you're going to see inside the boxes, remove the round felt pads on the bottom of each square.
Oh! And, if you're looking to eat up the majority of the hours in a day while also making yourself crazy, try taking multiple pictures of a mirrored box. Please send all cards of sympathy to me. At my house. Thanks in advance.

It took me 3 hours and a 2 calls to a mental health facility to take this photo.


I love this mirror box a lot, matter of fact I want to make one for my Mom for Mothers Day.
I bought 8" mirrors but however I'm not sure if mine will work for this because they aren't beveled mirrors they are flat straight mirrors. 6-8" mirrors
Hi Donna. They'll work just fine. :) ~ karen!
I wish you wouldve put what plant is in the picture. is Real or fake. I like it.
It's real Mandagee. It's called Baby Tears. ~ karen!
We'll I've said it before and I'll say it again....you're amazing! Love the mirrored planter. My favourite blog.
Cool idea but I would hot glue gun on the out side and use e6000 in the inside then when 24 hour pass it would be dry and permanent then take off the glue on outside . cause hot glue don't hold glass
Hi Yari - This DIY of mine is actually about 7 years old. (I originally did it 7 years ago) and the hot glue has held up fine. All planters are still stuck together perfectly. ~ karen
Are you freaking kidding me?? I have walked by those stupid glass tiles a million times and never once thought to do that. YOU ARE BRILLIANT! I love them filled with just a bit of greenery, and then since you used a mirror on the bottom you could always flip them over to use as a pedestal for a mantle display, etc. just plan brilliant.
LOL. Trust me. I walked past them a million times before the realization came to me too. I have what's known as delayed brilliance. ;) ~ karen!
Karen! These are adorable. The perfect place for a small women's trinkets :) + mirror. The best thing you can have :)
Thanks Rilane! Clearly I don't have trinkets, but a LOT of plants, lol. ~ karen!
Hello! I featured your tutorial in my blog series, Living in a White Box. My series features tips, inspiration, and ideas for how to decorate rental homes. Your mirrored planters were perfect for my latest post as they're a great way to decorate on a budget.
If you like, you can grab a featured button and check out my post at Living in a White Box: Dollar Store Decor. Thanks for sharing your amazing creativity!
You are hilarious and also very talented!!I cannot wait to make a trip to my Dollar Stores!Keep em coming, I'm sure there are lots more creations out there just waiting on you!
Thanks Judy! And yes ... they're pretty much popping out of me on a daily basis, LOL. Far less painful than childbirth. ~ karen!
Karen, I absolutely love this idea and it is so simple and stylish. Definitely going to give it a try. I'm sharing your idea on my blog as I know its something others will appreciate.
http://aunatureldesign.blogspot.ca/2012/06/current-crush-mirrored-box.html
If you put some cheap square wooden dowel at each corner, it will be much stronger. And wooden dowel is cheap. Love your site.
I have drooled over these mirror boxes for too long...I finally made my own and blogged them today. Thank you for the fab idea, Karen! I can't seem to stop making them, and i can't wait to gift a few, too!!!
I did thse about 25 years ago and they are still hanging on...............oh how I've used them for sooo many thihgs! One of the bbest was using them to display foods on buffet tqboe to qdd different heighte. So happy to wee diy/crafting is back again!
I love this and am going to try it this week!!! I absolutely LOVE your sense of humor! I literally laughed out loud at "my mirrored box. took me 3 hours and a 2 calls to a mental health facility to take this picture." Thanks for the idea!!!
Hi Shera - Thanks! Good luck with your mirrored box. Do NOT attempt to take a picture of it. ~ karen!
OMG. I love your sense of humor! Your mirrored box is great too.
Mindi - OMG Thank you! :) On both counts. ~ karen!
Karen, Your blog makes me laugh, outloud, sitting here by myself. Glad to know that someone is as nutty as me when it comes to decorating on the cheap but making sure it looks oh, so classy! Have enjoyed this more than any I've come across. Keep up the good work!
Thanks Jill. Keep readin'. ~ karen!
I just made this this afternoon and I am so excited about it! What is the type of plant you have in yours? I'd love to put the same type of plant in mine.
Good job Chelsea! I'm always so happen to hear when people actually *do* the things I show them! The plants I have in mine are called Baby Tears. They're around $2 for a small plant. ~ karen
Thank you! I can't wait to complete the project with the plant. Best wishes!
Wow, I'm thinking this would make great teacher gifts at Christmas time with a small poinsettia plant in it. What do you think of etching a design on the mirrors, like monogram letters or fleur-de-lis?
Hey Michelle ! I prefer the box to be plain. For some reason it seems more expensive to me that way. But I have absolutely no reason for thinking that! A monogram is a great idea. I'd just do it on one of the panes of mirror. Really fun idea! ~ karen
Hi,
I just came across this website today and you have some very nice things. I did the same thing with dollar tree mirrors about 2 years ago for a wedding but i glued the mirrors to square foam blocks so i could make silk floral arrangement centerpieces. They turned out nice.
Thanks for sharing your thrifty ideas.
After reading this I wandered into the Dollar General by my house and looked at it a totally different way. I also decided to bogart this idea and buy some mirrors. In a strange twist of geometry gone wrong though, the bottom doesn't quite fit....like it is smaller. I should've paid attention in math. Turns out I did in fact need that information later in life... Anywho, the point of this rambling is that I love my pretty mirrored boxes anyway and I will be spending a lot of time in my local dollar store now :)
Hi Karen!
First of I have to say that I think you are absolutely fantastic! I love when you are on Steven and Chris and I loved the segment when you were going through the Dollarama.... It is one of my favourite stores and I don't often just run in for something quick. I love to browse around and walk through studying some things carefully I just love it! Lots of things in our living room is decorated from the Dollarama and you wouldn't believe the compliments I get! I say guess where I got it from and my Mom and sister always say, "no way!!!!!". Always asking how I find this stuff! I love to see people who appreciate the Dollarama as much as I do- keep up the fantastic work!
Melanie
p.s. I was in Homesense the other day, and your mirrored flower holder that you did on the show was in there, no kidding, it was $16.99!!!!!