If you've ever thought about making a tree stump table, fall is a good time to actually do it. That's right. It's tree stump season! Fall sees a lot of firewood deliveries and trees coming down in storms which gives you, the intrepid reclaimer, easy access to tree trunks. Let's get started.
10 years ago I made a tree stump table. It got shared, copied and posted about so much it's one of 3 posts that I consider to have kickstarted my blogging career (thanks in part to Design*Sponge loving it too.) That table still sits in my living room looking as good as the day I made it.
Stump tables, made out of tree trunks, are one part architectural piece, one part table, one part bugs. Don't worry. We'll get rid of the bugs.
The point is they aren't just a place to put your coffee, a stump table brings the outside in giving your room a cozy organic feel.
They can feel modern or completely hygge and organic. It depends on how you finish them.

FYI! You can also use these as bases for a stump table with a glass top.
These two tree stump ideas are for using them indoors and no chain saws are involved.
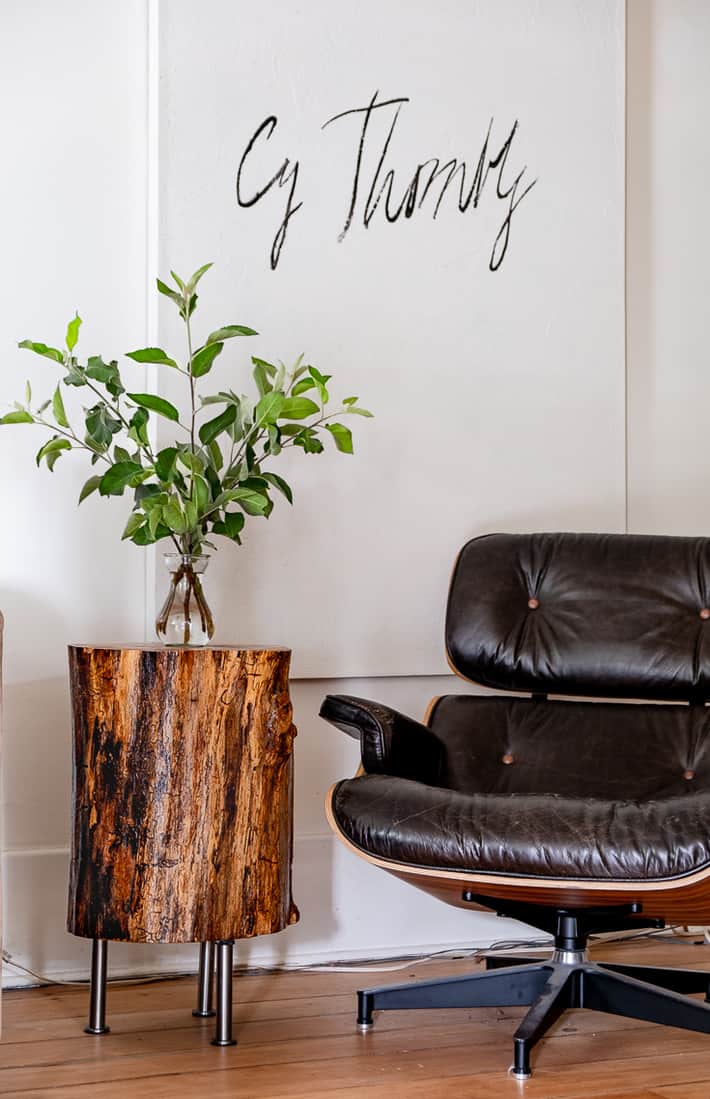
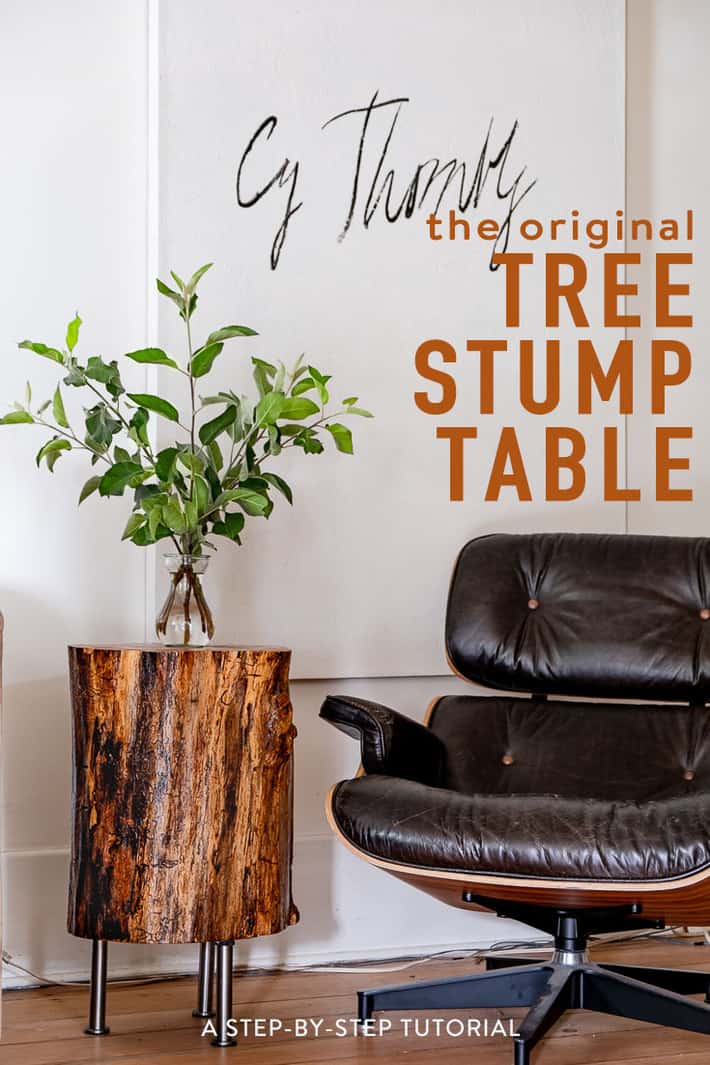
I'll show you how to make an unfinished table that's similar to the famous Crate and Barrel tree stump table and a finished one that sits on tall legs.
First the finished stump table that's on legs.
Table of Contents
Materials
- Tree stump
- Sandpaper (medium and fine grit)
- Polyurethane (high gloss, semi-gloss, satin … whichever you want) I used satin which has just a nice sheen
- Paint brush
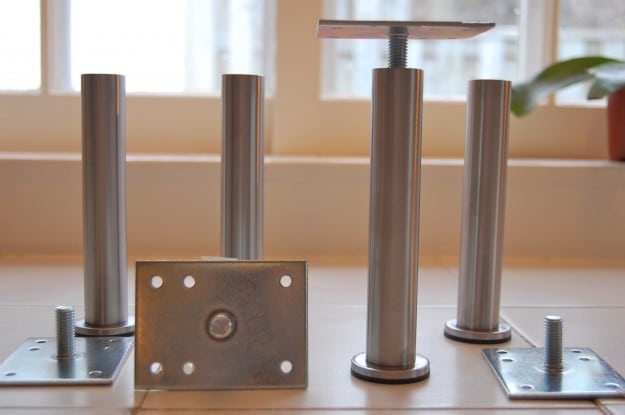
- 1 package of 4, 6" Capita legs from Ikea (these legs aren't available at Ikea anymore but they ARE available on Amazon.)
- Drill and appropriate bits
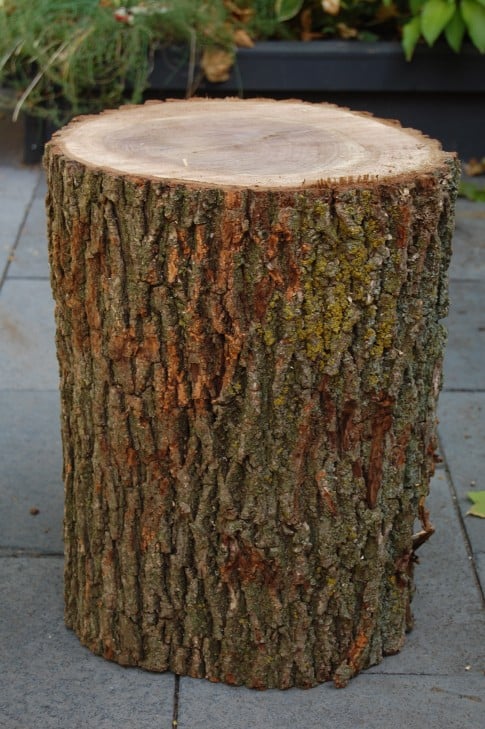
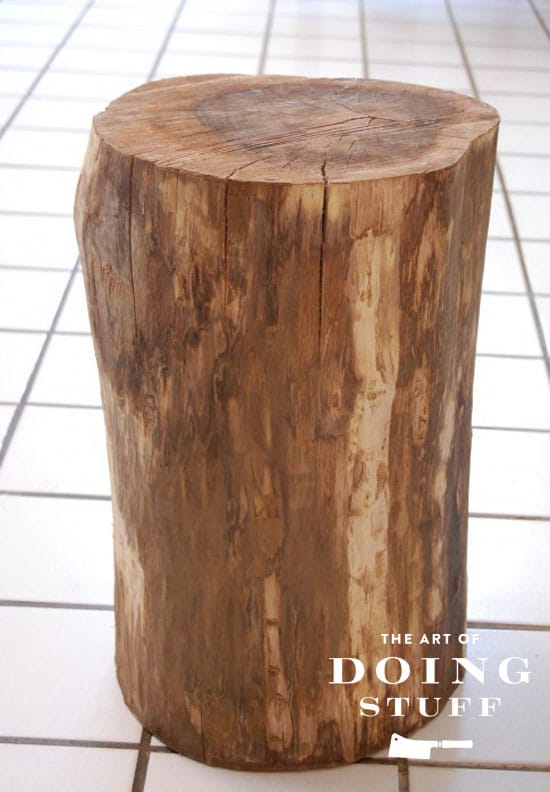
First things first. You have to get yourself a tree stump.
Where to find a tree stump?
Keep your eye out for city workers or private tree companies taking down trees. Pull over, ask them if you an have a section of a branch if they're big or the stump. Simple as that.
Call up places near you that sell firewood. They advertise a lot during this time of year so they'll be easy to find. That's what makes fall tree stump season!
I got my stump delivered with my yearly wood order.
How big should it be?
It depends if you want your table to be on legs or sit directly on the floor. I like the look of legs.
Your legs will be 6 inches high, so figure out how tall your stump needs to be for where you want to put it.
Generally you're going to want a tall tree stump for this.
If your sofa has arms at 25" and you want it to be around level with the arms, then you need a stump that's 18" tall.
My stump is 15" across by 18" high, with the 6" legs it's a total of 24" high. This brings it to just below the arm of my sofa.
Steps
Step 1 DRY IT
Allow your stump to dry out for at least a month. It’ll lose several pounds and the bark will loosen, making step 2 easier.
Coincidentally if you allow yourself to dry out for a month you’ll lose several pounds too.
You can dry the stump outside for a couple of months, then bring it inside for a couple of weeks.
If your stump was already cut and dried from wherever you got it, you can just bring it inside for a couple of weeks.
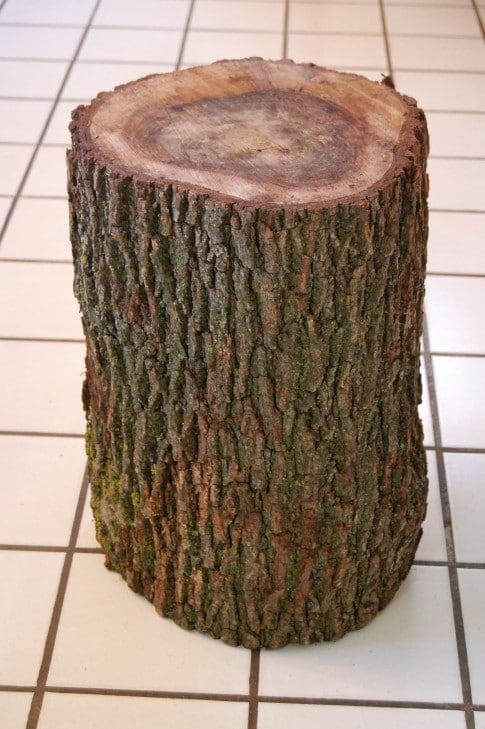
Step 2 REMOVE THE BARK
Now the work begins. You have to remove the bark. Sometimes this is easy, sometimes it isn't.
The first stump table I made was from Oak. The bark just pulled off with my hands.
The second stump table I made was from Walnut. The bark was a nightmare to remove. I needed an array of tools and a 14' length of prayer beads.
To remove the stump's bark, you'll need these tools to do it:
A Hammer
A Prybar
After your stump has dried inside for a couple of weeks insert the prybar between the bark and the stump. Hammer it enough to loosen the wood then either keep hammering or pull the bark loose with your fingers. Keep doing this all the way around the stump until all the bark is off.
And yes, you do need to remove the bark. If you don't, over time it'll loosen and fall off on its own leaving you with a cruddy looking piece of crud as a table.
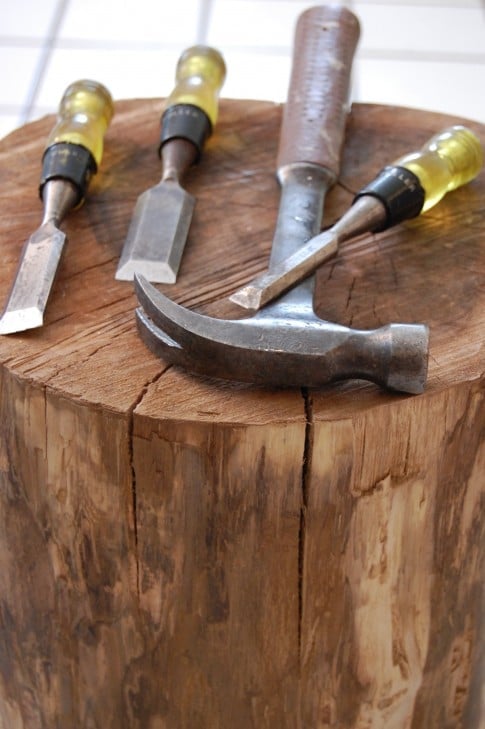

If the bark is particularly stubborn, like this stupid thing was ... do the same thing but with wood chisels. They're sharper and will cut through the fibres between the bark and the stump better than a prybar. Be careful not to hack into the wood with the chisel though.
Do not hack into yourself either. Wood chisels are sharp on all sides, not just the tips, so be careful.
Now your stump is cleaned of its bark.
When it's dried out the stump might split a bit like this. That's O.K. It adds character.
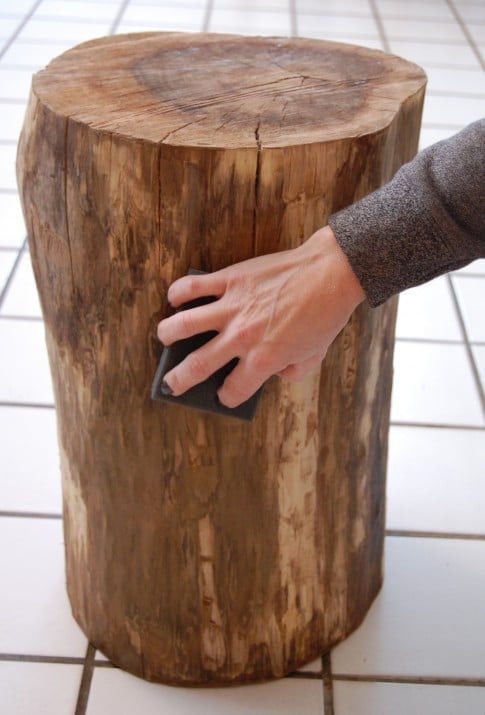
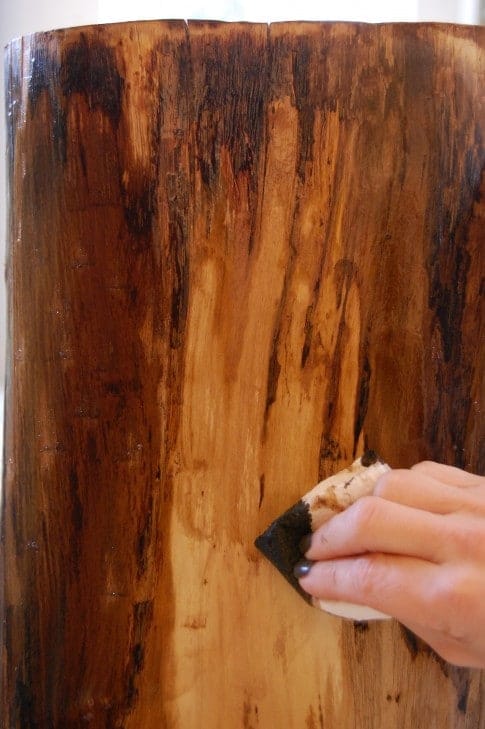
Step 3 - SAND IT
The stump now needs to be sanded to get all the little hairs and slivers off it.
You need a smooth stump. Use a variety of sandpaper grits to sand it smooth.

Start with the coarsest grit, gradually working your way to sanding the stump with the smoothest grit.
Get rid of all the hairs.
Sand until you can run your hand over the stump and it feels smooth.
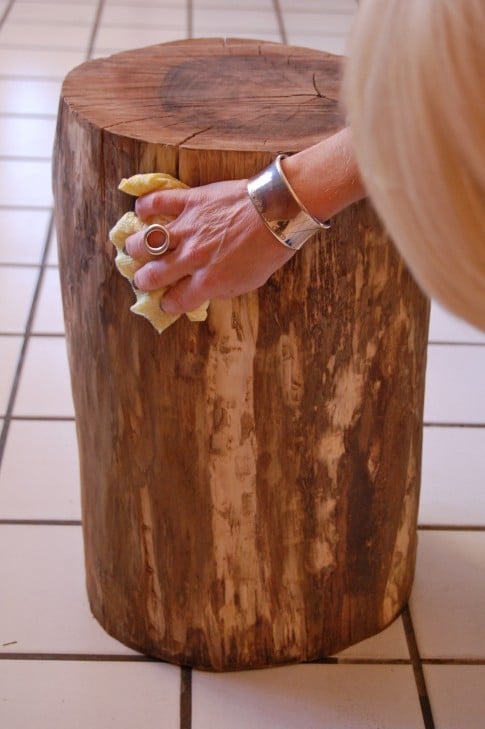
Once your stump is smooth wipe over it with a damp, lint free cloth or a tack cloth.
A lot of wood dust will come off. Keep wiping until your cloth comes away clean.
Now flip your stump over and get ready for the fun part.
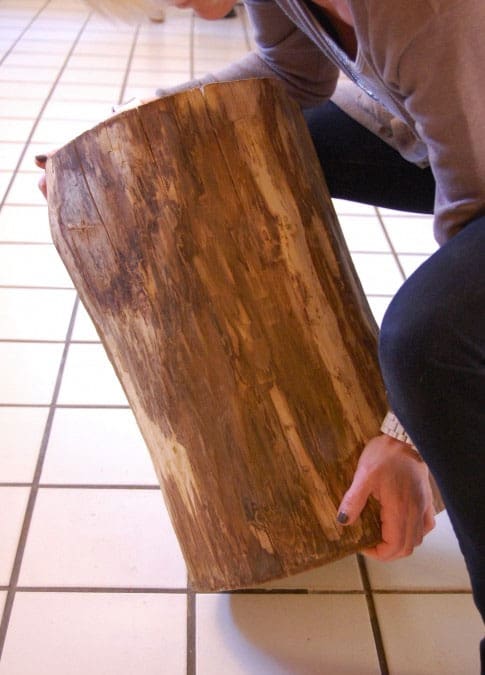
Step 4 - ATTACH THE LEGS
Get your pre-purchased legs. Like I said, mine are the Capita legs from Ikea which are soon to be discontinued. You can buy the exact Ikea Capita legs on Amazon though.
To make the end table more like the $900 Crate and Barrel one, ditch the long legs and use little bun feet like these instead. You'll also need a wider, more squat stump.
Each leg comes with a bracket that you screw into the base of your table.
Whatever kind of legs you get make sure the height is adjustable like these are. Adjustable legs on the table means you can make sure it's level without having to squish up a folded up piece of paper. Or if you're a certain age and type - a book of matches.
Don't forget. Adjustable legs are the way to make sure your stump table is level.
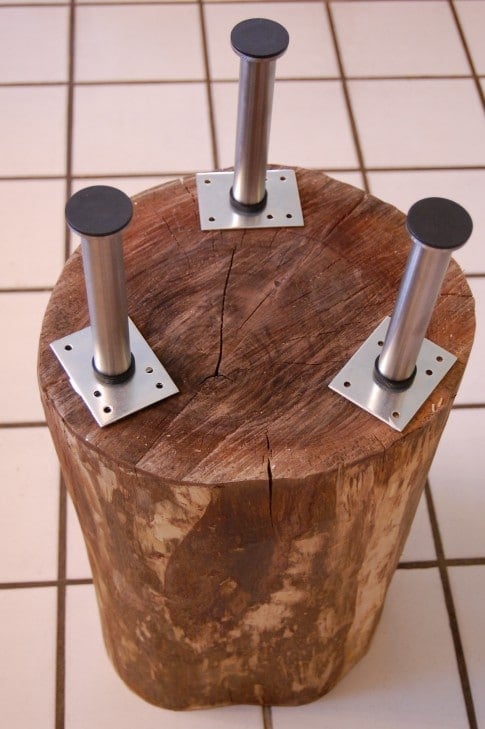
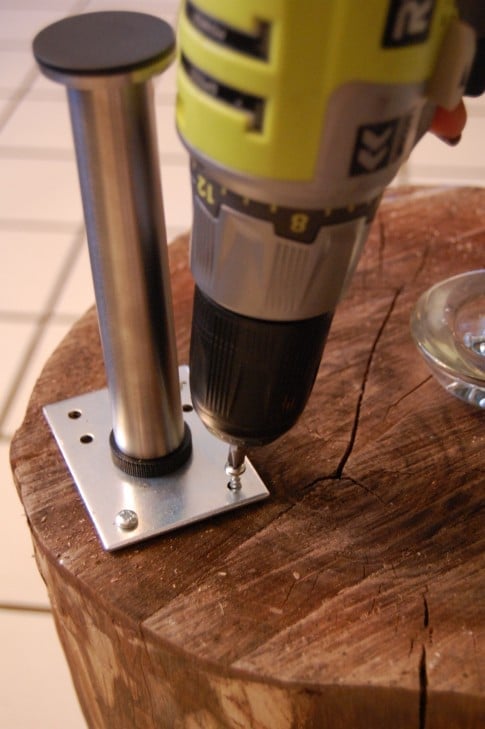
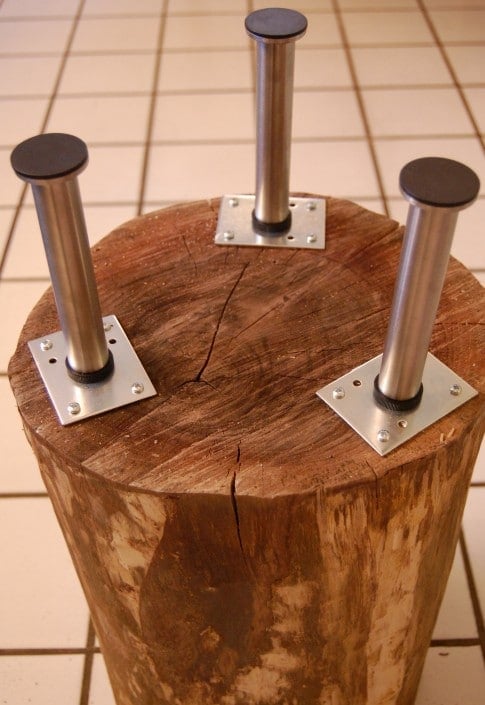
Place your legs on the underside of your stump. You can use all 4 legs or just 3. I'm partial to 3, but 4 is definitely more stable.
Use a measuring tape to make sure they're an equal distance apart.
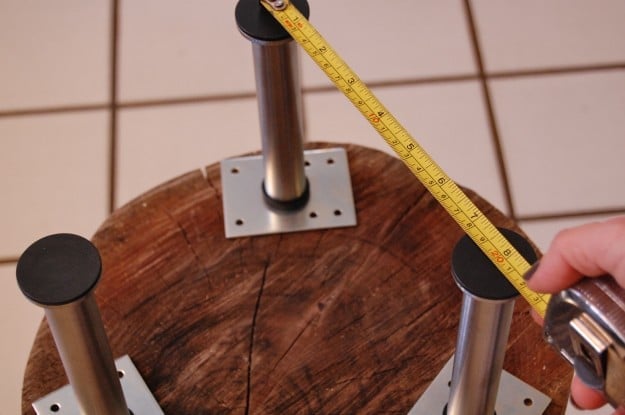
Once you have the legs positioned, mark the holes in the plates with either a pencil or a marker.
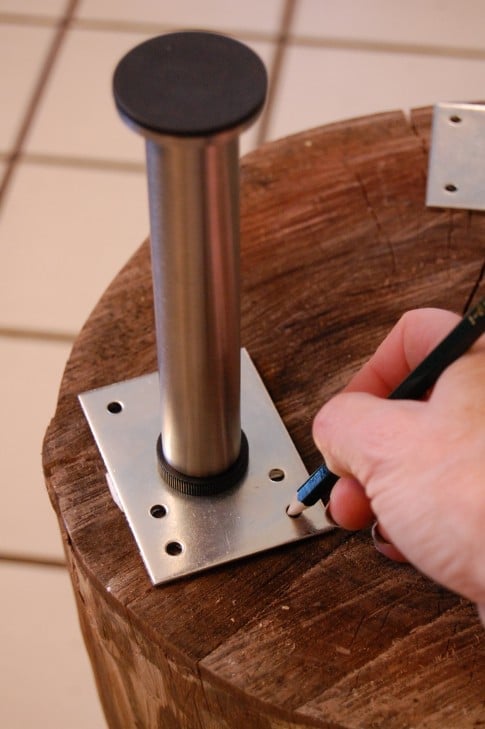
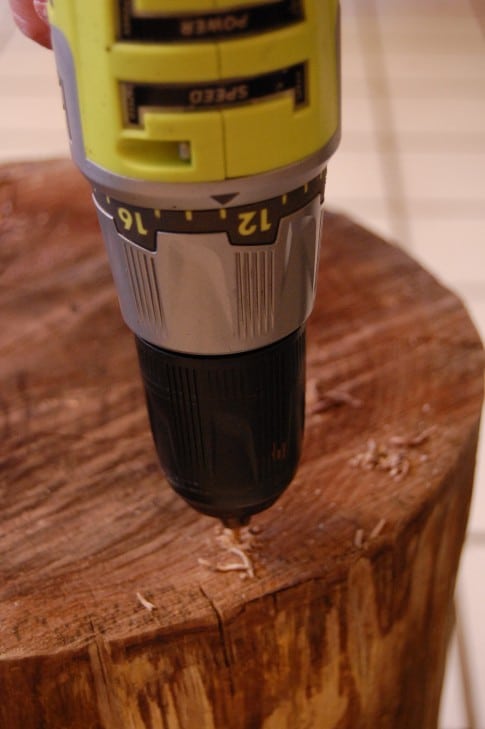
Remove the legs and fit your drill with the appropriate sized drill bit.
Pre-drill holes at the spots you marked for the screws.
Once all your holes are predrilled, place your legs and brackets back on and screw them into place.
To make my life easier, I put all my screws into a little dish. Don't question it. Just do it.
Now all your legs are on!
Step 5 - STAIN & SEAL IT (OPTIONAL)
If there are any sections where you accidentally took too much of the wood off (it's lighter underneath) you can skim over it with some stain. I have a whack of different cans of stain so I picked the one I thought would match the best.
Appropriately, it was "Walnut" stain for this walnut stump.
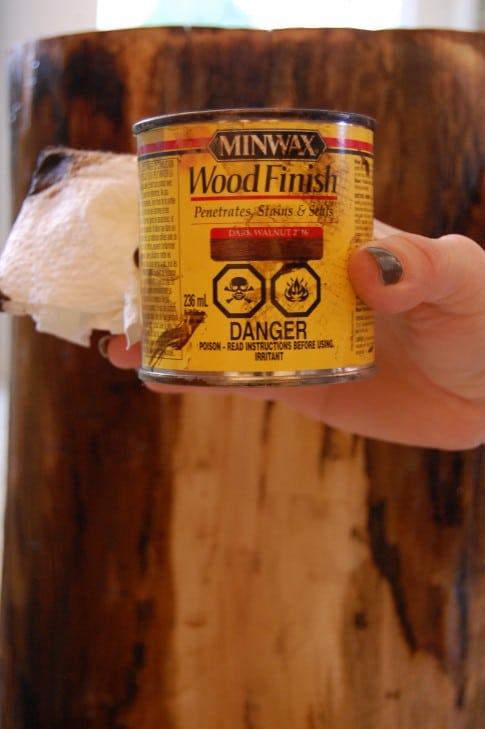
Just wipe it onto the light portion of your wood with some paper towel. It just darkens it up enough to make it blend in a little better. There will still be a colour variation, just not quite as distinct. Again, the look and colour and grain will be different depending on what type of wood stump you're working with.
The staining is a matter of choice. On my first stump table I didn't do it ... on this one I did.
Let your stain soak in and dry.
SEAL IT
Now you have to seal all that hard work in.
To stop your stump from drying out even more and to keep it from getting marked on top when you put things down on it you should seal your tree stump.
You can use any wood sealer. If you want a completely natural look I'd recommend sealing it with Thompsons Water Seal which will give the look of having no finish on it at all. Just remember that Thompsons Water Seal is water based which means it can only go on natural wood or wood that has been stained with a water based stain.
I used an oil based Polyurethane to make my stump top as durable as possible. I tend to be a bit spilly and bangy.
If you're using an oil based finish use a natural bristle brush.
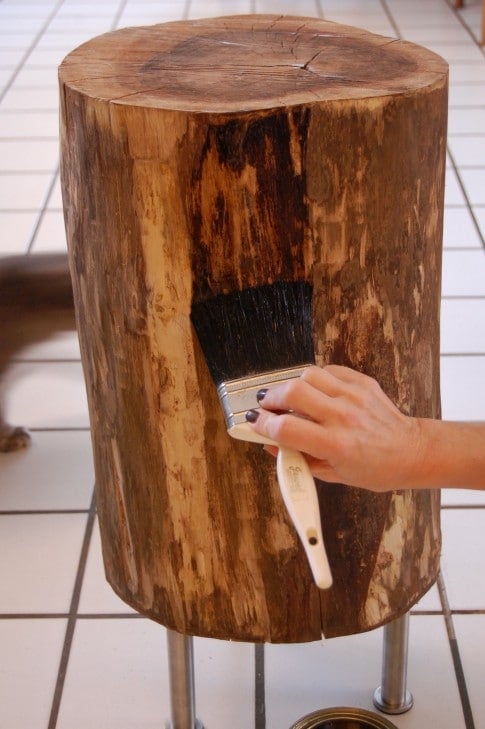
Seal the whole stump.
Seal the top, sides and bottom of the stump with 2-3 coats.
The top of the stump will get really dark, but it'll lighten up once the finish sinks in and dries.
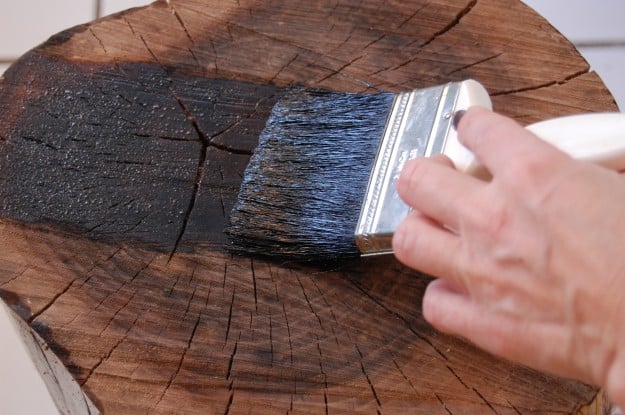
After your first coat dries, gently sand off any burrs and bumps.
The sanding will leave the finish with a white haze. Don't worry about it. It'll go away once you apply another coat of finish. Seal the sides and underside again 1-2 more times according to the manufacturer's directions.
Your stump may need up to 6 coats on the top. Because of the open grain, the finish soaks into the top a lot more and requires more coats. Always let your finish dry the recommended amount of time in between coats.
Once you've completed all coats of finish you're done.
Want to paint it?
If you're rather have a painted stump table, after sanding and wiping it apply a coat of primer. Once the primer has dried you can paint it with either water based or oil based paint.


Tree Trunk Table
How to make a tree stump table.
Materials
- Tree stump (your choice for size)
- Sandpaper (medium and fine grit)
- Polyurethane (high gloss, semi-gloss, satin … whichever you want) I used satin which has just a nice sheen
- Paint brush
- 1 package of 4, 6" Capita legs from Ikea (or similar)
Tools
- Drill
Instructions
Get your stump and allow it to dry out for at least a month. It will lose weight over this period and the bark will shrink away from the wood.
If you let your stump dry outside, as opposed to inside you'll still need to let it dry out inside for another couple of weeks to acclimatize it.
Once the stump has dried out remove the bark from it using a prybar and a hammer to chisel it away. Be careful not to gouge the wood stump.
If the bark is difficult to get off let it dry longer or carefully use a chisel with a hammer to remove it.
Sand your stump to get it smooth and then run over it with a tack cloth or damp cloth to remove any sawdust.
Flip the stump over so you're working on the underside of it and screw in the legs. Pre-drill your screw holes and make sure to measure so your legs are equal distances apart.
Stain and seal the table if desired.
Notes
If you want a very natural look to your stump, use a water based stain followed by Thompson's Water seal.
For optimal protection and a bit of a sheen on your stump use an oil based stain and a Polyurethane finish in satin.
Recommended Products
I'm an Amazon affiliate some I get a few cents when you buy something I've linked to.

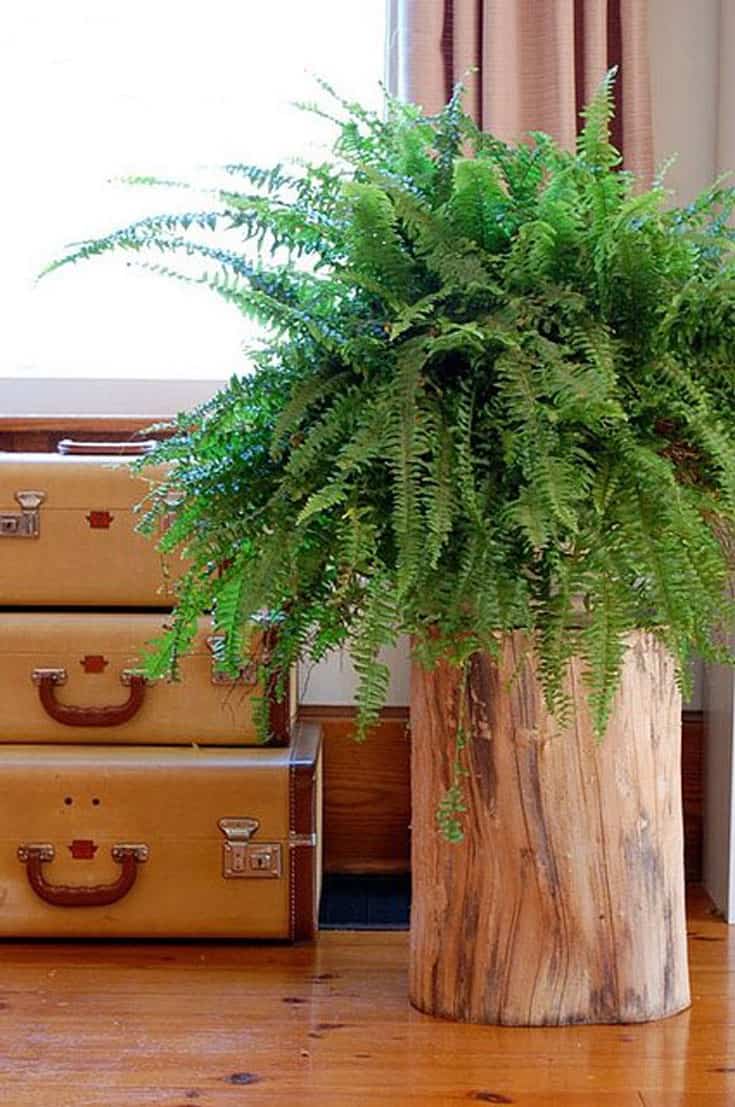
Unfinished stump table
This is pretty obvious, but if you'd rather make a more natural looking log side table, just skip adding stain and any finish to it.
For an even more organic look, leave the legs off of it.
To make one just find a log, let it dry out, then sand it smooth.
Wood from deciduous trees: Ash, black walnut, birch, cypress, cherry, elm, maple and oak are all good choices.
You should AVOID conifers. Those trees that have resin that are a sticky mess. Trees like cedar, fir, juniper, pine, redwood, spruce, yew, larch should not be used. (think of how sticky the bottom of a Christmas tree is after cutting it)
The only drawback to these tables? Everyone is going to want you to make them one. So you can either start a blog, get a following, contemplate quitting, keep at it, and then one day write a post about how to build a stump table that you can tell them about.
Or you can just skip all that and direct them to this post instead.
→Follow me on Instagram where I often make a fool of myself←


Hi - I know this old but in case anyone sees it. I have a few great stumps from a tree we recently cut, but they are too heavy for me to bring them in my garage. Any advice on how to dry them outside? I can cover with a tarp, but they are still sitting on the dirt - too heavy to raise. If anyone has a suggestion, please let me know (my goal is to keep them as outdoor "furniture" (stools and coffee table))
Hi CJ. It's me, karen. Writer of the post. :) Your stump can still dry outside, it will just take longer. But if the bottom is sitting in soil it will quickly rot. If you can manage to push the stumps over so neither of the cut ends touch the ground you'll have better success. You can then loosely tarp if it's rainy or snowy, otherwise leave them in the open air to dry. ~ karen!
Hi there!! Amazing instructions!!! Love!!!......so I have a question, I have access to about 40 Pine stumps at moment. They have been cut since 2016 & left in a disorganized pile at my dads sawmill. I live in Canada so that means 5 winters and 4 summers (soon to be 5) they have been outdoors but not stacked quite properly. I brought two home. They were damp, not soaked but damp. I had noticed the tops had a black damp film it does scrape of though. I removed bark and it came off very easily in one flush piece. Inside on the bark were a couple patches of white (fungus?) the stumps themselves have no white just the black film which does come off. The stumps are still slightly damp. I have not sanded. My question is do you think these stumps are ok to try & use? And also what is best way to dry them further, indoors? Or out?, and how long? Now that bark is removed. Also wondering if you have ever attempted with Pine & whether you have come across the damp black film before? 🙂
thanks for a very detailed instructiion!
Did you have to level the stumps and if you did, what did you use?
thanks!
Karen,
Currently staring at my own lil' stump side table that I made when I first saw this post in 2012, and was freshly moved into my first apartment post-college! It's brought me so much joy over the years. I still remember following your process, from finding "free wood" on Craigslist (and recruiting a friend to go with in case the free wood came with murderers), letting them dry out for months in the corner of my bedroom, hacking off all the dang bark, and sanding for DAYS. I've loved following your blog and work for all these years, thank you :-)
-sabina
Hi Karen
If the stump is not perfectly flat, how do you make it so? I ain’t good with a chainsaw!
Thanks Susan
Can you give me an idea of how much that stump table weighs now that it is finished?
How did you get it level?
Hi Renee. The stump has to be cut relatively level. From there you can level it slightly with the legs which will be adjustable. ~ karen!
Hello. Love your table. You have inspired me.
I have found a big, heavy log and brought it home. My plan is to use it outside as a center table. The bark peeled off easily. Does this mean it’s dried and ready for me to start the process of sanding and finishing?
How do I know if termites or bugs are living inside?
There were bugs on the bottom of it when I picked it up to bring home.
If there are cracks, do they need to be filled?
This is my first DIY project. BTW I don’t have any tools just my hands.
Thank you.
Hi KK. The log will be partly dried if the bark is off but it will still need to dry inside the house or garage (out of rain/moisture) to let it completely dry just from being outside. Bang the log around outside to scare off the rest of the bugs. You can generally tell if there's bugs eating it from the inside, because there will be tiny holes in it. Do not fill any cracks. You only need the tools I list in my post. ~ karen!
While very artsy not practical at all. Hardly large enough for a box of tissues or a lamp but not both.
I get rid of my current table and have to find space for hearing aid batteries, they always go out while watching TV, a pen for the morning crossword, a note pad for all the URLs being advertised, coaster for my coffee (DW will not let it out unless it is in use), eye drops, etc.
I found this article via Pinterest, gave it a go with a conker tree I planted in 1989 and am very happy with the result! I went with 3 hairpin legs as A, that means it won't be wonky and B, because 4 legs didn't actually fit on the base! Used Danish oil and now have it as a 24" high side table.
Very nice! It looks great. ~ karen!
Hey! I came across your article in April and have been wanting to make this ever since. A lot of trees fell in a storm and my neighbor chopped his tree up. He let me pick the piece I wanted and it took some time to do it (busy mom) but here it is! I am in love with it! Mainly because I did it, but also because it looks great in my living room! Thanks for posting this article! I would not have been successful without you! ❤️
Nice job Renee! It looks great. Looks really good with that lamp and the couch (or chair) beside it. :) ~ karen!
Great read, thanks. My folks in ireland had some trees cut down last year so i kept a stump, it's been drying out in their shed for a year now.
Now as i'm moving to Australia, having a piece of home will be really nice, a piece of one of the trees i grew up with.
That's a great thing to take with you! Heavy! But great. ~ karen!
You’re smart and funny. Thank you for the informative post!
Welcome to my site Maureen! And thx. :) ~ karen!
I've been reading your blogs for 1000 years now. Yes, all thousand of them. I am so happy to find this post again, I saw the table and remembered it. We just lost our neighborhood to California wildfires last fall. Making a table like this from a beloved tree we cannot save, eliminates some of the sting. I'm so happy for your step by step directions! Let the rebuild begin.
Oh that's such a great idea! Good luck. :) ~ karen!