As promised, this month is going to be devoted to some of the things you can quickly do to spruce up your house. The little things you never take the time to do.
Like sweep out the trundle cage in the basement. I never seem to get around to doing that.
Today we're gonna go back to the kitchen to focus on that.
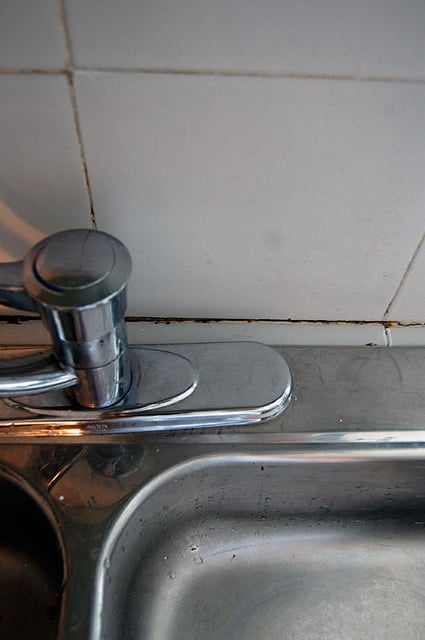
While I was painting my kitchen counter grout last week, I came to the realization that no matter how clean the grout ended up looking, the rim around my sink was still going to look gross. You fancy folks with undermount sinks don't have this problem. My sink is not an undermount sink, since it was installed approximately the same time water was invented. So my sink and the area where my backsplash meets the counter around my sink is gross. Mildewy and dirty and gucky.
I had to fix it.
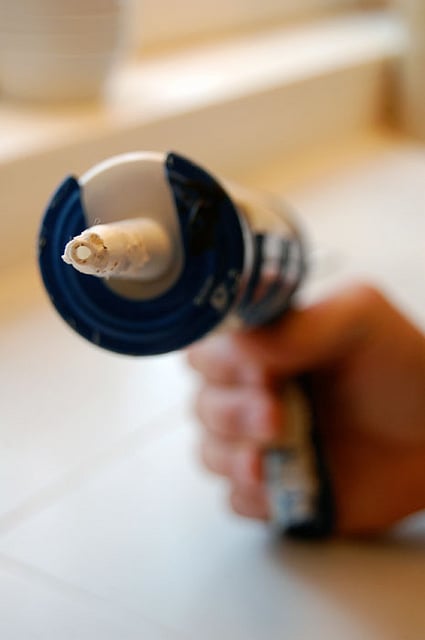
Let's talk caulk. When you're sealing in your kitchen or bathroom you want to use silicone sealant. NOT paint and trim caulking. Both are applied with a caulking gun, but caulking is for filling holes and cracks in walls and baseboards and such. Silicone sealant is for sealing up areas that get wet, like around your tub or sink.
Silicone sealants tend to stink. Deal with it. Using the wrong product will end in misery. Gooey, misery.
Keep in mind this is a quick fix. Not a proper fix. A proper fix would involve removing all the silicone that's in place right now. I didn't do that. I went over the old silicone. Because as I said ... this is a quick fix.
So load your gun ...
Find the area in need of help ...
Fill with a thin bead of sealant. And admire.
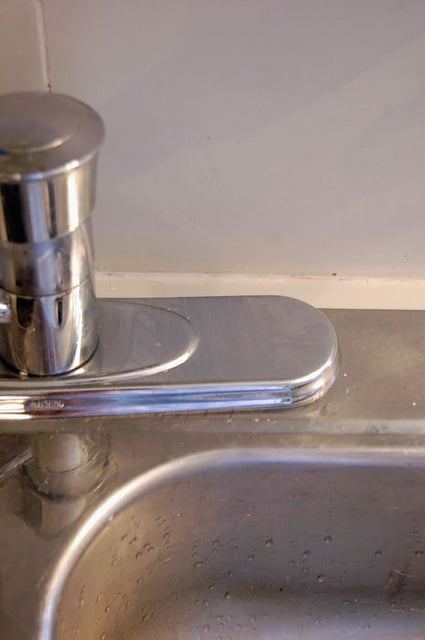
As you can see I also painted the grout on my backsplash using that grout pen I talked about last week. The whole project of painting the grount and resealing around the backsplash and sink took about an hour.
It's not exactly a kitchen renovation, but it didn't take 3 months and $40,000 either. And it has almost the exact same effect. Sort of. If you squint. From Africa.
So for now, that'll have to tide me over. It's one of those things you do and think, WOW. I had no idea how awful that was until I fixed it. Like when you get a new pair of glasses, put them on and think Holy Crap! I had no idea I couldn't see before. Look at all those trees. And the monsters in them! Those trees are covered in monsters! Huh. Pretty.
Not as pretty as a kitchen renovation but still, pretty.
** There's no such thing as a trundle cage by the way. No such thing at all. And you definitely wouldn't use it for holding fop-fops.
→Follow me on Instagram where I often make a fool of myself←


Sorry! When I entered my comment I could only see three others. Apparently the bleach idea is old news! ;)
LOL. That's O.K. Sometimes we all need it drilled into our brains anyway. (I was approving all the comments at the same time you were leaving yours ... that's why you couldn't see them) ~ karen
Perfect timing, Karen. I just bought silicon caulk to fix my kitchen sink. It's gross.
Rebecca, I spray a solution of one part bleach to 5 parts water on the sink caulking and let it sit overnight. Rinse in the morning and it's white and clean. It stays that way about a month. (If you decide to try this and you have cats, you might want to confine them overnight so they don't get bleach on their paws. I'm pretty sure mine are into everything while I'm sleeping!)
Hilarious- I'm cracking up bc for one, my sink looks exactly like yours. Except I don't even have tile and grout, I have a disgusting linoleum backs plash and counter that I try to melt all the time when I cook so my husband will agree a new one it needed! I keep a list of little projects on my phone for when I have time to myself to conquer things and this exact task is on it and I still had not done it..I'm inspired and doing it today- literally right now- THANK YOU for the reminder! :)
Trundle cage must be something Canadian. Just across the border, in Michigan, I've never heard of it. What IS a trundle cage?
It's where they put the Linda B's when they are done with them!
What a huge difference. Looks awesome. Looking forward to this month of "sprucing up" ideas. Goodness knows my house could use some sprucing up.
Great results!
My response to mildew is to attack with a spray bottle of chlorine bleach, straight no chaser (Aagh!). Yep... I'm more afraid of mold than I am of chlorine fumes. Weird, I know... but I get longer lasting results. The 'mold frequency' around here is crazy at this time of the year.
Ruth - I'll give bleach a shot when. You're the second person to mention it. ~ karen!
Oh Wow. Looks great. Seeing the before and after has me thinking about the caulking around my bathtub. It could use refreshing and the 'anti-mold' kind I guess. Is that gun gizmo hard to use? Does caulking come in a tube? A tube may be easier to use for those of us with little or no skill.
Reg - caulk does come in a tube, which is great for small projects. The caulk gun is super simple to use for larger projects, but you have to watch your pressure and release the little lever thingy on the bottom between squeezes or caulk will keep squirting while you are trying to smooth. That's my experience, anyway, but I'm usually cauliking room corners and around windows.
Erika - There are caulking guns now that lock once you've stopped squeezing so you don't have to press the handle to get the goo to stop coming out. I don't have one, but they do exist. ~ karen!
Thank you Erika and Karen
Cool!
I have been thinking about doing this in my kitchen. Thinking about it is very tiring, but maybe I can rest up and actually do it.
Langela - You sound like me and my income taxes. ~ karen
I have an undermount sink and don't see any caulk. It is under the counter. Maybe the counter hole was too big for Rebecca's sink (or the sink was too little for the hole). Just a suggestion or else maybe I need glasses and then will be able to see my moldy caulk also. Can you tell me the name of the paint pen again as I have a friend with a log home and she cleans the grout between each log every year and repaints them. Looks fantastic all the time BUT it would be easier if she used a pen instead of a brush.
Mary - The pen is actually harder to use than a brush! It gives you the impression it's easier but .. it's not. Mine is called "Grout Renew", but there are a bunch of different ones. ~ karen
You can buy Clorox bleach pens (other companies make them now as well), it looks similar to a highlighter marker. Treat and/or remove all mold, most importantly let it dry(!) then reapply grout or use the paint marker.... (You can put a fan in front of the area to help it dry faster) If you do not remove the mold first, you will be creating a never ending cycle.....
Have you tried putting chlorine bleach on a Q-tip or an old toothbrush to clean the mold/mildew off the grout? Rinse off after the "gunk" disappears so it won't disolve the components of the grout. I've done this a few times and it works pretty well.
Undermount sinks get just as nasty as top mounts. Nastier in fact because since people can't see the mold/gunk accumulating, they tend not to bother cleaning it til it gets incredibly revolting and smelly. And it's harder to keep clean than top mounts are even if you do keep it up on a daily basis. If you have a choice between putting in an undermount and a top mount, choose a top mount.
Ha! Here's me googling trundle cage at 5 in the morning. Ok, it's officially time for me to get a life.
Aww, c'mon. I wanted to see a picture of your ooky finger covered with all the extra caulk after you smooth it out. ...Or is that just me?
Ooky, LOL???
I have just recently started to "renew" the wet areas in my home and regrouted and recalked the second bathroom (thought I would test the least used room in the house) its so satisfying (and liberating) to do these little jobs!
I was just about to say that they have silicones with "anti-mold" built in, but then Karen beat me to it.
They do, in fact, work because I worked in a lab for 6 years or so that tested that kind of thing. Of course, it does depend on the brand, but it *should* work. (Although I should probably plug my old company's product, the truth is most of our competitors were just as good...*le sigh*.)
Thanks for saying theres no such thing as a trundle cage. After reading your post i was going to google "what is a trundle cage". Figured its a canadian thing.
How oh how did you get the silicone so straight and smooth? We have resealed our bath three times and the kitchen sink twice, and it always looks like a three year old has done it. It comes out in fits and starts and blobs all over the place, I smooth it with a damp finger, and then have most of it..on my finger! Yay! . I think a video clip is in order for us numptys...
The easiest way is to put tape down first on either side of where you want the caulk to go, do the caulking, wet your finger and smooth it, then remove the tape.
Cheers!
I helped build a playground for the co-op I live in this summer. We spent an evening applying caulk to the posts. Given the 13 year old hilarity that ensued (my caulk is very stiff, this caulk is still sticky, you have to push on the caulk, etc.) I am very, very impressed (and slightly disappointed) that you wrote an entire post without one singe innuendo.
Tasha - I've already done that post. Cant' remember when or what it was about ... but I did. :) ~ karen
I have a fancy-schmancy undermount sink and the caulking is disgusting all the time. We've lived here for five years and I've removed and recaulked it twice. It is constantly moldy. Don't know why. Maybe it wasn't put in properly? I've never had an undermount before so I have no idea if this is normal.
Rebecca - There are some silicones that have an "anti-mold" built into them. I have no idea if they work or not, but they do exist. ~ karen
I repeatedly had to remove/replace the caulking around the inside of my tub because it would constantly turn black. I often came across the tip that if you coat new caulk with a layer of car wax (I think it was car wax) after it cures, that protects against mold and mildew. I always meant to try that but never did, because I'm lazy that way, but considering all the other things we use wax to protect, it makes sense.
The other thing is, when you recaulk, be sure to clean the groove you're filling extremely well, because if there's any mold/mildew spores in there when you caulk, they'll attack the caulk from behind. (That's what was going on with my tub.) Tea tree oil is great for killing mildew. Just be sure to clean all oil residue off before caulking or the caulk won't stick properly. Just scrub, scrub, scrub with rubbing alcohol and a toothbrush and wipe. I recommend repeating that process at least three times.
Also, be vigilant about following all surface prep and curing instructions for the caulk to the letter. Nothing is more frustrating than having your pretty new caulk start to pull away from the surface in a couple of months because it didn't adhere properly. ARGH!
Too funny--I searched google for trundle cage, wondering what important household maintenance I had been neglecting. You are a riot.
I'm a dedicated DIYer (and Canadian!) who welds steel, makes art and does home repair. Love this site. How to handle caulk: cut a small hole in the tip of the tube, preferable at an angle. Load it into the gun, and get the caulk prepped, so that it is just about to come out of the tube (pressure keeps the caulk coming after you've squeezed the trigger: be prepared, know where the release button is). Get a bit of cloth, tee-shirt material,and dampen it. Wrap it once around the index finger of your non-dominant hand to make a smooth surface, holding most of the cloth in your palm to keep it snug against your finger tip. Place the tip of the tube against the beginning of the groove you want to caulk. Place your cloth-wrapped finger tip on the tip of the caulking tube, squeeze the trigger of the gun and as the caulk starts to come out, drag the gun AND your finger tip along the groove together. At the same time. You will wedge the caulk into the groove, while ensuring there is no mess, and no clean up. Use a smooth and confident motion, and there is no need for tape! And don't, repeat don't try to touch it up until the caulk is cured. Gaps can be filled easily later on with a bit of caulk on the finger-tip. Hope this helps.