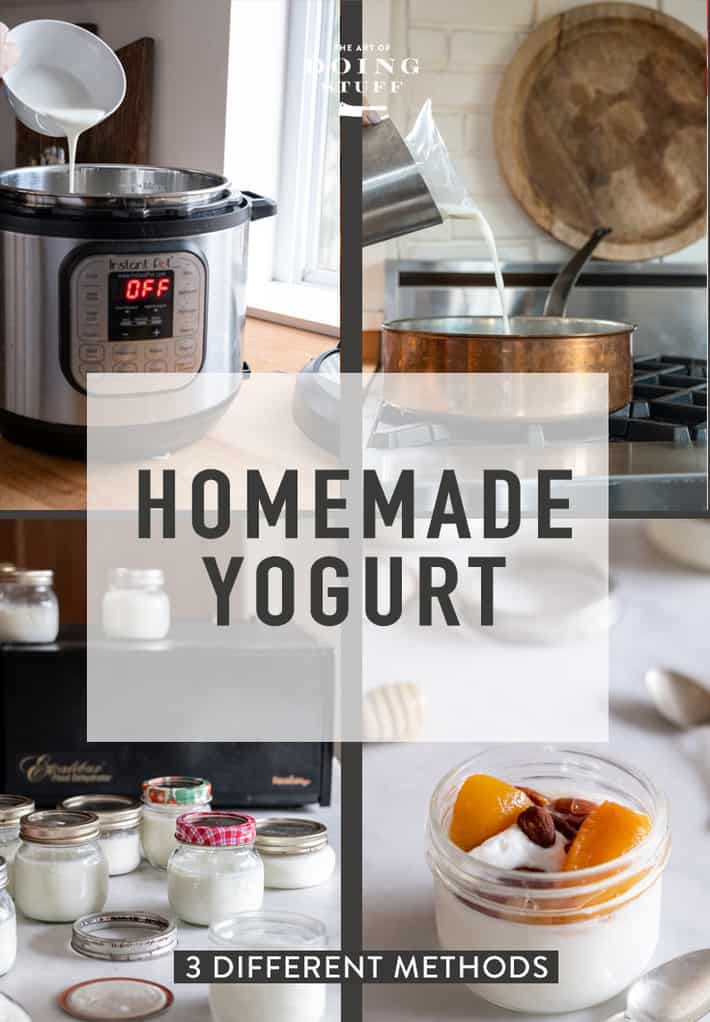
How to make yogurt every which way. Instructions for Instant Pot, stovetop & making yogurt in a dehydrator. And NOPE. This doesn't mean I now like my Instant Pot. Plus a new trick for thickening it that I learned in the past month.

Don't want to read my witty entertaining babbling? Skip right to the recipe.
I started making my own yogurt because of my imaginary world. This is the world many of us let our minds wander to when we should be thinking about insurance rates, mutual funds or other gross things.
In my imaginary world I'm usually at the cottage (that I don't own) and everyone is gathered around when we all realize, much to our horror, that we don't have any butter, or bread or ... in this case ... yogurt. "Everybody calm the hell down.", I say, my arms outstretched, palms facing the ground, in the internationally known gesture of "calm the hell down". "We have whipping cream, flour, yeast and milk. We've got this."
Butter as you know is made by shaking whipping cream.
Bread is made with flour, water, salt and yeast.
And Yogurt ... is made with milk. (And a little bit of yogurt. But that ruins imaginary world where I miraculously produce yogurt with just milk. So.)
Therefore years ago I started making my own so if I ever own a cottage and am ever stranded there with a group of starved people that I need to impress, I will be able to impress them.

Table of Contents
Yogurt Facts that'll make your head spin
(not really, it's remarkably dull actually)
- You can use whole, 2%, 1% or skim milk. The higher the fat percentage the more calories.
- Do not use ultra pasteurized milk.
- To "activate" your yogurt, you need 2 Tablespoons of plain yogurt with active cultures. Just look for the words probiotic or active cultures. Some people have had success using sour cream in a pinch as an activator/starter.
So the Instant Pot. The gadget I love to hate. There are two things it can do well. Make a small batch of chili and make yogurt. It's more complicated than just doing it on the stove. But it does work and has some pros to it.
However, I know a lot of you love your Instant Pots so I thought I'd better show you how to make it in the Instant Pot because 1) the instructions that come with the Instant Pot for almost everything are useless and 2) even online instructions for making yogurt in it don't cover the little things.
If you INSIST on buying an Instant Pot, even if you're only cooking for one, make sure you get one that's at least 6 quarts.
The process is the same no matter what you're using to make it.
The Basic Process
- Heat milk (to 180°F)
- Cool milk (to 115°F)
- Add starter culture (yogurt)
- Keep at 115°F (for 8 hours)
Here's how to accomplish that with an Instant Pot.
Instant Pot Method

THE HEATING PHASE
- Pour 2 litres (½ gallon) of milk into the inner pot. I use 1% but you can use any kind.
- Lock the lid on.
- Turn the vent to "sealing". (although I've forgotten this step before and my yogurt still turned out fine.)
- Press "Yogurt" button then,
- Press "Adjust" button. The light will switch to "more" and the word "boil" will show up.
- Wait. The Instant Pot does its thing for 35-40 minutes, heating the milk to 180° F.
- "Yogt" will show up on the display when it's done.
- Remove the lid. CHECK THE TEMPERATURE. After this part is done my yogurt is NEVER at 180° F. It gets to 175. So I put the lid on and restart the process of hitting "Yogurt" then "Adjust" to boil again until it registers as being 180° F.
- NEW TRICK below ⇓ (I learned this from Team Yogurt)
- Keep the yogurt at 180° F for 5 minutes. To do this, Press "Yogurt" then "Adjust" again. This will keep the unit warm enough to keep the yogurt at 180° F. Leave it like this for 5 minutes. Don't put the lid back on. (doing this helps to make it thicker)
- Press "Cancel" at the end of 5 minutes.

THE COOLING PHASE
-
Unplug the Instant Pot. Remove the inner pot and either let it rest on the counter until the temperature drops down to 115° F, OR put the pot in a cold water bath in your sink. This speeds up the cooling time a LOT. (instead of taking half an hour it will only take a few minutes, so keep an eye on it)
THE INOCULATION PHASE
- Put 2 tablespoons of yogurt (with active cultures) into a bowl and then temper it with a ladle of the hot milk and stir. This just makes it easier to disperse the yogurt through the entire pot.
- Pour bowl of yogurt/milk mixture into the inner pot of the Instant Pot and stir.
- Set the inner pot back into the unit.
THE INCUBATION PHASE
- Push the Yogurt button. Add or subtract with the (+) key until you reach a minimum of 8 hours. You can also let it go for 11 hours for tangier yogurt. You can even let it go longer than 11 hours for tangier yogurt. I often incubate my yogurt for 12 hours or more.
- At the end of your cycle "Yogt" will appear on the display and it's done.
- Pour off the whey from the top (or scoop it out with a spoon) and put the yogurt in mason jars or other glass containers.
** For extra thick Greek yogurt, strain the yogurt as shown in the straining method below.

Making it on the stovetop is simpler and has FAR fewer steps.
Stovetop Method
- Heat 2 litres (½ gallon) of milk in a pot on the stove until it reaches 180° F.
- Turn the heat off, put the lid on and let it sit for 5 minutes.
- Cool the milk to 115°F on the counter or in a cool water bath in the sink.
- Mix together some hot milk with 2 Tablespoons of yogurt to thin the yogurt then add the mixture to the rest of the hot milk. Stir.
- Pour into a good thermos (one that will retain the heat) and wait 8-11 hours. (or follow Dehydrator instructions)
**If you don't have a thermos then pour the hot milk into mason jars and store them in a good quality cooler wrapped in towels for 8-11 hours.


Yup. That's it. In my opinion this is much easier and faster than fiddling with the erratic behaviour of an Instant Pot.
Would you like to save this stuff?
The drawback is if you forget your milk on the stove while heating it, it can boil over.
Dehydrator Method
To make yogurt in a dehydrator, you're not really using the dehydrator for anything other than holding the yogurt at temperature.
Follow the stove top method up until the part where you hold the yogurt at 115°F for 8-11 hours. Instead of putting it in a cooler or thermos you can hold it at temperature perfectly with your dehydrator.
- Follow steps 1-4 for stovetop yogurt.
- Turn the dehydrator on and set it to 115°F
- Pour hot milk into glass mason jars. Screw on lids.
- Remove trays from dehydrator and place the jars inside.
- Set the dehydrator timer (if it has one) for 8-11 hours.
Straining to Thicken
- Dump your incubated yogurt into a sieve lined with cheese cloth or a flour sack tea towel set over a bowl or pot.
- Let drain for up to an hour or until it has reached the consistency you like.
- After 1 hour around 4 cups of whey will have drained away, leaving you with 4 cups of Greek yogurt.
When the process has finished its 8 hours of incubating it will have a lot of whey in it. That's the liquid stuff you see on top of yogurt or sour cream that you buy at the store sometimes.
Straining willt get rid of most of the whey resulting in a thicker, higher calorie yogurt. If you like it thinner you don't need to strain; just pour off the bit of whey on top and you're good.
YIELD: NOT STRAINING VS STRAINING
- Unstrained yogurt will get you the same amount of yogurt as milk used. 8 cups of milk will result in 8 cups of yogurt!
- Strained yogurt will get you thicker yogurt, but less yield. 8 cups of milk will result in 4 cups of greek yogurt.*
*the exact yield depends on how long you strain it and how much whey you remove.

Unstrained has a similar consistency to a very soft jello.
Straining is how you get that thick, Greek style yogurt.

Strained is so thick it will sit high on the spoon and even stick to it when you turn the spoon over.

I love a big spoonful of plain, tart Greek yogurt, but there are times I want to have something a little more dessert or breakfast like. THOSE are the times for toppings.

Topping Ideas
- Jam (Strawberry, raspberry, apricot etc. etc.)
- Nuts
- Granola
- Canned fruit
- Chia seeds
- Bananas
- Coconut Flakes
- Chocolate Chips
- Cocoa powder
- Honey
- Maple Syrup
- Cinnamon
- Nutmeg
- Poppyseeds
- Orange slices
- Mashed sweet potato
- Lemon zest
- Brown sugar
- Apple sauce
- Cookie crumbs

How to make Yogurt.
Ingredients
- 2 litres milk (whole, 2%, 1% or skim)
- 2 tablespoon active yogurt plain
Instructions
Instant Pot Yogurt
- Pour 2 litres (½ gallon) of milk into the inner pot. I use 1% but you can use any kind.
- Lock the lid on.
- Turn the vent to "sealing". (although I've forgotten this step before and my yogurt still turned out fine.)
- Press "Yogurt" button then,
- Press "Adjust" button. The light will switch to "more" and the word "boil" will show up.
- Wait. The Instant Pot does its thing for 35-40 minutes, heating the milk to 180° F.
- "Yogt" will show up on the display when it's done.
- Remove the lid. CHECK THE TEMPERATURE. After this part is done my yogurt is NEVER at 180° F. It gets to 175. So I put the lid on and restart the process of hitting "Yogurt" then "Adjust" to boil again until the yogurt registers as being 180° F.
- Keep the yogurt at 180° F for 5 minutes. To do this, Press "Yogurt" then "Adjust" again. This will keep the unit warm enough to keep the yogurt at 180° F. Leave it like this for 5 minutes. Don't put the lid back on.
- Press "Cancel" at the end of 5 minutes.
- Unplug the Instant Pot. Remove the inner pot and either let it rest on the counter until the temperature drops down to 115° F, OR put the pot in a cold water bath in your sink. This speeds up the cooling time a LOT. (instead of taking half an hour it will only take a few minutes, so keep an eye on it)
- Put 2 tablespoons of yogurt (with active cultures) into a bowl and then temper it with a ladle of the hot milk and stir. This just makes it easier to disperse the yogurt through the entire pot.
- Pour bowl of yogurt/milk mixture into the inner pot of the Instant Pot and stir.
- Set the inner pot back into the unit.
- Push the Yogurt button. Add or subtract with the (+) key until you reach a minimum of 8 hours. You can also let it go for 11 hours for tangier yogurt. At the end of your cycle "Yogt" will appear on the display and it's done.
- Pour off the whey from the top (or scoop it out with a spoon) and put the yogurt in mason jars or other glass containers.
Stovetop Yogurt
- Heat your milk in a saucepan over medium heat to 180 F (almost boiling, this happens quickly).
- Remove pan from heat and allow milk to cool to 115 F. This will take around 30 minutes on the counter or a few minutes in a cool water bath in your sink.
- Once the milk is at 115 degrees add some hot milk to a bowl with 2 tablespoons of yogurt in it and incorporate. Add this mixture to your pot of hot milk.
- Now your job is to keep this concoction at 115 degrees for the next 8 hours. There are a few ways to do this.
- Pour your milk mixture into a mason jar (or similar) with lid and place the entire jar into a small cooler filled with warm water. Leave for 8 - 11 hours. OR ...
- Pour your milk mixture into a good thermos, wrap it in a towel and leave it for 8 hours.
- Your yogurt is now done. Store it in glass jars and refrigerate. (If you want you can strain it to make it thicker.) Straining instructions in notes.
Dehydrator Yogurt
- Follow steps 1-3 for stovetop yogurt.
- Turn on the dehydrator and set to 115°F.
- Pour yogurt into serving sized mason jars for convenience (or use full sized mason jars).
- Set the jars into the dehydrator and allow to incubate for 8-11 hours.
Notes
- The longer you let the yogurt incubate the more tart it will be.
- 2 litres of milk will make 8 cups of yogurt.
- For extra thick Greek yogurt, strain the yogurt after it has set by pouring it into a cheesecloth lined sieve over a bowl. In about an hour 4 cups of whey will have drained out leaving you with an incredibly thick remaining 4 cups of yogurt.
- If your oven goes as low as 115°F then you can set the jars of yogurt in the oven for 8-11 hours as well to incubate it.
Nutrition
How healthy is homemade yogurt?
Really good natural yogurt is way more accessible now than it ever was. There was a time that the only yogurt you could buy was yogurt with premixed fruit and about a pound of sugar per serving.
Homemade has no sugar and no additives. Adding these two things will decrease the health benefits of this lively culture.
Homemade concoctions can be sweetened with honey, maple syrup or agave and you can add fresh fruit like peaches or strawberries as well.
By making your own you're controlling what milk it is you use to create it. Even some of the best brands of yogurt don't use the best milk and often come from cows that have been fed grain (GMO corn or soy). That means when you get that store bought healthy seeming yogurt you're actually consuming GMOs through the milk of the cow. If that's the sort of thing that worries you then homemade really is your best choice.
THOUGHTS ON WHICH IS THE BEST WAY
If I were in some sort of battle that required I choose only ONE method to make yogurt for the rest of my life what would it be?
A combination of the stovetop method for the initial heating and cooling and then finishing it in a dehydrator.


Christina
Oh poo...
Mine didn't turn out. I used the oven method (turned it on to 115, put the jars in and turned it back off) I also turned the oven light on for good measure and left the yogurt in for almost 7 hours. It came out tasty and quite tangy, but barely thicker than milk.
:( Where did I go wrong? Think my oven didn't stay warm enough?
Karen
Christina - The oven could have been the problem. It's hard to say. Try one of the other methods (using a thermos, a cooler or the crockpot) The only other thing I can think of is you didn't add enough or added too much yogourt. Did you use yogourt with active bacterial cultures? ~ karen
Mariam
Hi! Finally made the yogurt. It is out of this world. Maybe I got lucky with the first time, but just wanted to say THANKS for planting that crazy idea in my head.
Now, about that chicken coop....
Not woman enough to even dream of it.
-M
Karen
Mariam - You didn't get lucky. It is *that* easy to make and tastes that good every, single time! Congrats! ~ karen
Rhonda "SmartyPants"
Ta-da! Made my own batch of crockpot yogurt last week and it is better every day. I set aside the requisite 1 cup starter for the very next batch 'cuz I've been converted..... I will now make up some cards that say, "Rhonda . . . Yogurt Maker" with all the pertinent contact information.
Thank you for the post, Miss Karen, and thank you to all your followers who so generously shared their tips and tricks, successes and failures. I couldn't have done it without all of your help. Mmmmmmmmmmmmmm...smack! Thanks a bunch.
Karen
I'm glad you've been converted! Isn't it fun? And delicious? ~ karen
Liz
That sounds like a lot of work and just as expensive as buying it. I used to make my own yogurt in mason jars with a heating pad set on low using a non-instant dry milk powder. That milk powder has however become difficult to find and when you do it is very expensive. It did make GREAT yogurt though.
Liz
Oh and the milk powder was mixed considerably stronger than for milk, so it was like Greek style without the straining.
Deb
Take your yogurt one step father and make a batch of paneer cheese. Bring 2 litres of whole milk just to the point where it starts to form a skin on the top. Remove from the heat and stir in 1 mason jar of yogurt and gently stir. The yogurt / milk mix will start to form lumps which is what you want. Keep stirring gently till all you have are lumps floating in a clear whey. Strain thru cheesecloth squeezing as much of the liquid as you can from it. If you like it slightly salted now is the time to add a pinch. Wrap it up tightly in the cheesecloth set in the bottom of your strainer and add weight to it and let it sit for a couple of hours.
Diane Stairs
hey there...I haven't read all the comments on homemade yogurt but....I make it in the slow cooker....soooo easy, it does all the work, you leave it over night to cool and then strain through cheese cloth...tastes "almost" better than the real thing I bought in Athens. You can just google "slow cooker greek yogurt" for the recipe.
Karen
Hi Diane - Yes, several other people say that's how they do it, but I wanted to make sure I was providing a recipe that didn't need any special equipment. I know a slow cooker isn't exactly crazy, out there kitchen equipment but not everyone owns one. (me for example!) :) ~ karen
Janelle
While you're doling out unsolicited (yet valuable) advice at the grocery store, you should hang around the pharmacy section. If you see anybody taking out a prescription for antibiotics, you should command him/her to make yogurt...because of the gut/yeast thing. Those people are the most in need of yogurt making advice.
Dee G
That should be PUT the lidded pot...
And another thing...I use a piece of cotton for straining - like a men's hanky. Don't buy that cheesecloth crap anymore.
Dee G
I've made yogurt for years. It gave new life to a heating pad - out the lidded pot of cooled and inoculated milk on a heating pad set at medium for 7 hours, or until set. I am now using a multidopholus from the health food store to start the yogurt - about 1/2 tsp per quart. It takes a little longer to set, but the taste is incredible...
Be careful about watering your plants with too much whey. I use whey to jump start lacto fermented pickles...4 Tbs. per quart and you can cut the amount of salt to 1 Tbs.
Great post!
Erin
Guess I'll add my two bits!
I make yogurt at the end of the day. I stick to the same temps and methods you've posted. Instead of a Mason jar (which looks way nicer,) I put the yogurt in a glass bowl with a lid that seals very well. I wrap the bowl in a towel, stick it in the (cold) oven and go to bed. In the morning, there's yogurt. You've got to keep from tap-dancing in the kitchen, or otherwise jiggling the yogurt for that 6-8 hours.
If it's really cold in the house, I'll put the oven on "warm" then turn it off before putting in the towel-wrapped bowl. Yes, one towel is designated as the yogurt towel. Thanks for the tip on making it Greek style. Yum.
kirsten
So fabulous! Oh and another good thing about this! Did you know you can feed whey to your chickens? You can soak their feed in it and they'll get awesome extra protein and nutrients.
Barbie
Used to make my own yogurt all the time but never knew the extra step to make it greek. Thanks Karen, I'm going to do this.
PS: I grew up in LA and got really used to seeing the Hare Krishna's there all the time especially at the airport.
kely s
Karen, any time you want to go shopping with someone, let me know. you can shop with me anytime...and tell me what to do and how to do it.....i'm trying with the easier, cheaper, better for you, but then i'm in the store with the husband (who likes to shop wayyyy tooo much--but i'm not complaining cause i could have a whiny complainypants nonshopping husband) and everything goes out of my head and i can't remember that homogenized but not pasteurized milk and that blade instead of stew meat.....and oh look a chicken.....get off the deck you dang chicken....back to your coop...so before i was so rudely interrupted....please join me we'll have a great time and i'll let you share all your knowledge right there in the store.
Karen
kely s. O.K.! ~ karen
kelly s
two weeks...saturday....medford, or.....i'll meet you there...we can start at costco. i'd invite you to meet me in about 2 hrs today, but you're relaxing....i'm betting 3 days before you gotta get up and do something cause that's all i can take before the backside starts to give out. good luck, enjoy. hi to the man and true-dad
Rhonda "SmartyPants"
Hey there, neighbor Kelly S. I live near Medford OR and would get a real kick out of meeting up with you;even more so if Karen were able to meet us. If not, we could print off a ream of "The Art ..." posts and read them to people standing in line at the Medford Costco. Then we could move over to the lines at Food 4 Less for a bit more of advice giving and tip sharing. What say?
Karen
LOL!! ~ karen
Rhonda "SmartyPants"
Uh, Karen, I'm not sure if you truly understand the depth and breadth of Kelly S's initial invitation and my response; hence your somewhat lackluster 'LOL' response.
This is a serious invitation -- hell, even Martha Stewart came through this area a few seasons ago (post-prison, I believe) - you're ten times more creative, twenty times less expensive, and a gazillion times funnier!
You're being invited to an area of the Northwest renowned for it's natural resources (Rogue River, Steelhead/Salmon fishing, Marionberries), culture (Oregon Shakespeare Theatre, Southern Oregon Film Festival, Pear Blossom Parade, Methamphetamine Mecca soon to be displaced by more Medical Marijuana Cardholders per capita in the state), and a committed movement taking hold with community-based sustainable farming. The City of Ashland (AKA That Hippie-dippie, Crystal-loving, Trust Fund-babies City) just increased the number of chickens permitted per backyard AND was named one of the "Top 10 Small Towns in America" by the folks at the Smithsonian and it's less than 20 miles south of Medford.
There is an old joke that calls Medford 'Dredford', but those good ol' boys are pretty much dead and buried or a few that might be left are eating pureed peas in the local assisted living facilities.
Medford has a Costco, will be opening a second "Super Wal-Mart" store, and has a Dollar Tree on just about every corner in town!
Think of the possibilities -- you could fill your blog post calendar for a year with just one whirlwind weekend with Kelly S and me as your hosts. Kelly S obviously has a spouse that is a god among the other sex - he and The Fella could hang while we do what needs to be done -- pick berries, raft the Rogue, catch at least one Steelhead apiece, make jam and a Marionberry pie, catch an outdoor performance of Shakespeare, laugh at the tourists trying to find parking, tour a sustainable farm and steal their recipes for your future blogs and then check out chicken coop designs.
This could be your new 'home away from home' - your new escape to rejuvenate your creative blog juices. You could actually post a blog from another country without having to cross an ocean.
I know if we put our collective heads together (carefully, cuz I know how easily you are injured) and made enough fresh lemonade to sell during the month of August, we could raise $ to get you here in September -- what a way to end the jinx you have about that month. Did I mention that our Septembers are considered to be one of our best months - followed by October, March, April, May, June, and July...August gets hotter than you know where, November through February is just drab with rain, snow, and more rain and snow.
So, please consider the invitation wide open -- or at least know you are loved and adored in the Pacific Northwest. (Psst...I've never met Kelly S, but I can tell a kindred spirit when I see her post on a blog I've been addicted to from the first read. Kelly - if Karen is unable to make the trip here, I'll meet with you and walk you through some of her posts. Together we can get you together -- you rock!)
Pam
Hi Karen,
I love, love, love you blog.
I have been making my own yogurt for years - learned from some Indian (Sikhs) of mine. Really, you don't need a thermometer. Once the milk has cooled down, stick a clean finger in and if you can hold it there without burning, it's ready to add culture. I have found I don't need much active culture either. Just a spoonful.
Stick an iron skillet in the oven and pre-heat to 175 degrees for about 5 minutes and then turn off. If it feels to hot, leave door open for a minute. I wrap the jar of yogurt with a kitchen towel and put in the iron skillet. Turn the light on in the oven and leave for about 8 hours or overnight. (I sometimes add dried milk to the heated milk to make a bit more substantial.) Also, if you happen to let the milk boil, no problems. It just makes thicker yogurt. Just do not add the culture until it cools down.
I make smoothies all summer with mine. I get awful stomach aches and other intestinal problems when I drink milk so yogurt it is for me.
You can make the French creme fraiche the very same way using whole cream. It's wonderful. And, if yo don't have any good yogurt for you culture, you can use buttermilk or sour cream. Who knew?
Pam
Karen
Pam - Good to know about the sour cream! I always have that. I try to do tutorials with exact instructions. "Stick your finger in until it doesn't hurt" might not go over well with people new to this, LOL. Although you're right. Once you get the hang of it you don't need a thermometer. ~ karen!
Liz
I was out of yogurt so I used some cultured sour cream as a starter for my vanilla yogurt. I've never had yogurt turn out this way. Not sour or tart at all but, nice and thick. I used whole milk, sugar and vanilla. It's like custard. What should I call this? My husband insists that it's not yogurt.
Liz
Nathalie
Hey Karen,
I'll be attempting this this weekend. Do you think I can use a slow cooker for this?
Karen
Nathalie - You can as long as your slow cooker doesn't get too hot. That's the trouble I had with my oven. Couldn't get it cool enough. The slow cooker needs to hold it at 115. So put some water or something in there to test it out to make sure that's the temp. you're holding it at. Anywhere from 110 to 120 and you'd be fine I imagine. ~ karen!
Nathalie
Thanks Karen!
Kel
Did I read that right? You're making yogurt from yogurt? ;)
Carol
Yeah, that's what confusing me. I have to buy yogurt to make yogurt? Why don'y I just eat the yougurt I buy and spend all that time and effort doing something else?
Karen
Carol - Because you buy the yogourt once and then you never buy it again. ~ karen
Alisha
Just buy one little individual to-go cup of plain yogurt and you're set. Like Karen said in her post ... retain two tablespoons of yogurt from each batch you make to start your next batch.
A friend recentlly brought me organic honey yogurt from a farm in the States that left the whey on top. It was AMAZING. It created a nice firm crust on top that was sweeter and more honey flavored than the rest of it. I might try leaving it on with this recipe. I'm pumped to make it! I spend a fortune on yogurt. It's depressing.
Bonnie
It does for me. Helpful hint -- set a timer. I've forgotten it in the freezer over night. Freezing changes the texture a bit, but it was still edible and not noticeable in smoothies. I also incubate for up to 24 hours which I find thickens it further (also eats up all the lactose effectively making lactose free yogurt!). But really the long incubation time its so I can make it at night after the short people (my kids) go to bed and then finish it up the next night after they go to bed.
Bonnie
Another tip from a lazy yogurt maker. Put the milk directly into clean mason jars. Then heat the milk to temperature in a boiling water bath -- like when canning. Boil the lids at the same time. No pot to clean, lids and jars sterile and you can use the boiling water in the cooler to keep the yogurt warm while incubating (personally I prefer the heating pad approach). Also, after incubation put the jars in the freezer for about an hour, the whey separates out and you can pour it right off the top.
Karen
Bonnie - I'm gonna try the freezer thing next time. This'll create a thicker yogurt, like straining it, right? ~ k
Nancy Blue Moon
Yoghourt..no matter how you spell it or make it is a good thing except I can't seem to find a Greek yoghourt that I like..it just tastes odd to me???
adrienne
Try it with toasted walnuts and a drizzle of honey. Heavenly.
Cathy G
Can't wait to try this, but I think I've seen the word 'yogurt' so many times it has lost all meaning.............