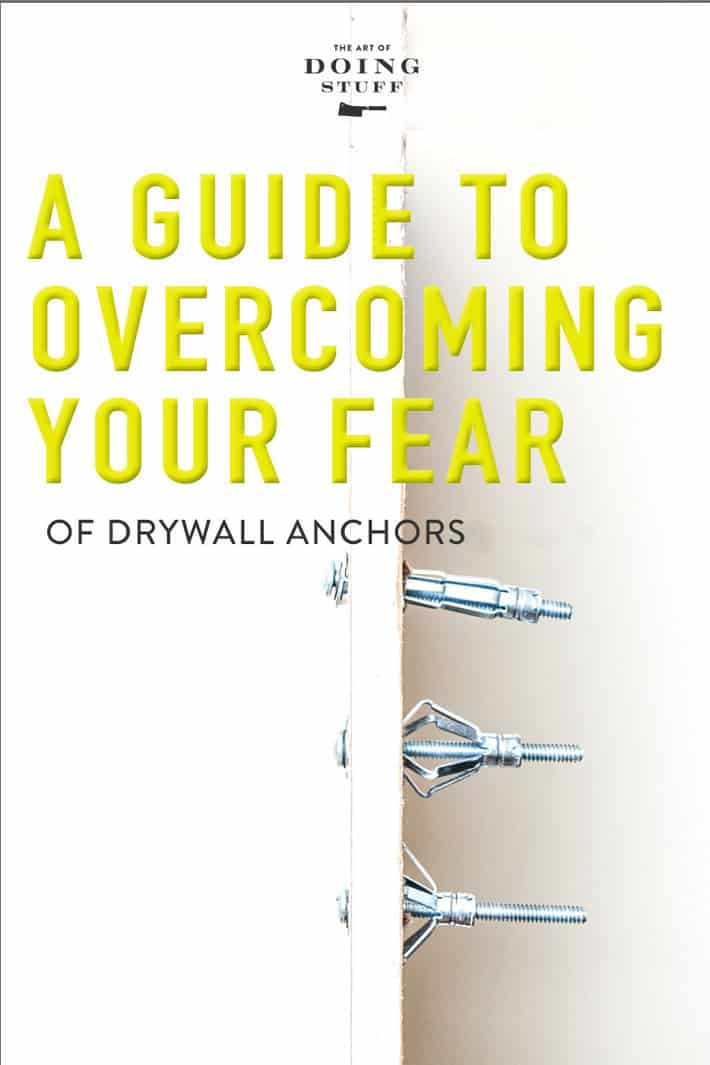
If you're insanely lucky, you'll have a stud in your wall exactly where you want to hang something heavy. For the other 99% of the time, you're going to need to use a drywall anchor to hang that thing on the wall. (That's a sheetrock anchor for the American folks out there.)

I know. The drywall anchor! It's a big, scary looking thing but once I explain it, it'll be about as scary as a chocolate covered cotton ball. I'll be calling it a drywall anchor through this post by the way because that's what it's called in my area in Canada. You might refer to it as sheetrock and a sheetrock anchor, but it's the same thing.
We've all been there I'm sure ... hung a full sized cow on our wall only to have it fall down in the middle of the night, scaring the farts right out of the cat. It happens. But it doesn't have to.
For some reason people are under the impression that hanging things on the wall is frightening. This fear stems out of two things. The fear of filling your wall with holes (you can overcome that fear in this tutorial where I teach you how to fix nail holes in drywall), and the fear of having no idea what the hell you're doing, what the hell you're supposed to use and how the hell you're supposed to use it.
Also you hung something once before and it fell down. And it was traumatizing.
But that's only because you probably used the wrong types of drywall anchors. I bet you're using those little, brightly coloured plastic wall anchors aren't you?
It's O.K. Not knowing, making mistakes, asking questions and learning are all a part of your successful home improvement journey.
Table of Contents
Plastic Wall Anchors

I've used them too. I'll admit it. Those plastic anchors (expansion anchors) in bright colours that you hammer into the drywall. You keep screwing and screwing your screw into it and it just keeps spinning and spinning because it isn't actually grabbing onto anything. But you hang something off of it anyways because you paid for it and installed it and can't think of any other way to do it. Then your cow falls down.
It's because those plastic anchors aren't really meant for drywall. They're actually meant for solid walls like concrete. They *can* in certain circumstances be used for drywall but even the must robust plastic anchor can only hold around 10 pounds. So they're very definitely light duty and don't have a lot of holding power.
If you INSIST on using a plastic wall anchor in drywall, remember this tip.

Pull the wings out on your plastic anchor!Not all plastic anchors are going to have them, but if they do, pull them out. They'll squish back in when you hammer the anchor into the wall but they'll pop out again a bit once they're in there. They'll help (a minuscule amount) to keep the anchor from falling out of the wall.
So if plastic wall anchors are crap, what should you be using to hang your stuff on the wall?
Threaded Anchors

Threaded anchors, (also called self-drilling anchors and E-Z anchors) are the absolute easiest choice and one of the most effective. They have a point on the end so you can tap them into the drywall. Then just stick a screwdriver into them and screw them in the wall. An average sized threaded anchor can hold about 50 pounds.
But my favourite is the hollow wall anchor. Otherwise known as a Molly Bolt. It's more complicated to use than the threaded anchor but I like them better.
What is a Molly wall anchor?
Also known as the classic "Molly Bolt" or a molly wall anchor. THESE are the only drywall (sheetrock) anchors you should use. (bit of an exaggeration but honestly if you aren't sure what to go with they are the best.) How do I know they're the best? Just ask Bessie the cow.
These are my favourite anchors. Yes there are others like screw-in anchors, toggle bolts and a bunch of other things, but these Molly wall anchors are my favourites so that's why I'm talking about them and telling you to use them too.
When you buy a box of Hollow Wall Anchors there are 3 things you need to look for on the box:

What to look for in Hollow Wall Anchors
- Make sure what you're buying is indeed a Hollow Wall Anchor for drywall.
- Make sure they're the right size for your drywall. This box is good for drywall that is ⅜ths to ⅝ths thickness. (there are other Hollow Wall Anchors that are for very thin materials like hollow doors)
- Note the size of the drill bit that they recommend you use and make sure you own one!
Also make sure you own a drill. I have a couple of drills, a "vintage" electric one I found at a garage sale that's GREAT and this Ryobi cordless one, which is great when the battery actually works. If you have issues with 18V batteries suddenly not charging, read my post on how to get a seemingly dead cordless battery to take a charge.
How to use Molly Bolts To Hang Stuff on Drywall

- Mark the place on your wall where you want to hang something. Using the right sized drill bit, drill your hole. DON'T go wiggling all over the place with your drill. Hold it stead and drill straight in and pull straight out. If you wiggle you'll actually drill a larger hole.

Would you like to save this stuff?
2. Take the Hollow Wall Anchor out of the package and hammer it straight into the wall. You don't have to adjust it or fiddle with it or anything. Just whack it in there.

If you look back up at the first picture I showed you you'll see that there's tiny teeth under the flat edge of the anchor. These will grip into the outside of the drywall so make sure you hammer it in good.

3. Now you get your screwdriver and start screwing the screw in. I know it looks like it's already in (and it is) but what you're doing at this moment is creating Hollow Wall Anchor magic.

As you screw the screw in, a sort of flange is being pushed out at the back of the drywall. The more you turn the screw the tighter and tighter the flange gets. Just keep turning until you can feel some good resistance. It may take a while and you might get bored.

4. Once you've screwed it in to the point that you feel the resistance of the flange (I'm not really sure that's the right word to be using) against the back of the drywall you can start unscrewing the screw. Again. Totally boring.
I recommend doing it by hand though and not with a drill because you don't have enough control over the drill and if you screw your Hollow Wall Anchor in too tightly you could end up squishing your drywall and ruining it. Just do it by hand. Super exercise for your wrist anyway which will come in handy the next time you slap someone.
- If you're only hanging a mirror or picture then you can just pull the screw out enough to get your wire picture hanger over it.

- If you're attaching something to the wall like a bar or TV mount you might have to remove the screw entirely and then, yes, screw it back in again.
And don't worry. Undoing the screw doesn't do anything to the flange. It stays rock solid. That baby's in your wall for good now.
Seriously. To remove a hollow wall anchor you have to just hammer it into the wall and fill the hole it leaves with drywall compound. Yes. I know. That's scared you even more. Calm down. Remember? I showed you how to fix a hole in drywall. It's easy.

What are the Strongest Drywall Anchors?
If you use either the threaded anchor or the molly bolt you'll do just fine. They can easily hold 50 pounds.
If you want to hang something a very large, heavy picture or mirror these no stud picture hangers are the absolute BEST. They are hooks and specifically for hanging mirrors or heavy artwork and I've used 2 of them to hang the life sized portrait you see in this post. Each of these hooks will support 200 pounds.
You're still scared. You don't think you can do this. It seems ... scary and you're pretty sure you're never going to need to hang anything on your walls. Ever.
You say that now, but one day you'll be driving around the countryside, hit a cow by accident and need to hang it. Now you know how to do it and what to use.
Good job.
→Follow me on Instagram where I often make a fool of myself←


Denise
I sit on my potty and look at the holes left in my sheetrock from a failed towel rack attempt. I live in a very old house with shiplap walls so I'm not accustomed to nails not holding. This particular wall is the result of a remodel. Just Saturday, I started looking for the proper wall anchor. Yea for you and your post. I'm trying it today.
Lisa
and..... to remove them, take an old screwdriver and a hammer and punch it through the wall. Let it fall down behind the wall - there is no way to reuse them.
Now you have a hole the size of a dime that you have to patch, but I think Karen did a DIY on that already.... right?
Also, there's a little stabilizer hook thingy that is in that package. When you're trying to get it started expanding, sometimes it spins around until it catches. There's a little weird hook thing in there that enables you to hold the anchor in place until it gets going.
christine hilton
Were you in Children Of The Corn?
Sally
I don't wanna post jack you, post block you, or whatever term should be used, but if you are looking to hang something less heavy duty, the even lazier route are monkey hooks, they are amazing! I use them all over my house, well technically only on the inside walls since you can puncture a houses vapour barrier using them on outside walls. all you do is poke it in the wall and they hold up to 25lbs per hook, the heavier duty ones hold more. I even have my bathroom mirror hung up on these bad boys after it fell down off those cheap plastic anchors, and miraculously didn't break. So worth checking out!
http://amzn.to/1kZtv3B
Cred
Wow, those look great. I'd thought I'd tried every type of wall anchor available but I'd never heard of monkey clips. Gotta see if I can find them around her.
Jennie Lee
In the U.S. the brand of hooks you describe which was marketed on TV is Hercules Hooks. For some things, yes, they're great.
SunGold
They're available in Canada at (everybody's dream story) Lee Valley Tools http://www.leevalley.com/en/hardware/page.aspx?p=52367&cat=3,40914,50630,52367
Karol
Yay! I actually know what a Molly bolt is and how to use it! ... and have installed them in multiple houses. We have moved a lot (18 addresses before this one) and I have a large, heavy mirror that needs the strength of a Molly bolt to stay securely in place.
Nice tutorial, you little blue eyed thing, you!
Sandra Lea
How do I know how thick my drywall is so that I get the right size?
Jennie Lee
I wondered about that, myself, once. Next time you have a hole drilled in your wall, take a flashlight and look inside it. If it's a neatly drilled hole, you can see how thick the drywall is. Be aware that sometimes your exterior walls have thicker drywall than your interior walls.
Karen
Excellent question! For me it was easy because I had a hole in my closet behind the wall I was drilling into. I could literally just stick a measuring tape into the hole and measure it. And that's what some people will have to do. Drill a hole in their drywall so they can see and measure the thickness. BUT if your house was built a few decades ago the standard drywall thickness then was 3/8ths of an inch. Homes built recently would have 1/2" thickness. These bolts are good for a range of drywall thicknesses so as long as you get a bolt that has a reasonable range you should be O.K. Another way to tell the drywall thickness is to pop off a piece of baseboard and see if you can get a measurement of the drywall from there. Your drywall won't go all the way to the flooring so you should be able to stick a tape in there to measure. ~ karen!
Cindy
I have an old house that wasn't always an actual house with drywall over plaster and have just been "creatively" hanging things at stud points. Any ideas for how I can hang things wherever I want?
Also, I use neodymium magnets to locate studs which is awesome. I attach magnets to all of the screws, top to bottom, then drop a weighted line down the center to split all of the differences so I can hit the center of the stud, which is fun and pretty handy but I'd really like to be able to hang things wherever I want. Any ideas?
Brook
Excellent! That will be great for the basement. Do you have any suggestions for hanging livestock on plaster walls? My poor walls are completely bare.
Karen
I do. I'll do a post on hanging things on plaster or brick in the future. ~ karen!
Brook
Whoohoo! Looking forward to it.
In the meantime, I'm choosing to view my naked white walls as Scandinavian serene. And to hang light artwork on doors using clipped-off wreath hangers.
I just don't want to relive the horror of a massive chunk of wall crumbling into the living room. On the up side, though, I was able to confirm that ancient New England plaster really did have horse hair in it. My current house is only 75 years old, but after that experience, I've been too nervous to try it again.
Nancy Blue Moon
Oh yeah...brick...brick please...I need to know how to hang things on brick!!!!
Shauna
Thank. Like. Thumbs Up. I have lathe and plaster. There is always a lot of cussing when hanging things on our walls.
Shannon
Oh yes please, for those of us who have 100-year-old plaster and lathe walls. I have used some similar anchors to what you show here (and the cheap crappy ones for light things) but sometimes I'm afraid the whole wall will come crumbling down when I least expect it.
whitequeen96
Ahhh, now I get it! Thank you, Karen. You wouldn't how many sleepless nights I've spent pondering this mystery! ;)
MaggieB
Just want to say - Lurve this community. How do you work out the weight limit for hanging assorted bovine and porcine beasties? Our problem here are wild boar - which always gets me humming Duran Duran - oh well. Looking forward to Wednesday.
Karen
Oh geez. It's really a bit of a guessing game once you get into wild boar. They're feisty. ~ karen!
Christina
To remove the molly bolt, you don't need to hammer the entire thing into the wall. You can remove the metal lip with a pair of pliers, and THEN you can push the rest of the bolt into the wall (to live forever with the dust bunnies). https://www.youtube.com/watch?v=foO5NM4pmsU
Karen
I watched the video Christina and I kept thinking ... But why? Why go to the bother of removing the disk if you're just going to push it in anyway? Then I realized that this way the whole anchor would fall down the wall and disappear forever allowing you to fill the entire void in with drywall compound. If you don't care about getting rid of the entire anchor then doing what I say and just tapping the bolt into the wall a tiny bit and filling with drywall compound is fine and faster. But if you want to get rid of the whole thing for some reason, this is a good way to go. ~ karen!
Teri
Oh NO! You don't DARE do this to me when I am already fatally insomniacly tired from an epic multi-Gulf-Island Ferry hopping wind-and-rain-storm infused 3-hour tour that turned into a 12-hour event just to get to my son's wedding. A joyous event (although slightly grayed by #1 son's seasick siblings and really poor holiday rental beds). 3 nights of bad beds and never slowing minds, including incredible joy and increasingly painful sleeplessness, I arrive home to read this:
"I hope you paid attention to all of this because tomorrow I’m going to show you something you’re going to need this little Hollow Wall Technique for a DIY I’m posting about on Wednesday.
A DIY that one year ago saved my life."
GREAT, you. make me lie in bed imagining all kinds of drywall and hanging disasters. Guess it beats lying in a very old rental accommodation bed cursing the springs and worrying about my new daughter's mother... but still.... REALLY?
Now, I know that you aren't old enough to be familiar with Saturday morning movie cliffhangers (I'm not old enough, either). However, my 85-year-old mom has told me stories. Clearly, you have missed your vocational calling...
I shall now attempt to sleep until Wednesday
Karen
Teri! Teri! Wake up! Are you awake?! WAKEEEE UPPPP! See you on Wednesday. :) Also nothing says festive occasion like sea sickness. And I know. I once spent Christmas on a cruise. ~ karen!
Julia (mumo3kids)
Did you know that drywall/sheetrock is called plasterboard in the UK? I sometimes fantasise that I move to Canada or the US, but then have a lot of trouble doing any diy because of the language barrier...
Karen
Well, you're best moving to Canada if you have the choice. You stand a much better chance of winning spelling bees here. ~ karen!
MissChris from SA
Aha, now I know how to use those megafties - thank you!!!
Irene
Haha, MissChris! :-D
Only a fellow South African knows what you're talking about; you may as well have said "Those dingetjies". :-P
Agnes
Thanks Karen, now I know what to put on my Christmas list! :)
Rick Bradley
Whenever I hang a cow I use the hollow wall anchors. For lesser tasks the Nylon Phillips Drive Drywall Anchors are quite reliable.
Jan in Waterdown
Hmmm . . . any idea why some of your pics are teeny tiny and others are huge? The tiny ones are like thumbnails and the huge ones are, well, pretty big. Also the titles in bold print are stretched out horizontally. Weird.
Jan in Waterdown
Ok well that was even weirder . . . the second I posted my comment above, everything was ok, although some of the print still looks a little stretched out. Maybe I should just have another Jack Daniels or go to bed or both.
Karen
Um. No. NO idea actually, lol. What are you reading on? Phone? Tablet? Vertically? Horizontally? I assume it has something to do with "responsive". ~ karen!
Jan in Waterdown
iPad mini, horizontally . . . husband claims I am the only person who uses it horizontally. I don't have a smart phone or want one, I proudly use a "vintage" flip phone. Guess that makes me an old gal, apparently lol. Btw, what do you mean by "responsive"?
Patt
I know it's a learning curve but in deference to those of us over 55 can you please lighten or enlarge your text on your new site! I can barely read it.
Sherry in Alaska
To enlarge the text in any post: Use Control Plus...... Simply press the ctrl and + keys at the same time. You can do this until the text is the size you want and when you want to go smaller, use ctrl and - keys simultaneously.
whitequeen96
Wow! It worked like magic! Thank you for such a great tip - I'll have to tell all my friends!
Sherry in Alaska
Yay! Glad to help.
Karen
Thanks Sherry! The way things are with a post having to look different on so many different types of screens it's *really* hard to get it to look really great on all of them. There's always going to be a bit of an issue with one of the devices. ~ karen!
Sheryl Powell
Well, why did no one ever tell me that before? Forget DIY stuff how about more DIY my stupid computer stuff?
Karen
Hi Patt! Because the text has to work on 3 different types of screens nowadays (phone, tablet, laptop) it's difficult to get a size that works for every scenario. You should be able to adjust the settings on your monitor/phone to increase the size of the font you see. Hopefully! ~ karen
TucsonPatty
Thank you, thank you! I've always tried those stupid little plastic thingys and they don't work!! I will be looking formthese things at Ace next time I'm in there.
Hey, I just went to thw auto parts store and bought new bulbs for my rear window brake light and replaced them. I feel like a fricking genius! It's the little things, yeah?
Karen
It ain't that hard, any of it. ;) ~ karen!
Judy D.
Thanks so much for explaining how to use these anchors. They've always seemed really confusing to me because I had no clue what was happening 'behind' the wall. Your pictures made it so easy to understand. Now I can get started hanging up all the crap I've stored in my guestroom closet. :-) ~ ~ Judy D.
Karen
You're welcome Judy D. I figured a photo like that would help people. ~ karen!
Paula
I concur - they are the best. Haven't lost a pic yet...