You're going to learn how to make a lazy susan today. These spinning circles of efficiency are a quick & easy DIY project.

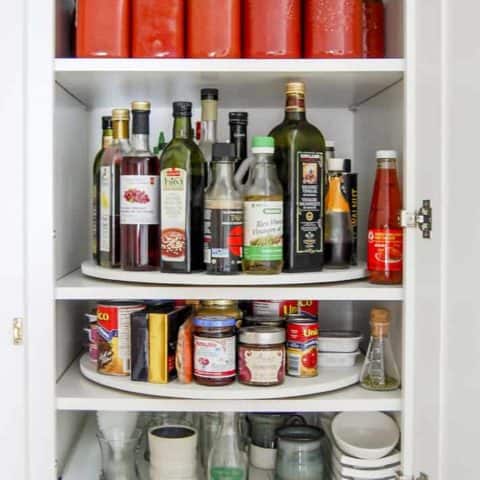
If you're on the hunt for a large, good quality Lazy Susan you're out of luck. There are no sturdy Susans, lazy or otherwise to be found anywhere.
There are a few small wood (16" or less) models around that you might use on a countertop but nothing for big cabinets.
When I first redid my kitchen done I didn't get ANY of the extras. You know, all those nice things that make your drawers and cupboards so nice? Yeah, I didn't splurge on any of those. So the first thing I did when my kitchen was made over was make some Lazy Susans for my cabinets.
They're incredibly easy & affordable to make.
Make this big DIY Lazy Susan for $8 out of wood or MDF and a bit of hardware.
This is a very informative post with step-by-step instructions. It is also all kinds of boring.
If you'd like to be entertained today, might I suggest throwing rubber snakes at your neighbours.
Onto the information!
Table of Contents
DIY Lazy Susan
BASIC STEPS
1. Measure the width & depth of cabinet.
2. Paint & Prime
3. Screw in lazy susan mechanism
Easy, right?
Materials & Tools Needed
- ½" sheet of MDF ($8.50)
- Lazy Susan hardware ($4-$9)
- 8 screws
- Paint
- Jigsaw
- Drill
Steps
- Measure your cabinet's width & depth. Draw a circle on the MDF. Make sure your lazy susan circle is slightly smaller than the width/depth of the cabinet. You just need a bit of wiggle room to ensure your lazy susan doesn't hit the sides of the cabinet when you spin it.

- Using a jigsaw cut the circle out.

TIP
I've tested a LOT of jigsaws. This Bosch jigsaw is the one I love and use myself.
It's steady, more stable & turns with precision.
- Prime & paint what will be the top of your lazy susan. You can leave the bottom unfinished.
- Working on the underside, find the centre of the circle and mark it.
- Place the lazy susan bearing over the centre and screw the portion that touches the bottom of the lazy susan into place.

- Align the top part of the mechanism so the large circle is over the MDF. Mark the MDF with a pencil in that spot (like you see in the photo above.)
- Drill a hole through the MDF where you marked it. The hole needs to be large enough to fit a screwdriver head through.

- Place your lazy susan wherever it is you want to put it - probably inside a cabinet.
- Rotate the lazy susan until the large hole is directly over one of the screw holes on the mechanism plate. Drop a screw in and then screw it into the cabinet shelf. Repeat until all 4 screws are screwed in and the lazy susan is secured.

You're done.

Lazy Susan Hardware
There are two types of Lazy Susan bearings (hardware).
Round bearings Generally speaking the round ones are more expensive and bigger. They'll be more stable, especially if you decide you'd rather not screw the lazy susan into your cabinet. They're also a better choice for a stand alone unit for your counter or tabletop.
Square bearings You can get away with the smaller, square hardware for 95% of your Lazy Susan needs. These are what you would use when making a lazy susan for a cabinet.
How to Make a Lazy Susan
Aside from the money savings, making your own lazy susan gives you the advantage of being able to make it the exact size you want.
Materials
- ½" sheet of MDF ($8.50)
- Lazy Susan hardware ($4-$9)
- 8 screws
- Paint
Tools
- Jigsaw
- Drill
Instructions
- Mark a circle on your MDF with pencil.
- Cut the circle out with a jigsaw.
- Prime and paint what will be the top portion of the Lazy Susan.
- Flip the circle over so you're working on the underside and find the centre. Mark it.
- Place your Lazy Susan hardware over the centre mark and screw it into place. You will be screwing only the part of the hardware that is in direct contact with the circle of MDF.
- Find the large circle on the hardware and mark it on the board underneath with a pencil. Drill a hole big enough for your screwdriver's head to fit through.
- Flip your Lazy Susan so it is right side up and place it where you want it to go (probably on a shelf.)
- Turn the Lazy Susan until your screwdriver access hole aligns with a hole on the hardware. Screw in a screw. Repeat this for all 4 screwing points on the hardware.
- You're done!
Notes
Circular lazy susan hardware is very similar and installed in a similar way.
1, 2x4 sheet of MDF will get you 2, 22" Lazy Susans.
Cost per Lazy Susan will be apx. $8 each.
Recommended Products
I'm an Amazon affiliate some I get a few cents when you buy something I've linked to.


And that's all there is to it. I made 7 of these for my kitchen. The cost of each will be slightly less than $8 for you if you make smaller Lazy Susans.
To any Susans who are upset that their name is associated with laziness - just be happy your name isn't Karen.
→Follow me on Instagram where I often make a fool of myself←


Hate the name ‘lazy susan’. Such a slur on all of us ....Susans.....
I would take it as a compliment. To me it implies most Susans are industrious, so it must be specified when one is lazy since it’s such a rarity ;-)
Fellow Susan, I not only agree with you that Lazy Susan is an offensive disparagement, but I also was on my way to the comments to say the exactly that when I saw you had the same reaction. I typically insist that my associates refer to these devices as TURNTABLES. Because that’s what they are. In my experience there is no such thing as a Susan who is lazy. And I appreciate Maria’s comment about Susans being industrious and all, but...TURNTABLE!
Also: considering their functionality and space-saving prowess, these should be called "Efficient Susans!"
Sincerely,
Another Susan
I appreciate your intent- but if we all said " lazy Marias" would you feel the same after a lifetime of hearing that expression and the chuckles that come with it?
love it!
I do believe that I shall now call them “Efficient Susans.” Thank you!
No discussion on centering. What’s a good way to center the Susan on the wood.
To center, just measure halfway across the circle in one direction, then again at 90 degrees. Do three at roughly 1/3 around if you want to make sure. Same for the cabinet.
Can you make a 2 tier lazy susan?
Hi June. Sure. I'd have to think about it for a bit, but basically you would have to run a dowel up the through the centre of two circles like a cake stand, or to make it sturdier and the top tier less wobbly, you'd use 4 dowels cut to equal lengths (6" or so), placing them in between the two Lazy Susan circles. Then just proceed as per my instructions for a single Lazy Susan. ~ karen!
I am definitely going to make at least one of these for my new pantry. Thank you for the instructions. But, how do you have a solution to keep the items from sliding off as the Lazy Susan is turned? I can see someone(kids ;-) ) spinning it too fast and things flying off.
I used to have a vague idea of how to make a Lazy Susan.
Now I know EXACTLY' how to do this!
Thank you so much Karen for your 'explicit' instructions - just what I needed.
(Love the tone of your blog and your respondents answers)
Shirley
Hi Shirley. Welcome to my site. :) ~ karen!
I'll be back!
Karen:
In your research on designing a lazy susan, did you come across any recommendations about load distribution for a larger circular platform? For instance, I am designing a 36" lazy susan for a telescope chair that will be designed to hold up to 1000 lbs. I assume that it would be best to use a lazy susan bearing that is near the outer edge, lets say at 30", and another one nearer the center, lets say a 12" lazy susan bearing. I was just wondering if you had come across any recommendations or rules of thumb on designing for weight bearing/weight distribution for larger devices?
Thanks,
Leo
your instructions are great but I tried to print instructions, some of the pictures do not fit even on an 11x17 page when I copied from your site. I tried to print directly from your site and because some pictures are grouped as ONE picture, they still don't fit on a page and I can't see ALL the pics. Unfortunately, I do NOT have a computer outside to refer to as I'm cutting and that's why I needed to print out instructions. Guess i'll have to pass on using your instructions to make my lazy susans. Just thought I'd let you know so that in the future, you might not want to group several pics into one when posting. The first couple of pics are separate pics.
Unfortunately it's a website Monya, not a pamphlet. So no, my pages aren't meant to be printed like that. In order for photos to fit on the screen in a certain manner they have to be fit together as "one" photo. ~ karen
I'm considering making an 18 inch lazy susan.. thanks for the great instruction.. my problem is that my pantry has wire shelves.. Home depot Rubbermaid pantry system... do you have any suggestions for mounting a lazy susan to a wire shelf... thanks
Caren
Hi Caren. A lazy susan doesn't necessarily have to be mounted. A few of mine aren't screwed into the shelves below. This works when whatever is on them is fairly heavy to keep the lazy susan from moving around. If I were you I'd probably put a thin board (painted) on top of your wire shelf and set your lazy susan on it. You can try to set it on the wire shelf with a rubber mat underneath to keep it from sliding around as well. ~ karen!
How about small zip ties? That *might* work??
THANK YOU!!! I just spent over an hour reading and watching instructions and finally someone speaks my language! You are my hero (not like the sandwich). I'm fixing a 3 tier lazy susan in a corner. It's huge and wasn't finished correctly (you coulda taught'em a thing or two). I think if I make a lazy susan like you did and attach the 3 tier to that, I won't have to take the counters off to get to it. That probably doesn't make sense to you. But real sincere-like.. Thank you!
I have a pantry with fixed shelves across back and on one side. Back shelf is 11" deep and side one is about 8" How large of a lazy susan can I install in those corners?
Hi patsy. It depends on whether you're comfortable with the lazy susan hanging over the edge or not. Personally I'd put it on the back shelf and wouldn't make the lazy susan any bigger than 14" across. And in that case, you may be able to find ones to buy. It's the larger lazy susans that are difficult to find. ~ karen!
Hi, Karen! What is your MDF sitting on when you jigsaw it? I got all excited and bought a jigsaw, but now I can't figure out how to cut anything without cutting my workbench too.
Hi Dana. You just have to find one or two surfaces you can clamp your board to. If I'm jigsawing anything, I usually lay my material between the corner of my workbench and clamp it there. Make sure you clamp your wood or MDF so both your hands are free, and the wood/MDF is completely secure. ~ karen!
Aye Lady Karen, Lee Valley DOES post the weight limits of their Lazy Susans.
Size Load Capacity Turntable Diameter
3" 200 lb up to 18"
4" 300 lb 12" to 25"
6" 500 lb 15" to 30"
9" 750 lb 18" to 36"
12" 1000 lb 20"+
This graph/picture/scale/??? provided compliment of :
http://www.leevalley.com/US/wood/page.aspx?p=44042&cat=1,250,43298,43316
TY Lady Karen for taking the time to answer my Q's.
GOD Bless
I love it!!
Madam you have out done yourself!
Q:
So how much weight will these hold?
I would love to build one for my tv .....and it weighs about 50 to 60 pounds(museum piece for a tv)....
Would I need a lazy Susan bigger than 12 inches??
Hi Capernius. It is I. The amazing Karen. The lazy susans hold a lot of weight, but I'm not sure how much. My guess would be definitely enough for a television. If you go to the link for Lee Valley in the post my guess is it will tell you what weight they can bear. And just buy the largest Lazy Susan mechanism you can. I think it should work out just fine. ~ karen! p.s. I had an archaic television until about a year and a half ago as well.
TY Ms.Karen for the quick response.
You have saved me a TON of Money & I have yet to purchase anything! LOL
TY again, & GOD bless.
An access hole! Brilliant!
So much easier than catching some carpenter bees (they have skills... and toolbelts...) and training them to install those screws!
What is MDF?
Hi Kristin - MDF is Medium Density Fibreboard. It's not wood and it's not particle board. A lot of mouldings etc. are made out of it. ~ karen!
I won a lazy Susan in a raffle. I looked it up on amazon and the thing was almost $90 US. It is hickory and vert nice but not worth $90. These are just as good, just as useful. Nice instructions. Are you tempted to stand on them and spin around?
Ok you need a proof reader....attack and shold??? Just saying...you must have been really sleepy...
I found a rubber snake on the housing to my ceiling fan the first time I cleaned it after I moved into my farmhouse. Someone was verrwy verrwy bad.
And, months later, found a real one in my bedroom. Had I not trapped it in a mesh wastebasket, skidded it along the wood floors and kicked his very long ass out the front door, I would have had to move.
Were you a teacher in a previous life? Your instructions and pictures are so clear and easy to follow that I'm going to make one this weekend since you made it look so easy! Thanks for this great DIY.
LOL. Not that I know of. That's funny because looking back on the post I thought ... NO ONE is ever going to be able to follow this, lol. It'll all make sense once you start to do it. Although it sounds like you'll be fine. ;) ~ karen!
If anyone throws a plastic snake at me it's your fault. I will not forget that fact.
I hope you don't because I want to make sure I'm the first one you email and tell about it! ~ karen