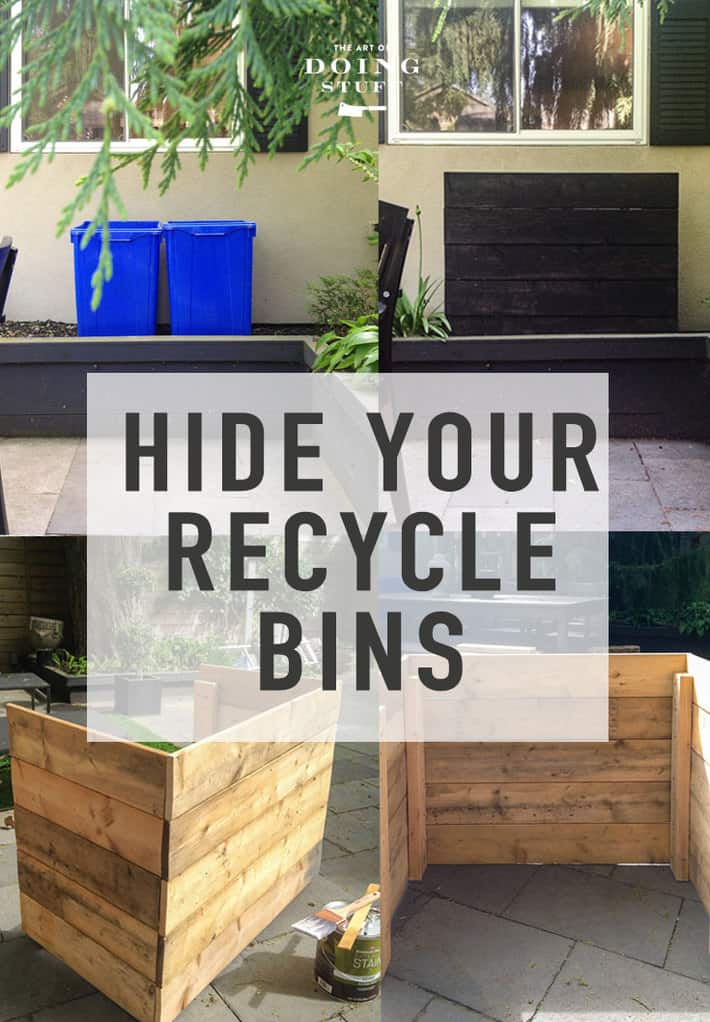
How to quickly DIY a wood cover for your recycle bins to hide them. Because the only boxes that should be blue come from Tiffany.
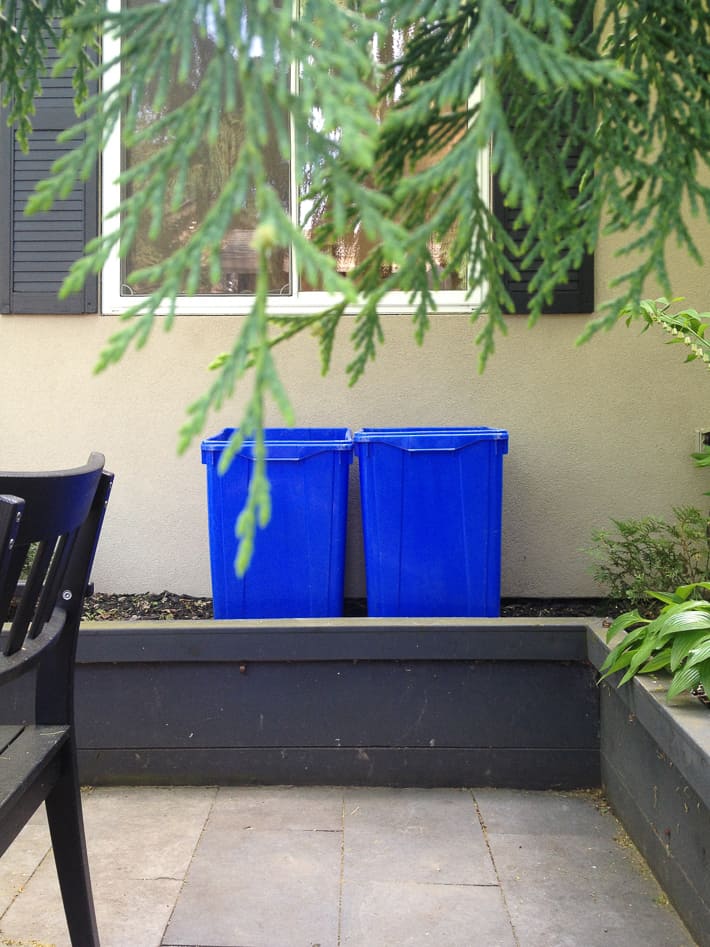
About a decade ago I started to put my recycle bins right outside my kitchen window. I did this because a) I am smart and b) I am lazy.
All winter long I can just open up my kitchen window and throw my recyclables into their appropriate bin without having to trudge through the backyard in the middle of an ice storm. This was fine in the winter because I was never hanging out in the backyard to see the ugly blue bins.
Come summertime I'd have to drag the recycle bins away from the window to a less visible, less convenient part of the yard because I didn't want big ugly blue recycle bins right out there in the open looking like their ugly selves.
So I created a bin cozy. An easy wood cover that just slips around my blue bins.
DIY Recycle Bin Cover
I'm not giving you measurements or anything for this project because chances are your recycle bins are a different size. For instance I have the super-tall, generally massive recycle bins. Standard ones are smaller.
I built this bin cover one morning while I was waiting for a friend to come over. I didn't even plan on building it. I was walking around the backyard and realized I probably had everything I needed to build the bin cover using the leftover materials from my chicken coop.
Again, you don't need to use the same materials I've used. Use whatever you have or whatever you can steal. From a neighbour. That you don't like. Under cover of darkness and drink.
Materials
4 lengths of 2x4s
several lengths of 1x6's or any other flat, fencing type wood.
Wood screws
Drill
Instructions
- Measure the width and height of your recycle bin. If you have 2, measure them side by side.
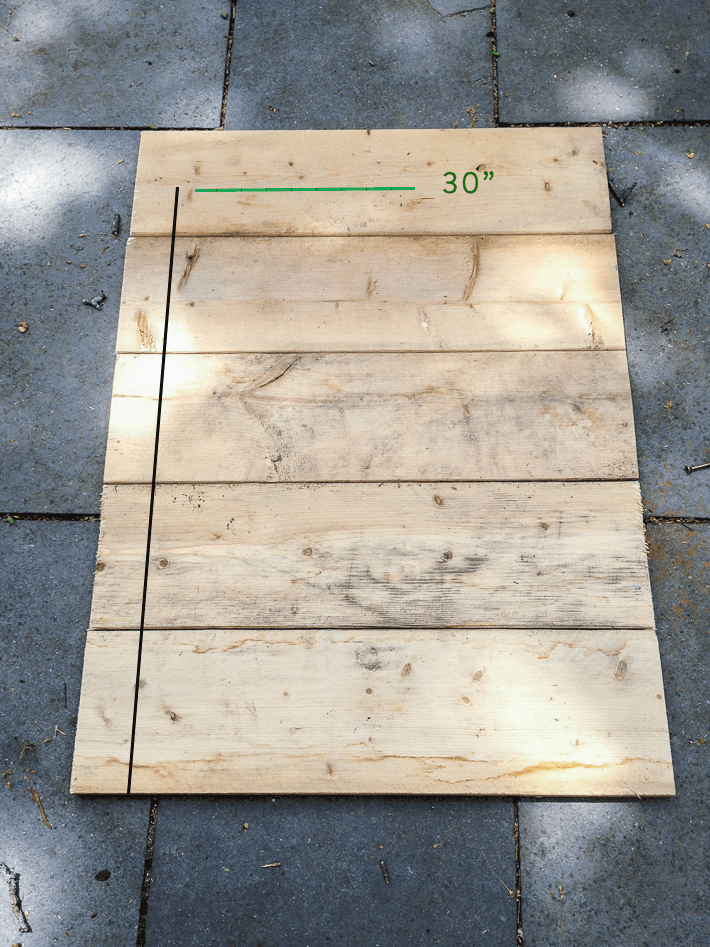
- FOR THE FRONT OF THE COVER: Cut the length of your fence boards so they are at least 6" wider than the width of your bins. (If your recycle bin(s) measure 30" wide, cut your fence boards to 36" wide. FOR THE SIDES OF THE COVER: Cut the length of your fence boards so they are at least 4" longer than the depth of your bins. (If your recycle bin measures 15" deep, cut your boards to 18" long. ) ** always measure the widest part of the bin (the top) **
3. Lay the fencing for the sides of the cover on the ground. Measure from the bottom board to the middle of the top board. Cut 4, 2x4's to this length.
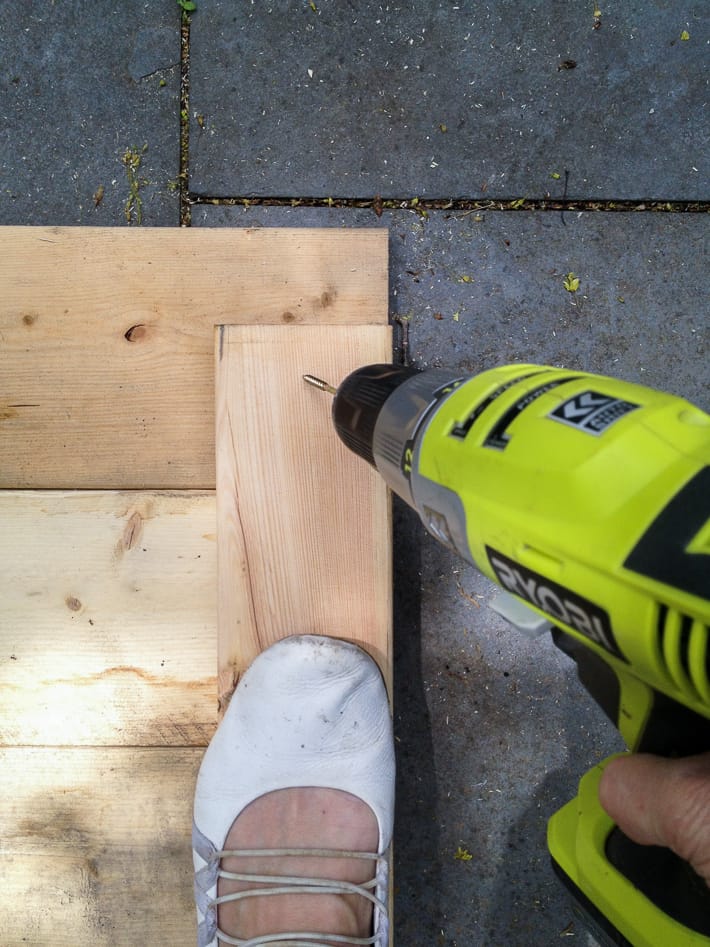
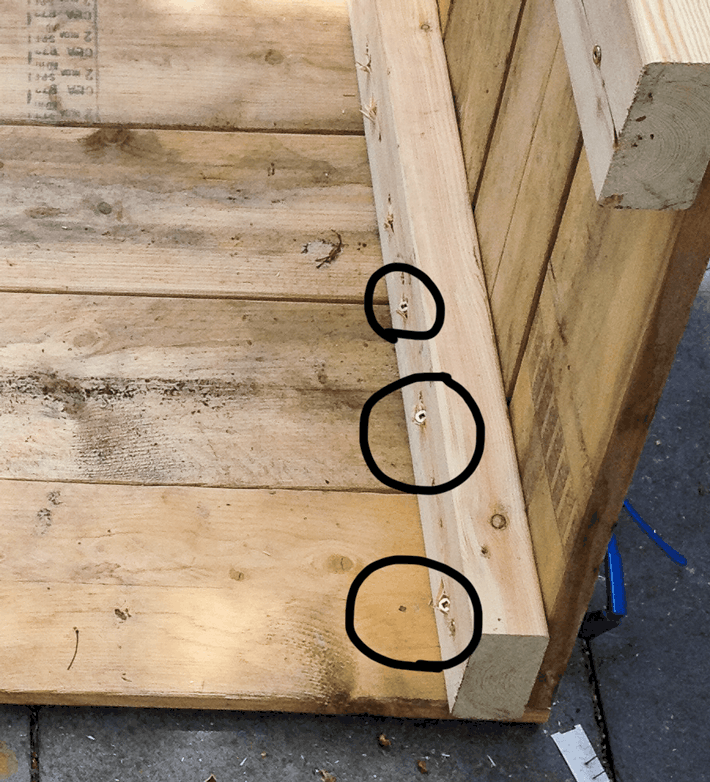
4. Lay your cut 2x4s on top of your fencing and screw into place. Always pre-drill your screw holes.

Drill into every board.
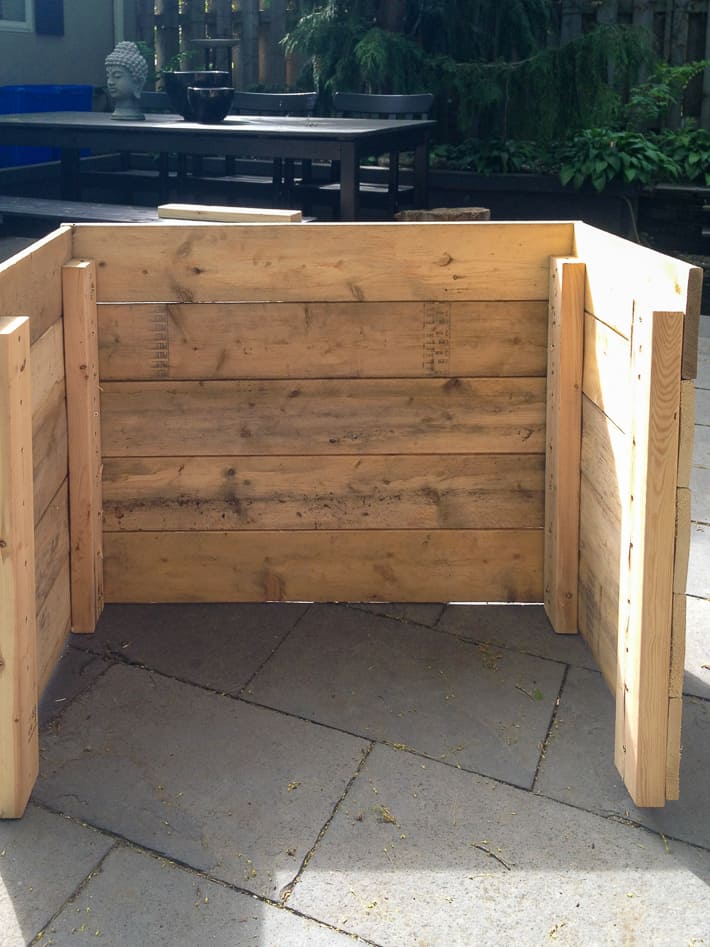
5. Repeat these steps for the other side of the cover. Once you have assembled and screwed together your two side pieces you need to attach them to the front fencing pieces.
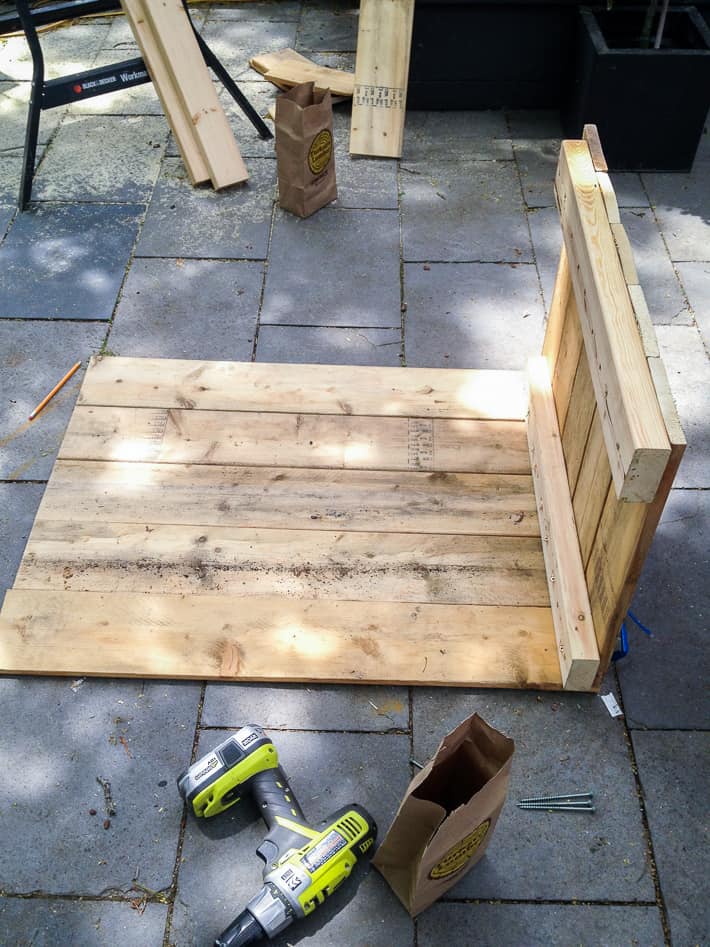
6. Like with the side pieces, just lay your front fencing pieces on the ground. Place one of your completed sides on the front fencing pieces and screw them together by drilling through the 2x4 on the side, into each of the front boards. Do the same on the other side. Pre-drill through the 2x4s at an angle into the front boards like you see in the photo below.
7. Stand everything up because you're done. You now have a slightly wobbly box. If you really want to you can brace the corners and run a 2x4 along the bottom and top of the open end. I didn't want to, so I didn't.
I knew that once the bin cover was in place I wouldn't be moving it so I didn't need to worry about it wiggling apart over the years. If the unstained wood suits your backyard then by all means, leave it as is. If not, then now's the time to stain.
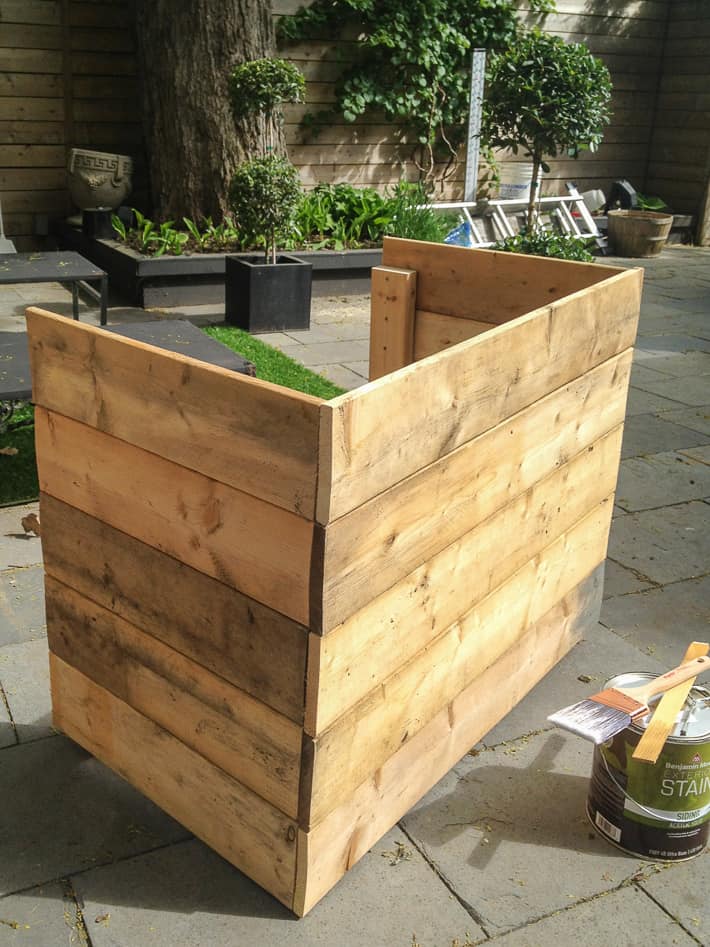
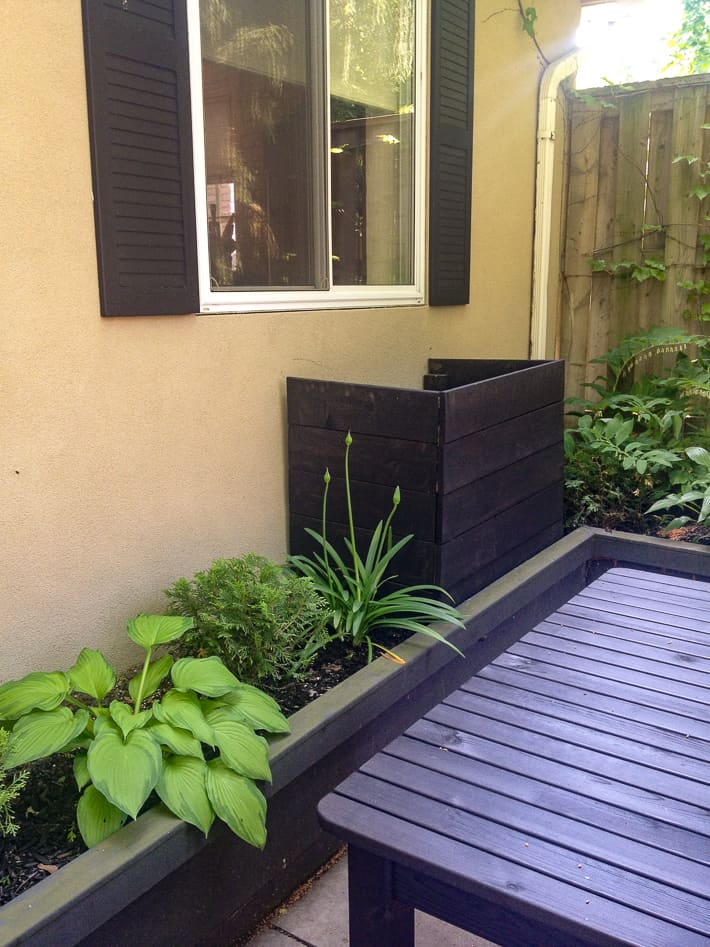
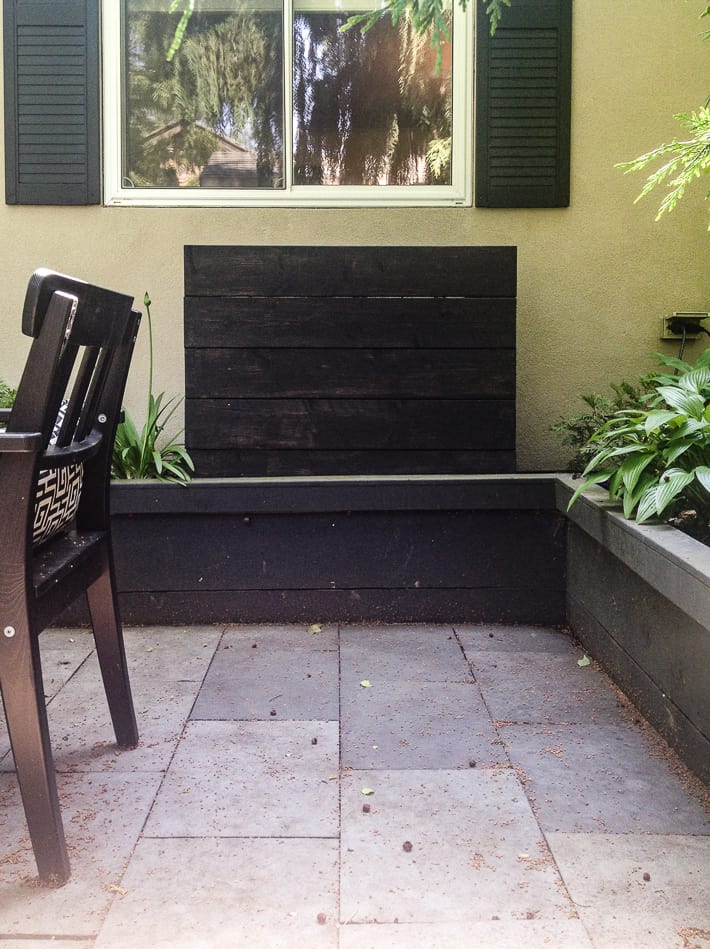
Now that your bin cover is stained you just need to slip it into place. (I realize it looks like I splashed paint all over my recycle bin, but I didn't. Well, I did, but that was during a long ago project, not this one)
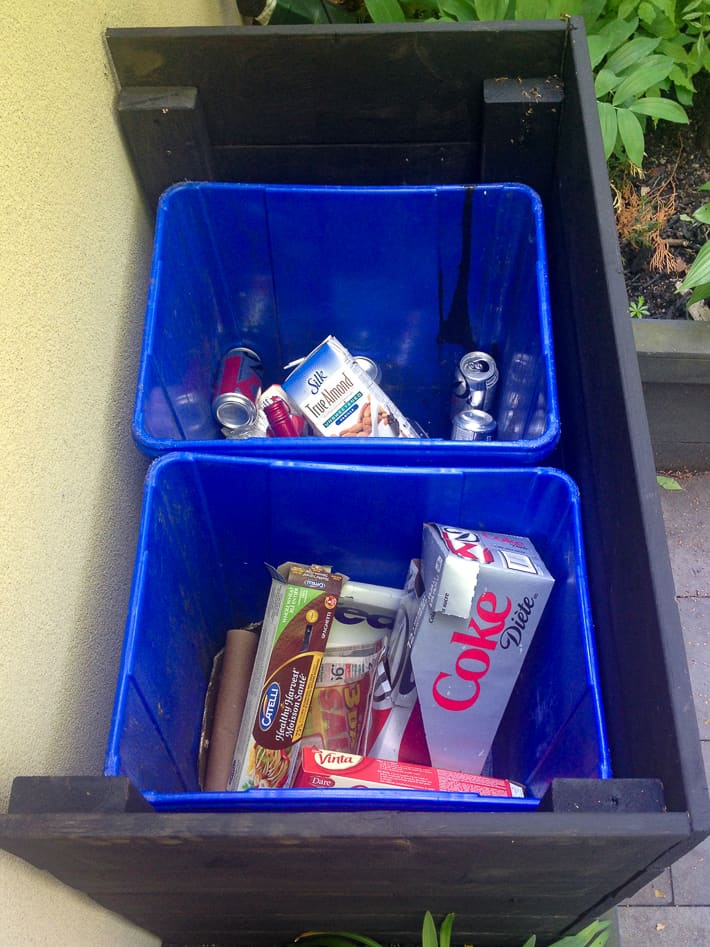
The bin cover blends in well with the planter boxes I built and is the exact same look as the chicken coop.
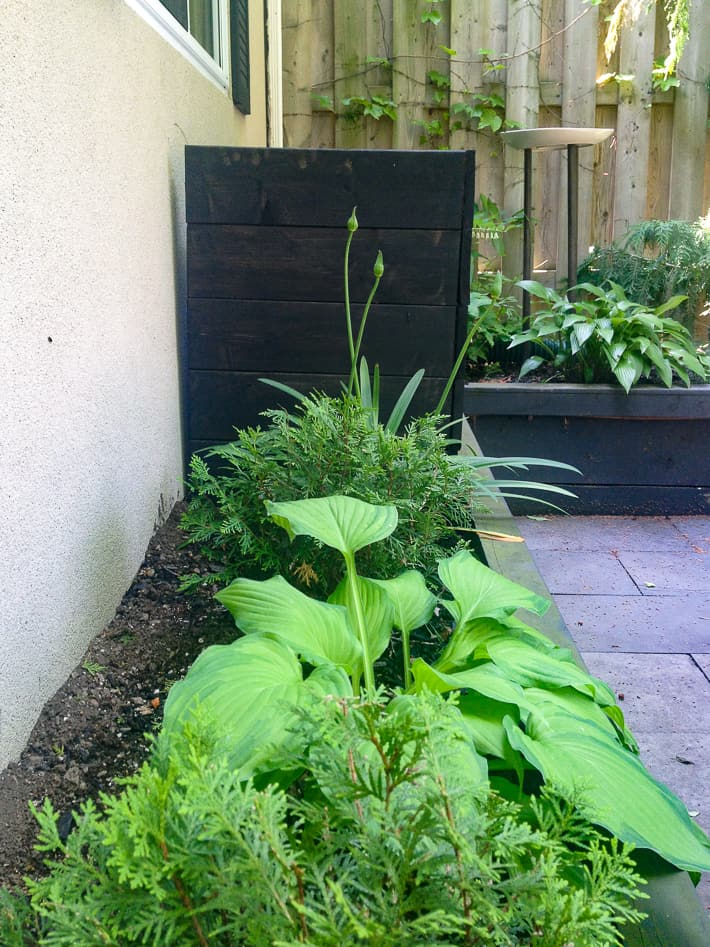
The dark colour is also a really good backdrop for the greenery all around it.
I am on year 8 with these DIY bin covers and so far there's been a bit of rot on the bottom (because mine are laying on dirt). If I had been even SMARTER I would have thought to put some stone or wood underneath the cover to help slow down the chance of rot.
Still. It's a pretty smart solution.

DIY Recycle Bin Covers
Because recyle bins are ugly.
Materials
- 4 lengths of 2x4s
- several lengths of 1×6’s or any other flat, fencing type wood.
- Wood screws
- Wood stain and paint brush (optional)
Tools
- Drill
Instructions
- Measure the width and height of your recycle bin. If you have 2, measure them side by side.
- FOR THE FRONT OF THE COVER: Cut the length of your fence boards so they are at least 6″ wider than the width of your bins. (If your recycle bin(s) measure 30″ wide, cut your fence boards to 36″ wide. FOR THE SIDES OF THE COVER: Cut the length of your fence boards so they are at least 4″ longer than the depth of your bins. (If your recycle bin measures 15″ deep, cut your boards to 18″ long. ) ** always measure the widest part of the bin (the top) **
- Lay the fencing for the sides of the cover on the ground. Measure from the bottom board to the middle of the top board. Cut 4, 2×4’s to this length.
- Lay your cut 2x4s on top of your fencing and screw into place. Always pre-drill your screw holes. Drill into every board.
- Repeat these steps for the other side of the cover. Once you have assembled and screwed together your two side pieces you need to attach them to the front fencing pieces.
- Like with the side pieces, just lay your front fencing pieces on the ground. Place one of your completed sides on the front fencing pieces and screw them together by drilling through the 2×4 on the side, into each of the front boards. Do the same on the other side. Pre-drill through the 2x4s at an angle into the front boards like you see in the photo below.
- Stand everything up because you’re done. You now have a slightly wobbly box. If you really want to you can brace the corners and run a 2×4 along the bottom and top of the open end. I didn’t want to, so I didn’t.
- If the unstained wood suits your backyard then by all means, leave it as is. If not, then now’s the time to stain.
- Set the cover in place. If it's going onto soil, lay wood or stones beneath the cover to help prevent rot.
Notes
* always pre-drill your holes first
I can now chuck things out the kitchen window to my heart's content all spring, summer, fall and winter long. My name's Karen and I am smart and lazy. Otherwise known as slazy.
Here's to all of you who are the same.
→Follow me on Instagram where I often make a fool of myself←


Clever very clever!
You cleaver lazy little thing you!
You do your carpentry work in ballet slippers? One more reason I come to this site for inspiration.
I thought the same thing when I saw those white slippers. 😂
As a note on black paint, there a product called solid body stain, which you can get at Home Depot. It's an opaque stain that works like paint, so you can paint wood with it and the product will soak into the wood, seal it, and then give you the color you want (such as gray or black etc.) without losing your wood grain pattern<:}
Thanks for the info Ms. Mia Pratt. I was actually wondering if there was a stain application that would work like paint. I think I'll go and check out my local Home Depot this weekend! Thanks again!
I have to ask how do you empty your bins out without moving the covers? Is the answer really obvious because no one else has asked it yet! Am I missing something?!
Salma - I just lift the bins out of the box and set them by the curb. That's it! :) ~ karen
Karen, you have lots of comments on this one which I don't want to read to see if maybe someone else answered the following question. I see a short eave over the bins, but nothing that keeps water of of them. I'm just curious as to why open bins don't get wet in that location.
Lovely use of leftover materials.
like two peas in a pod, Karen. I've been slazy since day 1. good work.
Lord tunderin' jaysus, put on some work boots.
P.S. awesome project!
LOL. You people are funny with the work boots. I'm just drilling some screws in some wood. Silly safety conscious people. ~ karen!
Yeah, we know, Miss Slazy...seems like I've seen you somewhere with a gauze sling wrapped around your head, and a milk tear running down your cheek?? Or are you just sweet on someone at the ER?
Nonetheless, your project is brillant.
Pftt. Who is this anyway? How did you get in my diary. Wait. Blog. Whatever. ~ karen!
Pbffftt! (sp?). The biggest risk is dropping the cordless drill on your foot. I don't wear work boots carrying a magnum of wine around- although, upon consideration, perhaps that's why wine is also available in cartons.
Slazy!!!! My new favorite word!
Really nice. Bet it could be modified to hide the ugly AC at the side of my house. My nice neighbour would be pleased because her kitchen window looks out on that side. I wouldn't do it for a neighbour I didn't like.
Hi Reg - The only thing is, air conditioners need a lot of air circulation around them. To do this, you'd have to have huge gaps between the boards in order to allow the air to circulate and it would need to be at least a foot away from all sides of the air conditioner. ~ karen!
Oh wow. Thanks for the information. I would never have known that. Oh well, nice neighbour will just have to look elsewhere. At least my intentions were good. :)
Reg, I built a “picket fence” around my too-obvious air conditioner. Similar to Karen’s design for her recycle bin cover, just use 1”x3”s spaced about an inch or so apart (cut at the top to look like pickets) and 4”x4” corner posts for stability. Important to make it large enough to allow air circulation. I have about 8” between the “fence” and the unit and regularly clean out any leaves that get stuck in that space. Have had no problems with the a/c unit and it ‘s camouflaged perfectly!
Don't the bins get smelly in the summer heat? Maybe not that far north?
Hi Pam ... well it's been known to get over 100 degrees here, LOL. Canada isn't as cold as people think. :) No they don't get smelly because they aren't holding garbage. Just recyclables. Paper, cardboard, rinsed out cans etc. ~ karen!
WHAT!!! someone didn't comment on your choice of footwear when doing "construction" with a drill???
Smart..definitely!! LAZY???..NEVER..You are the most un-lazy person I know...The only reason you would be putting something off is because you are busy doing 10 other things at the time..This is another shining spot in you brilliance my dear!!!
I couldn't agree with you more, Nancy Blue Moon!
Vintas! Roasted Red Pepper Rocks!
I wondered how long it would be before someone commented on my garbage contents, LOL! LOVE Vinta crackers. They're delicious. I'm buying some today as a matter o fact ... I'll give the roasted red pepper a try! ~ karen
oh how I wish I could chuck stuff out my kitchen window. p.s., the last thing I would call you is lazy.
This is nice... I live in a rented duplex and we have the big recycling containers (64 gallons, on wheels) - one for greens and compostables, one for mixed recycling. We wheel these out to the curb with the garbage bin on garbage pick up day. Yes, I have it easy.
Except when it comes to covering it up. When they are not on the curb, they are at the patio/veranda. (The place I read a book and fall asleep in the shade out by the garden.) I want to create something like a garage for them that allows me to lift the lid and dump but make it easy to wheel them away on garbage day. Hmm. Must think some more on this.
Next thing you know, you'll have installed a doggie-door-style flap within the window so that Slazy You don't even have to bother opening it! :)
Actually, sliding open a window to fire your stuff out mostly likely lessens heat loss also, compared to opening a door! Double earth conscience! You rock! We don't have that kind of window setup here. The "paffel" (my very own word: Pantry, Office, Laundry room is just off the kitchen, which is where most of the recycle lives till we drive to the recycle center, which is only about a city block's distance from us. The big stuff (flattened cardboard) lives in a wooden bin in our porch, which is also right off the kitchen. We are lucky to be able to recycle so easily!
OK I'm going to attempt to modify this design and build a box to disguise most of the hideous hydro meter/cable box contraption on my front stoop ...
What a great solution Karen! At first, I thought you were going to say that you opened the window and tossed out your vegetable peelings and kitchen scraps. I was thinking, rats! squirrels! racoons! Then I realized that it was your recycling, cans, bottles, cardboard etc. I tried, a few times to toss mine out the double hung window at the end of the hall. Had to remove the screen first and most of the time, I missed the blue box, so then had to put on my coat and boots and go pick the stuff up from off the patio. But, at your house, it certainly makes sense. Well done, looks superb!