Around this time last year I posted a Christmas House Tour of my home that featured a DIY I came up with using a few supplies from the Dollar Store and ... the ever popular mason jar. I have a thing for mason jars. And by "thing" I mean an unhealthy love affair normally reserved for stuff that lives and breathes. Or at the very least is covered in pizza sauce.
These little tree filled mason jars seem to have struck a chord with The Art of Doing Stuff readers.


I didn't think much about posting them until the comments started coming in asking how I made them. Then the emails. The screaming. The knocking on my door. WHEN was I doing a post on those mason jar trees. In December I said.
This is the first post of December. Drop the balloons from the ceiling, set off the confetti guns, THIS is the Mason Jar Christmas Tree post!
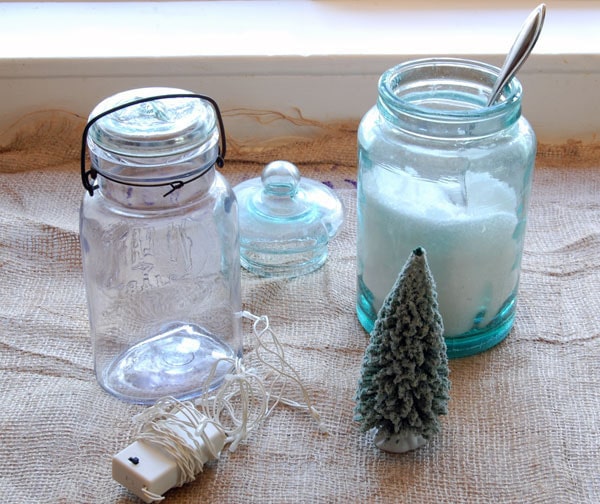
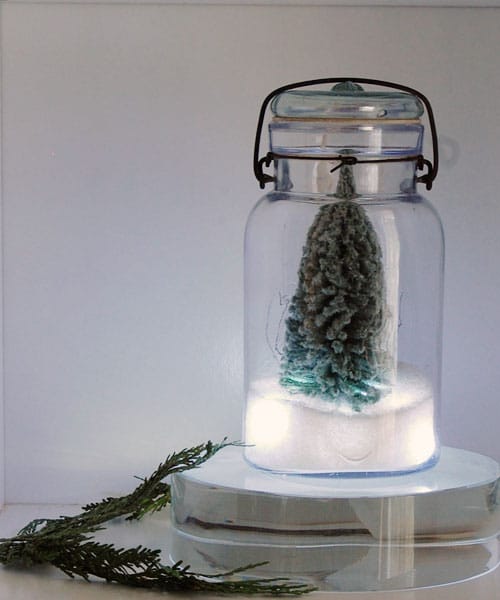
Supplies
Mason jar
Epsom Salts
Small fake Christmas tree
Battery operated string of lights.
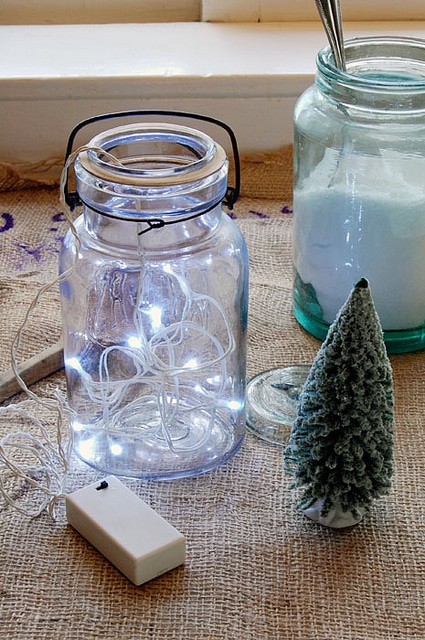
1. Shove your lights into the bottom of the jar. Turn them on first so you can see what they look like.
This part is a bit fiddly because the lights want to pop up every which way instead of staying placed in the very bottom of the jar. To make it a bit easier you can loop the lights around your hand, secure them with a twist tie or two and drop them in the jar.
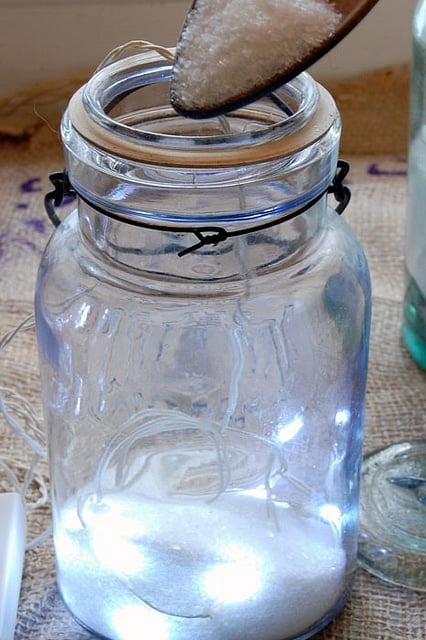
2. Start filling the bottom of the jar with Epsom salts. Push the lights down with your spoon if they pop up.
3. Place your tree in the jar and shove it down in the salts a bit. Add a bit more salt if you need to. Make sure the wire from the lights runs straight up the back of the tree (not the side or the front).
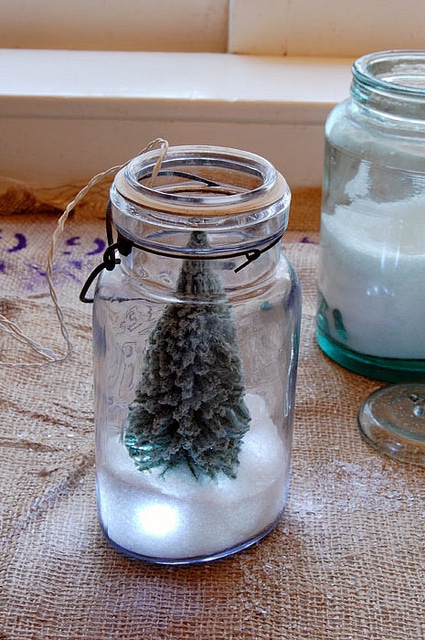
4. Admire.
That's all there is to it. Salted Christmas Trees. I kindda feel bad for keeping something so easy a secret for so long. Only kindda. Not a lot. O.K. I don't feel bad at all. But it seemed like the right thing to say.
→Follow me on Instagram where I often make a fool of myself←


Pizza sauce you say?
WHERE?!
I've just started following you. So far I'm inspired, tickled and enjoying. Sharing with my friends who also enjoy your down to earth way of getting stuff done.
Thanks Becca. ~ karen!
Hi, I made something similar this year. I had a glass jar w/o the cover. :-( It's about twice the girth of a Mason jar. I put about an inch and a half of table salt in the bottom. I took a straw and moved the salt around so it was at different depths. Then in the table salt I sat 2 different sized trees burying the base of the tree in the salt...and then added 3 small deer....? mommy & 2 fawns? I had a daddy deer with all the antlers but he took up too much room so I took him out. Around the threaded top I put a narrow red ribbon gluing the end over end to hold it in place because I didn't have a cover. Probably a piece of aluminum foil held in place with the red ribbon might have worked as a cover but it really doesn't need a cover.
Just wanted to add for those people who would prefer the trees to be white......a little water and bleach will remove the green colour ~ easy as that!! Great idea. Karen!
I received an email from Lee Valley Tools yesterday featuring your "Mason Jar Christmas tree!!! My immediate reaction was "I know her!!" I was just talking you up with friends of mine (Calvin is a set designer for the Thousand Island Playhouse in Gananoque) over lunch last weekend and gave them the link to your blog! Merry Christmas Karen and to your Mom Betty too!!!
Thanks Sharon! Same to you. (and your friend Calvin) :) ~ karen
Super cute. Your addiction: mason jars. My addiction: tiny vintage reindeer. See where this is heading?
Of course I do! I'm no dummy. This is leading to me tracking you down and stealing, your reindeer. ~ karen!
A simple craft, but so cleverly genius! I can't wait to make one. Thanks for sharing!
Karen June
http://littleyellowcouch.com/living-a-connected-life/
did the tree also come from the dollar store? Dollarama or Dollar Tree ?
Hi Erin - The white tree at the top of the post is from Dollarama and the green tree is from Michaels. ~ karen!
Good Lord, what are you trying to do, Kill me?! Every time I look at your blog there are other cute/cool things I want to do and then I start hyper-ventillating because I haven't done the other 20 things I saw that looked fun!
I think I will just live vicariously through you and let you have the nervous breakdown while I sip a glass of wine and look at the cute/cool things you do!
Ho, ho! Robin
Who you callin' a ho? ~ karen!
I've bought short white lights like you used several times from Hobby Lobby's wedding department for US$4.00. I think they have about 8-10 white or frosted lights and run on two 'C' batteries. At Christmas time they have green ones in the holiday department. They won't last the season if left on continuously so depending on what I used them for or if they're located where I see them often, I turn them on as needed or leave them on & keep spare batteries handy.
This is just the cutest! I'm thinking of trying them with snowmen. What do you think? Think they'll look cute? I, along with a few friends, are huge snowmen fanatics...so I'm thinking maybe snowmen? I don't know. Will give it a try and see later. Thanks Karen for the cute and awesome idea!
Hi BearBabe - I think snowmen would be fantastic! ~ karen
I wrote a tragically humerous story about this on my blog. Sometimes the best layed plans can go horribly awry!
Thank you, thank you! These are so pretty. Too bad I don't have any of those antiquey ones, but the new mason jars will do. My sis will be very happy with me when she gets one. You rock!