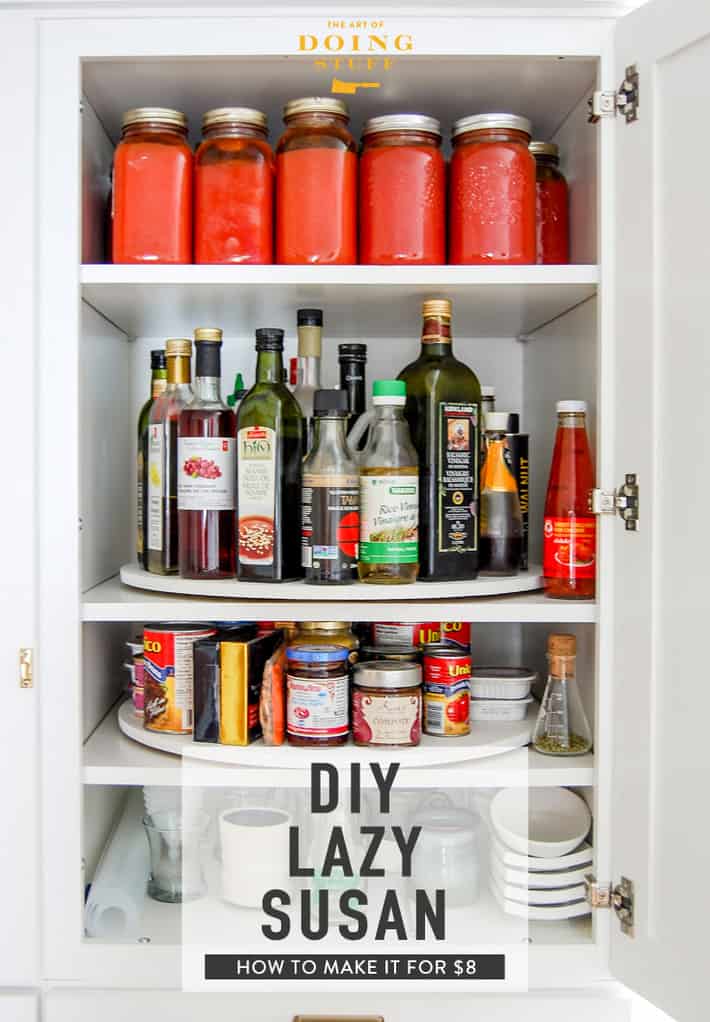
This DIY Lazy Susan costs about $8, spins like a politician in crisis, and won’t collapse under the weight of your canned soup collection.

You’re going to learn how to make a Lazy Susan today. These spinning circles of efficiency are a quick & easy DIY project. No, really, they are.
I made these 11 years ago and they're still spinning right round, baby right round.
When I first redid my kitchen I didn’t buy any of the extras—no organizers, no pull-outs, no fancy drawers. I got the bare minimum then DIYed the rest.
The first upgrade I added afterward? Lazy Susans for my cabinets.
At the time I couldn't find any large (over 20"), decent looking ones. Now, there are some options; this 21" one from Amazon is under $50 but most are between $50 and $100 each.
Quick Summary: Make a big DIY Lazy Susan for about $8 using MDF, paint, and a simple bearing plate
Table of Contents
Materials & Tools You’ll Need
- ½" sheet of MDF (2' x 4') — $17
- 6" Lazy Susan hardware (bearing plate, $4–$9)
- 8 screws
- Paint + primer (optional)
- Jigsaw
- Drill
Pro Tip: Use round bearings for countertop/table use. Stick with square bearings for cabinets—they’re a lot cheaper and perfectly stable.
Step-by-Step Guide to Building a DIY Lazy Susan
1. Measure and Mark Your Circle
- Measure the width & depth of your cabinet.
- Draw a circle on the MDF slightly smaller than the opening so the Lazy Susan can spin freely.

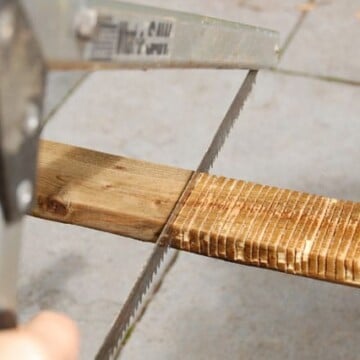
2. Cut the Circle with a Jigsaw
- Use a jigsaw to cut along your traced line.
- Pro Tip: I’ve tested a LOT of jigsaws—this Bosch model is the most stable and precise.

TIP
I've tested a LOT of jigsaws. This Bosch jigsaw is the one I love and use myself.
It's steady, stable & turns with precision.
3. Prime and Paint the Top
- Prime and paint what will be the top of your Lazy Susan.
- You can leave the underside unfinished.
Would you like to save this stuff?
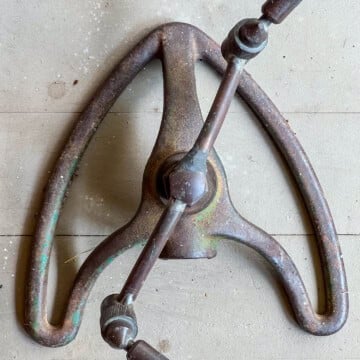
4. Attach the Lazy Susan Bearing
- Find the center of your MDF circle and mark it.
- Place the bearing over the center and screw in the underside portion.
- Drill a hole through the MDF where you marked it. The hole needs to be large enough to fit a screwdriver head through. widen enough to fit a screwdriver head.

- Align the top part of the mechanism so the large circle is over the MDF. Mark the MDF with a pencil in that spot (like you see in the photo above.)
- Drill a hole through the MDF where you marked it. The hole needs to be large enough to fit a screwdriver head through.

5. Install and Secure in Cabinet
- Place the Lazy Susan inside the cabinet.
- Rotate until the drilled hole lines up with a screw hole in the bearing.
- Drop a screw through the hole and secure it to the cabinet shelf. Repeat for all four screws.

That’s it—you’re done.

Lazy Susan Hardware Options Explained
There are two types of Lazy Susan bearings:
- Round bearings — larger, sturdier, and better if you’re building a standalone unit for a countertop or tabletop.
- Square bearings — smaller, cheaper, and perfect for cabinet installations (good for 95% of projects).
Tips, Variations, and Common Mistakes to Avoid
- Don’t size it too big. Leave wiggle room so it doesn’t scrape cabinet walls.
- Prefer plywood over MDF? Works just as well.
- Want to stop items from sliding off? Add a raised lip or edge. But you probably won't need it.
DIY Lazy Susan Cost and Durability
I made seven Lazy Susans for my kitchen over a decade ago. Each one cost under $8 at the time. Now they're run you around $15 each for the MDF and hardware. The bearings are durable; once installed, they’ll last years with zero maintenance.
Final Thoughts
To any Susans who are upset their name is associated with laziness—just be glad your name isn’t Karen.


Sheila Parrott
Why not remove the shelf to measure and install the turntable? It's shallow enough to be able to replace the shelf easily with the turntable attached, no?
Babs
This is a great idea for a Christmas gift.
Karen
They really work amazingly well. I can't imagine getting anything out of my cupboards without them. ~ karen!
Gin
I am inspired by this, especially as I just installed pull-out shelves in my base cabinets and am not happy with my upper cabinets. I may even be able to use the MDF from the narrow shelves from the base cabinets! This may be one of my next projects. Definitely will add to my list!
Karen
For big uppers this is such a good solution because there's no wasted space and everything is easy to grab. ~ karen!
Toby
The 6" lazy susan hardware is listed at $29 at amazon.ca.
Ann
Amazon has 1 - 6” for $6.99 and a pack of 6 -6” for $19.99 (3.34 apiece)
Scotty
Thank you again. It's so nice to be able to make one instead of consuming still more planet-eating plastic by just buying a plastic one.
And they look so cheap.
And yours are so much cooler, especially in fitting into cabinests just so.
Meg
OMG SO MANY POPUPS. Looks like it’s a good tutorial…WISH I COULD READ THE POST 🙄
Karen
There actually aren't any pop ups. But maybe you're referring to ads? If you actually cannot see the content then let me know. If you're bothered by ads, well that's how I make a living so unless you agree to give up part of your wages to have no ads it would seem we're at an impasse. ~ karen!
ROBIN CARTER
Touche!:-)
Howto
You did not show yourself with your head inside a cabinet with no clearance trying to find the screw hole in the hardware to drop the screw into...
Keith
I made a "D" shaped turntable. The flat part goes to the front so the door closes and the circle can be larger. I used cardboard as a template.
Karen
That's smart! ~ karen
Virginia
Can I make one to put 65 inch TV on and attach it to a half wall??? And what would I need to do differently???
Sandra Blackwell
My husband worked with a Susan who was irritated at the term lazy Susan...she insisted they be called highly productive susans. As a word girl...I want to know how they got the name Susan to begin with.
Randy P
OK, I'm pretty sure I've figured out the whole lazy Susan thing, seems simple enough ...... but which are the MOST effective rubber snakes to throw? Rattlesnake, cobras, snakes in the grass? Inquiring minds want to know and are too lazy to look it up on Google.... or Amazon.ca
Randy P
OK, I did just look on Amazon.ca, hoo boy, they sure do carry a whole bunch of 'em. NO, I'm not buying any to send out as gifts.
Karen
Ha! I was already preparing myself by planning to fill my P.O. Box with mice. ~ karen!
Karen
Always a cobra. Always. ~ karen!
Randy P
Hmmmmm - cobras you say????? Perhaps a stuffed mongoose as well? They don't bite as much as real ones.
Nora
Hi, Karen, Ikea actually sells some pretty large turntables (respecting the Susans of the world) but they are certainly not as cheap and it is great to be able to make them just the right size.
Mary Edmondson
I am not mechanically gifted. I reread your instructions and I think I’ve figured out that you have already answered my questions - I simply need to adapt to the different configuration. Your instructions could not be more clear and illustrative. However, some like me, need to pay closer attention and perhaps read through again to master the content. You very well might make DIYers out of all your fans. Thank you, Karen. Your postings are the highlight of my days.🥰
Karen
Glad you figured it out Mary. :) ~ karen!
Mary Edmondson
I would like to make a really big free standing turntable. Will the hardware include whatever is needed to attach the top part to a bottom support? I need to know how to go about attaching the two pieces. Thanks, Karen.
Roberta LaBrecque
I had to purchase wood screws separately
Debj
Thanks so much. I just made two for my kitchen. I did 22” and followed your directions. So easy. I just love them. I’m only 5’ so I now can easily access things. You are a genius! Love your blog!
Karen
That's great! I'm so glad you made them and did it so quickly! Usually if you don't do something right away, you don't end up doing it, lol. :) ~ karen!
billy sharpstick
Another option for anyone not ready to commit. (Apartment renters, not decided on location yet). instead of screwing it to the cabinet floor, make a rectangle of plywood that is (almost0 the size of the cabinet floor and screw it to that.
George McCarter
I hope someone hasn't written this idea before me but I didn't want to spend the time to read all the comments. Sometimes you may have a cupboard that is wider than it is deep. To make a lazy susan for that space you can cut a segment off the front of the circle and mount it far enough forward so it will turn and still be able to shut the door when the flat segment is forward. Also there are various sizes of bearings and if you use a larger one you will not have to keep the sides balanced as well. I hope this makes sense to you. I am not a blogger.
Margaret (Peggy) Miles
Brilliant!
Terry Curtis
Yes that makes a lot of sense!!!
Kipley Herr
Could you just use the top from one of those decorator tables that have three legs and one throws a table cloth over....?
billy sharpstick
I might try this to make a double decker one. We have a cheap plastic one we keep spices on. they are short bottles, less than half the height of the cabinet. Problem is sometimes bottles hide in the middle. I would solve this by mounting a column in the center to attach the upper shelf to. You could make a nice boxy thing, but I think a 4x4 would work fine. Nothing heavy is going on top. A thinner material would be adequate, too, say 1/4" plywood. Might make it hard to reach the rear mounting screw hole, but I think 3 would be enough.
LOIS M BARON
I love lazy susans. Thanks for your clear explanation of how to put more of them in my life. :-)