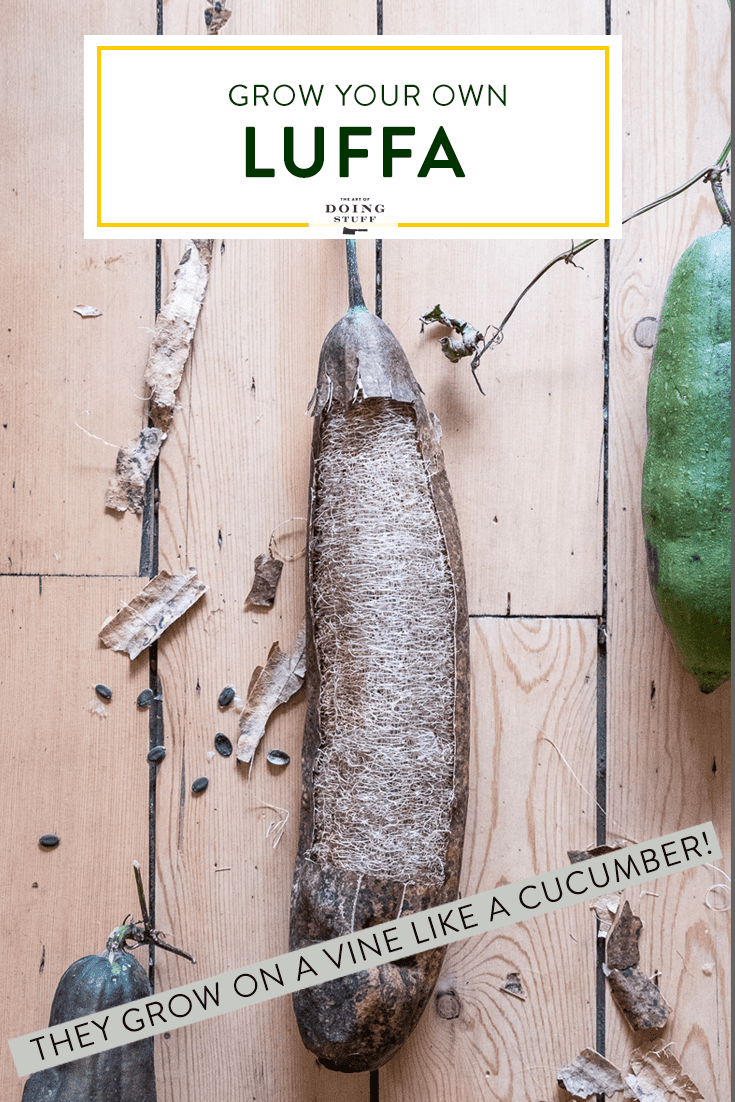
First off, congratulations on realizing that you can grow your own loofah sponge. Most people think they grow in the ocean alongside other sponges, like Mr. SquarePants. Growing loofah is easy in warm climates, but with this guide I'll show you that you can grow your own luffa sponge almost anywhere.
As a matter of fact, no they do not grow in the ocean. Or the sea. Or any other body of water.
The fact that loofah aka luffa is actually a vegetable is always the biggest shock to people when you tell them they can grow their own luffa sponges; the fact that they grow on land, not in the water.
Table of Contents
What IS a Loofah Plant
A loofah plant is a member of the Cucurbitaceae family like squash or cucumber. They have long growing vines that have fruit growing off of them. The plant produces edible fruit which become gourds when left on the vine to mature.
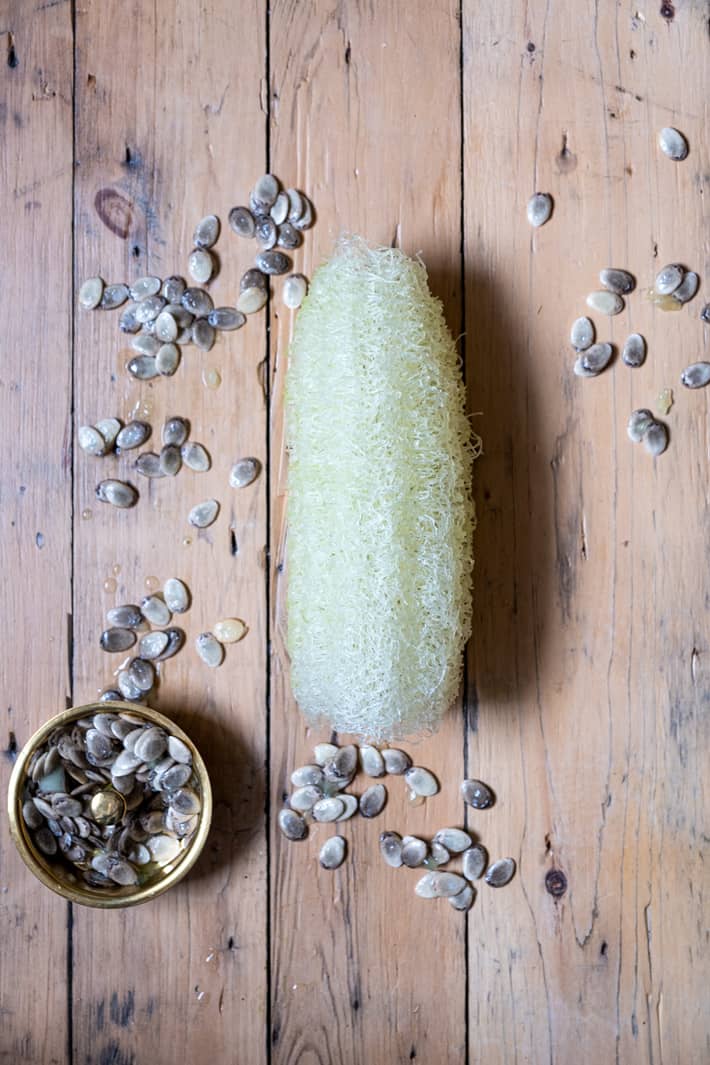
Those gourds dry as they get older, losing all their moisture. When cracked open all that is left inside are the fibres you recognize as a luffa sponge.
There are 2 species of this sponge producing plant.
- Luffa aegyptiaca (this is a smooth luffa, also known as Cylindra, Dishrag Gourd, Sponge Gourd, or Egyptian Cucumber)
- Luffa acutangula (this is a ridged luffa also known as Ridged Gourd, Angled Loofah or Chinese Okra)
They're all the same thing (edible vegetables that grow into fibrous sponges) with different names or a sightly different shape.
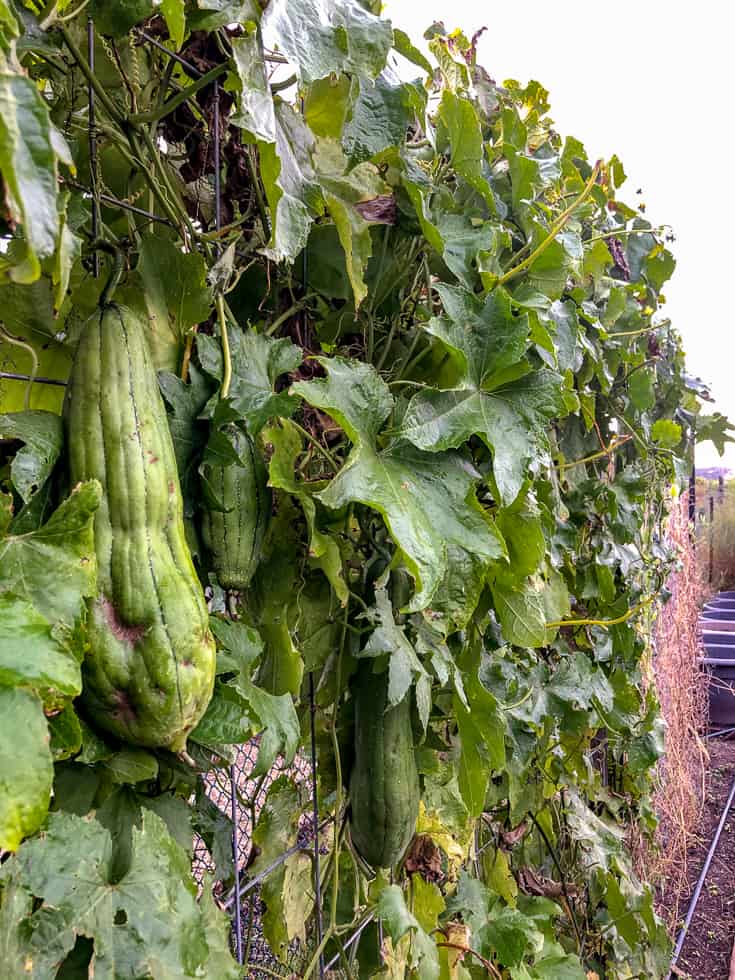
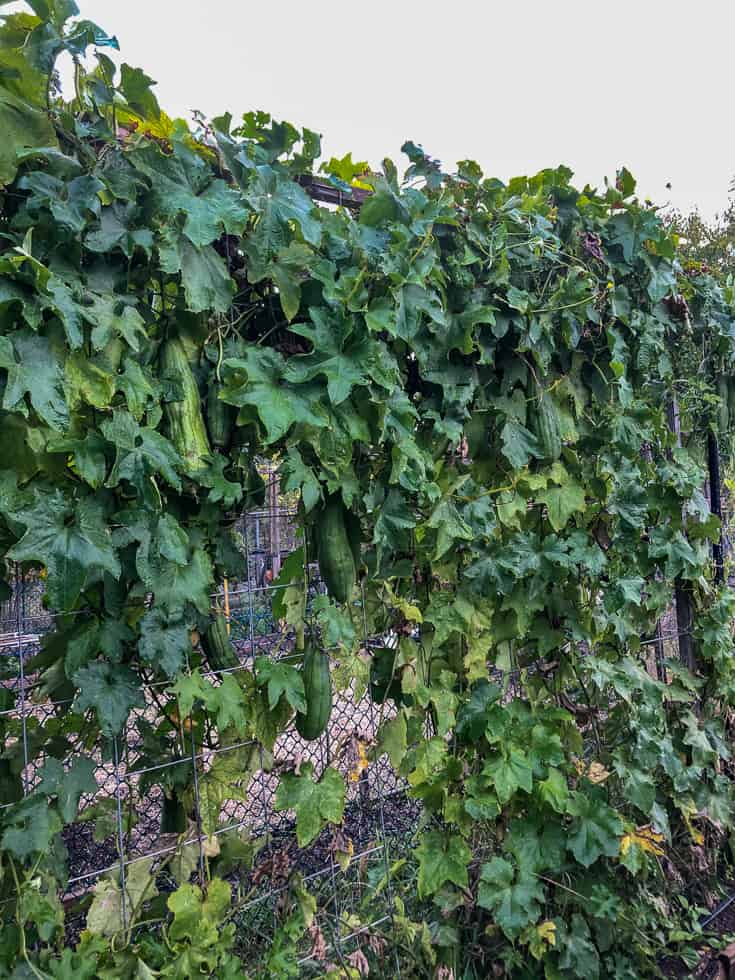
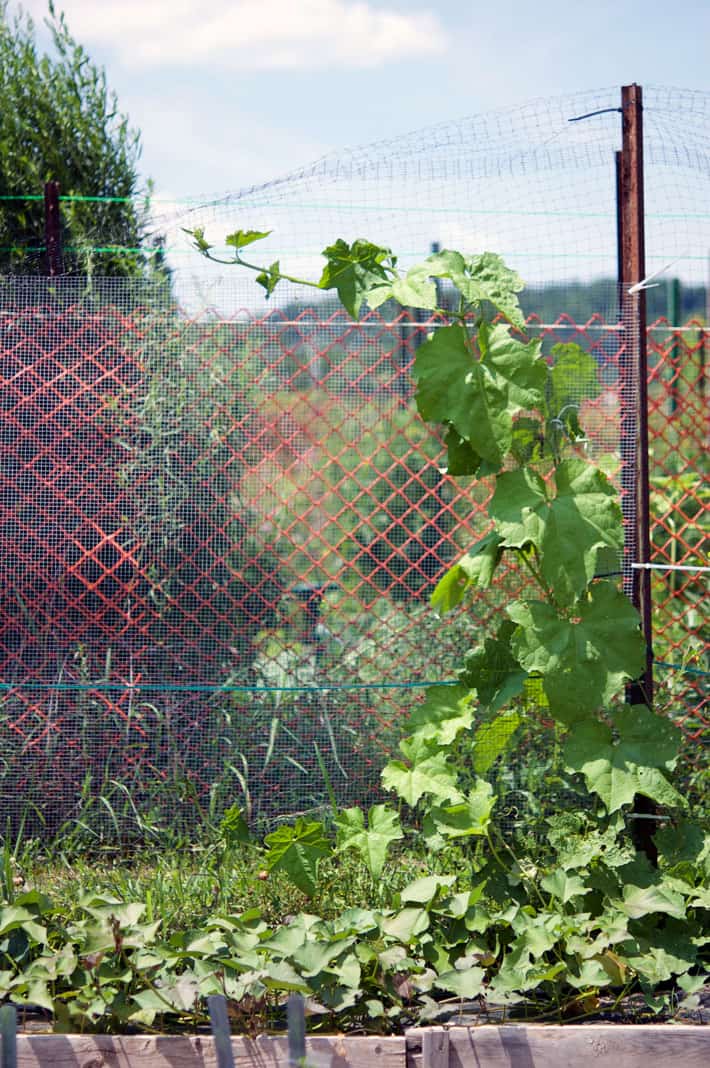
- Loofah plants are part of the gourd family and grow on vines that can get to be 30' long or more. Trust me on this.
- The part you're used to seeing is actually the inside fibres of the gourd, which lay beneath the green skin. That's the loofah sponge.
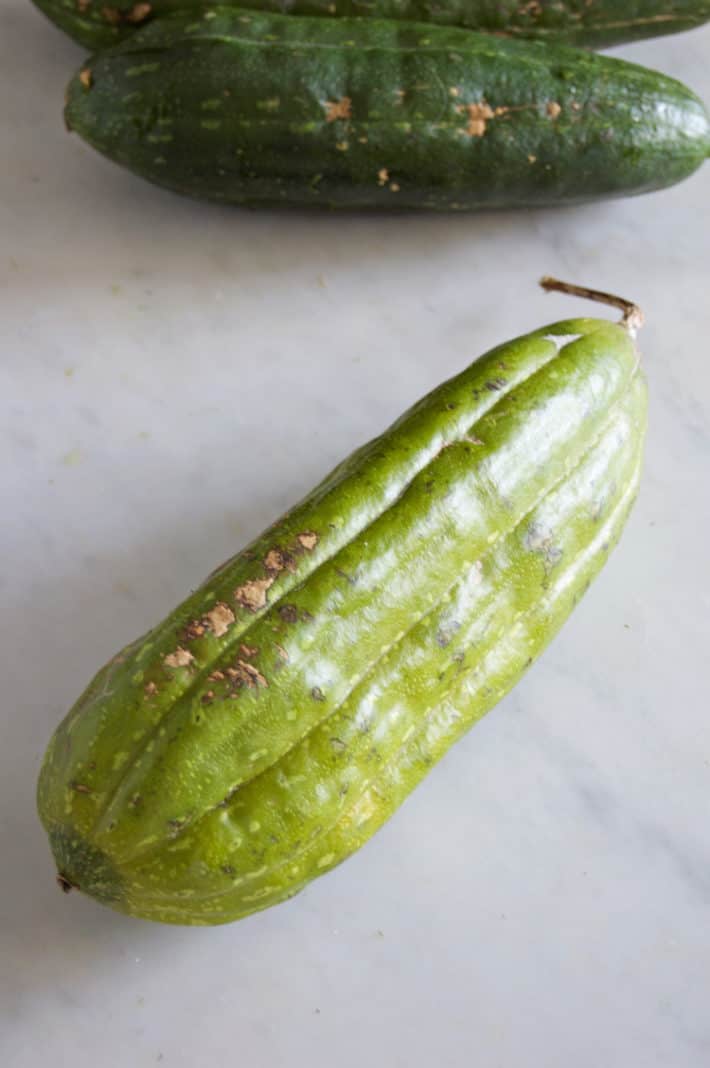
- Immature luffas look like a cucumber or zucchini and are edible when they're very young (4-8" long). They're traditionally eaten with eggs in Asian countries, like in this Serious Eats luffa recipe.
- They are annual vines and need to be replanted every year.
- Luffas are shitheads.
For the past decade I've been growing loofah in my Zone 6 climate. Each year more successfully than the previous year as I figure things out. They need a longggg growing season of 150-200 days. They are also easily frightened. Like you can frighten a Loofah to death.
More on that in a few moments.
To figure out how to successfully grow a loofah sponge, you have to know how to very, very unsuccessfully grow a loofah sponge.
Luckily for you, I have all kinds of experience in that particular area. In fact, I spent the better part of a decade being exceptionally unsuccessful at growing luffa.
Not to brag.
I now have it down to a science and you will now learn from my years of mistakes in this step-by-step guide.
Growing loofah
In colder zones you need to start your plant from seed, grow it indoors until temperatures warm up and then plant it outside on a sturdy structure where the vines can do their thing and the heavy luffa fruit will have support.
Potential Problems
There are 3 main areas where things can go horribly wrong with growing the plant.
- Your seeds won't germinate. Because they're little asshead seeds that hate you.
- Your little luffa seedling goes into shock when you transplant it outside and it dies of fright or at least goes into a month long coma.
- Your vine grows but you never get to the point of seeing fruit before the frost kills it.
I'm going to show you how to overcome all of those issues so you can grow your own organic luffa sponge this summer.
Handy for showers, scrubbing pots and whacking people on the head with.
Planting luffa seeds
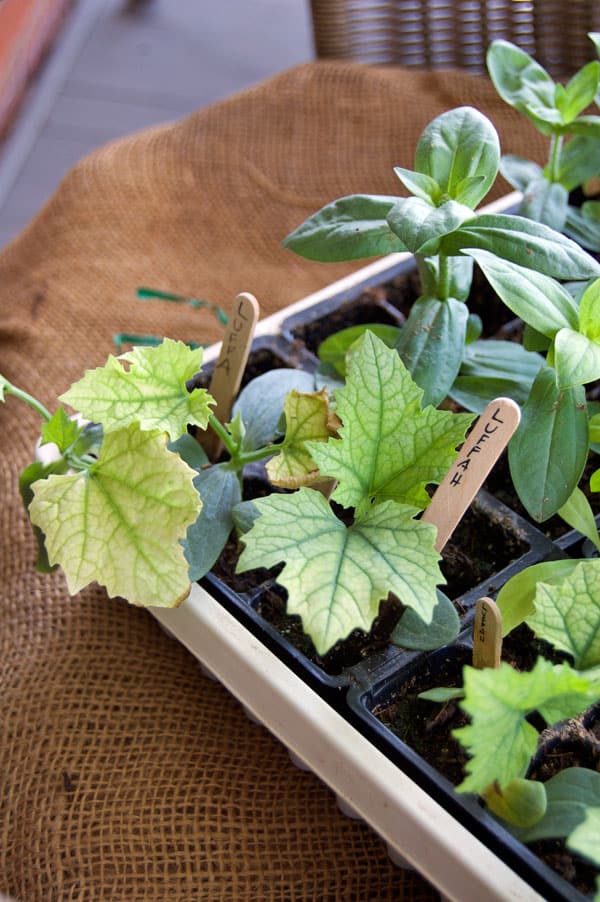
STEP 1 - If you're in a cooler zone, start your Luffa seeds early, indoors, 6 - 8 weeks before the last frost date.
STEP 2 - Use new Luffa seeds and soak them in water for 24 hours prior to planting. Seeds that have been hanging around for years won't germinate well.
STEP 3 - Sow seeds in a 4" pot of moistened soil. Plant ½" deep. Cover with plastic wrap, or a humidity dome just until the seeds sprout. Once sprouted you can remove the dome.
STEP 4 - Germinating luffa seeds on a seed heat pad will increase your success. Sow seeds and then place their pots or tray on the warmth heat pad to germinate.
STEP 5 - For an even BETTER chance of reducing transplant shock, grow in soil blocks instead of pots.
FINAL THOUGHT - Using this method your seeds should germinate within 3-10 days from planting.
TIP - I'm a soil block convert and you can read all about how they work and how to make them in my post on making soil blocks with a soil blocker.
Seed Heat mats
I can't overstate how much a seed heating mat improves germination and growth of your loofah seeds.

It's also working GREAT for my Sweet Potato slips using my updated sweet potato growing method, tomatoes and just about any other heat loving crop.
Planting out in the garden
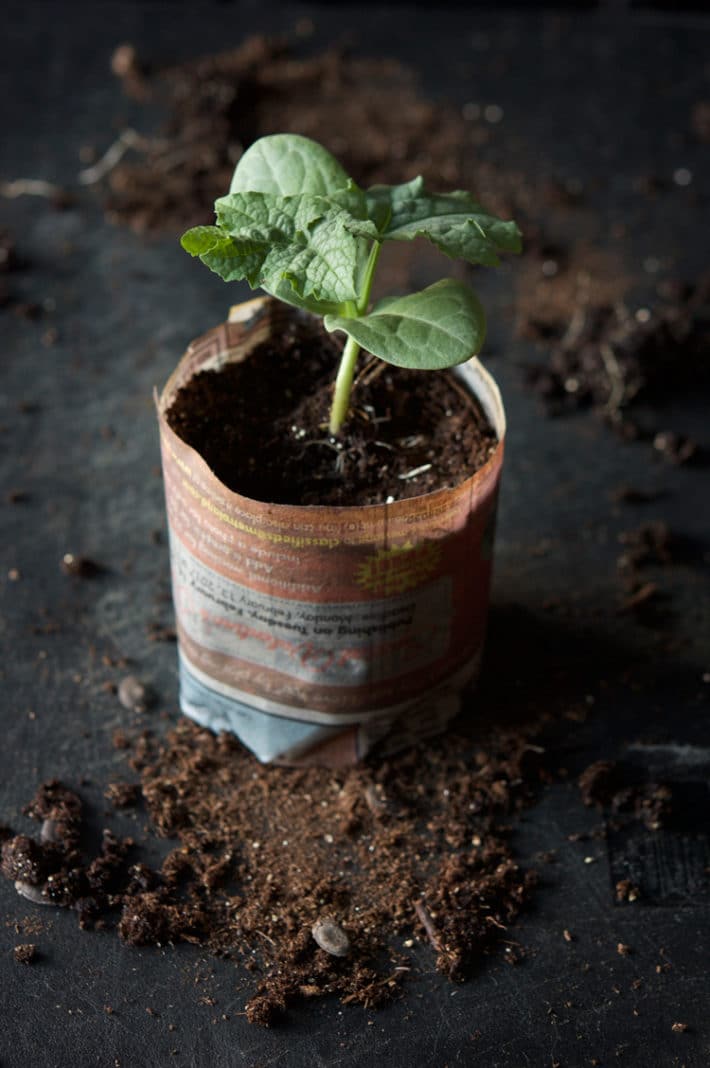
- When the weather is right ( air is consistently around 70 F or 21 C) start hardening off your seedlings. This is more important than with most other plants because Luffa are so prone to transplant shock.
- After a week or so of hardening off, plant your seedlings in an area that gets FULL sun. As much sun as possible. Anything less and you won't get any Luffas.
TIP - If you're unsure of what it is or how to do it, read these steps on how to harden off plants.
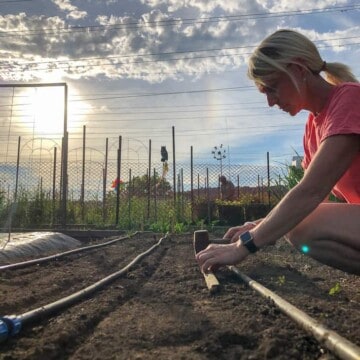
- Plant your loofah seedlings at the base of a strong structure that its vines can climb on and cling to. Chain link fence or something similar is perfect.
- If after planting out, a cold snap threatens, cover the seedlings with a vented cloche. Or you can cut the bottom off of a plastic pop bottle and place it over the plant (with the cap removed to allow venting). A few days of cold weather will STOP a luffa from growing and it could take a month before they get over the shock.
- Luffa will produce fruit 3 months after direct seeding, and 4 months after starting seeds inside. They are ready to harvest 6-7 months after seeding.
Alright then, you've started them from seed and planted them out. Now what do you do for the rest of the summer?
Growing Luffa in Containers
- You'll need a 25 - 30 gallon pot or grow bag. If you don't speak "gallons", just look for pots or grow bags that are about 20 - 24" across the top. This will ensure you don't have to water every 30 seconds, and it will hold enough soil to provide enough nutrients to the VERY large luffa.
- Grow one plant per bag. No more than that.
These are GREAT 30 gallon felt-like grow bags.

Growing on & summer care
Luffa take 6 - 7 months before they're mature and ready to harvest. That's how long you have to pay attention and take care of them.
Luckily it's mainly just a matter of watering, fertilizoing and keeping an eye out for pests.

Watering
Keep the soil consistently moist. Don't let it dry out or get oversaturated. Luffa doesn't like surprises. It likes everything to stay the same.
Like I've mentioned before, luffa are shitheads that are plotting against you. If you let them dry out or overwater them, they will rebel against you.
Fertilizing
Before planting, apply 3" of compost over your bed or container.
You can also spring dress your beds with this organic 4-4-4 all purpose fertilizer from Gaia Green. (it's what I use)
Pollination
Like winter squash, luffa have male and female flowers. You can hand pollinate the female flowers using this hand pollination technique to increase your luffa harvest. This is especially helpful if you don't have a lot of pollinators in your garden.
Pinching
2 months before your first frost date (by the middle of August for me in zone 6) you need to pinch away all the flowers and any small luffa on the vine. Continue to do this for the rest of the season.
This is important because it will direct all the plant's remaining energy to growing the luffas that are on the vine now instead wasting it ones that have no chance of becoming harvest size. THIS IS CRUCIAL.
Pests & Diseases
Cucumber Beetle (which cause cucumber wilt)
Aphids
Squash Bug ← link to treatment
Vine Borers ← link to treatment
Powdery Mildew ← link to treatment
Blight
I have never lost a luffa plant to pests or disease, but these are the ones to watch out for. Where indicated I have a link to successful treatments I use.
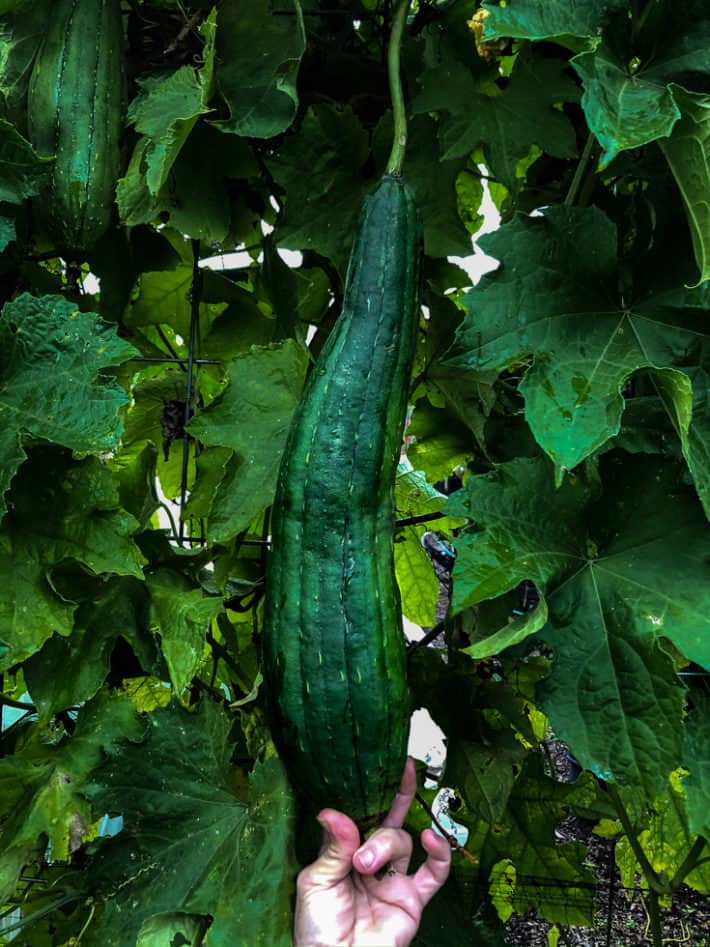
Harvesting
- By October you should have big Luffas. If you live in or above zone 7 your luffas will probably dry on the vine and be brown and light as a feather by October. For zone 6 and below they'll probably still be green. That's O.K.
- Pick your Luffa gourds BEFORE they're hit by frost even if they're still green.
Dry gourds vs Green gourds
Over and over you'll hear that you have to wait until the gourd is dry to pick it. And yes, that's the best time to pick it but it's not the only time.
If you live in zone 6 or below chances are you'll be harvesting them green. The lighter they feel in your hand, the greater chance they'll have fibres inside.
Some green luffas you pick will not have matured enough and when you peel them they'll be fleshy and gooey inside.
But OTHERS will indeed have developed enough to have the coveted fibres.

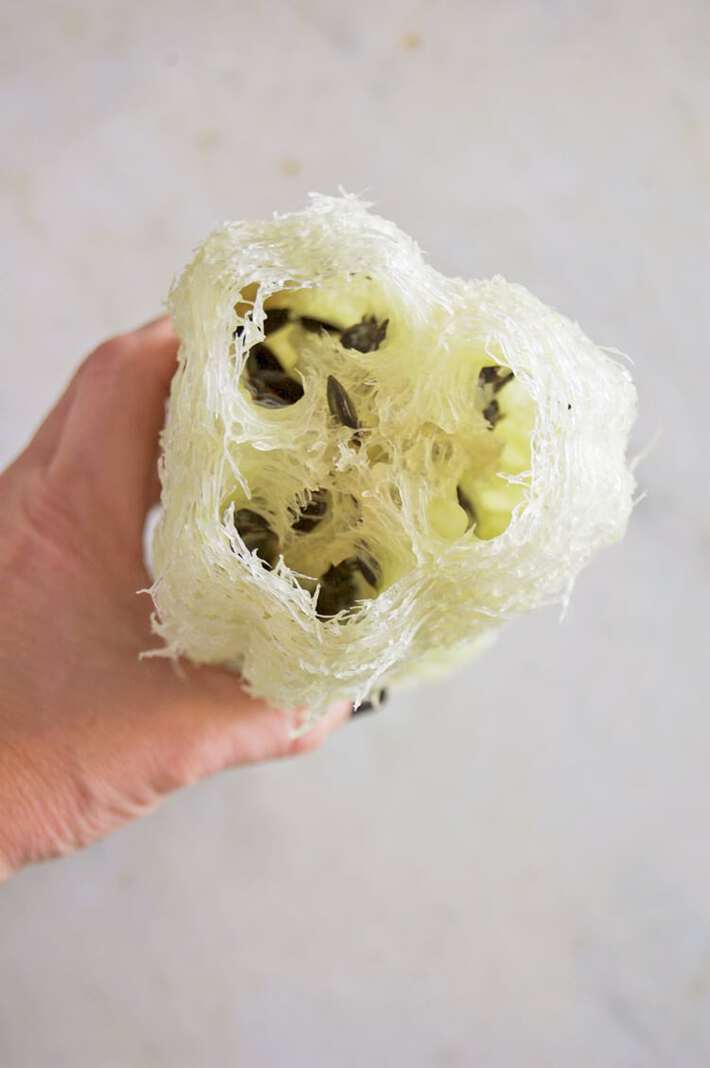
- 1st luffa is immature with spongey flesh inside.
- 2nd luffa is lighter in colour and weight which helps you know it may have developed fibres.
- 3rd luffa is well on its way to drying out and will definitely have a luffa sponge inside.
- 4th luffa is the ideal time to pick. When it's completely dry and you can hear seeds rattling inside.
Like I said, it isn't easy and definitely not for the half assed gardener in colder climates, but if you really want to grow loofahs you can.
Peeling, Processing & Preparing
Would you like to save this stuff?
How to process immature (green) luffa
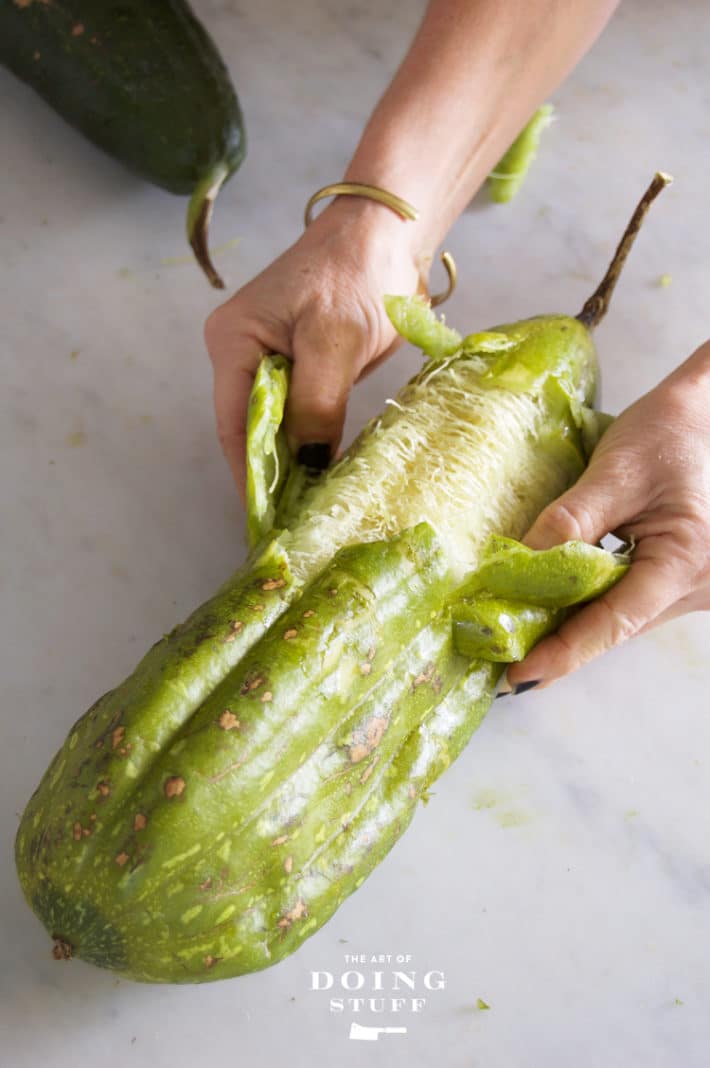
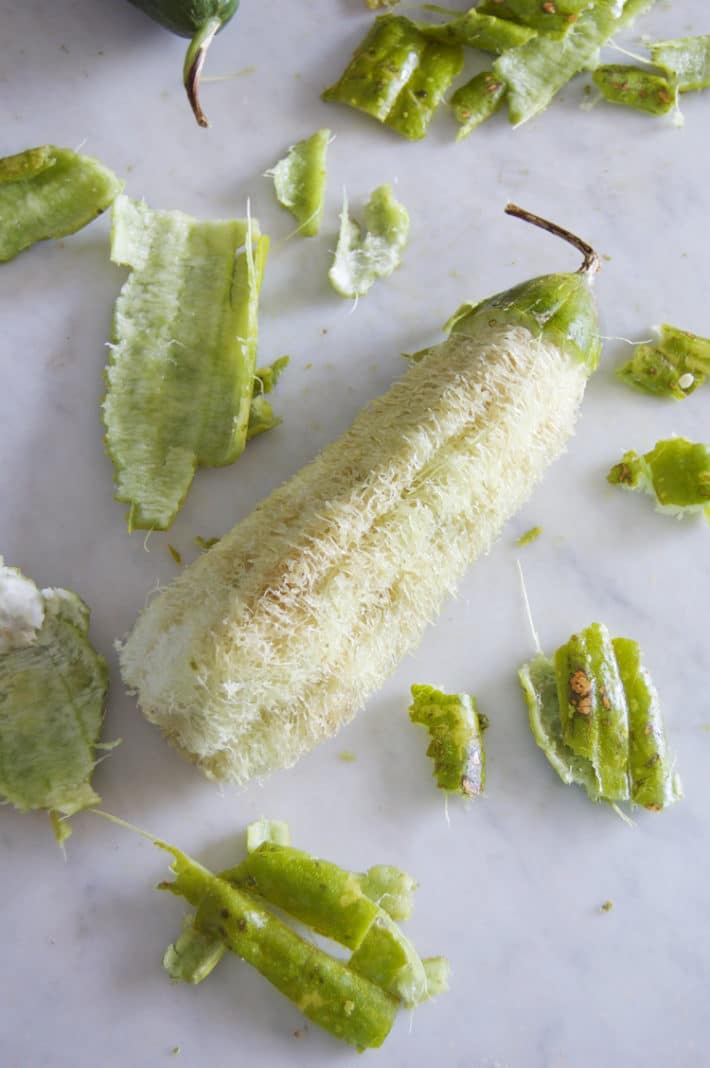
- Lay the gourd on a hard surface like a table. Press down hard on it with the palms of your hands to crack the skin. Do this many times until much of the skin is cracked.
- Press your thumb into the skin by a crack pushing down until you can worm your thumb under the skin. This will separate the skin from the sponge fibres. Kind of like how you would peel an orange that doesn't want to be peeled.
- Rinse the sponge under water once it's released. Squish any wet gooey parts out while you rinse. You want the sponge to be perfectly clean.
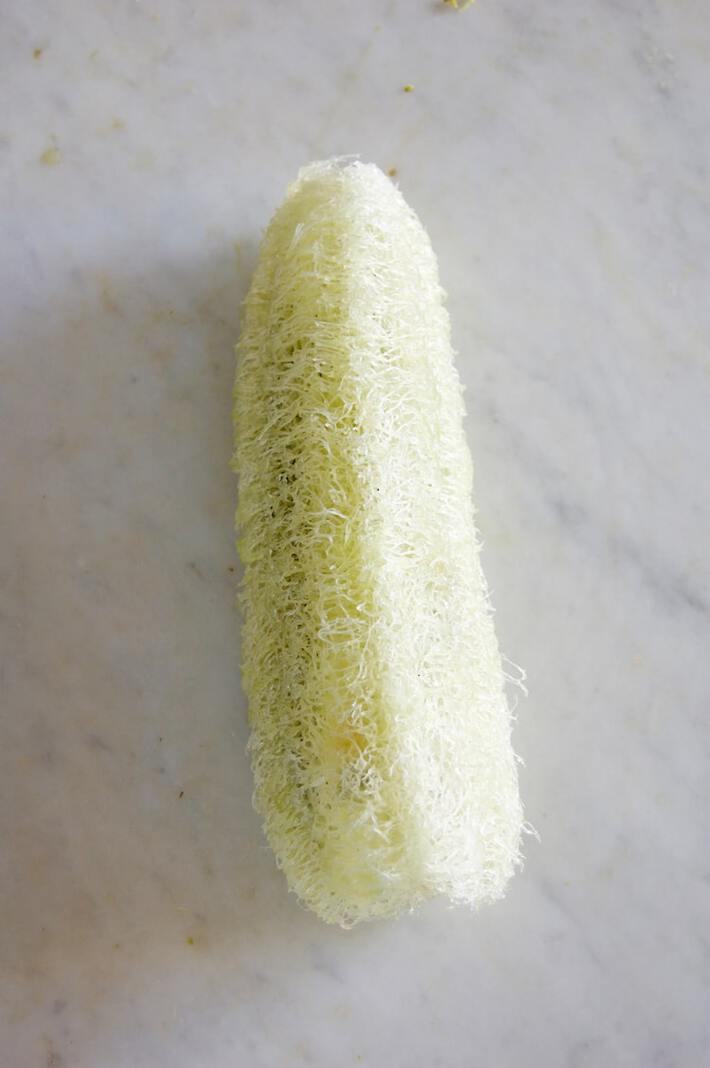
- While you rinse and squish, many of the seeds will come out. When it feels and looks clean, let it sit on the counter overnight to dry.
- Once dried you can shake and bat your luffa around to get the remaining seeds out. They'll come out much more easily once it's dried.
- If you'd like a brighter looking sponge you can soak it in a solution of 1 part bleach and 10 parts water. After bleaching, rinse it with clean water and let it dry again.
note: I have quite literally never measured my bleach solution. I just fill the sink with water and glug some bleach into it. But rules are rules and the rule is 1 part bleach to 10 parts water.
Peel green loofah as soon as you pick them. Don't wait for them to dry out - they could rot and discolour.
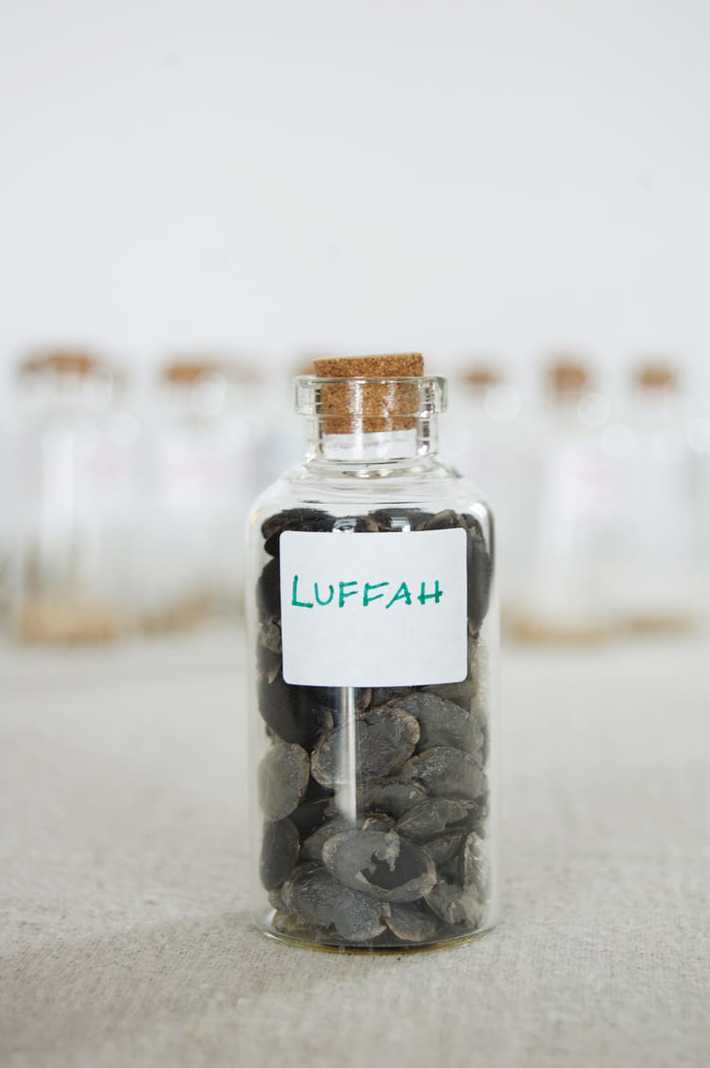
Saving Loofah Seeds
Each luffa will be FULL of seeds that you can use to grow more luffa next year.
- ONLY the black seeds are viable. White or light coloured seeds will not germinate or grow.
- Once you've set your black seeds aside, feel them. Some will be fat and some will be flat. Fat seeds have been properly pollinated. Flat seeds have not been pollinated.
- Only the FAT luffa seeds will germinate, so those are the ones you need to save for planting.

What is a Luffa Sponge Used For?
- In the shower. Either soap up yourself and slough away dirt and dead skin with the Luffa or cut a bar of soap so it fits into one of the luffa channels and it will lather as you scrub with it!
- Pot scrubber. I keep a bowl of these cut into 3 or 4" lengths and use them to scrub pots. When they get dirty they go into the dishwasher. If there's no hope of them getting clean because there are so many bits stuck in them, they go into the compost bin.
- Removing gummy glue from removing stickers off of plastic or glass. Just dab the sticker with oil then scrub with a luffa. Although truly, the best way to remove any sticker is with a hairdryer.
- Anything that needs cleaning by scrubbing.
- Vegetables! Luffas are the BEST vegetable scrubbers.
How to Clean Them
- With bleach in the sink.
- In the washing machine.
- In the dishwasher.
- To maintain the luffa make sure after using them you allow them to stand on end so they can dry properly. Otherwise they'll get musty and gross.
Luffa sponges NEED to be cleaned, especially if you're using them in the shower. Once a week throw your luffa into the wash or soak it in a bleach solution. 1 part bleach-10 parts water. Let it soak for a few minutes and then rinse it.
Where to buy seeds
I got my original seeds from William Dam Seeds in Canada. In the US Baker Creek would be a good place to get them.
Start to finish you're looking at around 6 months or 180 days. The length of time it takes depends on the variety of loofah, but generally it's about 6 months from the day you start your seed to the day you're picking the loofah.
In warm climates you can expect to get 6 sponges from 1 luffa plant. But in colder zones you may only get 3 or 4.
In climates with long growing seasons and in full sun. But they can be grown in cool climates if you use this guide.
If you're a soap maker, you can slice a sponge and put it in the mould before pouring your soap solution. Once it cures you'll have the absolute BEST shower buddy. If you don't count Idris Elba, who of course would be an even better shower buddy.
Yup. But not only are the luffa fruit edible, but the leaves are as well. Just make sure you pick them as a leafy green when they're young. As they get bigger and older they get tough.
If after all of this you've decided you'd rather grow something a little more reasonable, but still fun, I'd recommend growing Buzz Buttons™️ aka toothache plant.
So there. Now I've told you how to do it. Yes I know this post was long, but consider yourself lucky it wasn't a decade.
→Follow me on Instagram where I often make a fool of myself←

Nancy Eggert
I found out that luffa sponges grew on plants a few years ago when a good friend very successfully grew some luffa plants. We live in Chicago and it must have been a good summer because she had a bumper crop of luffas. She picked a bunch of them in October right before the first frost and then sort of forgot about the rest. In the spring when she went out to turn over her garden, she was at first stunned and then irate to find what she thought were used condoms all along her fence where the luffa plants were. She figured that someone was using her alley as a lovers' lane and disposing of the evidence over her fence. Only sometime later did she realize that the "condoms" were actually dead luffa skins that had sloughed off after the forgotten gourds were frozen and then thawed out!
Michelle
Funny! Excellent piece of writing Miss Wit.
Karen
:) Thanks Michelle. ~ Miss. Wit.
Kristi S.
I would love to try some luffa seeds. I have a great location next to a chain link fence in full sun (by my neighbor's driveway that I would love to conceal).
Thanks for the information!
Jani
I would have never believed anyone but you that these didn't grow in the ocean! Wow...learn something new every time you post. Love your site and sure hope I win some seeds.
Mary W
Never, ever tried them before. I had no idea you could also eat them when young! I have chain length around my backyard and could grow them on the inside as I'm sure the stinking deer would eat them to nothing as they did my whole tiny garden last year. I was sort of considering them until I read about the beautiful yellow blossoms and really want to try it now. Thanks for the information! and the laughs.
martina
My grandfather is an agronomist and helped develop and improve loofa as a cash crop in either Haiti or the Dominican Republic (I don't remember). They have a tremendous climate for it there and I remember seeing pictures of him with some almost as tall as he is! I'm so impressed you go them to grow at all in Ontario!
shannon lee
Thank you so much for this article! I tried last year and I think it was the transplant shock that did them in. I would love to try again. How do we win your seeds (it sounds like they are really good ones!) Also would you be open to a seed trade? I can send you lots of coriander!
Chris
I'm on the other side of the world but something of a similar heat/cold zone. I'm growing gourds and everything you've said about Luffa's goes for gourds. So you can rehash this blog at a later date and just substitute Luffa for gourd.
Not sure what to do with the gourds in the amazing chance that they actually grow and don't get wiped out by a cold snap. I know they can be worn as a body adornment but I don't have a penis to hang one on. Maybe they'll look just as good on the dining table.
Christina B
I got mine from this place, only one germinated though so I'm excited to start more this year with a heating pad!
http://www.rareseeds.com/dishcloth-or-luffa-gourd/?F_Keyword=luffa
Flash
We could use a few more loofa in Alaska. I will try planting a couple in the green house this spring. Thanks for another cool LOL idea
Marti
Totally amaze-balls! (Can you grow those, too?)
That heating pad looks suspiciously like the naked element of the medical heating pad I am shivering along on today. Makes me wonder if I threw it in a corner and added some old sweet potatoes, what the result would be? I would love to end up with a 5-10 gallon bucket of sweet potatoes next October.
MARILYN JOHNSON
I WOULD LOVE SOME OF THOSE MAGICAL SEEDS!!!
How do I enter the contest???
michelle
Wow! Aren't you clever for figuring this out. I never knew!!! Thanks for inspiring me to try this
Kelli
Karen, as you're in Canada, eh, I believe the correct spelling is "louffa." ;-)
Heather
I've never once thought about growing these...(partially because I thought they grew in the ocean...lol) but after reading this you have really peaked my interest. I think I will try it!
Loofah Plants
Growing loofahs is so much fun! I started growing them a few years ago, and they've done very well in my garden. I harvest young loofah gourds for eating and leave a few on the vine to use as a sponge.
Crystal
Do you live in Canada? I would love to try this! Do you have any growing tips for a zone 3-4 gardener?
Amy
Never in a million years would I have thought they came from a gourd and not the ocean! This is so neat! I also live in Zone 6 just outside of T.O. so I am very excited to try growing something new this year. The Amazon link seems to be giving a 404 error code, but I'll be looking forward to your post on Friday! Thanks for the link and info on the heating pad, I'll have to grab one. :)
Shelagh
Hi Karen, this sounds like fun and big yellow flowers? Even better.
I am in zone 5, I think, Ottawa? Can I start seeds inside earlier? How big can I let the seedlings get before putting them in biodegradable pots?
Sabina
Who knew? Not me! Love learning something new every day and I would love to grow my own loofah! I have the seed germinating/heating pad, biodegradable pots, seed starting setup in my basement and the room in my garden bed with strong support! So it would be really cool to get some seeds from you this season!
jeanne
Thank you so much!
I had no idea they were such creeps.
This explains the big loofa plants I grew that never bloomed! I will succeed this year, and all because of you!
Merrilee
Fun! Love learning from your mistakes. And I think I need seed heating pad. And an enormous greenhouse. But not a Brazilian. Unless said Brazilian is working as cute gardening guy.