If you start your own seeds or do any sort of transplanting I have 3 words for you ... ALERT! ALERT! ALERT! That means you should pay attention to what I'm about to say. Sometimes it also means a tornado is coming, but in this case it means if you want to use paper pots for planting your seedlings, now is the time to start making them.

Skip right to the instructions.
First off I have to say something very controversial. I like plastic pots. Which are in fact made of plastic. I think they're superior in a lot of ways to anything else for starting seeds. They hold moisture well and you can reuse them for decades.
In a post coming up I'm going to outline all the different "pots" I use for planting and why, but for now I'm going to teach you how to make newspaper pots which are an environmentally friendly way to pot up your sprouts for direct planting into the garden.
It's seed starting season so if you want to make this the year you finally start your own seeds and grow a garden full of vegetables listen up.
MATERIALS
- A paper pot form OR
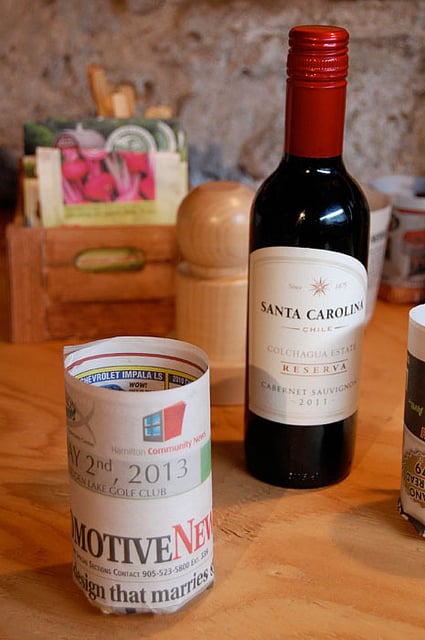
- Any straight sided glass bottle with a recessed bottom
- Newspaper
INSTRUCTIONS
Wrap newspaper around the bottle smush the bottom together and WHAMMO, you have a paper pot.
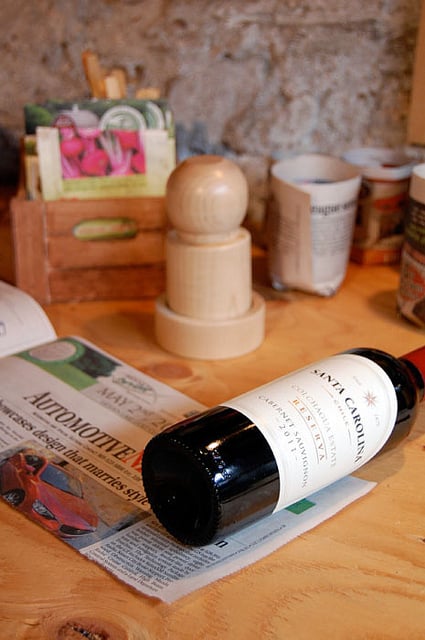
I RECOMMEND USING A GLASS BOTTLE.
Sorry for yelling, but it seemed the best way to make my point. The paper pot makers you can buy create very small pots only suitable for very small seedlings.
Wanna make paper pots? Grab some newspaper, a bottle with A RECESSED BOTTOM, and ... well that's it actually. That's all you need. Read on and you'll find out how to make the paper pots and WHY your bottle needs to have a recessed bum.
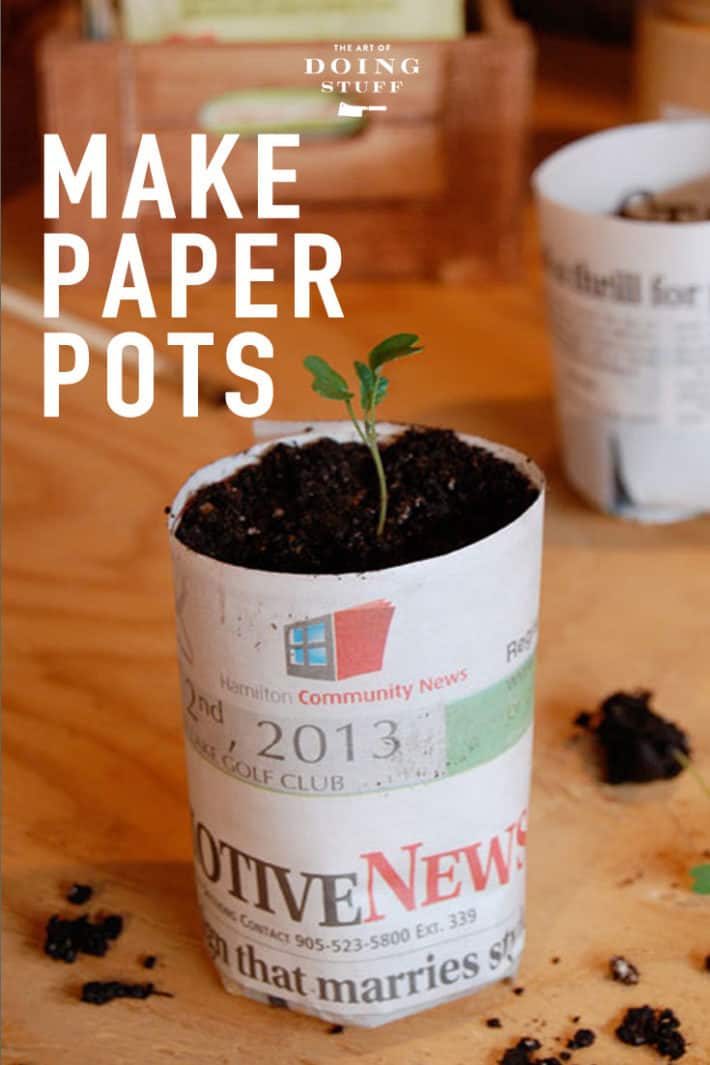
Step 1
Rip or cut a piece of newspaper.
It should be the height you want your pot to be, plus an inch or two. *
* One inch if your pot is narrow, two inches if it's wide.
Step 2
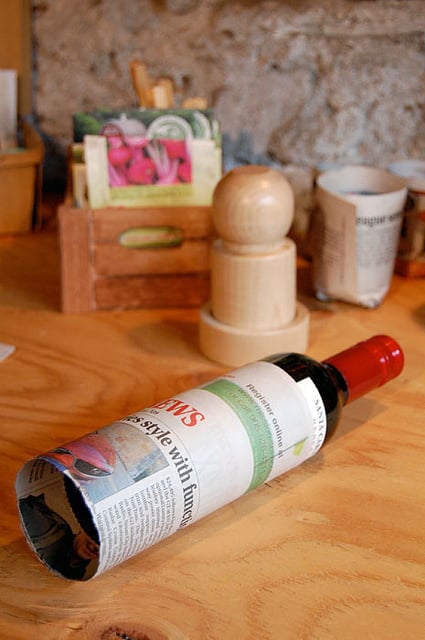
Roll your bottle until all the paper is wrapped around it.
Step 3
Starting with the seam of the newspaper, push the paper into the recessed bottom.
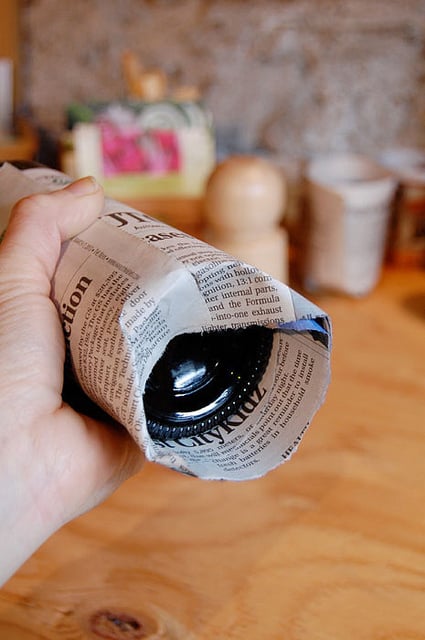
If you use a can or bottle, or something that isn't recessed on the bottom, the paper won't stay in position and your bottom won't form.
Then your plant will fall out the bottom. The bum is important.
Step 4
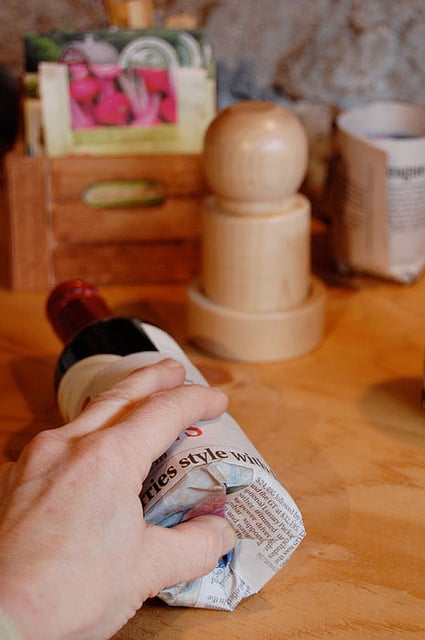
Continue to push the newspaper in until it's all wrapped under the bottle.
Push it hard with your fingers or hand.
This will help crease the newspaper and make it more inclined to hold it's shape and not fall apart.
Done
You now have a paper pot.
My apologies to everyone who thought they were going to end up with weed. Now go finish your Cheez Doodles.
If you did a good job your pot will stand up all on its own without any soil or anything in it. If it doesn't stand up on its own don't worry about it, it will once you fill it with soil.

QUESTIONS/ANSWERS
Don't the pots fall apart when you water them? Nope. Not for the month or two you have your seedlings in them. Don't however leave the paper pots in standing water all day and night. Then they will indeed fall apart on the bottom.
Can you plant the entire pot? Yep. Come planting time if you want you can plant the whole plant, pot and all, which is handy for any plants that are sensitive and don't like to have their roots disturbed.
How often should I water them? More often than you would a seedling in a plastic pot. The newspaper wicks away moisture which makes these pots dry out faster than a plastic pot.
What about the ink? This one is up to you. Most newspapers are printed with soy based ink which is perfectly fine and biodegradable. Additives include the pigment which are sometimes organic and sometimes chemical based, and waxes which might be added to help the ink dry faster.
Personally, I think of all the things that might kill me, a newspaper pot isn't high on the list.
The moral of this story? Nothing. There is no moral to this story at all. Now go make a paper pot.
Hi Karen,
I absolutely love your garden posts! I'm starting my first one this spring summer!
Questions (hopefully not a dumb one) but how many seeds do you plant per 'pot'? And how do you know how big the pot needs to be?
Thanks tons!
Two or three. When they have put out their second pair of leaves you carefully CUT off the weakest seedlings and let the strongest grow. Do not PULL the weakest ones as that will disturb the healthy roots too. Some times the info on the back of the seed envelope gives you planting information.
Push it. Push it real good!
Kim from Kelly Farms said to tell you "Hi!"
LOL. Is she the one with the beautiful chickens? They're all mottled looking. Love them. ~ karen
Beautiful chickens and ducklings! I was attacked by a Banty hen when I was 5 so I'll never have chickens but I like to look at them.
I hope you put that wine bottle back in your cellar; a 2011 Cab needs a few more years! Cheers!
Style at Home. Wow. Your part of our town looks beautiful.
I've actually had one of those little doohickies for a good 20+ years and I always loved it. So clever a device and truthfully, I love the way it feels in my hand. However, it's been awhile since I've used it and had just a few days ago, pulled it out of the pantry to contemplate my plan of action. I'm so excited to read your idea for larger pots made this way and, dang, who would of thought you could use any other cylinder shaped item with a RECESSED BOTTOM? You, of course. Thanks for the great idea, Karen. Can't wait to open a bottle of wine and get to potting. The bottle does need to be emptied, right?!
Thank once again Karen..I have seen the already made pots for sale on Etsy and the little wooden pot maker..now I can make them for cheap as I could use some TODAY!
I would love to repost this if that is ok with you?
Hi Karen! Fairly new to your blog, and I wanted you to know how wonderful it is and how very talented you are. The rare and wonderful combination of creativity and organization!!!
I have been caring for my 90 year old father, and we often read your posts together.
Thank you so much for many hours of happiness.
Big hugs to Cheese Wiz.
xoxo JoAnna
Thanks Joanna! Say hi to your dad from me and the chickens. ~ karen!
I heart you. And now I need to ditch weebly for wordpress..."curses loudly with big curses normally reserved for jail cells or paper cuts".
You're too much!
~Kim
GASP! I just took a look at your site and I absolutely *LOVE* the look of the Swedish Hens. I mean I *LOVE* them! They're stunning!!!! And YES! This comment does warrant all the capitals and exclamation points! ~ karen
Well...I'd send you one, but WAIT!!! You are in CANADA. You'd need to smuggle it over *lol*
I had to go look at the exclamation-point-worthy hens, and then I had to go look on Google to figure out which were Swedish hens and which were what turned out to be Sebastopol geese because who am I to know what's what? I had no idea that there were fowl that look like they are wearing faux-fur-hippy-retro coats--but I love the way they look!
Love your farm photos!
Karen - you guru of all things cheap.
What is proper protocal to share you ingeniousness on my website and blog?
u rock
Kim in Alafreakinbama :-)
Hi Kim - Here's my complete tutorial on how to repost things! https://www.theartofdoingstuff.com/how-to-properly-re-post-something/ ~ karen!
Wait.... how do you water these? Or do you just plant them after you make them?
Elizabeth - You just water them normally. It takes quite a while for the newspaper to break down. Once it's time to plant them you just plant them, pot and all into the garden. ~ karen!
Genius! I had one of those wooden paper pot doohickies. Loaned it out, and it has never been seen since. The wine bottle is a perfect solution!
Seriously brilliant !!!! I wonder if the same thing happens if I don't use a RECESSED BOTTOM ? Jokes. Jokes. Jokes.
*_*. Thanks for the epic idea !
really, nothing happens if your 'jig' doesn't have a RECESSED BOTTOM. I've been making these for years using cans and jars of various sizes. I usually make sure: 1) the paper goes around at least three times for a small {6 oz. tomato paste} can, four times for a medium {14 - 15 oz can size) and 5 - 7 (or more) times for a large {28 oz can size} --- 2) make sure the paper extends beyond the bottom by the width of the can - that is when you press it against the bottom it goes clear across the bottom --- 3) place your paper pots together in a box or pan so their combined togetherness hold each other up (otherwise, encirle them more times than suggested so they can stand on their own - remember, they will eventually be wet) ---- 4) fill with your soil and sow the seeds, or, as Karen demonstrates, transplant a seedling --- 5) when the pant is ready to put into the ground you can just gently pull out teh bottom - it will be easy beacause you've been watering it all along and tear or cut the sides and place it in the hole - no need to get rid of the paper as it will just decompose.
Kate - I've done it both ways and the recessed bottom really does make a huge difference in the stability of the bottom of the pot. Oops. Sorry ... the RECESSED BOTTOM really does make a huge difference. :) ~ karen
and I thought you were drinking in your potting shed, and forgot to move the bottles out of the way before taking the photo!
I make these using a can of beans or something for the form, then I dip the bottom in a little tray of shallow water for a few seconds, then let air dry. That seals them a little and keeps them from falling apart so easily. I like the idea of the recessed bottom, I'll have to try that next to compare. I agree with you...the fancy wooden form doohickey thing is too small.
What are you doing with the sweet potato?
Hi Linda - I'm doing my sweet potato slips ... https://www.theartofdoingstuff.com/how-to-grow-sweet-potatoesyour-slip-is-showing/ ~ karen!
Hi. Did I miss a note where you aren't doing M-W-F and going to T-TH posts?
I post every Monday, Wednesday and Friday (holidays like today notwithstanding). I am also posting on either Tuesdays or Thursdays with older posts that I've recently updated. ~ karen!
I was actually eating cheese doodles, get out of my head Karen! :)
What, no April Fool's post?
Wait, is this an ingenious plan to have your readers create small paper pots, the bottoms of which all fall out at a specific pre-destined time, resulting in scads of people swearing at the exact same moment, thus creating the first curse-word heard 'round the world?
I knew it. Good one, Karen...
she did a great April fools post! I could hardly stop laughing!
Very cool! And P.S. If you don't happen to have a cool wooden thing to make the small ones, you can cut four little slits in a toilet paper tube and fold them inward (like Karen so aptly demonstrates above)to form the bottom.
I just saw this tip. I barely finished it before grabbing a tp roll out of our compost pile. Works like a charm and I'm kicking myself for not thinking of it. Thank you from six years later!