I'm not even sure where to begin with this DIY so I guess we'll just go chronologically through my never ending steps of stupid.
Here we go!
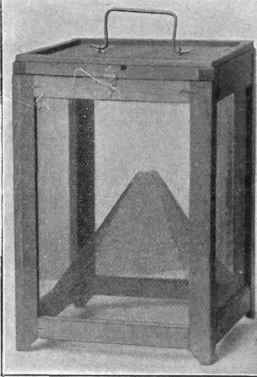
Day 1. Discovered a really great vintage Flytrap on Pinterest.
Day 2. Mentioned on Facebook how I was SO going to build one of these vintage Flytraps so I could do a post on it. That way you all would be able to build your own Vintage inspired flytrap.
Day 48. Decided spring was here, it was probably time to figure out how to build the vintage flytrap.
Day 49. Took a handful of stupid pills and went to bed. (this part I can't actually remember but there's no other explanation for what followed)
Days 50, 51 and 52. Somehow managed to waste 3 days turning what could have been the World's Greatest Flytrap into a literal pile of shit.
O.K. so that gives you a bit of background. Now let's get into the details of how I managed to singlehandedly figure out, build and then destroy what could have been a great project by being stupid.
In other words, by cutting corners trying to oversimplify it.
By reading this maybe you'll learn something and avoid turning one of your projects into a big pile of poo. Unless it's some sort of art installation and that's what you were actually going for.
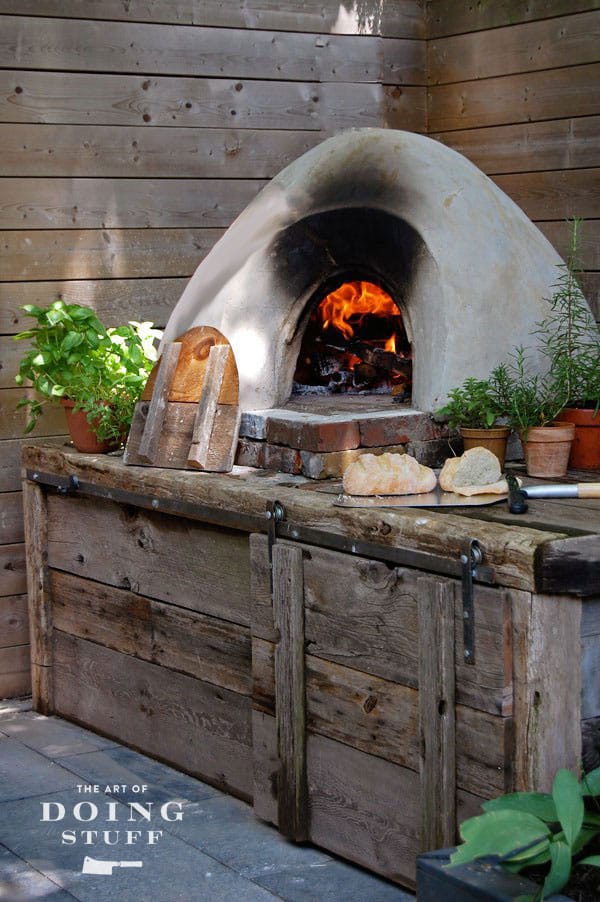
When I do DIYs I try very hard to make them easy for you to do and understand. Unless it's building a pizza oven or building a chicken coop. Those things you just sort of have to dive into and if you need a ton of instruction on the little things like how to plug your miter saw in, then it probably isn't the DIY for you.
But for the smaller things like the DIY Advent Calendar, The Original World's Greatest Flytrap, or the DIY Water Dispenser I try to really keep in mind what people are likely to do. Mostly what readers want are things they can do for $10 and in 10 minutes. Not always, but usually.
So I thought this is one of those DIYs I can simplify to make it appealing to more people.
I followed the "Keep it Simple Stupid" philosophy.
I kept it simple. Which was stupid.
Did I mention I also photographed my whole stupid process because I thought it was going to be a world class post? So we might as well throw those photos in to further prove my point.
I know what you're thinking. You're thinking. Holy crap. That looks great. And I think it does too.
Here it is 3 days later.
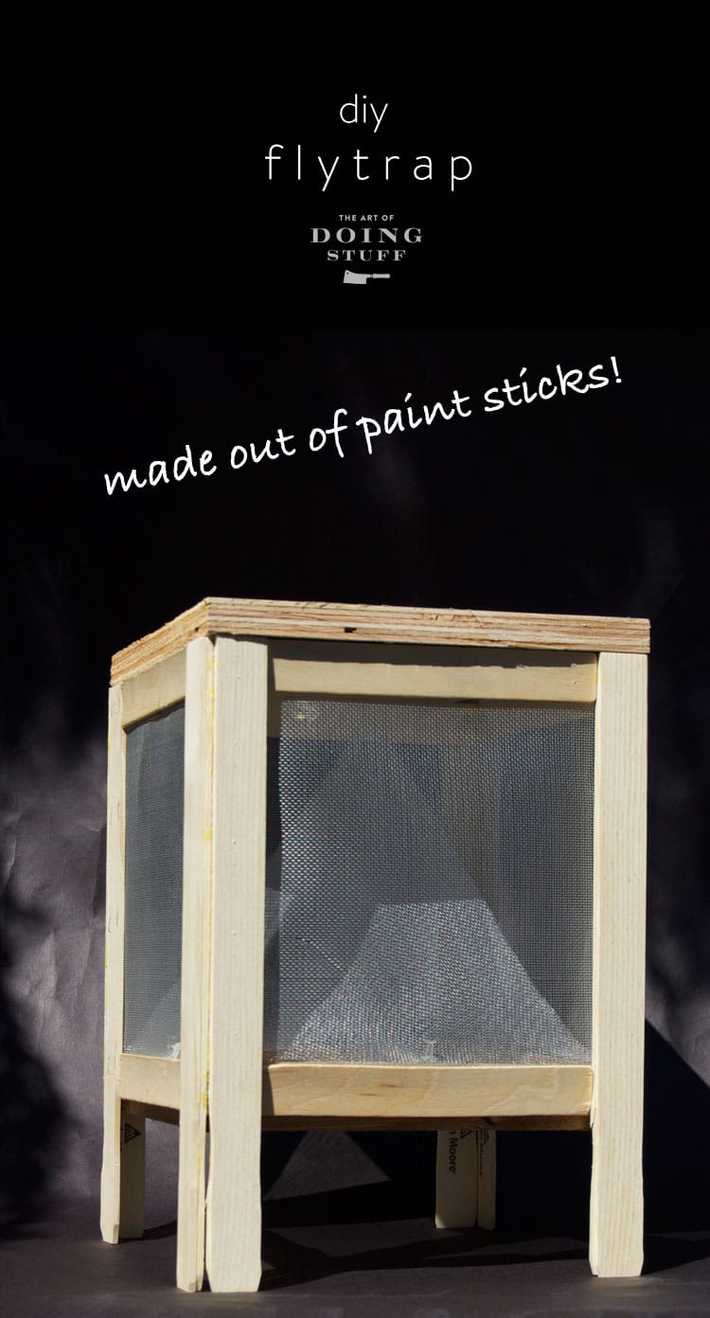
The first mistake I made was deciding I was going to do this entire DIY out of paint sticks. PAINT STICKS. You need 32 of them by the way so here's hoping you have a paint store that once had an employee die from a vicious fly swarming at some point. That way they'll be sympathetic to your crafting needs.

Why did I go with Paint Sticks? Because I KNOW how much a lot of people detest going to a lumberyard to get wood. It's a pain, you might feel out of place, you don't know where to get the wood (haha I said wood), and a big long piece might not fit in your car. (haha I said big, long piece).
So in order to alleviate some of your anxiety I decided to go with paint sticks. They're easy to find, paint stores give them away and if they don't they're willing to sell them to you for cheap. So paint sticks it was in order to keep it simple for you.
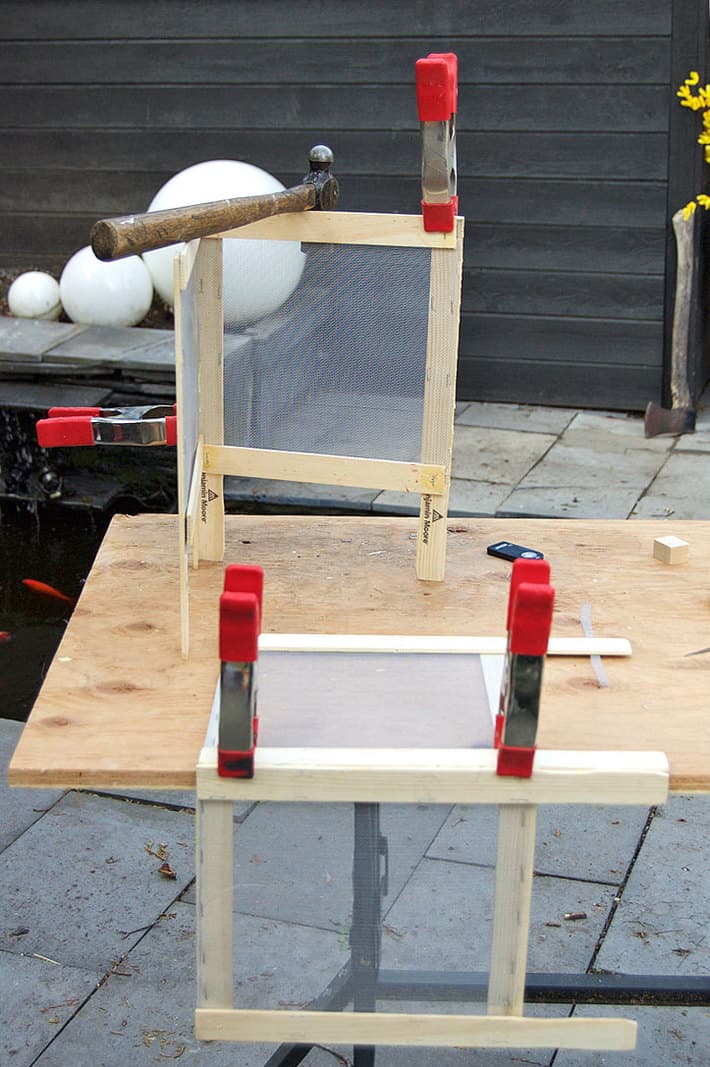
Mistake #2. I didn't get double of everything so I could do a prototype to work out all my mistakes on. I did this flytrap "on the fly" taking photos all the way. NOTHING ever turns out perfectly on the first try. The first try is to figure out everything you're doing that's wrong. The second try is the one that actually works. That's why if you're ever figuring something like this out, you do a prototype and then the real thing. I won't bore you with all the things that went wrong during this phase but here's a photo of some of my blood.

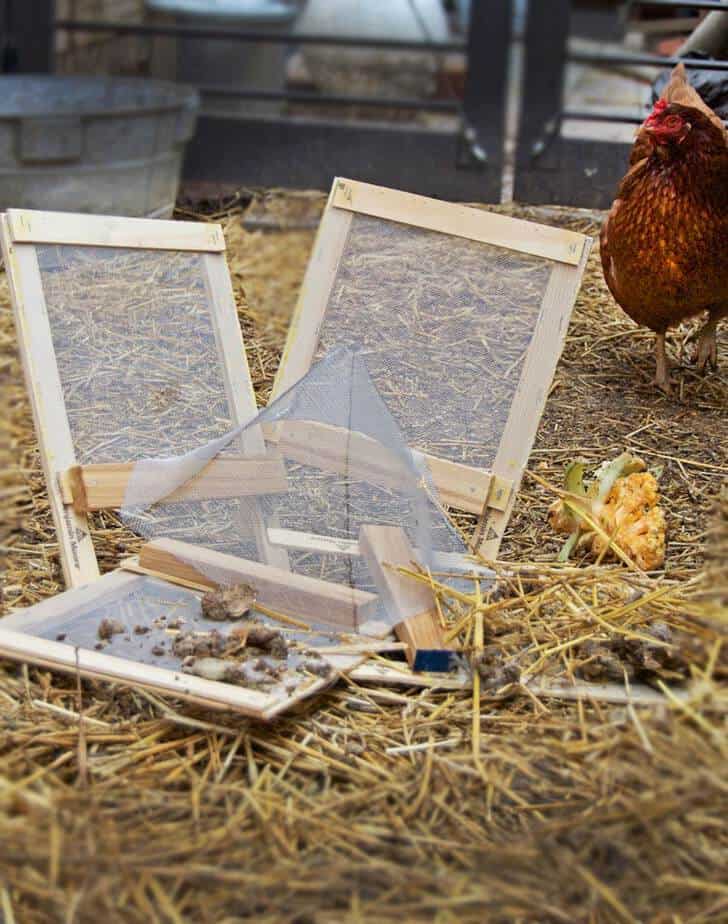
Mistake #3. This project was taking a lot of fiddling and fixing. Making paint sticks sturdy is no easy task. They're too skinny to nail and I ended up using a stapler and glue to hold everything together. Which actually worked. Until it fell apart. I used regular wood glue to hold things together along with clamping and staples.
I knew I should use Outdoor Wood Glue, but by this point doing things the right way had started to seem illogical. Dangerous even. I was going to do things wrong if it was the LAST thing I did. And judging by the amount of blood by Day 2, crafting 'til I croaked was looking like a good and even enticing possibility.

After 3 days of screwing around, trying this and that, running out of supplies, buying more supplies, begging more paint sticks, I finally finished the fly trap and the 35 step by step photos that went along with it.
I was so proud I went inside and slept for two days.
At which point I woke up and my fly trap looked like this.
![]()
You'll notice I was extra careful about making sure my logo was prominent on that photo because it's exactly the type of awe inspiring project people try to steal and claim as their own. You always have to protect your work.
So where does this leave us and this fly trap project?
I'm going to make a new one and I'm going to make it exactly how I would normally make it. With regular wood from a lumberyard (probably 1x1"s) with some trim pieces.
And I'm going to do a post on it again.
And in that post. I'm going to also teach yo how to go to the lumberyard.


I second that.
I love your determination and wit!! I would have just gone and bought some of the sticky fly tape and called it done!
I want to thank you.
Here's the backstory. I'm in college; flat broke, of course. So at, the start of the semester, I looked at the $300 book the professor wanted and thought "Nah. I'll be fine." First exam was a gentle hint I was, in fact, not fine.
I studied harder. Recorded the lectures. Did the homework problems twice. Second exam was um, a slightly stronger hint I was really -very much not fine-
Last week, in utter desperation, I googled the text book, hoping for slides, summaries, ANYTHING.
Thirty seconds later I'd found last year's edition of the book. On the publisher's website. For free.
Only 600 hundred pages more to grok. Before next Monday.
And so I want to thank you. For the reminder I'm not the only one invests time, work, effort into doing it utterly, completely wrong. And then keeps going.
My best to you (and the flytrap) I've no doubt whatsoever you'll knock it out of the park on the second runthrough.
This (oh, so funny) "failure" of a project is why we all love you, Karen!! No one else shows their "warts and all" as candidly as you! I know you'll succeed the next time and I'm looking forward to going to the lumber yard with you.
I am thrilled that you are not as perfect as you seem. Makes me feel much better about my failures!
Maybe not your best project, but definitely one of your best posts. Excellent stuff :-D
yeah, stir sticks ... barely strong enough to do the job they're meant for!
My first time failure was a coffee table. I large coffee table. Eventually the Home Warehouse people knew me by name and what "wood" I was there to buy more of! At least your failure you can use as kindling. Or maybe not... the smell of that melting glue and all... :)
Not only was the post funny, the comments had me in stitches too!
pretty on the outside, but not much holding it together - the story of my life LOL ;)
Thanks for showing the failures. When I was young and there was no Internet, there were only books to learn from and no one EVER showed mistakes, or even bothered to point out obstacles to overcome in a DIY project. Everything was smooth running and came out perfect on the first try, and the pictures showed how easy it all was. Letting us all see that even you, who has more skill than many people, can really mess something up -- and let us laugh while you tell about it -- is what makes most of us pay attention to you.
YES! That is exactly why we listen to her. Never thought about it but you have hit the DIY nail on the head! She is believable! Course she is unbelievable, also, but that is why we read her, laugh, and go back to our believable lives. Great observation, Grammy.
I think the main Fail here was the glue dissolving when the trapped flies realised all they had to do was take a wee on joins and "bingo" they were free.
Which reminds me of a childhood ditty...
A flea and a fly in a flue,
Were trapped!
What could they do?
"Let's flee!" said the fly,
"Let's fly!" said the flea,
So the flea and the fly, they flew.
I read the whole post,but can't stop thinking about that BEAUTIFUL photo of the pizza oven you built. Wish I wasn't a renter with no backyard to speak of. So no room for chicken coop ,don't need a fly trap but some projects just go that way. <3
Have you seen this one? http://www.thegoatspot.net/forum/f203/amazing-flytrap-132307/
It looks a bit easier to make and as Brenda just wrote, no wood needed... ;-)
Ewwww - so that's really a thing - I was thinking cute retro home for just the odd fly or two - and giving them names and whatnot. Very cool though - there was mention of sewing and a zipper ...
If it was cylindrical and conical then no wood would be needed ...
It's a little more difficult to make things that are round out of wood than things that are square. I've made one with no wood (it's the original fly trap I made last year that I linked to) and they're unattractive. ~ karen!
NOW I remember THAT post (obviously it's just been sitting inside my head waiting for just the right moment to come out upside down and being made with screening and wire ties) ... until I saw the sewing reference and zipper bit
I need a smaller cute version for fruitflies
Thank you for making me laugh. I needed it because my husband and I are living through stupid on a giant scale right at this moment. We were very stupid and may suffer long standing consequences. We kept things simple and are very very sad. Now we clean up and try to do things right. Again thank you... really needed the laugh. Now DYI and iron lung for two very stupid people.
So what do you do with trapped flies? Release them so they can be trapped again? Just thinking.....
little pets
No, once I show you the real trap made from REAL wood you'll see exactly how it works. :) ~ karen!
Gosh where was my mind at when I read this?? Maybe from a DYI on making a bee hive decoration? For the life of me I couldn't figure why anyone would want to trap flies and do what with them?? Now I get it.....trapping flies when you have a fly problem!! A.D.D. at its best.....oh look a chicken!!
That fly escapee wasn't an ordinary fly -- that was SuperFly!!! He embodies the fly force that shall not be contained.
(That's physics, right? "Fly force"? Anything "force" is physics. Except maybe Air Force... :)
The force was with it
LOL. Karen should have skipped the glue and staples and just used duct tape. It has a light side and a dark side...
so that dang fly escaped - bummer
Hmmm, I bet you could use those yard long rulers they sell cheap at Home Depot!
Still, you've now got kindling for your pizza oven. Mmmmm, pizza.....
Love your work. Even when it goes wrong. Because you admit it.